Evaporative Cooling for Caladiums in Greenhouse
The first time you see it, it feels unfair: your caladium bench looks perfect at 8 a.m.—leaves wide, colors crisp—then by 2 p.m. the plants are drooping like wet paper, edges browning, and a few leaves look “sun-scalded” even though they never saw full sun. Meanwhile, the greenhouse thermometer reads 95°F, and the air feels like a hair dryer. You water, and they perk up… briefly. Then the cycle repeats, and you start losing leaves.
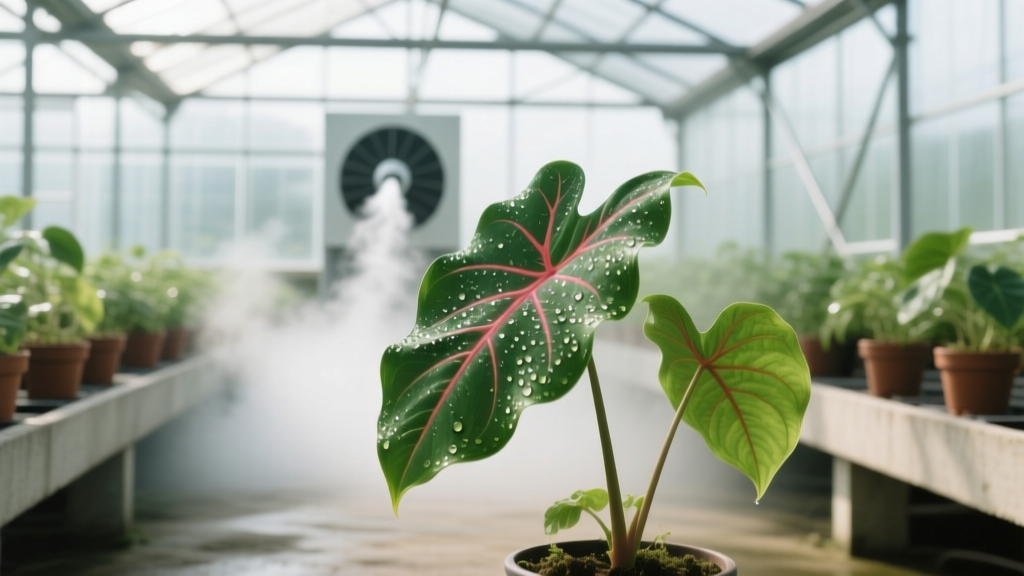
Caladiums aren’t hard, but they are heat-reactive in a greenhouse. When leaf temperature climbs and humidity drops, caladiums transpire heavily, pulling water faster than roots can supply it—especially in containers. Evaporative cooling (fogging, misting, or wet-wall + fan systems) can knock the edge off greenhouse heat and stabilize humidity so caladiums hold their leaves, color up, and keep growing instead of constantly recovering.
This article is the practical version: what actually works on a home scale, with numbers you can aim for, and the common mistakes that cause soggy pots, leaf spotting, or tubers that sulk.
What caladiums want inside a greenhouse (targets that matter)
If you remember nothing else, remember these targets. Caladiums can tolerate short swings, but they thrive when you keep conditions steady.
- Air temperature: aim for 70–85°F (21–29°C) day; avoid extended periods above 90°F (32°C).
- Night temperature: keep above 65°F (18°C) for reliable growth.
- Relative humidity (RH): 60–80% is a sweet spot; below 45% you’ll see stress quickly.
- Light: bright shade; in a greenhouse, that usually means 30–50% shade cloth depending on glazing and latitude.
- Root-zone moisture: evenly moist, never waterlogged; caladium tubers rot fast when oxygen is squeezed out of the mix.
These targets align well with general greenhouse humidity guidance from Extension sources and with the warm, humid understory conditions caladiums evolved in. For humidity and greenhouse environmental management benchmarks, see University of Georgia Extension greenhouse guidance (2020) and general greenhouse cooling principles summarized by University of Florida IFAS Extension (2019).
Evaporative cooling basics (and why it helps caladiums)
Evaporative cooling works because water absorbs heat as it evaporates. In a greenhouse, that can lower air temperature and raise humidity—both of which reduce leaf water loss. The key is to cool the air without soaking the foliage and potting mix.
There are three common approaches for home greenhouses:
- Wet wall + exhaust fan (pad-and-fan): best cooling power, more installation.
- High-pressure fogging: excellent for humidity control with minimal wetting if tuned right.
- Low-pressure misting: easiest and cheapest, but most likely to wet foliage and trigger disease if overused.
The limiting factor is your climate. Evaporative cooling shines in dry heat. In already-humid conditions, it helps less because the air can’t absorb much more water vapor.
Comparison: pad-and-fan vs fog vs mist (real-world performance)
| System | Typical temp drop potential* | Humidity impact | Leaf-wetting risk | Best for caladium benches |
|---|---|---|---|---|
| Wet wall + exhaust fan | ~10–20°F in dry climates | Moderate increase | Low | Whole-house cooling; stable afternoons |
| High-pressure fog (5–15 micron droplets) | ~5–15°F depending on RH | High, controllable | Low if droplets fully evaporate | Precision humidity + gentle cooling near plant canopy |
| Low-pressure mist (larger droplets) | ~2–10°F | High, often uneven | High | Small hobby setups if timed carefully |
*Actual cooling depends heavily on outside temperature, incoming RH, airflow rate, and greenhouse sealing. A 10–20°F drop is realistic in arid afternoons; in humid regions you may only see 3–7°F.
“The effectiveness of evaporative cooling depends on the difference between the dry-bulb temperature and the wet-bulb temperature of the incoming air.” — University of Florida IFAS Extension greenhouse cooling guidance (2019)
Step-by-step: setting up evaporative cooling for caladiums (home greenhouse scale)
You don’t need a commercial controller to get solid results, but you do need to think in terms of timing, airflow, and where the water goes.
1) Start with sensors (don’t fly blind)
At minimum, use a combined thermometer/hygrometer at canopy height. Even better: two sensors—one at plant height, one near the roof.
- Trigger point: start cooling when canopy temperature hits 85°F or RH drops below 55–60%.
- Shutoff point: stop when temp falls to 78–82°F or RH reaches 75–80% (avoid pushing RH to 90% for long periods).
Those numbers keep caladium leaves from cycling between stress and recovery, and they reduce disease pressure compared to constantly saturating the air.
2) Choose a strategy that matches your climate
If your afternoons are hot and dry (common in inland areas): pad-and-fan or fogging will feel like magic. If your afternoons are hot and humid (coastal or subtropical): focus more on shade + ventilation, and use evaporative cooling in short bursts mainly to prevent spikes.
3) Use pulsed cooling, not nonstop wetness
For foggers or misters, “pulse” cycles prevent leaf wetting and puddling.
- Begin with 10–20 seconds ON.
- Then 2–5 minutes OFF.
- Adjust until your RH stabilizes between 60–80% without dripping leaves.
In small hobby houses, I often end up around 15 seconds ON / 3 minutes OFF during peak heat, then back off as the sun drops. Your exact rhythm depends on nozzle size, pressure, airflow, and how sealed the greenhouse is.
4) Keep air moving across the caladium canopy
Evaporative cooling without airflow can leave you with clammy pockets—great for fungal spots, not great for caladium foliage.
- Run horizontal airflow (HAF) fans to keep leaves gently fluttering.
- Aim for steady mixing, not a wind tunnel; caladium leaves tear if blasted.
Watering caladiums under evaporative cooling (the part that trips people up)
Once you cool the air and raise humidity, caladiums may use less water than they did during heat stress. Many gardeners keep watering like it’s still 95°F and dry—and that’s where tuber rot begins.
Practical watering rules (containers)
- Water when the top 1 inch of mix feels dry, but below that is still lightly moist.
- Water deeply until you get 10–20% runoff, then dump saucers—standing water is rot insurance.
- In a typical 6-inch pot, that may be roughly 250–400 mL per watering, depending on mix and root mass.
Under steady evaporative cooling (say you’ve knocked afternoons from 95°F down to 82–85°F), your watering frequency might shift from every 1–2 days to every 2–4 days. Let the pot tell you, not the calendar.
Case 1: “They wilt every afternoon, so I water daily—now I’m losing tubers”
What’s happening: Heat-driven transpiration caused temporary wilting. Daily heavy watering kept the root zone saturated, reducing oxygen around the tuber.
Fix:
- Use evaporative cooling or shade to prevent the temperature spike.
- Switch to moisture checks at depth (finger or moisture meter), not surface appearance.
- Improve mix aeration (see soil section) and ensure pots drain freely.
Soil & potting mix: moisture-retentive but airy (caladiums demand both)
Caladiums like consistent moisture, but they hate “stale,” airless media. In greenhouses where cooling adds humidity, you want a mix that holds moisture without staying swampy.
A reliable greenhouse mix for caladiums
For containers, a simple, forgiving blend:
- 60% peat or coco coir (water holding)
- 30% perlite (air space)
- 10% fine bark or compost (structure)
Aim for a slightly acidic pH around 5.5–6.5. If you’re using a bagged mix, add extra perlite (often 10–20% by volume) to keep it breathing.
Tuber planting depth and spacing (avoids weak growth)
- Plant tubers about 1.5–2 inches deep.
- For fuller pots, use multiple tubers: in a 10–12 inch container, 3–5 medium tubers makes a lush display.
Light management: cooling and shade work together
Evaporative cooling fights heat, but it can’t fix harsh light. Caladium leaves can scorch even when the air temperature seems acceptable, especially under clear greenhouse glazing.
Targets and tools
- Use 30–50% shade cloth in summer (start at 30% and increase if you still see scorch).
- Place caladiums where they get bright light but minimal direct mid-day sun.
- Whitewash or diffuse glazing if your greenhouse is a “magnifying glass” type.
Case 2: “I installed fogging, the air is cooler, but the leaves still bleach”
What’s happening: Light intensity is still too high; cooling doesn’t prevent photobleaching or tissue burn from direct sun patches.
Fix:
- Add shade cloth (often jumping from 30% to 50% solves it).
- Move benches away from the south-facing wall or hottest corner.
- Check for lensing from clean glazing and direct sun angles.
Feeding: steady nutrition without pushing weak, soft growth
In a greenhouse, caladiums can grow fast. Fast growth is nice—until it’s floppy, pale, and more vulnerable to pests. The goal is a steady feed.
Simple feeding schedule (containers)
- Use a balanced fertilizer like 20-10-20 or similar at 100–150 ppm nitrogen every 7–14 days.
- Or use a controlled-release fertilizer at label rate for 3–4 months and supplement lightly if needed.
If your greenhouse cooling keeps humidity high, avoid overfeeding—lush, soft leaves invite fungal spotting and aphids. If leaf color fades (beyond the normal cultivar pattern), feed lightly and check that your media pH hasn’t drifted.
Common problems when you add evaporative cooling (and how to fix them)
Cooling systems solve one set of issues and can accidentally create another. Here’s the troubleshooting I use when caladiums start acting up after adding fog, mist, or pad-and-fan cooling.
Symptom: brown leaf edges, crispy tips
Likely causes:
- RH too low (often <45–50%) during peak heat
- Salt buildup from fertilizer (especially if you rarely get runoff)
- Hot air pooling at the top with poor circulation
Fix:
- Start cooling earlier (trigger at 85°F, not 95°F).
- Run HAF fans continuously during the day.
- Leach pots monthly: water with plain water until 20–30% runoff to flush salts.
Symptom: leaf spots that spread, especially after misting
Likely causes: leaf wetting + slow drying; high RH staying above 85–90% for long stretches; poor airflow. Low-pressure mist is the usual culprit.
Fix:
- Switch from mist to fog if possible, or reduce droplet size/nozzle output.
- Change timing: avoid late-day misting. Try to stop wetting foliage by 4–5 p.m. so leaves dry before night.
- Increase airflow across benches.
- Remove the worst spotted leaves so you’re not farming spores.
General greenhouse disease prevention practices—especially managing leaf wetness duration—are emphasized in Extension greenhouse IPM materials (University of Georgia Extension, 2020).
Symptom: tubers soft, crown collapses (rot)
Likely causes: overwatering combined with cooler, more humid air; heavy mix; pots sitting in runoff; nights too cool (extended periods below 60–65°F).
Fix:
- Let the top layer dry slightly between waterings; don’t keep “perma-wet.”
- Increase perlite content and ensure sharp drainage.
- Water early in the day so pots don’t stay cold and wet overnight.
- Hold night temps at 65°F if you can; cool + wet is a rot recipe.
Symptom: leaves curl, look puckered, or show silvery streaks
Likely causes: thrips or spider mites. Ironically, mites often flare when the greenhouse is hot and dry; thrips can thrive even when humidity rises.
Fix:
- Inspect undersides with a hand lens. Tap a leaf over white paper to spot movement.
- Rinse foliage with water in the morning (not at night), then ensure fast drying with fans.
- Use insecticidal soap or horticultural oil as label directs, testing a small area first (caladium leaves can be sensitive).
- Use yellow or blue sticky cards to monitor and catch early.
Three real-world greenhouse scenarios (and what I’d do)
Scenario A: Small hobby greenhouse (8x10), inland dry heat
You hit 98°F by mid-afternoon, RH drops to 25–35%, and caladiums wilt daily.
- Add 40–50% shade cloth.
- Use a high-pressure fogger (or carefully tuned mist) on a pulse cycle like 15 seconds ON / 3 minutes OFF.
- Run a small exhaust fan plus intake vent so the cooled air actually moves through.
- Water caladiums in the morning and check again late afternoon; don’t automatically water twice.
Expected outcome: canopy temps settle around 82–86°F, leaves stop collapsing, and new growth stays flatter and larger.
Scenario B: Coastal humid climate greenhouse
Outside is 88°F with 70–85% RH. Inside, your greenhouse is hot and sticky, and leaf spots show up after misting.
- Prioritize ventilation and shade over adding more moisture.
- If you use evaporative cooling, do it in short bursts to prevent temperature spikes, not to chase high RH.
- Keep RH closer to 60–75% and run fans to prevent stagnant air.
Expected outcome: fewer disease issues, less leaf wetness time, and steadier growth even if temps only drop 3–7°F.
Scenario C: Pad-and-fan installed, but caladium bench still struggles
You’ve got a wet wall and a fan, but the far end of the greenhouse still hits 92°F and caladiums there scorch and wilt.
- Check airflow path: the coolest air is near the pad; the hottest is near the fan end.
- Move caladiums closer to the pad side or add an HAF fan to mix air lengthwise.
- Seal bypass leaks around pads and doors—short-circuiting reduces cooling.
- Add shade over the hot end; it’s often the sun load, not the cooling capacity.
Expected outcome: the temperature gradient shrinks, and the “bad end” becomes usable for caladiums again.
Daily rhythm: a simple operating routine that keeps caladiums happy
If you like routines (I do), here’s a dependable day plan for summer greenhouse caladiums:
- Morning (7–10 a.m.): Water as needed; check for pests and remove damaged leaves. Start ventilation early if a hot day is coming.
- Late morning (10–12): If canopy hits 85°F, begin evaporative cooling pulses. Confirm fans are running.
- Peak heat (12–4 p.m.): Maintain RH around 60–80%. Keep leaves dry if possible (fog over mist). Watch for dripping lines or over-output nozzles.
- Late afternoon (4–6 p.m.): Reduce or stop misting/fogging so foliage dries before evening; keep airflow going.
- Night: Avoid high humidity sitting stagnant. If you’re routinely above 85–90% RH at night, increase ventilation or reduce late-day fogging.
Quick troubleshooting checklist (when you walk in and something looks “off”)
- Wilting but soil is wet: too hot at canopy, roots oxygen-starved, or early rot—cool air, increase aeration, back off watering.
- Crisp edges + dry soil: RH too low or missed watering—start cooling sooner, water deeply, add shade.
- Spots after cooling upgrades: leaf wetness too long—shorter pulses, earlier cutoff, stronger airflow.
- Pale new growth: too much light or underfeeding—add shade or feed at 100–150 ppm N.
Citations (real sources you can look up)
These references are useful for understanding greenhouse cooling mechanics and humidity/disease relationships:
- University of Florida IFAS Extension. Greenhouse Cooling and Ventilation (2019).
- University of Georgia Extension. Greenhouse Management: Humidity, Air Movement, and Disease Prevention (2020).
Once you get evaporative cooling dialed in, caladiums stop acting like drama queens and start behaving like the tropical foliage plants they are: steady leaves, cleaner margins, and far fewer “mystery” meltdowns. Keep your targets realistic—mid-80s°F with 60–80% RH beats chasing perfect numbers—and let your plants confirm what the sensors suggest. When the greenhouse feels comfortable to you, it’s usually right where caladiums want it too.