Olla Watering for Lavender in the Garden
The first time I watched someone “kill” lavender with love, it wasn’t dramatic—no instant wilt, no brown crunch. It was slower: a healthy-looking plant that gradually turned dull, then floppy, then patchy at the base. The gardener was doing what good gardeners do: watering faithfully. Lavender, though, plays by different rules. It wants dryness at the crown, oxygen at the roots, and long stretches between drinks. That’s why olla watering—slow seepage from a buried clay pot—can be either a lavender-saver or a lavender-sinker depending on how you set it up.
If you’ve been tempted by ollas because you’re tired of dragging hoses, dealing with summer watering restrictions, or you’re trying to keep new lavender alive through its first season, this is the practical, hard-won version: what works, what doesn’t, and how to spot trouble early.
How lavender actually drinks (and why ollas can help)
Lavender (especially Lavandula angustifolia and many common hybrids) is native to Mediterranean-type climates: bright sun, lean soils, and quick drainage. It’s drought-tolerant once established, but not drought-immune—especially in its first year or two. The big danger isn’t “not enough water”; it’s “water hangs around.” Wet, airless soil invites root and crown rot.
Ollas (unglazed clay pots) slowly release water through their walls as the surrounding soil dries. That means:
- You can water deeply without wetting the foliage or constantly splashing the crown.
- You can keep moisture down where roots explore, not at the surface where weeds thrive.
- You can reduce watering frequency—helpful in hot spells and for gardeners who travel.
But an olla is not automatically “dryland friendly.” If you place it too close to the crown or use it in heavy soil, you can create a damp pocket that lavender hates. The rest of this guide is about keeping the benefits and dodging the pitfalls.
Watering lavender with ollas: practical rules that prevent rot
Placement: keep the crown dry
Lavender’s crown (the point where stems meet soil) is the rot zone. Your job is to keep that area on the drier side, even while you encourage deeper roots.
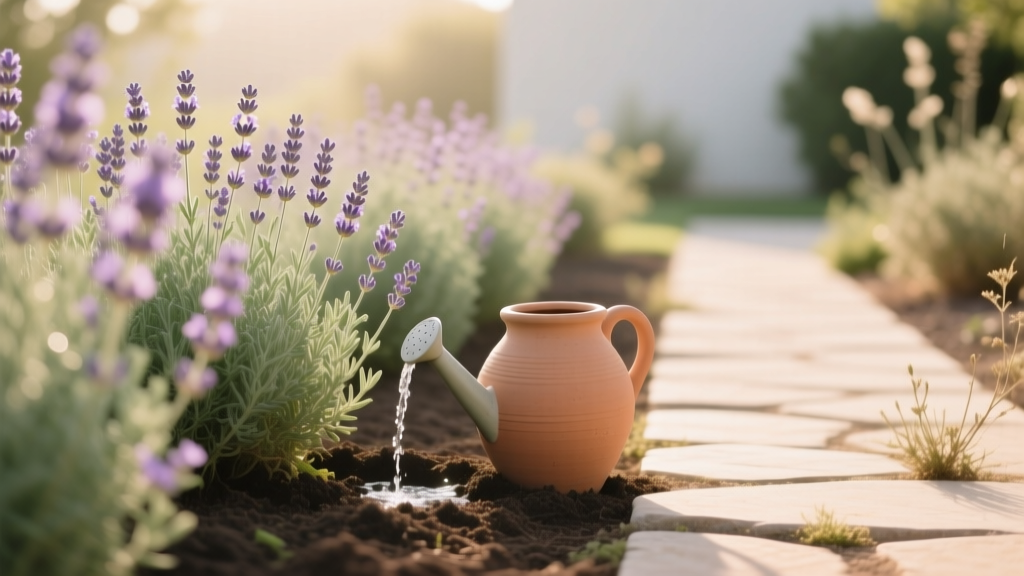
- Distance from plant: Place the olla 8–12 inches from the center of a small lavender and 12–18 inches from a mature plant.
- Depth: Bury the olla so the shoulder is below soil level and the neck/lid sits above the surface by 1–2 inches. This reduces evaporation and keeps soil from falling in.
- One plant or shared: One 1–2 gallon olla can usually support 1 mature lavender (or 2 smaller first-year plants) if spacing and soil are right.
How often to fill (real numbers, not guesswork)
Olla schedules change with heat, wind, soil texture, and plant age. Use these as starting points, then adjust.
- Newly planted lavender (weeks 1–6): Fill a 1-gallon olla about 2 times per week in warm weather (highs 75–90°F). If highs are above 95°F with wind, check every 2–3 days.
- First-year lavender after establishment (midseason): Fill about once per week in typical summer heat, aiming for a dry-ish top couple inches between fills.
- Established lavender (year 2+): In many gardens, you’ll fill every 10–21 days, or not at all during mild periods—especially if you get periodic rainfall.
Here’s the habit I trust: don’t refill on a calendar alone. Refill when the olla is near empty and the soil around it is no longer cool/moist at a finger-depth test about 3–4 inches down (not right next to the pot, but a few inches away).
How full should you fill it?
Fill to within 1 inch of the top, then cap it. Keeping a lid on matters: an open olla becomes a mosquito nursery and an evaporation machine.
- Remove lid.
- Pour water in slowly to avoid stirring soil into the pot.
- Stop with about 1 inch headspace.
- Replace lid tightly.
Comparison: olla watering vs drip vs hand watering (with actual data)
Water use and results vary, but the patterns are consistent. The table below reflects typical home-garden conditions for a single established lavender during a hot stretch (highs around 90–95°F), assuming well-drained soil. Think of it as a realistic “what you’ll probably see,” not a lab guarantee.
| Method | Typical water applied per week (1 plant) | How often you actively water | Crown stays dry? | Most common failure |
|---|---|---|---|---|
| Olla (1–2 gallon, buried) | ~2–4 gallons/week (refill 1–2x) | Every 3–10 days | Usually yes (if placed 8–18 inches away) | Placed too close in heavy soil → rot pocket |
| Drip line (0.5 gph emitter) | ~1–3.5 gallons/week (30–120 min total) | 2–4 small runs/week | Yes if emitters are offset | Too frequent scheduling → constantly damp root zone |
| Hand watering with hose/can | ~3–7 gallons/week (variable) | 1–3 times/week | Often no (splashing, inconsistent) | Overwatering “just a little” too often |
If you like data-driven guidance, note that universities consistently recommend deep, infrequent irrigation for drought-adapted shrubs and to avoid keeping the root zone continually wet. That principle matches lavender’s needs. For drought-tolerant landscape plants, UC Agriculture and Natural Resources emphasizes irrigation that encourages deep roots rather than frequent shallow watering (UC ANR guidance, 2021). Likewise, Oregon State University Extension notes lavender needs well-drained soil and careful watering to prevent root problems (Oregon State University Extension, 2020).
“Overwatering is the most common cause of lavender failure in home landscapes; the goal is moist-but-not-wet soil during establishment and then letting the root zone dry between irrigations.” — Oregon State University Extension publication on lavender care (2020)
Soil: the make-or-break factor with ollas
Lavender doesn’t demand rich soil. It demands air. If your soil holds water, an olla can quietly maintain the exact moisture level that root-rot organisms love.
Drainage targets you can actually check
- Percolation test: Dig a hole 12 inches deep, fill with water, let it drain, then fill again. If the second fill drains within 2–3 hours, you’re in decent shape for lavender. If it’s still holding water after 6 hours, you need serious drainage improvement or a raised bed.
- Texture reality check: If you can roll a moist soil sample into a long “worm” that holds together, it’s likely too clay-heavy for lavender without amendment and elevation.
Best soil mix approach for in-ground lavender with an olla
Skip the temptation to dig a big hole and backfill with fluffy compost—this can create a “bathtub” that traps water. Instead:
- Raise the planting area by 4–8 inches using a berm or raised bed if your native soil is slow draining.
- Amend broadly, not narrowly: incorporate mineral drainage (coarse sand or fine gravel) across a wider area rather than only in the planting hole.
- Mulch choice matters: use pea gravel or small stone around lavender instead of bark. Gravel keeps the crown drier and reflects heat and light.
Soil pH and lavender
Lavender generally prefers neutral to slightly alkaline conditions. Aim for a pH around 6.5–7.5. If your soil is very acidic, a soil test is worth the small cost. (Don’t guess with lime—apply based on test recommendations.)
Light and temperature: the hidden driver of watering needs
Lavender is a full-sun plant. Less sun means slower drying soil and weaker growth—both of which make overwatering more likely, even with an olla.
- Sun minimum: 6 hours of direct sun; 8+ hours is where lavender really shines (and stays healthier).
- Heat: Lavender tolerates heat well, but high humidity plus warm nights can increase disease pressure. In humid climates, give extra spacing and air flow—don’t plant in a tight pocket near a wall where moisture lingers.
- Winter: In cold-wet winters, the danger is saturated soil. Many gardeners should stop filling ollas in fall once rains begin and temperatures trend below 50°F.
Feeding: less is usually better (especially with ollas)
Lavender grown in rich soil tends to get lush, floppy, and shorter-lived. Ollas already encourage steady growth by preventing severe drought stress, so you typically don’t need much fertilizer at all.
- Compost: If you must add organic matter, keep it light: a 0.5–1 inch top-dressing once in spring is plenty, and keep it away from the crown.
- Fertilizer: Avoid high-nitrogen fertilizers. If growth is truly weak and your soil test indicates low fertility, use a low-N option (for example, something close to 5-10-10) at a reduced rate in spring only.
- Container lavender + olla-style watering: Containers leach nutrients more quickly. Use a restrained feeding schedule: half-strength balanced feed once in spring, then stop by midsummer.
Three real-world scenarios (and what I’d do)
Scenario 1: New lavender planted in July heat
You planted a 4-inch pot lavender in midsummer because the nursery sale got you. Your highs are 92–100°F, and the plant droops by late afternoon.
- Install a 1-gallon olla 8–10 inches away.
- Fill it every 3–4 days for the first two weeks, then stretch to once or twice weekly depending on how quickly it empties.
- Use gravel mulch around the plant, leaving a bare ring at the crown.
- For the first week, provide temporary afternoon shade (a piece of shade cloth) to reduce transplant stress, then remove so it hardens in full sun.
Key point: the goal isn’t to keep the soil constantly moist—it’s to avoid severe drought swings while roots expand.
Scenario 2: Heavy clay yard where lavender “always dies”
You’ve tried lavender three times. It looks okay, then collapses in late winter or after a rainy spell.
- Don’t install an olla in native clay at grade. That’s asking for a permanent wet pocket.
- Build a raised mound or bed 6–10 inches high using a gritty mix (native soil + mineral aggregate). Plant high so the crown sits above surrounding grade.
- If you still want an olla, place it on the outer side of the mound, not right beside the crown, and fill less often (let it empty).
This is the scenario where many gardeners should skip ollas and use occasional deep watering instead. Lavender would rather be a bit thirsty than a bit soggy.
Scenario 3: Vacation gardener who can’t water for 10 days
You’ve got established lavender and you’re leaving during the hottest part of summer.
- Install a 2-gallon olla 12–18 inches from each plant (or one shared between two plants if they’re spaced closely).
- Fill to the top, lid it, and do a test run a week before you leave to see how fast it empties.
- Before leaving, water the surrounding bed once deeply to pre-moisten the soil profile, then rely on the olla to maintain it.
This is where ollas shine: slow, steady support without daily attention.
Common problems with olla-watered lavender (symptoms and fixes)
Problem: Yellowing leaves at the base, limp growth, and a “sad” look
Most likely cause: Too much water held in the root zone (often heavy soil, olla too close, or refilling too frequently).
What to do:
- Stop refilling until the olla is empty and the soil has dried noticeably.
- Check placement—if the olla is within 6 inches of the crown, move it farther out.
- Pull mulch back from the crown and switch to gravel if you’re using bark.
- If the site is clay, lift the plant and replant on a mound when weather is mild (not during peak heat).
Problem: Blackening at the crown, stems dying back from the base
Most likely cause: Crown rot encouraged by constant moisture near the base.
What to do:
- Immediately stop watering and remove any wet mulch touching the stems.
- Prune out dead material back to healthy tissue (sanitize pruners).
- Improve airflow: thin nearby plants, avoid crowding, and ensure full sun.
- Plan a long-term fix: raise the planting area and relocate the olla further away (or remove it entirely in wet seasons).
Problem: Plant looks fine, but flowering is weak and stems are floppy
Most likely cause: Too much fertility and/or too much water for an established plant.
What to do:
- Let the olla run empty between fills; aim for longer dry intervals (often 10–21 days for established plants).
- Stop fertilizing. If you added compost heavily, don’t add more for a year.
- Make sure the plant gets 8+ hours of sun in summer.
Problem: Olla empties in 24–48 hours
Most likely cause: Very sandy soil, extreme heat/wind, or the olla isn’t sealed (cracks, no lid, poor lid fit).
What to do:
- Confirm the lid is tight and shaded by the neck (a loose lid can double evaporation loss).
- Use a larger olla (2–3 gallons) or add a second olla rather than refilling daily.
- In very sandy soils, accept that lavender may need more frequent refills during heat waves, but still keep the crown zone on the dry side by placing the olla farther out.
Problem: Mosquito larvae or algae inside the olla
Most likely cause: The olla is uncovered or the lid doesn’t seal well.
What to do:
- Always cap the olla. Even a simple terracotta saucer works.
- Scrub the inside every 4–8 weeks in peak season if buildup is heavy.
Seasonal timing: how to run an olla system without babying it
Spring
When daytime highs regularly hit 60–70°F, start filling as new growth begins—especially for first-year plants. Spring is also the time to confirm drainage and reset gravel mulch away from the crown.
Summer
Expect your most frequent fills during hot spells. In weeks with highs above 95°F, check the olla level midweek even if your normal schedule is longer. Wind can empty an olla faster than you’d think because it dries the surrounding soil and increases the seepage pull.
Fall
Begin stretching the time between refills as nights cool. For many gardens, once average highs fall below 70°F, established lavender needs far less support. If fall rains arrive, let the olla go empty and keep it covered so it doesn’t become a rain reservoir feeding constant moisture.
Winter
In wet-winter climates, I leave ollas empty and capped. Lavender is far more likely to die from wet feet than from winter drought in regions with regular precipitation. In dry-winter climates, a single midwinter fill during an extended dry spell can help, but only if your soil drains fast and temperatures are not staying below freezing for long periods.
Fine-tuning: getting the “dry on top, moist below” balance
The best lavender with ollas has a specific feel to the bed: dusty surface, dry crown, and a cooler, slightly moist zone deeper down. You’re encouraging roots to travel outward and downward toward the olla rather than hovering at the surface.
Use these checkpoints:
- Topsoil: The top 1–2 inches should often be dry in summer for established plants.
- Root zone check: At 4 inches deep, soil should feel cool but not wet or sticky.
- Plant signals: Slight afternoon droop during extreme heat can be normal; persistent morning droop is not.
If you remember only one thing: ollas are a tool to reduce watering frequency, not a tool to keep lavender constantly supplied. Let the pot empty now and then. Give the bed time to breathe. Lavender rewards that restraint with tighter growth, stronger scent, and a longer-lived plant.
When you get it right, you’ll notice the shift: fewer weeds near the plant, less crusting on the soil surface, and a lavender that looks steady through heat—without the soggy, sulky decline that so many gardeners mistake for “needs more water.” That’s the sweet spot, and it’s why I keep a few ollas reserved for establishment periods and for those weeks when summer gets serious.