How to Automate Watering for Daylilies
The summer I stopped dragging hoses around was the summer my daylilies finally looked consistent—same bloom quality in the front bed and the back fence line, even during heat spells. Before that, I’d water “when I had time,” which usually meant a deep soak followed by a week of forgetting. Daylilies are tough, sure, but inconsistent moisture shows up fast: fewer buds, shorter scapes, and flowers that look tired by mid-afternoon. If you want daylilies that perform like they’re in a display garden, automated watering is the quiet workhorse that makes it happen.
This guide is built from what actually works in home landscapes: simple systems you can install in an afternoon, programming that matches daylily growth cycles, and troubleshooting for the real problems—clogged emitters, soggy crowns, and the dreaded “why are my buds aborting?” moment.
What Daylilies Really Need From Water (Before You Automate Anything)
Daylilies (Hemerocallis) aren’t bog plants and they’re not cacti. They bloom best with steady moisture in the root zone, especially while scapes are forming and buds are sizing up. A good working target is 1 inch of water per week total (rain + irrigation) during active growth. In hot, dry weather, many gardens need closer to 1.5 inches weekly, particularly in sandy soil or windy sites.
The most useful way to think about watering is depth, not frequency. Most daylily roots are concentrated in the top 6–12 inches of soil. Automated systems should wet that zone evenly, then let the surface dry slightly between cycles to discourage rot and fungus.
“Irrigating to maintain uniform soil moisture—especially during flowering—improves ornamental performance, but avoid prolonged saturation.” — North Carolina State Extension publication on daylily culture (2020)
That “avoid prolonged saturation” line is the reason automation helps so much: it removes the feast-or-famine pattern that comes from hand watering.
Pick an Automation Method That Matches Your Bed (and Your Patience)
There are three practical ways home gardeners automate watering for daylilies: sprinklers, dripline/soaker, or micro-sprays. Each has a place. The best choice depends on how your bed is planted (mass planting vs mixed border), how windy it is, and whether you’re watering foliage or just soil.
| Method | Typical Output (Real-World Range) | Best For | Downsides | My Practical Take |
|---|---|---|---|---|
| Sprinkler (fixed or rotating) | 0.5–1.5 in/hour (varies by head & pressure) | Large, uniform beds; new divisions needing even moisture | Wets foliage; wind drift; more evaporation | Works well if you water early and keep run times short enough to avoid puddling. |
| Dripline (inline emitters) | 0.5–1.0 GPH per emitter (common); emitter spacing 6–18 in | Mulched beds; mixed borders; water efficiency | Clogs if unfiltered; can under-water if placed too far from crowns | The best “set it and forget it” option when installed with a filter and pressure regulator. |
| Soaker hose | Highly variable; depends on length & pressure | Quick retrofit for an existing bed | Uneven output along the run; degrades in sun | Fine for a small bed, but don’t assume it’s uniform—test it. |
| Micro-sprays/micro-jets | 5–20 GPH per sprayer (pattern dependent) | Established clumps; heavier soils; shrubs + daylilies together | Can overspray paths; needs tuning | Great compromise: less leaf wetting than sprinklers, broader coverage than drip points. |
If you want a straightforward recommendation: dripline with inline emitters plus a basic timer is the most reliable approach for daylilies in a mulched bed.
Three Real-World Setups (Choose the Scenario That Looks Like Your Yard)
Scenario 1: A Sunny Front Border That Bakes (Heat + Reflection)
These are the beds along a driveway, sidewalk, or south-facing wall where reflected heat is real. In this scenario, automation should aim for deeper watering less often so roots chase moisture downward. Start with 2 waterings per week, delivering roughly 0.5 inch each time (adjust for rain). If temperatures regularly exceed 90°F, bump to 3 cycles per week until the heat breaks.
Scenario 2: A Mixed Perennial Bed (Daylilies + Salvias + Shrubs)
Mixed beds are where hand watering goes wrong: you soak the daylilies and drown the lavender, or you baby the shrubs and starve the perennials. Here, dripline lets you target zones. Run daylilies on one zone and drought-tolerant neighbors on another. If that’s not possible, use micro-sprays and keep mulch at 2–3 inches to buffer moisture swings.
Scenario 3: Clay Soil That Holds Water (and Punishes Overwatering)
Clay can make daylilies lush—but crown rot is the tax you pay for “just one more cycle.” In heavy soil, shorten the duration and keep fewer cycles. Think 1–2 waterings per week depending on rainfall, and prioritize good drainage and crown exposure (more on that below). Your automation goal is “moist, not wet.”
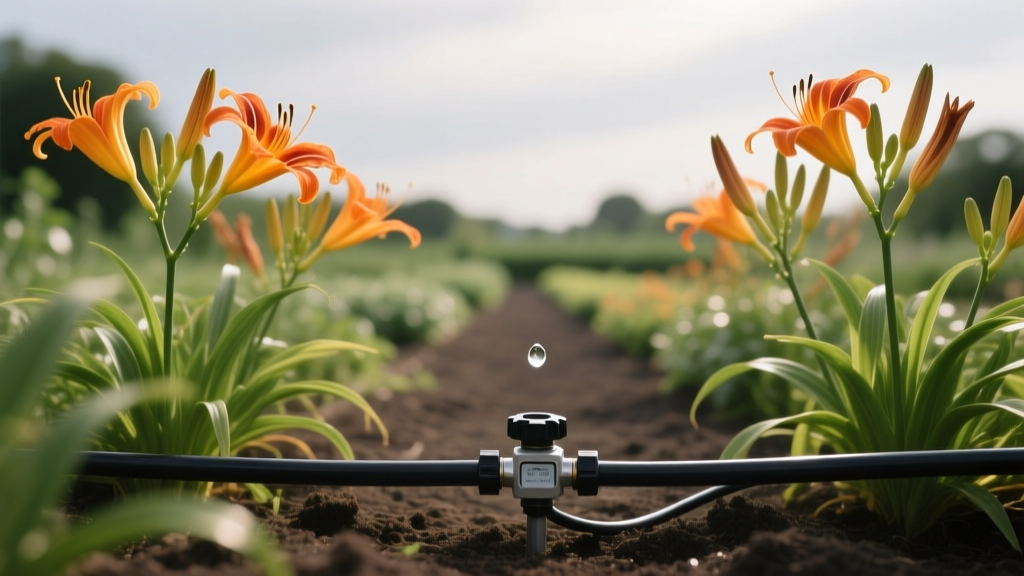
Step-by-Step: Building a Simple Automated System That Actually Works
You don’t need a buried irrigation system to automate watering well. A hose-end timer and dripline will handle most home daylily beds.
What to Buy (A Practical Shopping List)
- Hose-end timer (battery or solar). Look for multiple programs and manual override.
- Backflow preventer (important for safety; often required by code).
- Filter (150–200 mesh is common for drip; prevents emitter clogs).
- Pressure regulator (many drip systems want 20–30 PSI).
- 1/2-inch poly tubing for the main line.
- Inline dripline or 1/4-inch lines with emitters.
- End caps and goof plugs (you’ll need them, trust me).
- Mulch to cover tubing and reduce evaporation.
Install in 8 Steps (No Fancy Tools Required)
- Sketch the bed and measure the length. Decide where your main line will run.
- Attach timer → backflow → filter → pressure regulator at the spigot.
- Lay out 1/2-inch main tubing along the back of the bed (or a hidden edge).
- Branch dripline runs through daylily clumps. Aim for moisture around the root zone, not directly on the crown.
- Secure with stakes so lines don’t shift when you mulch.
- Flush the system: run water for 2 minutes with end caps open to clear debris.
- Cap ends, then run again and check for leaks and dry spots.
- Mulch over the tubing with 2–3 inches, keeping mulch pulled back from the crown area.
If you’re using soaker hose, do the same flushing step. A surprising amount of grit comes out of new hoses and fittings.
Programming Your Timer: Schedules That Match Daylily Growth
Here’s the part most people skip: automation is only as good as the schedule. The goal isn’t frequent sprinkling; it’s consistent root-zone moisture.
Baseline Schedule (Adjust With Rain)
- Spring (active leaf growth): 1–2 cycles/week
- Bud/scape development and bloom: 2 cycles/week; increase to 3 during hot spells
- After peak bloom (summer): 1–2 cycles/week depending on heat and rainfall
- Fall: taper down; water only during extended dry stretches
For timing, I like early morning: 4:00–8:00 a.m. Leaves dry quickly, wind is usually calmer, and plants start the day hydrated. If you’re using drip under mulch, the exact hour matters less, but morning is still a good habit.
How Long Should Each Run Be?
Run time depends on output. A practical way to dial it in is to measure how long it takes your system to deliver water into the root zone.
- Sprinklers: set out a few straight-sided containers (like tuna cans) and run the system until you collect 0.5 inch. That run time becomes your “half-inch” setting.
- Dripline: start with 45–90 minutes per cycle for established beds, then adjust based on soil moisture at 6 inches deep.
- Soaker hose: start with 30–60 minutes and test for evenness along the length.
For soil moisture checking, I still use the old-school method: a trowel and my fingers. Dig down 6 inches. If it’s dry and dusty, increase duration. If it’s soggy or smells sour, back off.
Soil and Mulch: The Automation “Multiplier”
Automated watering works best when soil holds moisture evenly but drains well. Daylilies tolerate a range, but they look best in soil with organic matter that doesn’t turn to sludge.
Drainage Targets and Simple Fixes
- Ideal soil texture: loam or amended clay with good crumb structure.
- If water puddles for more than 4 hours after irrigation, you need better drainage or shorter run times.
- Compost: incorporate 1–2 inches into the top 8–10 inches of soil when prepping a bed.
- Mulch depth: 2–3 inches (shredded bark, leaf mold, or pine fines). Keep mulch pulled back from the daylily crown by an inch or two.
That little crown “moat” matters. Wet mulch packed against the crown plus frequent irrigation is how hardy plants rot.
Light and Heat: How Sun Exposure Changes Your Watering Plan
Most daylilies bloom best with 6+ hours of sun. More sun usually means more flowers—but also more water demand. In partial shade (4–6 hours), plants use less water, but soil can stay damp longer, especially under trees.
Heat and wind are the silent drivers of irrigation. A breezy, full-sun bed can dry twice as fast as a sheltered one even if soil is identical. If your daylilies look fine in the morning but wilt by mid-afternoon, that’s a signal to water deeper or add mulch—not to sprinkle lightly every day.
Feeding Daylilies Without Fighting Your Irrigation System
Overfeeding is a common mistake, especially when automated watering makes plants look lush. Too much nitrogen can mean lots of leaves and fewer blooms.
A Simple Fertility Plan
- Spring: apply a balanced slow-release fertilizer like 10-10-10 at label rates when growth is 4–6 inches tall.
- After first bloom flush: a light second feeding can help rebloomers, especially in sandy soils.
- Compost top-dress: 1/2–1 inch around clumps once per year is often enough in decent soil.
If you use fertigation (feeding through irrigation), be careful with hose-end injectors. They’re convenient but easy to overdo. Keep it mild and infrequent. Many home gardeners get better results from compost + a spring granular feed.
For evidence-based guidance on watering and efficient irrigation practices, the Colorado State University Extension emphasizes watering deeply and infrequently to encourage deeper roots (GardenNotes, 2023). Likewise, the University of Minnesota Extension recommends morning watering to reduce disease pressure and improve efficiency (Extension article on watering, 2022).
Common Problems with Automated Watering (and How to Fix Them Fast)
Automation doesn’t remove problems—it makes them repeatable. The trick is catching small issues before they become a season-long mess.
Symptom: Lots of Leaves, Few Flowers
- Likely causes: too much nitrogen, too much shade, or consistently soggy soil.
- Fix:
- Reduce fertilizer (skip midseason feeding).
- Confirm sun exposure is at least 6 hours.
- Decrease irrigation cycles; lengthen time between waterings.
Symptom: Buds Form, Then Shrivel or Abort
- Likely causes: drought stress during bud development, inconsistent watering, or heat spikes.
- Fix:
- During bud set, aim for 1–1.5 inches/week total water.
- Switch from 1 big weekly soak to 2 cycles if soil dries too fast.
- Add 2–3 inches of mulch to stabilize moisture.
Symptom: Yellowing Leaves Starting at the Base
- Likely causes: normal aging, overwatering in heavy soil, or nutrient imbalance.
- Fix:
- Check soil moisture at 6 inches deep before changing anything.
- If wet: cut watering frequency in half and improve drainage (raise crowns slightly when dividing).
- If dry: increase run time by 15–20 minutes per drip cycle or add a second weekly cycle.
Symptom: Crown Rot (Soft, Mushy Base; Plant Collapses)
- Likely causes: water pooling at crown, mulch piled against crown, frequent irrigation in clay soil.
- Fix:
- Pull mulch back from the crown immediately.
- Reduce irrigation cycles; water only when the top 2 inches are dry.
- When dividing/replanting, set the crown so it’s not buried; keep the growing point near soil level.
Symptom: Dry Spots Even Though the System Runs
- Likely causes: clogged emitters, kinked tubing, pressure loss, or slope issues.
- Fix:
- Clean the filter and flush the line for 2–3 minutes.
- Replace suspect emitters; don’t waste time trying to resurrect a badly clogged one.
- If the bed is sloped, consider pressure-compensating dripline.
Troubleshooting Your System Like a Gardener (Not an Irrigation Tech)
If your daylilies are unhappy, don’t immediately blame the plant. Automated watering issues usually come down to a short checklist.
The 10-Minute Diagnostic Walkthrough
- Check the timer battery. Weak batteries cause partial cycles and random shutoffs.
- Look at the filter. If it’s gritty, your emitters are getting the same grit.
- Run the zone and watch. Are all lines pressurizing evenly within 30–60 seconds?
- Dig one test hole after watering. Moisture should reach at least 6 inches deep.
- Adjust one variable at a time (duration or frequency, not both), then observe for a week.
One of the best habits you can build is a quick irrigation check every couple of weeks during peak season. It’s the gardening equivalent of checking tire pressure—boring, but it prevents blowouts.
Method A vs Method B: A Practical Comparison With Numbers
If you’re deciding between sprinklers and drip for daylilies, here’s the comparison I give homeowners when we’re standing in the yard looking at a bed that needs consistency.
- Water efficiency: Drip generally loses less water to evaporation and wind drift than sprinklers. In a breezy yard, that difference is noticeable when you’re trying to deliver 1 inch/week reliably.
- Disease pressure: Sprinklers wet foliage, which can increase leaf spot issues if watering late in the day. Drip keeps leaves drier.
- Scheduling flexibility: Sprinklers often need shorter, more frequent cycles on slopes to prevent runoff. Drip can run longer at low flow.
- Typical run times: Many sprinkler setups deliver about 0.5 inch in 20–40 minutes (site dependent). Drip systems often run 45–90 minutes to soak the root zone under mulch.
If your daylilies are planted in a dedicated bed and you can mulch, drip is usually the cleaner solution. If they’re scattered across lawn-adjacent islands where drip would be awkward, sprinklers may be the practical choice—just keep watering early and measure output with catch cups so you’re not guessing.
Seasonal Tweaks That Keep Automation From Overwatering
The biggest automation mistake is forgetting to change the schedule. Plants and weather shift; timers don’t.
- After a soaking rain: pause irrigation for 2–3 days and re-check soil moisture.
- During a heat wave: add one extra cycle per week rather than doubling every cycle’s duration (this reduces stress swings).
- Late summer into fall: reduce frequency as nights cool; daylilies slow down and soil dries more slowly.
If you want a simple upgrade, add a rain sensor or a smart timer that adjusts for weather. Even then, I still recommend verifying moisture in the soil a few times a season—no app beats a quick check at 6 inches deep.
Once your automated watering is dialed in, daylilies become what they were meant to be: reliable color with minimal fuss. The system doesn’t have to be fancy. It just has to be consistent, measured, and adjusted when the season changes. Set it up, test it with real numbers (inches, minutes, depth), and you’ll spend more time enjoying blooms and less time arguing with a hose at dusk.