Strengthening Carrots Roots for Long-Term Health
The first time you pull a carrot and it snaps clean in half, it feels personal. You did the weeding, you watered, you waited… and you still got a stubby, forked, or cracked root that looks more like a gnarled finger than a dinner vegetable. Here’s the surprising part: most “bad carrots” aren’t caused by bad seed. They’re caused by a few fixable root-zone problems—soil structure, moisture swings, and timing—stacking up over the season.
If your goal is strong, straight, resilient carrot roots (the kind that store well and don’t split), the work is mostly done before the seed even germinates. The rest is steady, boring consistency: even moisture, gentle feeding, and resisting the urge to fuss.
What “strong roots” really means for carrots
Carrots are storage roots. Strength isn’t about woody toughness; it’s about a well-formed taproot with uniform growth, good cell structure, and minimal stress cracks. A strong carrot root:
- Grows straight and deep without forking
- Holds together when pulled (doesn’t snap or split)
- Has a smooth shoulder (no big growth rings or corky bands)
- Resists rot in the ground and stores longer after harvest
Getting there depends on three pillars: soil that lets the taproot run, moisture that doesn’t yo-yo, and nutrients that support steady growth (not leaf explosions).
Soil: the root-strength foundation (and where most carrot problems start)
If I had to pick one lever that fixes the most carrot issues, it’s soil texture. Carrots don’t negotiate with clods, rocks, or fresh manure. They either push through—or they fork, twist, and stall.
Best soil texture and depth for strong carrots
Aim for a loose, stone-free zone at least 10–12 inches deep for full-size varieties (Nantes, Imperator). Short types (Chantenay, Parisian) can tolerate 6–8 inches, but even they benefit from deep, mellow soil.
- Ideal texture: sandy loam or well-structured loam
- Avoid: chunky compost, fresh wood chips, undecomposed manure, rocky beds
- Raised beds help because you can control stone content and compaction
Soil compaction is a hidden carrot killer. Even if the surface looks fluffy, a compacted layer at 3–6 inches can cause sudden forking. If you’ve walked on the bed, rolled a wheelbarrow across it, or it’s been rained on hard, assume compaction exists.
pH targets (and why extremes weaken roots)
Carrots prefer slightly acidic to neutral soil. A practical target is pH 6.0–6.8. Outside that range, calcium availability and micronutrient balance get weird, and root growth can suffer.
For pH guidance and soil test interpretation, lean on local Extension recommendations. For example, Cornell Cooperative Extension notes carrots perform best around neutral to slightly acidic soils and emphasizes soil testing for accurate amendment rates (Cornell Cooperative Extension resource, 2021).
Bed prep that actually works (step-by-step)
Here’s a carrot bed preparation routine I’ve used in both raised beds and in-ground plots. It’s not fancy—it’s repeatable.
- Clear and sift the top layer: Remove stones larger than a marble from the top 8–10 inches. If you can’t sift the whole bed, at least create a “carrot strip” where you’ll sow.
- Loosen deep without flipping: Use a broadfork or garden fork to loosen to 10–12 inches. Wiggle and lift—don’t turn the soil into layers.
- Add mature compost only: Work in 1 inch of fully finished compost. If you can still recognize the original material (straw chunks, leaves), it’s not finished enough for carrots.
- Level and firm lightly: Carrot seeds germinate better when the soil is in contact with the seed. Level the surface and press lightly with a board.
Skip fresh manure. It’s a classic cause of hairy roots and forking. If you use manure in your garden, apply it to the bed in fall for a different crop, and plant carrots there the following season.
Watering: steady moisture builds strong, crack-resistant roots
Carrots don’t need constant babying, but they do need consistency. Most splitting and cracking comes from a dry spell followed by a sudden soaking—your carrots swell fast and the skin can’t keep up.
How much water carrots need (and how to apply it)
A solid benchmark is about 1 inch of water per week total (rain + irrigation), adjusted for heat, wind, and soil type. Sandy soil may need smaller doses more often; clay holds longer but is riskier if you overdo it.
- Germination stage: keep the top 1/2 inch consistently moist for 7–21 days (carrots can be slow)
- After thinning: water deeply to encourage the taproot to go down—aim to wet the soil to 6–8 inches
- Late season: avoid extremes; keep moisture even to reduce splitting
Drip irrigation or soaker hoses beat overhead watering for carrots because they reduce soil crusting and keep moisture steady. If you do use sprinklers, water early so foliage dries quickly, especially in humid climates.
Temperature and timing: when carrots stall
Carrots grow best in cool conditions. Many varieties perform well when daytime temperatures are around 60–75°F. In sustained heat above 85°F, growth can slow, shoulders may get bitter, and stress increases the odds of cracking when moisture returns.
Seed germination is most reliable when soil temperatures are roughly 50–85°F, with many growers finding the sweet spot around the mid-60s to low-70s. This aligns with Extension seed-germination guidance commonly published for cool-season crops (University of Minnesota Extension publication, 2020).
Real-world case: the “weekend watering” split-carrot problem
If you water only on weekends, you’re setting up classic carrot splitting. Here’s the pattern: soil dries Monday–Friday, carrots slow and toughen, then Saturday brings a heavy soak and the root swells too fast.
Fix:
- Switch to drip with a timer for 2–3 smaller irrigations per week
- Mulch with 1–2 inches of fine straw or shredded leaves once seedlings are established (not thick enough to smother tiny seedlings)
- Check moisture with a finger test: if it’s dry at 2 inches down, it’s time to water
Light and spacing: strong roots need room and sun
Carrots want full sun, ideally 6–8+ hours a day. In partial shade, you’ll still get carrots, but they’re often thinner and take longer, which increases the odds of pest pressure.
Spacing that reduces weak, skinny roots
Overcrowding makes carrots compete, and competing carrots make thin roots. Thin roots dry out faster and are more prone to stress.
- Final spacing: thin to 1.5–2 inches apart for most standard carrots
- Row spacing: 10–12 inches is workable in raised beds; wider rows dry out faster but allow easier weeding
Thin when seedlings are about 2 inches tall. Yes, it feels wrong. Do it anyway. If you wait too long, roots tangle and you disturb neighbors when you pull extras.
Feeding carrots for root strength (not just big tops)
Carrots are light feeders compared to tomatoes or corn, but they’re picky about balance. Too much nitrogen makes lush foliage and weaker, hairier, sometimes forked roots.
What to feed, and when (with practical amounts)
If your soil has decent organic matter and you used 1 inch of finished compost, you may not need additional fertilizer. If you do fertilize, go gentle.
- At planting (optional): a low-nitrogen organic blend (for example, something close to 5-10-10) scratched into the top couple inches at label rate
- Midseason (optional): if growth is pale and slow, side-dress lightly with a balanced fertilizer, but keep total nitrogen modest
A common Extension recommendation for root crops is to avoid excess nitrogen and focus on phosphorus and potassium where soil tests show need (University of California Agriculture and Natural Resources guidance, 2019).
“Excess nitrogen tends to promote top growth at the expense of root development, and can lead to misshapen roots.” — University Extension guidance on root crops (2020)
Comparison analysis: compost-only vs. nitrogen-heavy feeding
Here’s what I see repeatedly in home gardens. The “data” in the table reflects typical outcomes under the same planting density and irrigation, based on garden trials and common Extension observations: nitrogen-heavy beds produce more leaf mass and more root defects.
| Method | Typical input | Top growth | Root shape quality | Splitting risk | Best use case |
|---|---|---|---|---|---|
| Compost-focused | ~1 inch finished compost + mulch | Moderate, sturdy tops | High: straighter roots, less forking | Lower (steady growth) | Most home gardens, especially raised beds |
| Nitrogen-forward | High-N fertilizer (e.g., lawn-type) applied 2+ times | Very lush, fast | Lower: more hairy roots, more forking | Higher (fast swelling after watering) | Rarely ideal for carrots; better for leafy greens |
| Soil-test targeted | Amendments based on soil test (pH + P/K needs) | Balanced | High: consistent size and shape | Lowest (less stress) | Gardeners growing storage carrots for winter |
If you want the most predictable results, the soil-test targeted approach wins. It’s also the easiest long-term because you stop guessing.
Common problems that weaken carrot roots (and how to fix them)
This is where “strong roots” gets real. Below are the problems I see most often—and what actually changes the outcome.
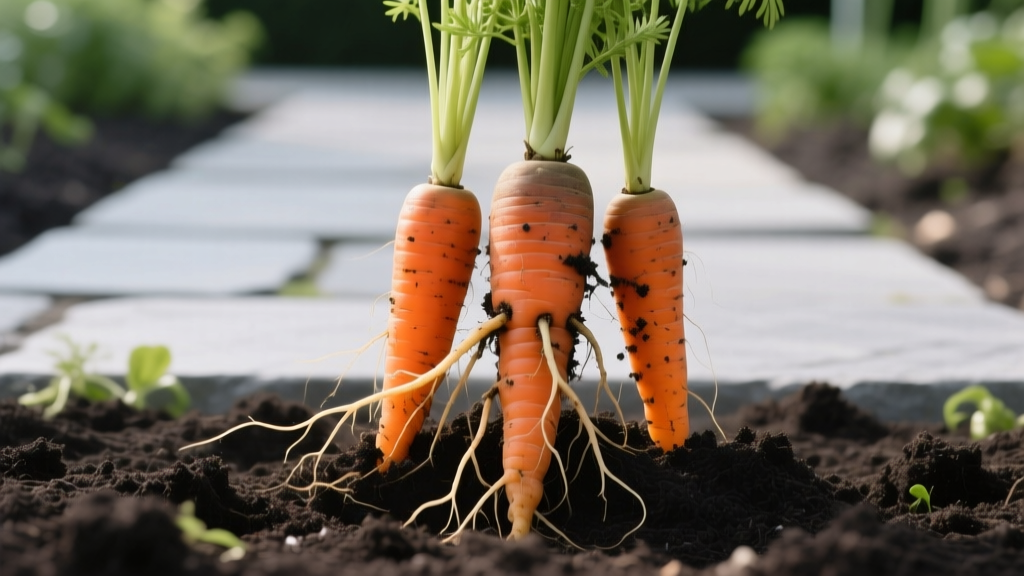
Forked or twisted carrots
Symptoms: two or more main “legs,” hooked roots, stumpy shapes.
Most common causes:
- Rocky soil or clods in the root zone
- Compaction layer at 3–6 inches
- Fresh manure or unfinished compost chunks
- Thinning too late and disturbing neighboring roots
Fix (pick the one that matches your situation):
- For rocky beds: grow shorter carrots (Chantenay) or switch to a deeper raised bed
- For compaction: broadfork before planting; don’t step in the bed
- For manure history: wait a season; plant carrots where manure wasn’t recently applied
- For thinning: thin early at 2 inches tall; snip extras at soil line if you hate disturbing roots
Cracked or split roots
Symptoms: lengthwise splits, especially after rain; cracks near the shoulder.
Most common causes:
- Dry soil followed by heavy watering or rain
- Overly fast growth from high nitrogen
- Carrots left in the ground too long past maturity during fluctuating moisture
Fix:
- Mulch once seedlings are established with 1–2 inches of fine mulch.
- Water more evenly: aim for that 1 inch/week split into smaller irrigations.
- Back off nitrogen; don’t feed like you’re growing spinach.
- Harvest on time: most carrots are ready in roughly 60–80 days depending on variety and conditions.
Hairy roots and bitter flavor
Symptoms: fuzzy root hairs, rough texture, stronger “carroty” bite or bitterness, especially near the top.
Likely causes:
- Too much nitrogen or fresh manure
- Heat stress (extended periods above 85°F)
- Moisture stress (dry cycles)
Fix: Use compost instead of high-N fertilizers, keep moisture steady, and consider shade cloth during heat waves. Even 30% shade cloth over hoops can reduce stress in hot climates without turning your bed into deep shade.
Green shoulders (tops turning green)
Symptoms: top of the carrot root is green and sometimes bitter.
Cause: light exposure at the crown as the root pushes upward or soil erodes.
Fix: Hill a little soil or compost around the shoulders when roots start to size up, usually when the top of the root is visible. You only need 1/2–1 inch of coverage.
Troubleshooting by scenario (real garden situations)
Scenario 1: Heavy clay backyard bed that bakes hard
You can grow carrots in clay, but not by fighting it head-on with a shovel once and hoping for the best. Clay swings between brick and bog, and those swings weaken roots.
Plan:
- Grow carrots in a raised bed at least 10–12 inches deep, or use a “raised row” mounded 6–8 inches above grade
- Add finished compost annually (1 inch), not sand (sand + clay can set like concrete if ratios are off)
- Use drip irrigation to prevent crusting and puddling
- Choose varieties that tolerate heavier soils (Chantenay types)
Scenario 2: Container carrots that stay thin and dry out fast
Containers can grow beautiful carrots, but the margin for error is small because pots dry quickly and heat up. Thin carrots are often just moisture inconsistency.
Plan:
- Use a container at least 12 inches deep for standard carrots (deeper is better)
- Use a fine-textured potting mix (no big bark chunks)
- Water when the top 1 inch is dry; in hot weather that may be daily
- Thin to 1.5–2 inches apart—containers tempt people to overcrowd
Scenario 3: Raised bed carrots that look great on top, ugly underneath
This is the classic “beautiful feathery tops, forked roots” situation. In raised beds, the usual culprit is chunky compost or a compacted layer from leaning and pressing the soil.
Plan:
- Stop adding chunky, half-finished compost where carrots will grow.
- Before sowing, loosen with a hand fork to 10–12 inches and remove debris.
- Thin early and gently.
- Keep water even—raised beds drain faster than in-ground beds.
Pest and disease issues that undermine root strength
Most carrot pests don’t just damage foliage; they weaken roots by stressing the plant or creating entry points for rot. A healthy root system is partly pest prevention.
Carrot rust fly (and why your roots look tunneled)
Symptoms: rusty tunnels and scarring on roots; plants may look stunted.
What helps:
- Use a floating row cover immediately after sowing; seal edges well
- Practice rotation: don’t plant carrots in the same spot year after year
- Harvest promptly—damaged carrots don’t store well
Root-knot nematodes (gnarled roots even in good soil)
Symptoms: knobby, distorted roots; poor growth; problems worse in sandy soils and warm climates.
What helps:
- Rotate with non-host crops and use resistant cover crops where possible
- Solarize soil in hot climates during the warmest period (often 4–6 weeks under clear plastic)
- Grow carrots in fresh soil in a raised bed if the infestation is severe
Alternaria leaf blight and other leaf diseases (indirect root weakness)
Symptoms: dark leaf spots, yellowing, foliage collapse.
Why it matters: Less foliage = less photosynthesis = weaker root filling and poorer storage quality.
What helps:
- Water at the soil line (drip/soaker) to keep leaves dry
- Give airflow: don’t overcrowd; keep rows accessible
- Remove badly infected foliage and avoid working in wet beds
Harvesting and handling: keeping roots strong after they leave the soil
Strong roots can still be ruined at harvest. If you yank carrots from dry soil, you’ll snap them and bruise the crown. If you leave mature carrots through big weather swings, you raise splitting risk.
- Water lightly the day before harvest if soil is dry
- Loosen with a fork 2–3 inches away from the row, then lift gently
- Twist off tops (don’t cut flush if you can avoid it); leaving tops on pulls moisture out of the root
- Store at 32–40°F with high humidity for best keeping quality
If you’re aiming for long-term storage, grow a main crop timed to mature as nights cool down. Carrots sweeten in cooler conditions, and steady cool weather tends to produce denser, better-keeping roots.
Carrots reward gardeners who do the quiet basics well: deep, clean soil; early thinning; even watering; and restrained feeding. Fix those, and the “mystery” of forked, cracked, or flimsy roots stops being a mystery. You’ll start pulling carrots that feel solid in the hand—straight, clean, and strong enough to store for weeks without turning limp or splitting at the first sign of stress.