Building a Simple Garden Trellis Panel
Most trellis failures don’t happen in a storm—they happen the first time you try to “train” a tomato and the whole panel flexes like a diving board. The common mistake is building a trellis that’s plenty strong in the center but weak at the edges (or worse: fastened with indoor screws that snap right when the vines load up). A simple garden trellis panel can be rock-solid, cheap, and fast to build, but only if you treat it like a little outdoor structure, not a craft project.
Plan the Panel Like a Mini Structure (Not Decor)
Tip: Pick panel dimensions that match your plant and your reach
A good “default” panel is 2 ft × 6 ft because it’s easy to carry, fits in most raised beds, and you can reach the center from either side. For peas and pole beans, 5–6 ft tall gives enough climbing height without turning harvesting into a ladder job. Example: In a 4 ft-wide bed, a 2 ft-wide panel down the center leaves you a comfortable reach zone on both sides.
Tip: Use the right grid opening for the crop (it matters more than you’d think)
Grid size controls how easily you can tuck vines and harvest. Aim for 6-inch openings for peas and beans (easy to weave), and 4–6 inches for cucumbers so fruit doesn’t get trapped. Example: If you’ve ever had to cut a cucumber out of a 2-inch mesh panel, you already know why bigger openings save time.
Tip: Don’t guess wind load—build for it with a simple rule
If your panel is taller than 5 ft or your site gets regular gusts, plan on anchoring with two T-posts or ground spikes (one at each end). A tall trellis acts like a sail once vines fill in; the leafy mass can catch wind and twist frames. Example: A 6 ft panel covered in pole beans can pull loose from flimsy stakes even on a calm day when the soil is wet and soft.
Tip: Choose materials based on “outside life,” not what’s cheapest on the shelf
For wood frames, cedar or pressure-treated lumber lasts longer than standard pine; for mesh, vinyl-coated welded wire resists rust and stays easier to handle. If you’re growing edibles, stick with materials rated for outdoor use and keep any treated wood from direct soil contact by mounting it slightly above grade. For safety notes and durability guidance on outdoor treated wood, see extension recommendations such as Oregon State University Extension (guidance varies by product; review current labeling and best practices).
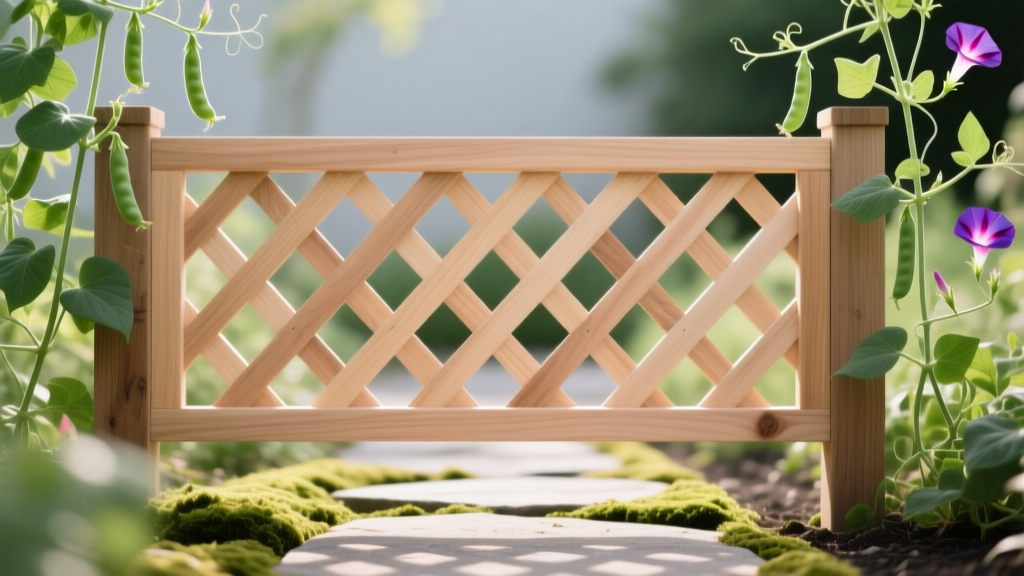
Build the Frame Fast, Strong, and Square
Tip: Use a “picture frame” build with 1×2s (cheap, light, plenty strong)
A simple frame made from 1×2 lumber (actual 0.75 in × 1.5 in) is lightweight but stiff when screwed together properly. Cut two verticals at 72 in and two horizontals at 24 in for the 2×6 panel size. Example: This setup fits neatly behind a 2×8 raised bed and is light enough to move when you rotate crops.
Tip: Add one center brace if you’re using thinner mesh or heavier crops
If you’re trellising tomatoes or heavy cucumbers, add a center horizontal brace at about 36 in to stop bowing. This also gives you a solid line to clip vines without pulling the mesh loose. Example: A mid-rail makes it easy to attach tomato clips every 10–12 inches as the plant grows.
Tip: Make it square in 30 seconds using the diagonal trick
Before you tighten all screws, measure corner-to-corner diagonals; when both diagonals match, your frame is square. This prevents a “racked” panel that wobbles and fights you during installation. Example: If diagonal A is 78.5 in and diagonal B is 79.25 in, nudge a corner until they match—then drive the final screws.
Tip: Use exterior screws, not nails (and not indoor drywall screws)
Use 1-5/8 in exterior deck screws for 1×2 frames; they resist corrosion and won’t snap under twisting. Nails loosen over time with wind and temperature swings, especially when vines pull on the mesh. Example: If you’ve ever grabbed a trellis and felt it “click” loose, that’s often nail creep.
Tip: Pre-drill ends to stop splitting (especially with cedar)
1×2 lumber splits easily at the ends, so pre-drill pilot holes about 1/8 in diameter. It takes an extra minute and saves you from rebuilding a corner after the wood cracks. Example: On a dry summer day, cedar is more brittle—pre-drilling prevents that sudden snap when the screw bites.
Pick the Best Trellis “Skin”: Mesh, String, or Slats
Tip: Welded wire is the fastest “set it and forget it” option
Vinyl-coated welded wire (often sold as garden fencing) gives a rigid grid that’s easy to clip to. A common size is 2 in × 4 in openings; it’s strong but can be annoying for harvesting larger fruit, so consider 4 in × 4 in if you can find it. Example: For peas, 2×4 works great; for cucumbers, you’ll appreciate larger openings.
Tip: Cattle panel strength is amazing—but it’s overkill for small beds
Cattle panels are typically 16 ft long and heavy-duty; they’re excellent if you want an arch or a long run, but they’re awkward for a single movable panel. If you do use one, cut it with bolt cutters and cap sharp ends. Example: A cattle panel arch over a path can support winter squash, but it’s not the quickest option for a simple 2×6 trellis.
Tip: String trellis is the cheapest and most adjustable (great for peas)
If cost is the priority, run UV-resistant twine in a grid and staple it to the frame. Use 6-inch spacing and pull it tight; it will sag once plants start climbing, so over-tension slightly. Example: One $6 roll of UV twine can cover multiple panels—perfect for spring peas when you want to take the trellis down later.
Tip: Slatted wood looks nice, but needs wider spacing to function
If you prefer a wood-lattice look, keep slats at least 4–6 inches apart so you can get hands in for harvesting and pruning. Tight lattice becomes a trap for vines and makes it hard to remove old growth at the end of the season. Example: A decorative lattice that looks great in April can become a tangled mess by July with cucumbers.
| Panel Surface | Typical Cost (2×6 panel) | Best For | Speed to Build | Harvest Friendliness |
|---|---|---|---|---|
| Vinyl-coated welded wire (4×4 if possible) | $18–$35 | Beans, cucumbers, lightweight tomatoes | Fast (10–20 min to attach) | Good (best with larger openings) |
| Twine grid (UV-resistant) | $2–$6 | Peas, pole beans, flowers | Medium (20–40 min to weave) | Excellent (easy to snip at season end) |
| Wood slats | $10–$25 | Light climbers, ornamental vines | Slow (more cutting/fastening) | Fair (depends on spacing) |
Anchoring: The Part Everyone Skips (Then Regrets)
Tip: Treat the ends like fence posts—stake them, don’t just “set” them
A panel leaned against two bamboo poles is fine until the plants hit peak growth. For a reliable install, drive two 6 ft T-posts 18–24 inches into the ground, one at each end of the panel, then fasten the frame to the posts. Example: This approach stops the slow forward “lean” that happens when vines pull the panel as you harvest.
Tip: Use two fasteners per post so the panel can’t twist
Attach the panel with two heavy zip ties, hose clamps, or fence wire at two heights (top third and bottom third). One tie per post lets the trellis rotate like a hinge in strong wind. Example: A pair of stainless hose clamps costs a few dollars but keeps the panel locked and silent (no rattling).
Tip: In raised beds, bolt to the bed frame—no digging required
If your raised bed has thick wood sides (like 2×10s), you can mount the trellis with 2.5–3 in exterior screws and washers, or small L-brackets. This is a great shortcut when your soil is rocky or you don’t want posts in the bed. Example: On a 4×8 bed, mounting a 2×6 trellis panel to the north side keeps it stable and reduces shading on shorter crops.
“Support structures work best when they’re installed early and designed to carry the mature plant load, not the seedling.” — University of Minnesota Extension (2019)
Crop-Specific “Shortcuts” That Save Time All Season
Tip: Install the trellis before planting (your roots will thank you)
Put the panel in place first, then plant seedlings 4–8 inches away from the base so you can water and add mulch without crowding stems. Installing later usually means pounding stakes through established roots. Example: For cucumbers, planting 6 inches out gives space to guide the main vine up without kinking it.
Tip: Use the “two-leader” method on indeterminate tomatoes to reduce chaos
Instead of letting tomatoes become a trellis-eating monster, train 1–2 main leaders and clip them upward every 10–12 inches. This keeps airflow high and makes harvest faster because fruit isn’t buried inside a jungle. Example: A gardener with a single 2×6 panel can grow two indeterminate tomatoes if they’re pruned and trained, rather than one plant swallowing the whole thing.
Tip: For peas, run a second “starter string” at 6 inches high
Young peas sometimes flop before they grab the mesh, especially in spring winds. Add a horizontal string line at 6 inches above soil to give them something immediate to catch. Example: This tiny add-on prevents the classic pea seedling face-plant that leads to snapped stems.
Tip: For cucumbers, add a sling for heavy fruit (it’s a 2-minute fix)
Once fruit gets large, the stem can kink where it hangs through the grid. Use strips of old T-shirts or nylon stockings as slings tied to the mesh—cheap and surprisingly effective. Example: If you’ve got long English-type cucumbers, a sling keeps them straighter and reduces stress on the vine.
Tip: Keep airflow in mind—spacing and trellis placement reduce disease pressure
Trellising improves air circulation compared to plants sprawling on soil, which can help reduce foliar disease risk. Clemson Cooperative Extension (2020) notes that improved airflow and keeping foliage off the ground are common cultural practices to reduce disease problems in vegetable gardens. Example: A cucumber vine trained up a panel dries faster after rain than one lying on mulch, which can mean fewer leaf spots spreading.
Weatherproofing and Longevity (Without Overbuilding)
Tip: Seal end grain first—this is where rot starts
If you’re using wood, brush on an exterior sealer or stain, focusing on the cut ends where water soaks in fastest. You don’t need to dip the whole board—just hit the end grain and any screw holes. Example: Sealing four end cuts takes 5 minutes and can add seasons of life to a cheap pine frame.
Tip: Avoid direct soil contact to double lifespan
Keep the wood frame 1–2 inches above soil level by mounting to posts or brackets. Constant wet soil against wood is rot’s best friend. Example: A panel that sits on soil all summer often gets punky at the bottom corners by next spring.
Tip: Rust-proof your cut wire ends so they don’t stain everything
If you cut welded wire, dab the cut points with exterior paint or clear nail polish to slow rust. This is especially helpful near patios or light-colored bed frames where rust streaks look messy. Example: A $5 bottle of touch-up paint can save your cedar bed from orange drips after a rainy week.
Real-World Builds: Three Scenarios (What I’d Do Differently Each Time)
Scenario 1: Small patio bed with peas and limited storage
Go with a 2 ft × 5 ft lightweight 1×2 frame and a twine grid so you can roll it up or store it flat. Mount it with two small L-brackets to the bed wall so you don’t need posts. Example: One gardener on a balcony can clamp the frame to a railing, then remove it in June after peas finish and reuse the bed for basil.
Scenario 2: Windy side yard with pole beans that always topple supports
Use welded wire on a 2×6 frame, but anchor it to two T-posts driven 24 inches deep, then add a third stake if your soil is sandy. Beans get surprisingly heavy when wet, and wind makes them whip the whole structure. Example: In open yards, this setup stops the “leaning tower of beans” effect by mid-summer.
Scenario 3: Raised bed tomatoes where you want clean pathways and easy picking
Mount two panels end-to-end along the north side of a 4×8 bed, then train tomatoes up with clips and prune to two leaders. Keep plants 18–24 inches apart so you can actually reach in to harvest. Example: This layout keeps fruit off the ground, frees the bed center for basil or onions, and makes it easier to spot pests early.
Money-Saving Hacks (That Don’t Cut Corners)
Tip: Build two panels from one 8-ft 1×2 pack plan
If you buy eight 8-ft 1×2s, you can cut parts for two 2×6 panels with minimal waste (plan your cuts before you start). This is the cheapest way to get multiple matching trellises. Example: Batch-building on a Saturday means you only set up tools once, and every panel fits the same brackets and ties.
Tip: Use zip ties strategically—then upgrade only where needed
UV-rated zip ties are fine for the mesh-to-frame attachment, but for frame-to-post connections, use metal hose clamps or fence wire for long-term strength. A pack of UV zip ties might cost $8–$12, while hose clamps are about $2–$4 each but last longer in sun. Example: Use zip ties on the interior grid (easy to replace), and clamps at the ends where failure would topple the trellis.
Tip: Salvage materials safely (old bed frames and crib springs can be gold)
Metal bed frames and crib springs make sturdy trellis panels if they’re not flaking paint or heavily rusted. Scrub, seal, and make sure openings are large enough for harvesting before committing. Example: A salvaged metal frame can become a cucumber panel for nearly $0, while the same size new welded wire might run $25–$35.
Quick Build Checklist (So You Don’t Rebuild It Next Month)
Tip: Keep a simple hardware list and stick to it
For one 2×6 panel: four 1×2 boards (two cut to 72 in, two to 24 in), welded wire or twine, 12–16 exterior screws, and fasteners to anchor (two T-posts plus wire/clamps, or bed brackets). This prevents the mid-project hardware-store run that always turns into an hour. Example: If you pre-count screws and ties, you’ll finish in one session and install immediately.
Tip: Time your build to your planting window
Build trellis panels 1–2 weeks before you plan to plant climbers so you’re not assembling in mud or rushing at dusk. Early setup also helps you place crops with mature shading in mind. Example: Put the trellis on the north side in spring so it won’t shade shorter plants as vines climb higher in summer.
Once you build one solid trellis panel, you’ll start seeing spots all over the garden where a vertical surface solves problems: cleaner fruit, fewer broken stems, easier picking, and more planting space. Make it square, anchor it like you mean it, and match the grid to the crop—those three moves turn “a panel that kind of works” into a tool you’ll use for years.