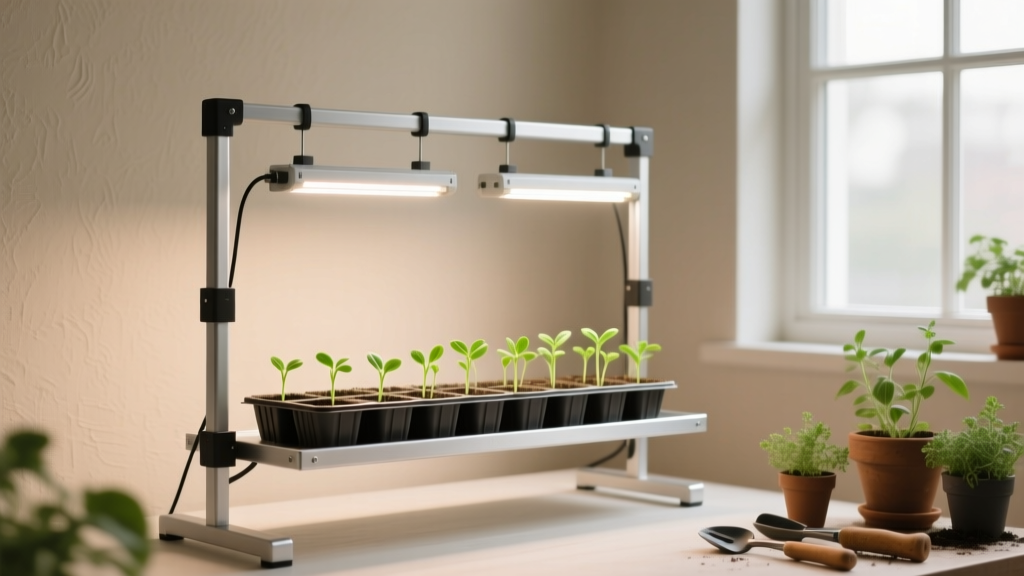
DIY Seed Starting Light Stand
Most leggy seedlings aren’t “weak genetics” or “bad soil”—they’re the result of a super common mistake: the light is too far away for too long. A sunny window feels bright to you, but to a tomato seedling in February it’s basically a dim hallway. The fix isn’t buying a fancy grow tent; it’s building a simple DIY seed-starting light stand that lets you keep lights at the right distance and adjust them fast as plants grow.
Researchers have long documented how inadequate light intensity leads to stretched, fragile seedlings. Utah State University Extension (2018) specifically flags “insufficient light” as a primary cause of leggy transplants indoors, and Purdue Extension (2020) recommends keeping fluorescent-style lights just a couple inches above seedlings for sturdy growth. Translation: your light stand is the real tool—your bulbs are only as good as your ability to position them.
Build It Like a Tool (Not a Craft Project)
A seed-starting stand doesn’t need to be pretty; it needs to be adjustable, stable, and easy to use daily. If raising the light is annoying, you’ll “forget” once, then suddenly your basil looks like spaghetti.
Pick a footprint that matches your tray count (don’t wing it)
Tip: Size the stand around standard trays. A standard 1020 tray is about 10" x 20", and most people quickly end up with two side-by-side. If you build for 24" x 48" of shelf space, you can fit four 1020 trays (two by two) and actually use the light efficiently.
Example: If you only have room for one shelf, build a compact stand sized for 12" x 24" so one tray plus a small fan fits without crowding.
Make height adjustment stupid-easy (chains beat holes)
Tip: Hang the light on chain + S-hooks. Drilling a series of height holes works, but it’s fussy. Two lengths of light-duty chain with S-hooks let you raise/lower in seconds—move one link, done.
Real-world shortcut: If you’re running late before work, you can bump the light up by two chain links (about 1–2 inches) without tools.
Overbuild the stability—seed trays are heavier than you think
Tip: Plan for water weight. One fully watered 1020 tray can weigh around 8–12 lb depending on cells, soil mix, and drainage. If your shelf holds four trays, design for at least 50 lb plus lights and a small fan.
Example: A basic shelving board that feels “fine” dry can bow after a week of bottom-watering. Using 3/4" plywood or a wire rack prevents sagging.
Use reflective sides before you buy more lights
Tip: Add cheap reflectors to increase usable light. White foam board or emergency mylar blankets can bounce light back onto leaves. Leave a couple inches of airflow gap so you don’t trap heat and humidity.
Cost reality: A $5–$10 sheet of foam board can save you from buying a second fixture ($25–$60).
Lighting Setup: The “Distance + Duration” Rules
The best DIY light stand is basically a way to control two things precisely: how close the light is, and how long it runs. Everything else is secondary.
“Place fluorescent lights 1 to 2 inches above the plant tops… raise the lights as plants grow.” — Purdue Extension, 2020
Measure from the leaf tops, not the shelf
Tip: Keep LEDs close—usually 2–4 inches from the canopy. Many common LED shop lights perform best when close to seedlings, because intensity drops fast with distance. Check the manufacturer notes, but as a rule of thumb, start at 3 inches above leaf tops and adjust if you see bleaching (too close) or stretching (too far).
Scenario: Apartment gardener with one shelf: keep the light at 3" for tomatoes and peppers; raise to 5–6" once leaves are thick and you’re watering more heavily.
Run lights on a timer: 16 hours on, 8 hours off
Tip: Automate the schedule. Set a cheap outlet timer to 16 hours on and 8 hours off. Plants need a dark period for normal development, and you need consistency so you’re not guessing every morning.
Cost: A basic mechanical timer is often $8–$12. That’s cheaper than restarting a whole tray of leggy seedlings.
Use one bright fixture per shelf—then upgrade only if needed
Tip: Start with a 2-ft or 4-ft LED shop light. For a single 1020 tray, a 2-foot fixture often works well; for two trays side-by-side, a 4-foot fixture covers more evenly. Look for daylight color (around 5000K) and a decent lumen output (many good ones land in the 3000–6000 lumens range).
Example: If your seedlings lean toward the center, you’re under-lighting the edges—either lower the light slightly or add reflective sides before buying another fixture.
Don’t guess—do the “shadow test” for quick feedback
Tip: Check intensity by looking at shadows. Hold your hand at seedling height: you want a fairly crisp shadow, not a fuzzy one. It’s not lab-accurate, but it’s a fast way to detect “too dim” when you’re tinkering with height.
Scenario: Garage setup in late winter: if your stand is in a dark corner and shadows are weak, move the whole unit closer to a wall and add a reflector to brighten the canopy without extra watts.
Stand Designs That Don’t Make You Hate Your Life
Pick a design that matches your space and your personality. The “best” stand is the one you’ll actually adjust and keep using.
The 2x4 + shop light classic (fast, sturdy, inexpensive)
Tip: Build a simple A-frame or goalpost. Two upright 2x4s and a top crossbar create a “goalpost” that’s easy to hang chains from. If you have scrap lumber, this can be a near-free build besides screws and a light.
Example: A backyard gardener building for four trays: a 48" crossbar supports a 4-ft LED shop light, hung on chains so you can keep it 2–4" above plants.
The wire shelving hack (zero carpentry, instantly adjustable)
Tip: Use a wire rack and zip ties or shelf clips. A standard wire rack shelf unit lets you adjust shelf height in minutes. Hang lights under each shelf using zip ties, S-hooks, or the included clips.
Cost comparison: A wire rack might run $60–$120, but it replaces a separate stand, gives you multiple tiers, and collapses the learning curve to basically nothing.
The PVC frame (lightweight, renter-friendly, easy to modify)
Tip: Build with 1" PVC and friction-fit joints. PVC is great if you need a stand you can disassemble and store. Use elbows and tees, and add a top bar for hanging lights with chain.
Scenario: Balcony grower: a PVC stand can be moved indoors during cold snaps and back out when temps stabilize, without hauling a heavy wood frame.
Money-Saving Choices (Without Sacrificing Seedlings)
People overspend on grow gear and underspend on the one thing that matters: controllable light position. Here’s where to put money—and where to save it.
Skip “grow light” branding—shop lights often work
Tip: Buy performance, not marketing. Many LED shop lights provide plenty of usable light for seedlings at close distance, especially when you’re running them 16 hours/day. “Grow lights” can be great, but you’re paying for spectrum claims you may not need for short-term seed starting.
Example: Starting lettuce, brassicas, and herbs for transplant: a basic 5000K shop light at 3" can produce stocky seedlings without purple “blurple” fixtures.
Use one fan per rack, not one per shelf
Tip: Aim for gentle airflow across the whole setup. You don’t need a hurricane—just enough movement to reduce disease pressure and encourage sturdier stems. A small clip fan on low can cover a 48" shelf if you angle it slightly upward.
Cost: One decent clip fan at $15–$25 beats buying three tiny fans that clutter your shelves and cords.
Bottom-water with a measured pour to prevent algae and gnats
Tip: Add water to trays in small amounts, then drain. Pour about 1/4" of water into the bottom tray, wait 15–20 minutes, then dump any excess. This keeps the surface drier, which helps reduce algae and fungus gnat outbreaks.
Scenario: Busy parent starting flowers: bottom-watering on a schedule prevents the classic “oops I soaked them” problem that leads to damping-off.
Quick Comparison Table: Popular DIY Stand Approaches
| Approach | Typical Cost | Build Time | Adjustability | Best For |
|---|---|---|---|---|
| 2x4 goalpost stand + chains | $25–$70 (depends on lumber + light) | 45–90 minutes | Excellent (move S-hooks) | Garage/basement setups, heavy trays |
| Wire shelving rack + zip ties | $60–$180 (rack + 1–3 lights) | 20–40 minutes | Excellent (shelf clips + chains) | Multi-tier seed starting in small spaces |
| PVC frame (1" pipe) | $35–$90 (pipe/fittings + light) | 45–75 minutes | Good (easy to modify) | Renters, portable/seasonal storage |
Dialing It In: Three Real-World Setups (and What Actually Changed Results)
The best part about a DIY light stand is how quickly you can tweak it. Here are three setups that show what matters most in the real world.
Scenario 1: Cold garage + peppers that never stop stretching
Tip: Lower the light and add a heat mat—don’t crank light hours to 24/7. Peppers grow slowly when cool; stretching happens when they’re reaching for more photons. Keep the light at 2–3", maintain 16 hours of light, and warm the root zone with a heat mat set around 80–85°F for germination, then lower once sprouted.
Example: A gardener in zone 5 moved lights from 8" down to 3" and stopped the “thread-stem” look within a week; stems thickened after adding gentle airflow and not overwatering.
Scenario 2: Kitchen corner setup + moldy soil surfaces
Tip: Increase air exchange and keep the surface drier. Mold usually means stagnant air and consistently wet mix. Add a small fan on low, bottom-water using the 1/4" + 15–20 minute soak method, and remove humidity domes as soon as most seeds sprout (often within 2–5 days for fast crops).
Example: Herbs and lettuce started cleanly once the dome came off on day 3 and the light was lowered from 6" to 3", reducing the seedlings’ “reach” and keeping them sturdier.
Scenario 3: Multi-shelf rack + uneven growth (middle is great, edges are sad)
Tip: Add reflectors before adding fixtures. Edge seedlings often get less light spill. Tape white foam board along the sides (like little wings) or hang reflective film a couple inches away from leaves to bounce light back.
Example: A four-tray shelf showed noticeable improvement within 7 days after adding two foam-board side panels; the gardener skipped buying a second $40 light for that tier.
Small Tweaks That Make a Big Difference
Once the stand is built and the light is running, these tiny adjustments are what separate “fine” seedlings from thick-stemmed transplants that take off outdoors.
Mark height targets directly on the stand
Tip: Add simple reference marks. Use a permanent marker to mark 2", 4", and 6" from the shelf surface on one upright. When you’re adjusting lights quickly, you’ll stop guessing and start being consistent.
Example: If you’re growing mixed trays (tomatoes + flowers), you can keep the light at 3–4" and raise taller cells onto an upside-down tray to even the canopy.
Level the canopy with “plant risers” instead of raising the light
Tip: Bring short plants up, not the light up. If one flat is shorter, set it on an upside-down tray, a clean food container, or a scrap board. This keeps the light close for everything, rather than sacrificing the whole shelf to accommodate one tall tray.
Real-world hack: Starting onions (short) next to tomatoes (tall): raise onions up 2–3" so both stay in the sweet spot.
Prevent cord chaos before it starts
Tip: Mount a power strip to the stand. Screw or zip-tie a surge strip to the side so all plugs go to one place. Route cords along uprights with zip ties so you don’t snag a light and drop it onto seedlings.
Cost: A decent surge strip is often $15–$25, which is cheaper than replacing a cracked LED fixture (or a whole tray of seedlings).
Track your “sow date” and “light date” separately
Tip: Write two dates on plant tags. Seedlings behave differently from the day they sprout. Mark “Sowed: Mar 1” and “Up: Mar 6” so you can time thinning, potting-up, and hardening off accurately.
Example: Brassicas might be ready to pot up 10–14 days after emergence under strong light, but only if they weren’t light-starved early.
Safety and Longevity (Because DIY Shouldn’t Be Sketchy)
Your setup will run long hours next to water. Make it safe once and you’ll use it for years without worrying.
Keep electricity above water lines
Tip: Mount outlets and connections higher than trays. Put the power strip halfway up the stand, not on the floor. Create a “drip loop” in cords (a low dip before the plug) so any water runs off the cord instead of into the outlet.
Example: If a tray overflows during bottom-watering, the drip loop helps prevent water from traveling straight to the plug.
Choose hardware that won’t rust in humid conditions
Tip: Use coated screws and decent chain. Seed starting areas get humid fast. Galvanized or coated screws and basic corrosion-resistant chain keep your adjustments smooth instead of crunchy and stuck by April.
Example: If you reuse the stand year after year, rust-free hooks are the difference between a 10-second adjustment and an annoying wrestling match.
Sources Worth Trusting (So You’re Not Guessing)
Two reliable, no-nonsense references back up what most experienced seed starters learn the hard way: close lights and consistent schedules matter.
Utah State University Extension (2018) notes that inadequate light is a primary driver of leggy seedlings and recommends bright light immediately after germination.
Purdue Extension (2020) recommends keeping fluorescent-type lights about 1–2 inches above seedlings and raising as plants grow to maintain intensity.
If you build your DIY light stand so adjusting height is effortless, you’ll automatically follow that advice without even thinking about it—which is exactly the point. Set the timer once, keep the light close, use reflectors to stretch your lumens, and your seedlings will look like they’ve been working out instead of reaching for the ceiling.