The Secret to Perfect Tomato Staking Every Time
The most common tomato-staking mistake isn’t picking the “wrong” stake—it’s waiting until the plant needs help. By the time a tomato is flopping over, you’ve already bruised stems, snapped roots, and taught the plant a bad habit: sprawling. Stake (or cage/trellis) early—when the transplant is only 8–12 inches tall—and you’ll spend less time wrestling vines and more time harvesting clean fruit.
Perfect staking is really three things done right: support choice (matched to tomato type), early installation (before roots spread), and simple training (a repeatable weekly routine). Do those three and you’ll avoid the classic midsummer tomato pile-up.
Start Right: Match the Support to the Tomato
Tip: Decide by growth habit in 30 seconds (determinate vs. indeterminate)
If the tag says determinate (bush type), it sets most fruit in a short window and usually tops out around 3–4 feet—a sturdy cage often works. If it’s indeterminate, it keeps growing until frost and can hit 6–10 feet (more in warm climates), so you’ll want a tall stake, trellis, or Florida weave. Real-world example: ‘Roma’ often behaves determinate-ish in many gardens, while ‘Sungold’ is famously indeterminate and will swallow a short cage by July.
Tip: Don’t use the cheap cone cages for vigorous tomatoes
Those lightweight cone cages (the 42-inch ones sold everywhere) are fine for peppers, not big tomatoes—especially indeterminates. They tip in wind and pinch stems where wires meet. If you want cages, aim for 54–72 inches tall with large openings (at least 6 inches) so you can actually reach in to harvest.
Tip: Use this quick “space math” to pick a system
Small bed with few plants? Single stakes or cages keep things simple. Long row with 8+ plants? The Florida weave saves money and time because you buy stakes once and replace twine cheaply. Example: a 20-foot row with 10 plants is often easier with weaving than managing 10 separate cages.
Install Like a Pro: Timing, Depth, and Layout
Tip: Put supports in at planting time (or within 7 days)
Tomato roots spread wider than you think, and driving a stake later can spear roots and set the plant back. Install the support the same day you transplant (or at least within one week), then you’re training growth instead of correcting chaos. A clean early install also reduces stem scuffs that can invite disease.
Tip: Drive stakes deep enough that wind can’t “pump” them loose
A good rule: sink stakes 12–18 inches into the soil, deeper in sandy ground or windy sites. If the stake wiggles, the plant rubs, and that rubbing creates weak points right where heavy fruit clusters form. Example: in a windy side yard, a 7-foot stake sunk only 6 inches will slowly loosen; sunk 16 inches, it stays put through thunderstorms.
Tip: Place the stake 2–3 inches from the stem to avoid root damage
Set the stake close enough for easy tying but not so close you shred the main root ball. I aim for 2–3 inches away from the stem on the windward side so the plant leans into the support rather than away from it. Real-world example: in raised beds where soil is fluffy, that small offset keeps the stake stable without pinching the transplant.
Tip: Keep plants breathable: 18–24 inches apart (minimum) when staking
Staking lets you grow a bit tighter than sprawling, but crowding still traps humidity. Many extension recommendations land around 18–24 inches between plants in-row for staked tomatoes, with wider spacing for cages. Better airflow means faster drying leaves and fewer disease headaches.
Tie Smart: The “Snug, Not Strangling” Rules
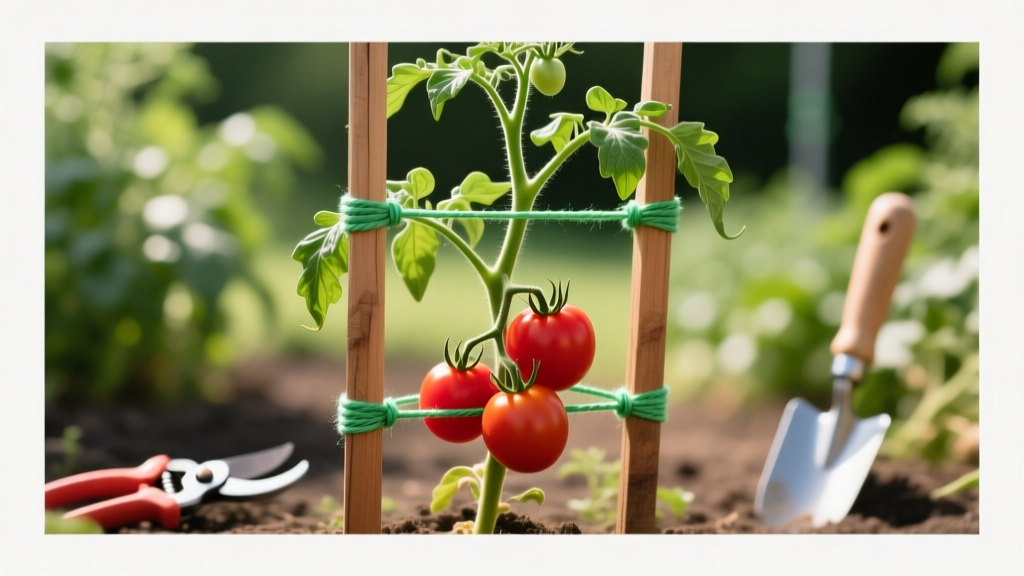
Tip: Use soft ties and a figure-eight loop
Skip wire, thin string, and anything that cuts in. Use soft cloth strips, tomato clips, or stretchy plant tape, and tie in a figure-eight: one loop around the stake, one around the stem, crossing between them. That cross creates a cushion point so the stem doesn’t grind against the support in wind.
Tip: Tie every 8–10 inches of growth (and check weekly)
Tomatoes grow fast in warm weather; waiting “until it looks floppy” is how stems kink. Add a tie every 8–10 inches up the plant, and do a quick tie-check once a week—especially after heavy rain when stems swell. Example: in peak July growth, an indeterminate can add 6 inches in a week, which is exactly when it needs one more tie.
Tip: Never tie directly under a heavy fruit truss
A tie placed right below a fruit cluster can act like a choke point when the cluster gains weight. Instead, tie a few inches above or below, and let the stem flex naturally. Real-world example: when a cluster of 6–8 tomatoes starts coloring, it suddenly gets heavy; a poorly placed tie can crease the stem and reduce flow to the fruit.
Tip: Use one cheap item as the “perfect tie” in a pinch
DIY win: cut up an old 100% cotton T-shirt into 1-inch-wide strips. Cotton grips without sliding and is soft on stems; just replace if it rots midseason. Cost example: a worn shirt makes 50+ ties for essentially $0, compared to buying a roll of plant tape for $6–$12.
Pick Your System: Stakes, Weave, Trellis, or Cages
Not all staking methods fit all gardens. Here’s the quick comparison I use when helping friends pick a setup that won’t collapse at the first summer storm.
| Method | Best for | Typical materials | Upfront cost (approx.) | Labor over season | Common failure point |
|---|---|---|---|---|---|
| Single stake + ties | 1–6 plants, indeterminates | 6–8 ft stake, soft ties | $3–$8 per stake | Medium (weekly tying) | Stake too short or shallow |
| Florida weave | Rows of 8+ plants | T-posts/wood stakes, tomato twine | $20–$60 per 20 ft row | Low-medium (weave every 7–10 days) | Twine breaks or posts lean |
| Heavy-duty cage | Determinate or semi-vigorous plants | Concrete wire cage, stakes | $10–$25 each (DIY cheaper) | Low (minimal tying) | Cage tips in wind if not anchored |
| Overhead trellis + string | Raised beds, high tunnels | Top bar, clips/string, anchors | $30–$100+ (depends on build) | Medium (twist/clip regularly) | Top bar sags without bracing |
Tip: For the Florida weave, place stakes every 2 plants (max 3)
Weaving works because the twine becomes a supportive “sandwich” around plants. Put a sturdy stake at the row ends and then every 2 plants (every 4–6 feet depending on spacing). Example: with plants at 24 inches, you’ll drop a stake about every 4 feet for a row that stays upright when the fruit loads up.
Tip: Use tomato twine, not random string
Tomato twine is made to resist sun and snapping; cheap string turns brittle fast. A single 650-foot roll often costs around $8–$15 and can last multiple seasons depending on your row length. If you’ve ever had a whole row slouch because the twine popped mid-August, you already know this is worth it.
Tip: DIY a heavy-duty cage from concrete reinforcing wire
Concrete reinforcing wire (often a 5-foot-tall roll with 6-inch openings) makes excellent cages. Cut a section about 5 feet long, roll it into a cylinder, and secure the seam with wire or hog rings; stake it with one metal post. Cost example: one roll can make several cages, often bringing the per-cage cost down to roughly $6–$12 depending on local prices—usually cheaper than “premium” store cages.
Train the Plant: The Shortcut Routine That Prevents Jungle Mode
Tip: Pick a pruning plan and stick to it (1–2 leaders is the sweet spot)
For indeterminates on stakes or strings, training to 1–2 main stems keeps fruit reachable and airflow high. Choose the strongest sucker below the first flower cluster if you want two leaders, then remove other suckers when they’re small (around 2–4 inches). Example: a ‘Cherokee Purple’ on a single stake is much easier to manage as 1–2 leaders than as a many-stem thicket that needs constant rescue ties.
Tip: Prune on dry mornings and sanitize if disease is present
Dry leaves heal faster and spread fewer pathogens. If you’re dealing with suspected disease, wipe pruners with 70% isopropyl alcohol between plants (quick and effective). This lines up with common extension recommendations for reducing mechanical spread of tomato diseases.
“Staking and pruning tomatoes improves air movement and helps foliage dry faster, which can reduce disease pressure in the canopy.” — University of Minnesota Extension (2020)
Tip: Use clips for speed if you grow more than 10 plants
Tomato clips can turn a 30-minute tying session into 10 minutes, especially on string trellises. They cost more upfront (often $10–$20 for a pack), but they’re reusable for years if you collect them at season’s end. Real-world example: in a 12-plant raised bed setup, clips make weekly maintenance feel like a quick lap around the garden instead of a chore.
Stress-Test Your Setup: Wind, Storms, and Heavy Fruit
Tip: Add a second anchor before the first storm, not after
If your cage or stake leans even slightly when you shake it, add reinforcement now. For cages, that can be one extra stake or a metal U-post; for stakes, add a second stake and tie the two together with a short cross-tie. Example: coastal gardens or open yards often need this by early summer—waiting until a plant is loaded with green fruit is how you end up with snapped branches overnight.
Tip: Plan for “August weight” and overbuild by 25%
A tomato support that feels sturdy in June can fail when the plant is carrying 10–20 pounds of fruit and foliage. Overbuild a little: thicker stakes, deeper set, and stronger twine than you think you need. A $5 sturdier stake is cheaper than losing even a couple ripe slicers to rot because they hit the ground.
Tip: Stop growth at the top on purpose (topping timing)
About 30 days before your expected first frost, pinch the growing tips on indeterminates so the plant focuses on ripening existing fruit rather than launching new flowers. This keeps the top from turning into a floppy sail that catches wind. Example: if your first frost is around October 15, topping around mid-September can simplify support needs and improve ripening odds.
Real-World Setups That Actually Work (and Why)
Scenario: The 4-plant patio bed with limited tools
Use 6–7 foot wooden stakes or metal conduit and soft ties, one stake per plant. Train each indeterminate to 1–2 leaders so it stays slim and upright, and tie every 8–10 inches. Money saver: T-shirt ties + a $4 stake per plant often beats buying four “nice” cages at $15–$25 each.
Scenario: The 20-foot family row that needs to be low-maintenance
Go Florida weave with stakes every 4 feet and weave every 7–10 days. You’ll spend more time early, then almost none once the plants are layered and supported. Example: a row of 10 plants can be maintained with one roll of tomato twine and about 6–7 stakes, which is typically cheaper than 10 heavy-duty cages.
Scenario: The windy corner lot where cages always tip
Use a stake-and-trellis hybrid: drive 8-foot metal T-posts 18 inches deep, run a top line (wire or strong rope), and drop strings to each plant with clips. This creates a stable frame that resists twisting better than a single cage. If you prefer cages, anchor each cage with a post—one cage, one post—so the whole thing can’t roll.
Scenario: The “I’m going on vacation for 2 weeks” garden
Choose cages or a strong weave system over single stakes, because they’re more forgiving if you miss a tying session. Before you leave, do one thorough pass: add ties, remove long suckers (keep your chosen leaders), and check stake depth. Real-world example: a staked indeterminate left untied for 14 days can bend permanently; a well-anchored cage usually keeps it upright until you return.
Little Fixes That Prevent Big Midseason Problems
Tip: Flag your ties so you can spot them fast during weekly checks
If you’re using green twine on green stems, you’ll miss tight spots. Use light-colored cloth ties or add a small tag on the main stem tie so you can find it instantly. Example: a white cotton tie stands out at dusk when you’re doing a quick after-dinner garden lap.
Tip: Keep the bottom 8–12 inches of stem clear once plants are established
After the plant is growing strongly and setting fruit, remove leaves that touch the soil and keep a clean 8–12 inch gap from the ground. This reduces soil splash onto foliage during rain or overhead watering, which many extensions note is a common pathway for disease spread. It also makes it easier to place mulch and check for pests near the base.
Tip: Use mulch to reduce splashing—and to keep ties from loosening in cracked soil
A 2–3 inch layer of straw or shredded leaves reduces soil splash and keeps the ground more evenly moist, which means stakes stay tighter and soil doesn’t crack away from them. Example: in hot spells, bare soil can shrink and loosen stakes; mulch helps stabilize that root zone.
Quick Reference: A Simple Weekly Tomato Staking Routine
Tip: The 10-minute loop (per 6–10 plants)
Once a week: (1) add a tie or weave layer, (2) remove suckers you don’t want while they’re under 4 inches, (3) check that no tie is biting into a thickening stem, and (4) push stakes back if the soil softened after rain. This routine prevents the “one big emergency” day that eats your weekend. Example: I’d rather do 10 minutes every Sunday than spend 2 hours re-staking after a windy Thursday.
For extra confidence, lean on extension guidance when dialing in spacing and training. Clemson University Extension has long recommended staking to improve air flow and fruit quality (Clemson Cooperative Extension, 2016), and multiple university extensions note that staking/pruning helps leaves dry faster and can reduce disease pressure in humid canopies (University of Minnesota Extension, 2020).
The real secret to perfect tomato staking isn’t a fancy product—it’s getting supports in early, tying with a repeatable method, and choosing a system you’ll actually maintain in under 10 minutes a week. Set it up once with a little overbuilding, and your tomatoes will grow like they have a plan—upright, reachable, and loaded with cleaner fruit.