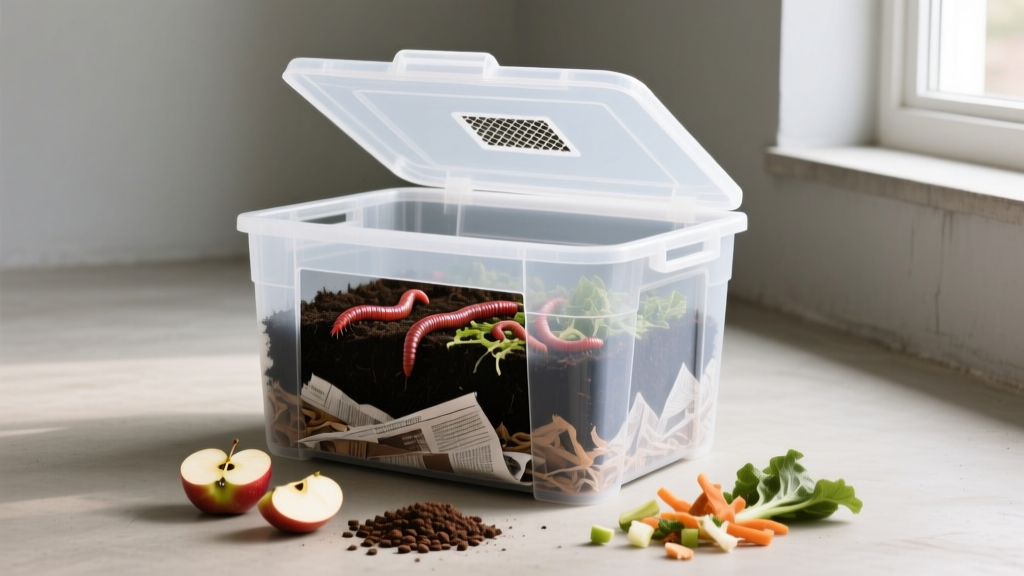
How to Make a Worm Bin from a Storage Tote
The most common worm-bin mistake isn’t “forgetting to add worms”—it’s drowning them. A storage tote with no airflow and a dripping-wet bedding mix turns into a smelly, anaerobic soup fast, and the worms try to escape (or worse). The good news: a basic tote bin can run clean, fast, and nearly odor-free if you build in ventilation, drainage, and the right bedding-to-food balance from day one.
I’ve built tote bins that processed kitchen scraps for apartment dwellers, busy families, and even a classroom—without fancy parts. Below are the shortcuts and little “gotchas” that make a cheap tote bin work like a purpose-built vermicomposter.
Pick the Right Tote (and Set Yourself Up for Less Mess)
Choose an opaque tote: worms hate light, and you’ll hate algae
Go for an opaque (not clear) plastic tote in the 14–18 gallon range for most households. Clear bins encourage algae and invite you to “check on them” too often—worms prefer stable darkness. A black or dark-blue tote also hides minor condensation so you don’t panic and over-correct.
Real-world example: A friend tried a clear 12-gallon bin on a sunny porch; within two weeks the sides were green and the worms clustered at the bottom. Switching to an opaque 18-gallon tote reduced stress and escape attempts immediately.
Don’t undersize the bin: surface area matters more than “volume”
Worm bins work from the top down, so surface area is your engine. A low, wide tote beats a tall, narrow one even if the gallons are similar. If you’re feeding 1–2 pounds of scraps per week, you’ll have a much easier time keeping things balanced with a wider footprint and a 6–10 inch bedding layer.
Shortcut: If your tote is tall, simply don’t fill it deep—aim for a “working depth” of 10–12 inches total (bedding + food + castings) and leave headspace for airflow.
Budget hack: skip “worm composters”—a tote is usually under $20
A heavy-duty storage tote typically costs $10–$25 depending on size and brand. Commercial stackable worm towers often run $80–$200. The tote bin wins on cost and simplicity, and the worms don’t care about branding—only bedding quality and oxygen.
| Feature | Storage Tote Bin | Stackable Worm Tower |
|---|---|---|
| Typical cost | $10–$25 | $80–$200 |
| Best for | Most beginners, kitchens, garages | People who want built-in migration trays |
| Moisture control | Easy if you add drainage + bedding | Can be tricky if trays drip and pool |
| Harvesting castings | Hands-on but straightforward | Often easier (tray method) |
| Failure mode | Overfeeding + too wet | Overfeeding + too wet (same issue) |
Build the Tote: Airflow, Drainage, and a No-Leak Setup
Drill the “right” number of holes (more than you think)
For a standard 18-gallon tote, drill 12–16 ventilation holes around the upper sides using a 1/4-inch bit, plus 8–12 holes in the lid. This creates cross-ventilation so the bin stays aerobic, which is the difference between earthy and stinky. If fruit flies are an issue, you can cover holes from the inside with window screen and hot glue or silicone.
Real-world example: A classroom bin I helped set up had only lid holes—condensation rained back down and everything went sour. Adding side holes fixed the odor within a week.
Add drainage holes—then prevent the “worm rain” problem
Drill 8–12 holes in the bottom (also 1/4-inch) for leachate drainage, but don’t let it drip on your floor. Nest the drilled bin inside a second, undrilled tote to catch liquid, and use two scrap wood strips or upside-down plastic nursery pots as spacers so the inner bin doesn’t sit in puddles. This “double tote” setup costs about $10 extra and saves you from soggy bedding.
DIY alternative: No second tote? Set the bin on a boot tray or a shallow cement-mixing tub ($8–$15) and elevate it with bricks.
Skip the spigot unless you’re committed to maintenance
Lots of DIY plans add a spigot to drain “worm tea,” but leachate isn’t a guaranteed safe fertilizer—it’s just excess moisture that ran through decomposing food. If you do add a spigot, plan to flush it monthly so it doesn’t clog with castings. For most gardeners, the simplest move is preventing excess liquid by using drier bedding and draining into a catch tote.
Expert note: Excess leachate is usually a symptom of too-wet bedding or overfeeding, not a bonus product.
Get Bedding Right: The Ratios That Keep Worms Busy (and Quiet)
Start with a fluffy carbon base: aim for 2–3 parts bedding to 1 part food
The easiest shortcut to a stable bin is a carbon-heavy start. Use shredded cardboard, torn egg cartons, or black-and-white newspaper (no glossy inks) at about a 2:1 or 3:1 volume ratio of bedding to food. The bedding buffers moisture, reduces odor, and gives worms a safe place to retreat if the food side heats up or gets acidic.
Real-world example: A family of four feeding lots of melon rinds kept getting gnats. Doubling the bedding (going from 1:1 to 3:1) reduced odors and stopped the gnat bloom in two weeks.
Moisten bedding to “wrung-out sponge,” not “mud pie”
Wet bedding should feel like a wrung-out sponge: damp enough to clump, but not dripping when squeezed. A practical check: grab a handful and squeeze hard—if you get more than 1–2 drops of water, it’s too wet. Too wet means low oxygen, and low oxygen means stink and worm escapes.
Shortcut: If you accidentally over-wet, mix in a full grocery bag of dry shredded cardboard and leave the lid slightly ajar for 24 hours (in a safe indoor spot) to vent moisture.
Inoculate with “grit” and microbes: a cup of soil + eggshell powder
Add 1 cup of finished compost or garden soil to introduce decomposer microbes (don’t use soil treated with pesticides). Then add 2–4 tablespoons of finely crushed eggshells or agricultural lime (not quicklime) to buffer acidity and provide grit for worm digestion. This simple combo helps prevent the sour, acidic bins that happen when citrus and coffee pile up.
Citation: Cornell University’s waste management guidance emphasizes that worms need moist bedding, oxygen, and a balanced feedstock to prevent anaerobic conditions (Cornell University, 2018).
“Worms breathe through their skin, so bedding must stay moist but well-aerated—waterlogged conditions quickly become anaerobic.” — Vermicomposting guidance used in multiple Extension education programs
Worms, Food, and Timing: The Part People Overcomplicate
Buy the right worms: red wigglers, not nightcrawlers
Use Eisenia fetida (red wigglers) or Eisenia andrei, not common garden nightcrawlers. Red wigglers thrive in decaying organic matter near the surface and tolerate bin life much better. A starter amount of 1/2 to 1 pound of worms is plenty for most kitchens.
Cost note: Expect roughly $25–$45 per pound depending on your region and shipping.
Feed small, buried portions: 2 cups at a time beats a whole mixing bowl
Start feeding lightly for the first two weeks while the worm colony settles. A good beginner pace is 2 cups of scraps every 3–4 days, buried under bedding in a different spot each time. Burying stops fruit flies, prevents odor, and spreads the workload so you don’t create one big rotten hot zone.
Case example (apartment): In a 700-square-foot apartment, one 14-gallon bin handled small feedings twice a week with zero odor—because scraps were always buried under 2 inches of bedding.
Freeze scraps to break cell walls (faster processing, fewer flies)
If you want the bin to “eat” faster, freeze your scraps in a container and thaw before feeding. Freezing ruptures plant cells, so microbes and worms can break food down quicker. It also lets you batch-feed once or twice a week instead of daily, which is handy if you’re busy.
Real-world example: A gardener who cooked lots of broccoli stems froze scraps all week and fed every Sunday; the bin processed stems noticeably faster than when they were added fresh.
Avoid the classic stink triggers: go easy on wet, acidic, or salty foods
Keep citrus, onions, and spicy/salty leftovers to small amounts, especially early on. Big loads of watermelon, tomatoes, or soup can flood the bin and push it anaerobic. If you do add wet foods, “pay” for them with extra dry bedding—add a double handful of shredded cardboard right on top.
Citation: Washington State University Extension notes that managing moisture and avoiding overfeeding are key to preventing odors and pests in home worm bins (WSU Extension, 2020).
Temperature and Placement: Where Tote Bins Actually Thrive
Keep the bin in the worm comfort zone: 55–77°F is the sweet spot
Red wigglers stay active and reproduce best in moderate temperatures. Aim for roughly 55–77°F; below that they slow down, and above that they can stress quickly (especially if the bin is also too wet). Garages, basements, mudrooms, and shaded porches are usually better than sunny patios.
Case example (hot summer): A tote bin on a shaded porch still overheated during a heat wave. Moving it into a laundry room kept it stable, and feeding resumed after 3–5 days of rest.
Use the “lid-offset trick” for humid bins (no extra holes needed)
If condensation is heavy, rotate the lid so it sits slightly offset (still covering the bin) for a day or two. This boosts airflow without creating a fruit-fly superhighway like leaving the lid fully open. Pair it with a fresh layer of dry bedding to wick moisture upward.
Pest-Proofing and Odor Control: Fix the Cause, Not the Symptom
Make a cardboard “blanket” and stop fruit flies at the source
Cut a piece of cardboard to fit the bin surface and lay it directly on top of the bedding. This blanket keeps the top layer evenly moist, discourages flies, and reduces the temptation to overwater. Bonus: worms love gathering under it, so it’s an easy way to check activity without stirring the whole bin.
DIY alternative: Use a few layers of damp newspaper, but replace weekly so it doesn’t mat into a sludge layer.
When it smells, don’t add baking soda—add air and carbon
A sour or rotten smell almost always means anaerobic pockets from too much food or moisture. The fix: remove any obviously rotting clump, fluff the bedding gently, and add 2–3 quarts of dry shredded cardboard or coco coir. Hold feeding for 5–7 days while the bin rebalances.
Case example (busy family): After a holiday, a family dumped in a week’s worth of leftovers and got a “dumpster smell.” They paused feeding for one week, mixed in a gallon bag of shredded shipping boxes, and the bin returned to an earthy smell by the next weekend.
Stop ants with a moat, not chemicals
If your bin sits outdoors and ants move in, don’t spray anything near your worms. Put the tote legs/blocks in shallow dishes of water (a simple moat), or set the bin on a tray sprinkled with diatomaceous earth around the outside perimeter (not inside the bin). Ants usually show up when the bin is too dry—so also check moisture and re-wet bedding lightly.
Speed Boosts: Small Tweaks That Make Castings Faster (Without More Work)
Chop scraps to 1-inch pieces for a noticeable speedup
Worms don’t have teeth; microbes do the first stage. Chopping scraps to about 1 inch increases surface area and speeds decomposition. If you already meal-prep, just rough-chop peels and stems before they hit your scrap container.
Feed in “lanes” so harvesting is easier later
Pick a side of the bin and feed only there for 2–3 weeks, then switch to the other side. Worms will migrate toward fresh food, leaving behind castings that are easier to scoop. This simple pattern saves you from sorting worms out of every handful when it’s harvest time.
Add a handful of finished compost as a monthly “starter culture”
Once a month, mix in a handful of finished compost or leaf mold. It introduces a diverse microbe community that helps process tougher scraps like broccoli stems or corn husks. Think of it like adding sourdough starter—small input, steady payoff.
Harvesting Castings Without a Fancy Separator
Use the “light mound” method with a desk lamp
Dump the bin onto a tarp and make several small mounds. Shine a light over the piles; worms dive down, and you can scrape castings from the top every few minutes. In 20–40 minutes, you’ll have a nice batch of castings with minimal worm loss.
Shortcut: If you don’t want to dump the bin, use the feeding-lanes approach and harvest from the “resting” side in place.
Know when castings are ready: look for uniform, coffee-ground texture
Finished castings look dark and crumbly, with few recognizable food bits. If you still see lots of intact bedding or slimy scraps, give it another 2–3 weeks and keep feeding lightly. Harvesting too early usually means you’re scooping half-finished material that won’t be as stable in pots.
Use castings strategically: 10–20% in potting mixes, or a thin topdress
Worm castings are powerful—more isn’t always better. For containers, mix castings at about 10–20% of the potting volume. In garden beds, topdress a 1/4-inch layer around plants and water in; it’s a targeted boost without smothering soil structure.
Three Setups That Work in Real Life (Steal One)
The apartment “no-drip” bin (clean floors, no odors)
Use a 14-gallon tote nested inside an un-drilled catch tote, with a thick cardboard blanket and extra bedding on hand. Feed frozen scraps twice a week in small buried portions. This setup stays tidy, and you can keep it in a closet or laundry area as long as temperatures stay moderate.
The family kitchen bin (high volume, low drama)
Go 18 gallons and start with a deep bedding base: 8–10 inches of shredded cardboard mixed with a few cups of compost. Keep a paper bag of dry shreddings next to the bin so every wet feeding gets a carbon “cover charge.” This is the simplest way to handle the inevitable watermelon season and salad leftovers without odors.
The garage/classroom bin (low maintenance, pest-resistant)
Prioritize ventilation (side holes plus lid holes) and consistent feeding lanes so students or family helpers don’t dump food randomly. Stick to fruit/veg scraps and crushed eggshells, and avoid messy leftovers. Set a calendar reminder to check moisture every 7 days—quick squeeze test, add dry bedding if needed, done.
If you build your tote with real airflow, keep bedding carbon-heavy, and feed in small buried batches, your bin will smell like forest soil—not a trash can. And once you’ve got a steady rhythm, the tote becomes one of the cheapest ways to turn everyday scraps into a potting-mix upgrade you’d otherwise pay for by the bag.