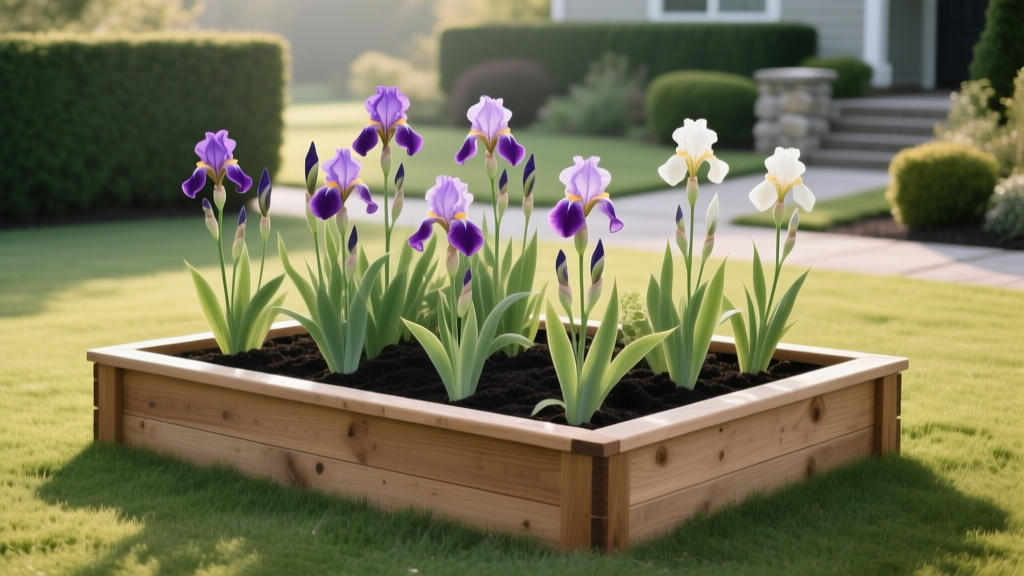
Creating Raised Beds for Irises
The first time many gardeners “lose” irises, it isn’t to winter cold or summer heat—it’s to soggy feet. You plant gorgeous rhizomes, they leaf out, maybe even bloom once, and then the clump dwindles. When you finally dig, you find mushy rhizomes that smell like a compost bin. If your yard has heavy clay, a low spot, or irrigation overspray, a raised bed isn’t a fancy upgrade—it’s the difference between thriving irises and a slow rot.
Raised beds give you control over drainage, soil texture, and planting depth—three things irises are picky about. And once you build one correctly, maintenance gets simpler: fewer weeds, easier division, and blooms that don’t stall out after a couple seasons.
Pick the Right Raised Bed Design (Before You Move a Shovel)
Irises aren’t all the same. Bearded irises (Iris germanica and hybrids) want sharp drainage and sun-baked rhizomes. Many Siberian and Japanese irises tolerate more moisture, but still benefit from improved soil structure. The bed you build should match what you’re growing—and what your yard naturally does after a 1-inch rain.
Recommended bed height, width, and orientation
- Height: 8–12 inches is enough for most bearded iris problems; go 12–18 inches if you have tight clay or frequent standing water.
- Width: Keep beds 3–4 feet wide so you can reach the center without stepping on soil.
- Length: Any length works, but plan for spacing (more on that below).
- Sun exposure: Aim for 6–8 hours of direct sun for bearded irises; morning sun is especially helpful to dry foliage.
- Orientation: In cool climates, a south-facing edge warms earlier in spring; in hot climates, avoid placing the bed against heat-reflecting walls.
If you’re using lumber, untreated cedar lasts well. Avoid old railroad ties or unknown treated wood near edible beds; for ornamentals it’s still a choice many gardeners avoid out of caution.
Comparison: Raised bed vs in-ground vs mounded rows
| Method | Typical Height Above Grade | Drainage Improvement | Best For | Watch Outs |
|---|---|---|---|---|
| In-ground planting | 0 inches | Low (depends on native soil) | Sandy/loamy sites with quick percolation | High rot risk in clay; hard to correct compaction |
| Mounded rows | 4–8 inches | Moderate | Large plantings; quick fix for minor drainage issues | Mounds settle; edges dry fast in summer |
| Raised bed | 8–18 inches | High | Clay soils, wet spots, show beds, tight spaces | Needs attentive watering in heat; initial material cost |
Real-world comparison: If your soil holds water for 24 hours after rain, in-ground is gambling. Mounds help, but a well-built 12-inch raised bed usually ends the rot cycle for bearded irises because excess water drains sideways and down, away from rhizomes.
Soil: The Raised-Bed Mix That Keeps Rhizomes Firm
The goal is simple: a mix that drains fast yet stays slightly moist a few inches down. Bearded iris rhizomes should never sit in heavy, airless soil. Most failures come from “nice rich soil” that’s too rich in compost and holds too much water.
A proven raised-bed mix for bearded irises
For a new bed, start with this by volume:
- 50% screened topsoil (or a sandy loam)
- 30% coarse mineral material for drainage (pumice, expanded shale, coarse sand, or fine gravel—choose what’s locally available)
- 20% finished compost (not manure-heavy, not “hot”)
If your compost is very fine and dark (the stuff that turns into mud when wet), cut it back. Irises like fertility, but they like air more.
Target pH and texture
Most bearded irises perform best around pH 6.8–7.5. If your soil test comes back acidic (below 6.0), consider adjusting gradually with lime per label rates. Don’t guess—use a soil test.
University guidance consistently emphasizes drainage and avoiding excess nitrogen. For example, the University of Minnesota Extension notes bearded iris prefer well-drained soil and full sun, and warns that overly wet conditions promote rot (University of Minnesota Extension, 2023). Similarly, Iowa State University Extension and Outreach recommends good drainage and careful fertilization to avoid lush, disease-prone growth (Iowa State University Extension and Outreach, 2021).
Step-by-step: building the bed so it drains (not just looks raised)
- Mark the footprint and remove sod.
- Loosen the subsoil to a depth of 6–8 inches with a fork. This is a big deal—water needs a place to go.
- Optional but helpful: If you have hardpan clay, mix 1–2 inches of coarse material into the loosened layer.
- Fill with your bed mix, then water it in to settle. Expect it to drop 1–2 inches over a week.
- Re-top and rake level. A slightly crowned top sheds heavy rain.
Avoid lining the bottom with landscape fabric. In real gardens it often becomes a sediment trap, slowing drainage right where you need it most.
“The common thread in iris losses is not cold—it’s lack of oxygen around the rhizome. Drainage is protection.” — paraphrased from extension recommendations emphasizing well-drained sites for bearded iris (University of Minnesota Extension, 2023)
Light: The Bloom Switch You Can Actually Control
If irises don’t bloom, most gardeners blame fertilizer. Nine times out of ten, it’s light. Bearded irises want sun on the leaves and warmth on the rhizomes.
- Bearded iris: 6–8 hours of direct sun; 8+ is fine in most climates if soil moisture is managed.
- Siberian iris: Tolerates partial shade, but blooms best with at least 5–6 hours.
- Japanese iris: Can handle more moisture and some shade, but still benefits from strong morning sun.
Raised beds can dry faster, which makes sun easier to handle. If you’re in a hot inland climate where summer highs regularly exceed 95°F, consider placing the bed where it gets afternoon shade from a fence or light tree canopy—especially for non-bearded types.
Planting Irises Correctly in a Raised Bed (Depth Is Everything)
Raised beds tempt gardeners to plant “nicely deep.” With bearded irises, that’s a mistake. Rhizomes are meant to be close to the surface.
Spacing and placement
- Bearded iris spacing: 12–18 inches between rhizomes (closer for a fast show, wider for airflow and fewer disease issues).
- Set the rhizome: Top of rhizome at soil level or even slightly exposed in humid climates.
- Roots: Spread downward and firm soil around them; don’t bury the rhizome like a bulb.
Best planting time (and why it matters)
For most bearded irises, plant or divide in late summer after bloom—typically 6–8 weeks before your first hard frost. This timing lets roots establish in warm soil without forcing lush top growth.
If you must plant in spring, do it early and keep watering consistent, because spring-planted rhizomes can dehydrate before they root deeply.
Watering: Enough to Root, Not Enough to Rot
Raised beds drain quickly, so watering becomes a deliberate practice. The trick is to water deeply, then let the top couple inches dry so the rhizome stays firm and aerated.
Newly planted rhizomes
- First 2 weeks: Water every 2–3 days if there’s no rain, applying roughly 0.5–0.75 inches per week total.
- Weeks 3–6: Shift to once weekly deep watering, about 1 inch per week if weather is dry.
Use your finger test: if soil is dry at 2 inches deep, water. If it’s cool and damp, wait.
Established clumps
Once rooted, bearded irises are fairly drought-tolerant, but best bloom comes with even moisture in spring.
- Spring growth to bloom: Aim for about 1 inch of water per week (rain + irrigation).
- After bloom: Water only when the top 2–3 inches are dry, especially in humid regions.
Water at the soil line. Overhead irrigation that wets foliage in the evening is a reliable way to invite leaf spot and soft rot.
Feeding: Fertilizer That Supports Blooms (Without Making a Disease Buffet)
Irises like moderate fertility. In raised beds, nutrients can leach faster, but don’t compensate by dumping high-nitrogen fertilizer. Too much nitrogen gives you floppy leaves and fewer flowers—and can worsen rot and leaf diseases.
Simple feeding schedule
- Early spring (as new growth appears): Apply a balanced or slightly low-nitrogen fertilizer such as 5-10-10 or 6-10-10, following label rates. A common garden rate is about 1/2 cup per 10 square feet, but always confirm with your product.
- After bloom (optional): Light feeding if plants are in sandy mixes or you’re seeing pale growth—again, avoid high nitrogen.
- Avoid: Fresh manure or heavy compost topdressing directly over rhizomes.
If your bed mix already contains compost, you may only need spring fertilizer. If you’re getting great leaf growth but no blooms, stop feeding and check light and crowding first.
Common Problems in Raised Beds (And How to Fix Them Fast)
Raised beds solve drainage issues, but they create new patterns: faster drying, warmer soil, and sometimes more burrowing pests. Here are the problems I see most often, with the fixes that actually work.
Troubleshooting: symptoms and solutions
- Symptom: Rhizomes turn soft, smell bad, leaves collapse at the base.
Likely cause: Bacterial soft rot, usually triggered by wet soil + buried rhizomes or injuries.
Fix: Dig and cut away all soft tissue with a clean knife. Dust cuts with powdered sulfur or let dry 24–48 hours in shade. Replant with rhizome top exposed and improve airflow. Reduce watering until new roots form. - Symptom: Leaves show brown spots or streaks that expand, especially in humid weather.
Likely cause: Fungal/bacterial leaf spot encouraged by overhead watering and crowding.
Fix: Remove worst leaves, water at soil level, and increase spacing. Clean debris in fall. If recurring, consider a labeled fungicide as a last resort and improve air movement first. - Symptom: Big clump, lots of leaves, few blooms.
Likely cause: Too much shade, too much nitrogen, or clumps not divided.
Fix: Confirm 6–8 hours sun; stop high-N fertilizer. Divide every 3–5 years (often sooner in raised beds because growth is vigorous). - Symptom: Rhizomes heave out of soil in winter or early spring.
Likely cause: Freeze-thaw cycles in light raised-bed mixes.
Fix: Firm rhizomes back into place and add a thin mulch layer after the ground freezes, about 1 inch of straw or pine needles—then pull it back in early spring so rhizomes can warm and dry. - Symptom: Leaves look shredded; rhizome chunks missing.
Likely cause: Slugs/snails, iris borer (in some regions), or rodents.
Fix: For slugs: iron phosphate bait and remove hiding places. For borers: remove and destroy affected rhizomes; clean up old foliage in fall. For rodents: use hardware cloth barriers under the bed if they’re persistent.
Three Real-World Raised-Bed Scenarios (What Changes, What Doesn’t)
Scenario 1: Heavy clay yard that stays wet for days
If puddles linger 48 hours after rain, build higher than you think: a 12–18 inch bed, loosen subsoil, and use extra coarse mineral material. Keep compost modest (no more than 20%). Plant rhizomes with the top exposed. In this scenario, a raised bed is less about convenience and more about oxygen.
Scenario 2: Hot, windy site where raised beds dry out too fast
In exposed yards, raised beds can act like a drying rack. Keep the bed at 8–12 inches rather than towering. Use more water-holding topsoil (still well-drained), and consider a light organic mulch between plants—not over the rhizomes. Plan on 1 inch weekly in peak heat, sometimes split into two waterings if the mix is very fast-draining.
Scenario 3: You inherited an overcrowded iris patch and want a show bed
Older clumps often have dead centers and tight fans that block airflow. Build a 10–12 inch raised bed in full sun, then replant only the healthiest outer rhizomes. Space them 15–18 inches apart for fewer disease problems. If you want a “wall of bloom” quickly, plant at 12 inches—but plan to divide sooner (often at the 3-year mark).
Seasonal Care in Raised Beds: What to Do and When
Raised beds warm earlier and drain faster, so your timing shifts slightly compared to flat ground. Use the plant as your calendar.
Spring
- Remove winter mulch early so rhizomes can dry and warm.
- Feed once as new growth starts (see feeding schedule).
- Water deeply if spring rains are light.
Summer (after bloom)
- Deadhead spent blooms; keep leaves to recharge rhizomes.
- Watch watering—raised beds can swing from wet to dry quickly.
- Divide and replant in late summer if clumps are crowded.
Fall
- Remove and discard diseased foliage; don’t compost it if leaf spot was heavy.
- Stop fertilizing by late summer so plants harden off.
- In cold climates, add 1 inch mulch after the ground freezes if heaving is common.
Small Details That Make a Big Difference
These are the “master gardener” tricks that don’t sound exciting until you see the results.
- Label varieties with UV-stable tags. Raised beds get replanted more often, and names vanish fast.
- Keep rhizomes exposed to sun and air. If soil washes over them, brush it back.
- Don’t over-mulch. Mulch is great between plants, risky on top of bearded rhizomes.
- Plan for division access. Leave stepping stones or a narrow path so you can work without compressing the bed.
- Use drip or soaker lines if possible—watering the soil, not the leaves, prevents a lot of heartache.
Raised beds for irises aren’t about pampering. They’re about building a root zone that behaves the way irises evolved to expect: airy, bright, and quick to drain. Once you get that right—bed height, gritty mix, rhizomes at the surface—the rest becomes routine. And when the first warm spell hits and the fans stand up like green swords, you’ll know you finally gave your irises what they were asking for all along.
Sources: University of Minnesota Extension (2023); Iowa State University Extension and Outreach (2021).