How to Rejuvenate Overgrown Gardenias
You step outside on a warm evening expecting that famous gardenia perfume—and instead you get a hulking green mound with a few blooms stuck on the tips, yellowing leaves inside, and bare “legs” down low. The plant looks healthy from 10 feet away, but up close it’s a tangle of old wood, crossing branches, and exhausted roots. That’s the classic overgrown gardenia: plenty of foliage, not much flower power, and a slow slide toward pests and nutrient problems.
The good news: gardenias respond well to a thoughtful reset. The bad news: a rushed hard prune at the wrong time can wipe out next season’s blooms. Rejuvenation is a blend of timing, pruning strategy, and dialing in basics (water, soil acidity, light, feeding). I’ll walk you through what works in real home gardens—hedge-shaped shrubs, pot-bound patio plants, and old foundation plantings that haven’t seen a pruner in years.
First, diagnose what “overgrown” means in your yard
Overgrown doesn’t always mean “too big.” It can mean the plant is too dense, too shaded, too leggy, or simply older wood that’s stopped producing well. Before you cut, do a 3-minute inspection.
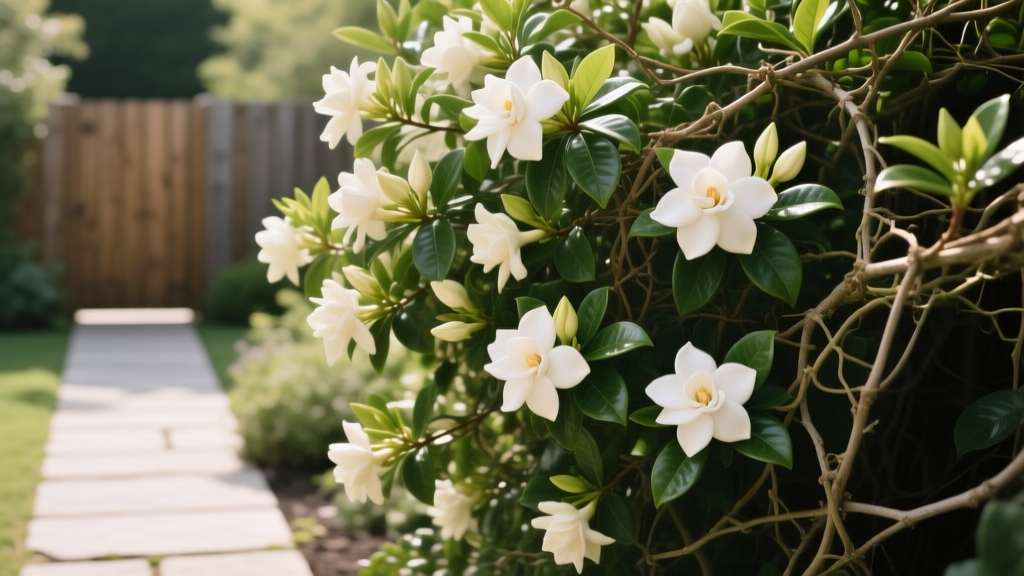
- Bloom placement: Flowers only on the outer shell usually means the interior is shaded and unproductive.
- Interior leaf drop: Bare sticks inside the canopy signals poor light/airflow or drought swings.
- Leggy base: Long bare stems with foliage only at the top often happen when shrubs are sheared or shaded.
- Yellow leaves (chlorosis): Often from high pH soil/water, poor drainage, or root stress—not just “needs fertilizer.”
- Stunted new growth: Can point to root binding (containers) or compacted soil (in-ground).
Reality check on timing: Most gardenias set flower buds on new growth produced after flowering. That means heavy pruning is best right after the main bloom flush (often early to mid-summer depending on variety and climate). Pruning in late fall or winter commonly sacrifices the next bloom cycle.
Rejuvenation pruning: the safe way to bring an overgrown gardenia back
If there’s one place gardeners get burned, it’s pruning at the wrong time or cutting everything at once. Gardenias can take a firm prune, but they do best when you keep enough leaf area to power regrowth and you avoid forcing tender shoots right before cold weather.
When to prune (timing with real numbers)
- Best window: Within 2–4 weeks after the main flowering period ends.
- Stop hard pruning: About 8–10 weeks before your average first frost to avoid cold damage on new growth.
- Temperature cue: Gardenias grow best when nights are reliably above about 60°F (16°C). Rejuvenation is slow when nights stay cooler.
Many U.S. extension recommendations align with “prune after flowering.” For example, North Carolina State University Extension notes pruning is done after flowering to avoid removing buds (NC State Extension, 2023). University of Florida guidance also emphasizes pruning timing and the importance of acidic conditions for gardenias (UF/IFAS Extension, 2020).
Pick your approach: renovation vs. staged rejuvenation
Here’s a practical comparison of two real methods. If your shrub is truly out of hand, staged rejuvenation is the least risky for bloom loss and plant stress.
| Method | How much you remove | Best for | Bloom impact | Stress risk |
|---|---|---|---|---|
| Staged rejuvenation | Remove 25–33% of oldest stems per year for 2–3 years | Established shrubs, homeowners who still want some blooms each season | Moderate; usually still flowers | Low to medium |
| Hard renovation | Cut back most stems to 12–24 inches (variety and size dependent) in one go | Severely neglected plants, storm damage, extreme legginess | High; often loses a season of bloom | Medium to high |
Staged rejuvenation: step-by-step
This is the method I recommend for most home gardens because it rebuilds a flowering framework without shocking the plant.
- Sanitize tools: Wipe pruners with 70% isopropyl alcohol before and after. (It matters when you’re cutting into older wood.)
- Remove dead wood first: Cut dead stems back to live tissue. If you scratch the bark and it’s brown/dry under it, keep cutting until it’s green.
- Take the oldest canes: Identify the thickest, darkest, woodiest stems. Remove 1 out of every 3 at the base (or as low as you can without gouging the crown).
- Open the center: Remove crossing branches and inward-growing shoots to create “windows” for light and airflow.
- Reduce height thoughtfully: Instead of shearing, cut long stems back to a lower side branch. Aim to remove no more than 30% of the canopy in a season.
- Finish with a light tip-prune: Snip 1–2 inches off vigorous new shoots to encourage branching—only if you still have at least 6–8 weeks of warm growth left.
“Pruning immediately after flowering helps preserve the next flush of buds while improving light penetration and airflow—two of the biggest factors in gardenia health.” — North Carolina State University Extension (2023)
Hard renovation: when it’s justified (and how to survive it)
Use hard renovation only when the shrub is so leggy or shaded that staged work won’t fix it—or when you’re willing to trade blooms for a reset.
- Cut height: Reduce the plant to 12–24 inches tall, making cuts just above outward-facing nodes or side branches.
- Leave some green: If possible, keep a few leafy stems to fuel regrowth (especially in hotter zones where sunscald can hit newly exposed wood).
- Aftercare is not optional: Consistent moisture and mulching matter more than fertilizer in the first 4–6 weeks.
Watering: the make-or-break piece after pruning
An overgrown gardenia often lives on rainfall alone, which is exactly how you get stress cycles: bone dry, then soaked, then dry again. After rejuvenation pruning, the plant needs steady moisture to push new shoots and rebuild its canopy.
How much water (with numbers you can use)
- In-ground shrubs: Target about 1 inch of water per week total (rain + irrigation). In sandy soils or hot spells above 90°F (32°C), plan on 1.5 inches.
- Deep watering: Apply water slowly so it penetrates 8–12 inches deep.
- Container gardenias: Water until you get 10–20% runoff from the drainage holes, then empty saucers so roots don’t sit in water.
Simple soil test: Stick your finger in the soil. If the top 2 inches are dry, it’s time to water. If it’s cool and moist, wait. Gardenias hate “muddy” roots, but they also hate drying out completely.
Scenario: the shrub that wilts every afternoon
If leaves droop at 3 p.m. but perk up by dusk, that’s often heat stress—not always drought. Check soil moisture before you add more water. If the soil is already moist and the plant wilts daily, give it relief:
- Add 2–3 inches of mulch (pine bark or pine straw is ideal).
- Provide temporary afternoon shade for 2 weeks after a major prune.
- Avoid fertilizing until the plant is pushing steady new growth.
Soil and pH: fix this or you’ll chase yellow leaves forever
Rejuvenation isn’t just pruning. If your soil pH is high, gardenias can’t access iron and other micronutrients well, and you’ll see pale leaves, green veins, and slow recovery.
Target soil conditions
- Soil pH: Aim for 5.0–6.0. Problems commonly show up above 6.5.
- Drainage: Water should soak in, not puddle for hours. If a planting hole holds water after 4–6 hours, drainage needs work.
- Mulch: Maintain 2–3 inches, kept a few inches away from the main stems.
University extension resources consistently flag pH and drainage as central issues for gardenias. UF/IFAS describes gardenias as acid-loving plants that struggle in alkaline conditions (UF/IFAS Extension, 2020). NC State Extension also highlights the need for appropriate soil conditions and careful pruning timing (NC State Extension, 2023).
What to do if your pH is too high
Don’t guess—test. Use a basic soil test or send a sample to your local extension lab.
- Short-term cosmetic fix: Apply chelated iron (follow label rates). This greens leaves but doesn’t correct soil pH.
- Long-term correction: Elemental sulfur can acidify soil over time, but it works slowly and depends on soil type and microbes. Apply only based on soil test recommendations.
- Mulch strategy: Pine bark fines or pine straw help maintain an acidic surface layer and improve soil structure over time.
Scenario: gardenia planted next to concrete
Foundation plantings near sidewalks and slabs often run alkaline because concrete leaches lime. If your gardenia is wedged between the house and a walkway, you may be fighting pH and reflected heat.
- Switch to a wider mulched bed so irrigation and organic matter can buffer the root zone.
- Use rainwater when possible; municipal water can be alkaline in some areas.
- If chlorosis persists yearly, consider transplanting in early spring to a spot with morning sun and better soil volume.
Light: more isn’t always better, but “too little” causes most overgrowth
Overgrown gardenias are frequently light-starved. They stretch, bloom only at the top, and drop interior leaves. At the same time, harsh all-day sun in hot climates can scorch leaves and stress a freshly pruned shrub.
Best light setup
- Ideal: 4–6 hours of sun, especially morning sun with afternoon shade.
- Too much: In hot inland areas, full sun with temps above 95°F (35°C) can burn leaves, especially after pruning exposes the interior.
- Too little: Less than 3–4 hours of direct light often equals fewer blooms and more pests.
Scenario: the hedge that’s been sheared into a cube
Shearing forces dense outer growth and shades the interior—exactly the opposite of what gardenias want. The fix is to stop shearing and start selective pruning:
- Use hand pruners to remove entire stems back to a junction, rather than clipping the outer shell.
- Create uneven, natural contours so light can reach deeper into the plant.
- Expect a “transition season” where it looks a bit open before it fills back in with healthier branching.
Feeding: fertilize for recovery, not for speed
Fertilizer is not a substitute for proper moisture and pH. After rejuvenation, feeding should support steady regrowth without pushing weak, sappy shoots that attract pests.
When and what to feed
- Timing: Feed after you see new growth starting—typically 2–4 weeks after pruning, depending on warmth.
- Type: Use a fertilizer formulated for acid-loving plants (often labeled for azalea/camellia/gardenia).
- Frequency: Usually 2–3 times during the growing season (spring through mid-summer). Avoid late-season nitrogen within 8–10 weeks of frost.
Practical application tip: Spread fertilizer evenly under the dripline (the outer edge of the canopy), not piled at the base. Water it in well.
Comparison analysis: slow-release vs. liquid feeding (real-world performance)
Both can work, but they behave differently in home gardens.
| Feeding method | Typical re-application | Growth response | Risk of burn | Best use case |
|---|---|---|---|---|
| Slow-release granular | Every 8–12 weeks (product dependent) | Steady, moderate | Lower (if watered in) | In-ground shrubs, consistent baseline nutrition |
| Liquid feed | Every 2–4 weeks (light doses) | Faster visible response | Higher if overmixed or applied to dry roots | Containers, quick correction after chlorosis treatment |
If you’re rehabilitating a stressed plant, I prefer slow-release at label rate plus good mulch and moisture. Liquid feeding is useful when you need a short-term boost, but it’s easy to overdo—especially if the plant is also dealing with heat or root stress.
Common problems that show up during rejuvenation (and what to do)
When you open up an old shrub, you often discover the “hidden issues” that were building inside the canopy. Here are the ones I see most.
Yellow leaves with green veins (interveinal chlorosis)
Likely causes: High soil pH, alkaline irrigation water, poor drainage, root stress.
Do this:
- Test soil pH; aim for 5.0–6.0.
- Apply chelated iron per label instructions for a quick green-up.
- Improve drainage and avoid daily shallow watering.
- Mulch with 2–3 inches pine bark/pine straw to moderate moisture and support acidity.
Bud drop (buds form, then fall off)
Likely causes: Inconsistent watering, sudden temperature swings, moving a container plant, too much nitrogen, pest pressure.
Do this:
- Keep moisture consistent—no bone-dry cycles. Hit that 1 inch/week target.
- Avoid fertilizing heavily while buds are forming.
- Keep nighttime temps as steady as possible; gardenias can drop buds when nights dip below about 55°F (13°C) during bud set.
- Inspect buds and leaf undersides for thrips or mites.
Black sooty mold on leaves
Likely causes: Honeydew from sap-sucking insects (scale, whiteflies, aphids).
Do this:
- Find the insect source: check stems and leaf undersides.
- Wash foliage with a strong spray of water to remove some mold.
- Use horticultural oil or insecticidal soap, following label directions and spraying in the cool part of the day (morning/evening), not in mid-day heat above 85–90°F.
- Prune out heavily infested twigs to reduce the population fast.
Leaf scorch or bronzing after pruning
Likely causes: Sudden sun exposure on previously shaded interior leaves; hot reflective heat; drought stress.
Do this:
- Provide temporary shade cloth or a patio umbrella for 10–14 days after a hard open-up.
- Mulch and water deeply; avoid light daily sprinkling.
- Don’t fertilize a scorched plant until it stabilizes.
Three real-world rejuvenation plans (pick the one that matches your situation)
Case 1: Overgrown foundation gardenia (8+ years old, shaded inside)
Goal: Restore blooms and airflow without gutting the shrub.
- Week 1 (post-bloom): Remove dead wood; take out 25–30% of oldest canes at the base; open the center.
- Week 2: Mulch 2–3 inches, expand the bed if lawn is crowding roots.
- Weeks 2–6: Water to reach 1 inch/week. Watch for new shoots.
- Week 4: Light feeding with acid-lover fertilizer if growth has started.
- Next year: Repeat cane removal (another 25–33%) to fully rebuild.
Case 2: Container gardenia that’s pot-bound and flowering poorly
Goal: Reset roots and top growth so the plant can feed itself again.
- Timing: Early spring or right after flowering (avoid repotting during peak bloom if possible).
- Repot: Move up only 2 inches in pot diameter (for example, 10" to 12"). Oversized pots stay wet and invite root rot.
- Root work: Tease or slice the outer root mat in 3–4 vertical cuts; remove a small amount of circling roots.
- Soil: Use a well-draining, acidic mix (pine bark-based blends work well).
- Watering: Water until 10–20% runoff; don’t let it sit in a saucer.
- Pruning: Reduce top growth by about 20–25% to balance the root disturbance.
Case 3: Gardenia hedge that’s been sheared for years
Goal: Replace “green meatball” growth with layered, flowering branches.
- Season 1 (post-bloom): Stop shearing. Thin by removing entire stems—take 1 in 4 of the thickest stems to the base.
- Season 1 continued: Shorten a few long stems back to side branches to reduce height gradually (no more than 30% total mass removed).
- Season 2: Repeat thinning. You should see more blooms along the sides, not just on top.
- Maintenance: After it’s shaped, do selective hand pruning once a year after flowering.
Maintenance after rejuvenation: keep it from getting overgrown again
Once you’ve done the hard work, the goal is to stay ahead of the plant—not fight it every few years.
- Annual touch-up (post-bloom): Remove a handful of older stems and any crossing branches.
- Mulch refresh: Top up to maintain 2–3 inches, keeping it off the trunk.
- Water routine: Deep soak during dry spells rather than frequent light watering.
- Watch pH creep: If chlorosis shows up every year, test soil and irrigation water and correct the root cause.
Rejuvenating an overgrown gardenia is a seasonal project, not a single afternoon. But if you prune with restraint, keep roots evenly moist, and get the soil on the acidic side of happy, you’ll be rewarded with the kind of glossy foliage and bloom fragrance that made you plant it in the first place. And the best part? After the reset, keeping a gardenia in shape becomes a quick yearly habit instead of a major rescue mission.
Sources: North Carolina State University Extension (2023); University of Florida IFAS Extension (2020).