Trichoderma Protection for Hostas Roots
You plant a gorgeous new hosta, keep it watered, and it looks fine for a few weeks. Then, right when summer heat hits, the leaves get smaller, the plant “sits there,” and when you finally tug it up, the roots are short, brown, and smell off. The surprise for many gardeners: the problem often starts underground long before you see it up top. And one of the most useful tools we have for shifting the odds back in the plant’s favor is a beneficial fungus called Trichoderma.
I’m not talking about miracle dust. I’m talking about a well-studied group of fungi that colonize roots, compete with disease organisms, and help plants build a stronger root system. Used correctly—paired with sane watering and decent soil—Trichoderma can be a practical layer of protection for hostas that struggle with root rots, transplant shock, or recurring decline in soggy shade beds.
“Certain strains of Trichoderma act as root colonizers and biological control agents by outcompeting and inhibiting root pathogens, while also stimulating plant defenses.” — Cornell University IPM Program (2023)
Below is how I use Trichoderma in real home gardens: what it can (and can’t) do, how to apply it so it actually takes hold, and how to troubleshoot the common hosta root problems that send gardeners back to the garden center every spring.
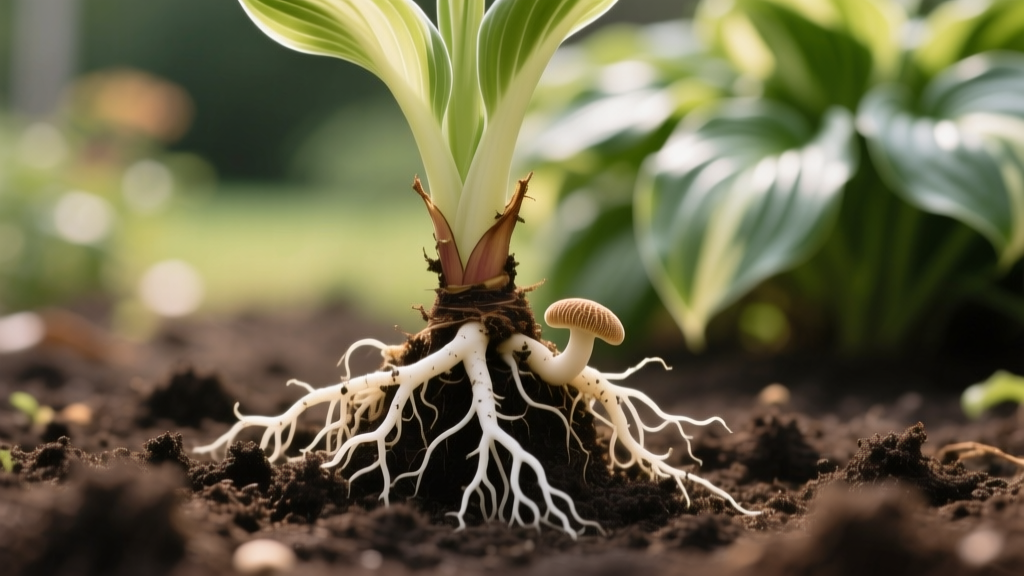
What Trichoderma is really doing for hosta roots
Trichoderma is a genus of beneficial fungi found naturally in many soils. The strains sold for gardening are selected because they:
- Colonize the root surface and the surrounding soil zone (the rhizosphere), taking up space and resources that pathogens would otherwise use.
- Compete and antagonize pathogens (especially certain fungi and oomycetes associated with root rots), through enzymes and other mechanisms.
- Support stronger root growth and improved nutrient uptake in many plants, which matters when hostas are stressed.
It’s important to keep expectations realistic. Trichoderma is not a cure for a hosta that’s already mushy at the crown, and it won’t fix a bed that stays waterlogged for days. Think of it as a protective ally that works best when you also correct drainage, watering habits, and planting depth.
For background reading, the Cornell University IPM Program discusses biological controls and how organisms like Trichoderma suppress certain soilborne pathogens (Cornell University IPM Program, 2023). Washington State University Extension also emphasizes that biological products are most effective when integrated with sound cultural practices like drainage and sanitation (WSU Extension, 2022).
Three real-world hosta situations where Trichoderma earns its keep
Scenario 1: The “soggy shade” bed that never quite dries
This is the classic hosta problem spot: downspout splash, heavy clay, deep shade, and thick mulch. Hostas tolerate moisture, but they hate “wet feet.” If the soil stays saturated, oxygen drops and roots fail—then opportunistic pathogens move in. Trichoderma can help protect new roots, but you still have to address the waterlogging.
Scenario 2: Dividing and replanting mature clumps
Division is a wound. Fresh cuts and disturbed roots are more vulnerable for 2–4 weeks. This is a perfect time to inoculate the root zone so beneficials occupy the space first.
Scenario 3: Container hostas that crash in midsummer
Pots swing between too wet and too dry. Once roots are stressed, rot organisms can take advantage—especially if the potting mix is old and compacted. A fresh mix plus Trichoderma at planting can reduce setbacks, but consistent watering is still the main game.
Watering: the fastest way to help (or hurt) Trichoderma protection
Trichoderma needs a living root zone—moderately moist, oxygenated, and not blasted by extremes. Here’s what works for hostas:
Target moisture: “evenly moist,” not “constantly wet”
- New plantings: Water deeply every 2–3 days for the first 2 weeks if there’s no rain, then transition to weekly.
- Established hostas: Aim for about 1 inch of water per week from rain + irrigation. In hot spells above 85°F, many gardens need a supplemental soak.
- Best method: Soaker hose or drip at the soil line. Keep foliage dry when you can—less stress, fewer leaf diseases.
Simple “dig test” timing
Don’t guess from the surface. Dig down 4 inches near (not through) the root zone:
- If it’s cool and slightly moist, you’re good.
- If it’s wet and sticky, skip watering and address drainage.
- If it’s dry and dusty, water slowly until the soil is moistened to 6–8 inches deep.
Why this matters for Trichoderma: if the root zone is waterlogged for long periods, the roots suffocate and beneficial colonization stalls. If it’s bone dry, fungi and roots both go dormant.
Soil and drainage: where Trichoderma succeeds or fails
Hostas thrive in a soil that holds moisture but drains. That’s the sweet spot where beneficial fungi can persist and where roots can actually breathe.
Ideal texture and organic matter strategy
- Clay soil: Incorporate 2–3 inches of compost into the top 8–10 inches of soil before planting. Avoid adding sand to clay (it can make a concrete-like mix).
- Sandy soil: Compost still helps—same 2 inches into the top 8 inches, plus a light mulch to reduce drying.
- Mulch depth: Keep mulch at 1–2 inches and pull it back an inch from the crown to avoid constant dampness right where rot starts.
Drainage test you can do in 10 minutes (plus waiting)
- Dig a hole 12 inches deep and wide.
- Fill with water. Let it drain completely.
- Fill again and time how long it takes to drain.
If the second fill takes more than 4 hours to drain, you’re in the danger zone for root problems in many shade perennials. Improve with raised planting, redirected downspouts, or reworking the bed structure before leaning on any biological product.
Light: getting enough energy to support new roots
Hostas can live in deep shade, but they root better and recover faster with some light—especially morning sun.
- Best light for most hostas: Bright shade or 2–4 hours of morning sun.
- Too dark: Thin, stretched leaf stems; slow growth; weak root recovery after division.
- Too much sun: Scorched leaf edges, faded color, and higher water demand—stress that can undermine root health.
Practical note: if you’re trying to rescue a declining hosta, moving it from dense dry shade (under thirsty tree roots) to a brighter spot with consistent moisture can make more difference than any additive.
Feeding: supporting roots without pushing weak, sappy growth
Trichoderma is not fertilizer. It helps roots function; you still need sensible nutrition.
A grounded feeding plan
- Spring: When shoots are 2–4 inches tall, top-dress with 1 inch of compost, or apply a slow-release fertilizer (for example, an even blend like 10-10-10) at label rate.
- Mid-summer: If plants are pale or small, use a light feeding (half-rate) and water in well. Avoid heavy nitrogen late in the season.
- Stop timing: Avoid pushing growth after about 6–8 weeks before your average first frost.
Excess fertilizer can backfire in shady, wet beds by creating lush top growth on a weak root system. That imbalance makes the plant more likely to flop, scorch, or collapse under stress.
How to apply Trichoderma for hostas (and actually get results)
Different products contain different strains and concentrations. Always follow the label first. The goal is simple: get the organism into direct contact with the roots and keep conditions friendly for colonization.
Best times to inoculate
- At planting (new hostas or bare-root pieces)
- At division (right after cutting and before replanting)
- Early spring as shoots emerge, when soil is warming but still moist
Step-by-step: planting with Trichoderma
- Prep the hole so the crown will sit at soil level (not buried). A crown buried even 1 inch too deep stays wetter and is more rot-prone.
- Moisten the root ball if it’s dry. Damp roots accept inoculants better than dusty roots.
- Apply the product as directed—commonly as a root dip, a sprinkle in the planting hole, or a drench.
- Backfill and water in slowly to settle soil around roots (not a hard blast that leaves air pockets).
- Mulch lightly (1–2 inches) and keep mulch off the crown.
Compatibility: what can wipe out your beneficials
- Broad-spectrum fungicides applied as drenches can reduce beneficial fungi along with pathogens. If you must use a fungicide, check the label and consider timing it so you’re not immediately undoing your biological inoculation.
- Chlorinated water at typical municipal levels is usually fine for garden drenches, but extremely hot water or concentrated disinfectants are not.
- Bone-dry soil for extended periods reduces colonization—water management matters.
Comparison: Trichoderma vs. “just improve culture” vs. fungicide drench
In the real garden, these aren’t always either/or. But it helps to see what each approach is best at.
| Approach | Best use | What you’ll notice | Typical timing | Tradeoffs / risks |
|---|---|---|---|---|
| Trichoderma inoculation | Prevention; post-division support; transplant stress | Steadier growth; better root regrowth over 2–6 weeks | At planting or early spring when soil is 50–75°F (common activity range for many beneficials) | Needs decent drainage; can be set back by fungicide drenches |
| Cultural fixes only (drainage + watering + planting depth) | Foundational correction for chronic decline | Biggest long-term improvement; fewer repeat losses next year | Any time, best in spring/fall when you can dig | May require regrading, raised beds, or moving plants |
| Fungicide drench (targeted products) | Active disease pressure in high-value plants; when diagnosis supports it | Can slow spread if applied early; not a rebuild tool for dead roots | At first clear symptoms; often repeated every 7–14 days per label | May harm beneficial biology; must match pathogen; label restrictions |
Practical takeaway: If your bed drains poorly, start there. If you’re dividing, planting, or replanting into improved soil, Trichoderma is an excellent add-on. If a plant is actively rotting, you need to correct conditions and decide whether the plant is salvageable—no biological product revives mush.
Common hosta root problems (and how Trichoderma fits into the fix)
Hosta troubles often look similar above ground: yellowing, stunting, wilting. The clues are underground and at the crown.
Troubleshooting: symptoms, likely causes, and what to do
1) Leaves yellowing, limp by afternoon; soil feels wet
- Likely cause: Oxygen-starved roots, early root rot, or a crown sitting too low.
- What to do (this week):
- Stop watering for a few days and do the 4-inch dig test.
- Pull mulch away from the crown.
- If the hosta is newly planted, gently lift and reset so the crown is at grade.
- Where Trichoderma helps: After you correct the wet conditions, apply as a drench to the root zone to encourage beneficial recolonization.
2) Plant stalls after division; new leaves are small; roots look cut and slow to regrow
- Likely cause: Normal transplant shock compounded by dry pockets or too much sun.
- What to do:
- Water deeply every 2–3 days for the first 14 days, then taper.
- Provide temporary shade cloth for 7–10 days if the site gets hot afternoon sun.
- Skip heavy fertilizer for 3–4 weeks so the plant focuses on roots.
- Where Trichoderma helps: Root dips or planting-hole application right at division are ideal.
3) Crown feels soft; base is brown/black; foul smell
- Likely cause: Advanced crown/root rot.
- What to do:
- Dig the plant and rinse soil off the crown.
- Cut away all soft tissue with a clean knife until you reach firm, pale tissue.
- Let the cleaned division air-dry in shade for 1–2 hours to callus slightly.
- Replant in a better-drained spot or raised mound; do not over-mulch.
- Where Trichoderma helps: Only after you remove rot and replant into corrected conditions; it’s supportive, not a rescue for mushy crowns.
4) Healthy roots, but plant is wilted and chewed; slime trails present
- Likely cause: Slugs/snails are stressing the plant, reducing photosynthesis and root support.
- What to do: Use iron phosphate bait as directed, set traps, and reduce thick, wet mulch layers. Hand pick at dusk for 5 minutes nightly for a week—old-school but effective.
- Where Trichoderma helps: Indirectly. Less leaf damage means more energy to build roots, but you still must manage pests.
Three “case fixes” from typical home gardens
Case A: Hostas by a downspout that keep shrinking each year
The fix wasn’t more water—it was less. Redirect the downspout, build a shallow raised berm 4–6 inches high, and replant hostas slightly proud of grade. Once drainage improved, a spring Trichoderma drench helped new feeder roots establish without that annual rot cycle.
Case B: Newly purchased hostas that look fine, then collapse in the first heat wave
This often comes from pot-bound roots and inconsistent watering after planting. Tease or slice circling roots, water to 6–8 inches deep, and mulch lightly. Inoculating at planting helps because nursery media and garden soil are very different environments—beneficials can help the roots transition faster.
Case C: A prized blue hosta in a container that always looks “tired” by July
Old potting mix collapses and holds water strangely—wet at the bottom, dry at the top. Repot every 2–3 years, use a quality mix, and ensure the pot drains freely. Apply Trichoderma at repotting, then water when the top 1 inch is dry (don’t wait until the plant wilts). The plant usually responds with sturdier leaves and more consistent growth.
Practical tips to make Trichoderma work better in your garden
- Use it where it matters: planting time, division time, and after you’ve corrected drainage issues.
- Store it right: Many biological products lose potency if stored hot. Keep them cool and dry, and don’t use expired material.
- Don’t smother the crown: Mulch is great—just keep it 1–2 inches and off the plant’s base.
- Be patient: You’re encouraging a living relationship at the roots. Expect subtle improvement first (less wilting, steadier growth), then stronger clumps over the season.
Common problems people blame on “root rot” (but aren’t)
Before you treat everything like a fungus problem, check these:
- Drought stress under trees: The soil can look shady and cool but be dry at 4–6 inches deep. Dig to check.
- Planting too deep: A crown buried even slightly stays wet and struggles.
- Vole damage: Roots look chewed off cleanly. You may see tunnels. Trichoderma won’t fix missing roots—protect the plant physically.
- Herbicide drift: Twisted or cupped leaves with otherwise normal roots can point to chemical injury.
Sources and further reading
Two solid references that align with what we see in gardens:
- Cornell University Integrated Pest Management Program. Biological control concepts and soilborne disease management context (2023).
- Washington State University Extension. Guidance on integrating biological products with cultural controls for plant disease prevention (WSU Extension, 2022).
If you remember one thing: Trichoderma is most useful when you treat it like you’d treat compost or mulch—part of a system, not a stand-alone fix. Give hostas a root zone that drains in hours (not days), water deeply but not constantly, keep the crown dry-ish, and inoculate at the moments roots are trying to establish. That’s how you get hostas that bulk up year after year instead of fading out one soggy summer at a time.