Wicking Bed Setup for Succulents
The first time I saw a “self-watering” wicking bed stuffed with succulents, it looked like a miracle—lush rosettes, clean gravel top-dressing, not a shriveled leaf in sight. Two months later, the same bed smelled swampy, and the plants were melting from the base up. The surprise for many gardeners is that wicking beds don’t fail because they don’t hold water; they fail because they hold water too well for plants that hate wet feet.
Succulents can thrive in a wicking bed, but only if you design it like a cactus bench, not like a lettuce trough. That means building in limits: a shallow or controlled reservoir, a gritty soil profile that interrupts capillary rise, and an overflow you can trust. I’ll walk you through a setup that works in real yards with real weather—plus the troubleshooting I’ve learned the hard way.
How wicking beds behave (and why succulents are picky)
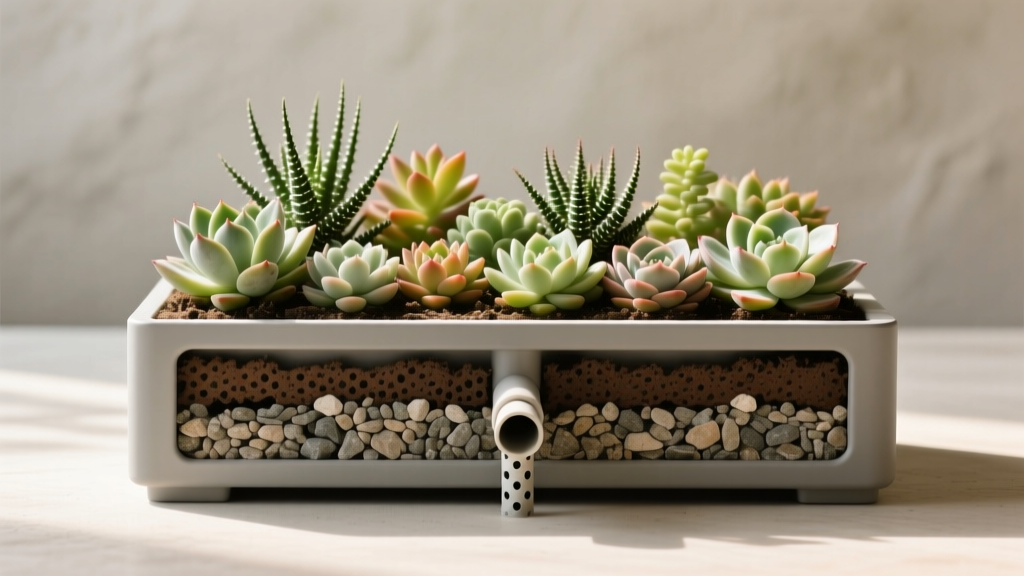
A wicking bed is basically a water reservoir at the bottom, a soil layer above it, and a barrier between the two (often geotextile). Water moves upward through capillary action. That’s great for thirsty vegetables, but succulents evolved to store water and then dry out fast. Constant moisture at the root zone encourages rot organisms and weak, stretched growth.
Here’s the key idea: succulents can handle a wicking reservoir as long as the upper root zone cycles dry. You achieve that by (1) limiting how high the “wet zone” can climb, (2) using a very mineral-heavy mix, and (3) managing fill timing rather than keeping the reservoir topped up.
“The most common cause of succulent loss is overwatering—especially repeated watering when the potting mix stays wet for extended periods.” — University of Maryland Extension (2023)
Design specs that actually work for succulents
Recommended dimensions (use these numbers)
If you’re building from scratch, start with proportions that keep the saturated layer away from the crown and main feeder roots.
- Bed depth: 12–18 inches (30–45 cm) total is plenty for most succulents.
- Reservoir depth: 2–4 inches (5–10 cm). Avoid the common 6–8 inch reservoirs used for vegetables.
- Soil layer above reservoir: at least 8–12 inches (20–30 cm).
- Overflow height: set exactly at reservoir depth (e.g., 3 inches / 7.5 cm from the bottom).
- Air gap (optional but helpful): 0.5–1 inch (1–2.5 cm) between reservoir media and soil (created with coarse scoria plus a firm geotextile).
These aren’t arbitrary. A shallow reservoir reduces the height of the permanently wet zone. Combined with a gritty mix, you get moisture availability without the bog effect.
Materials list (simple, durable choices)
- Container/bed: food-safe plastic trough, lined timber box, or raised bed with pond liner
- Reservoir media: washed scoria (lava rock) 10–20 mm, or coarse gravel (avoid limestone if you grow sensitive plants)
- Geotextile fabric (not plastic sheet): allows water movement but slows fine migration
- Overflow fitting: 19 mm (3/4 inch) bulkhead or uniseal
- Fill pipe (optional): 40–50 mm (1.5–2 inch) PVC with slotted bottom
- Top dressing: 5–10 mm pumice, granite grit, or coarse sand (not fine play sand)
Step-by-step build (succulent-friendly wicking bed)
If you want a reliable setup, don’t improvise the overflow. A wicking bed without a correct overflow is just a bathtub.
- Install the liner and ensure corners are smooth (no puncture points).
- Fit the overflow at 2–4 inches (5–10 cm) from the base. Test by filling with a hose and confirm it drains freely.
- Add reservoir media (scoria/gravel) to overflow height. Level it.
- Insert fill pipe to the bottom corner; slot the bottom 6 inches (15 cm) so water exits into the reservoir.
- Lay geotextile over the reservoir media. Run it up the sides slightly to reduce soil washing down.
- Add a “wicking bridge” (optional): push 2–3 small columns of soil down through the fabric into the reservoir media. For succulents, keep these narrow (2 inches / 5 cm wide) so wicking is present but not aggressive.
- Fill with your gritty soil mix (details below) to within 1–2 inches (2.5–5 cm) of the top.
- Top dress with 1/2 inch (1–1.5 cm) of mineral grit to keep leaves off damp soil and reduce algae/fungus gnats.
Soil: the make-or-break layer
Succulents in wicking beds need a soil that drains fast, resists compaction, and doesn’t wick too aggressively. Standard raised-bed mixes (compost-heavy) stay wet too long and slump over time.
A proven succulent mix for wicking beds
I aim for a mix that’s roughly 70–85% mineral by volume.
- 40% pumice (3–6 mm) or scoria fines
- 30% coarse perlite or expanded shale
- 20% screened pine bark fines (3–8 mm) or coco coir chips
- 10% compost (well-finished) or worm castings
If you only change one thing, reduce compost. Compost is great, but in a wicking system it can stay wet and oxygen-poor. The mineral fraction keeps air moving through the root zone.
Target pH and salinity notes
Most succulents tolerate a pH around 6.0–7.5. If you’re using limestone gravel, pH can creep higher. Also, wicking systems can concentrate salts because water evaporates upward and leaves minerals behind. This is why occasional top-watering flushes matter (more on that below).
For background on succulent substrate preferences, Iowa State University Extension notes that cacti and succulents perform best in fast-draining media and suffer when mixes stay wet (Iowa State University Extension, 2022).
Watering: treat the reservoir like a tool, not a lifeline
The biggest mental shift: you don’t keep a succulent wicking bed “always full.” You use the reservoir to stretch time between waterings, then allow dry-down.
Filling schedule (realistic timing)
- Summer (75–95°F / 24–35°C): fill the reservoir, then wait until the top 2 inches (5 cm) are fully dry for at least 5–7 days before refilling.
- Spring/Fall (55–75°F / 13–24°C): refill every 14–21 days, depending on sun and wind.
- Winter (below 55°F / 13°C): keep the reservoir mostly empty; water lightly from the top only every 3–6 weeks if plants show thirst.
These intervals assume an outdoor bed with good light. If your bed is shaded or temperatures are cool, extend the time. If you’re in a hot, windy microclimate, shorten it—but still allow a genuine dry phase.
How much water to add
As a working number: a 2 ft x 4 ft bed (60 x 120 cm) with a 3 inch (7.5 cm) reservoir holds roughly 7–10 gallons (26–38 L) depending on reservoir media void space. Don’t obsess over precision—watch plant response and soil dryness. But do measure once so you know what “full” means.
Top-watering flushes (salt management)
Every 6–8 weeks in the growing season, I top-water enough to produce runoff from the overflow for 30–60 seconds. This helps push accumulated salts down and out. It’s a simple habit that prevents the “mysterious crust” and stalled growth you sometimes see in self-watering setups.
Light: wicking beds don’t fix shade problems
A succulent in perfect soil can still fail in low light—stretching, pale growth, and weak roots that rot more easily. Most popular rosette succulents (Echeveria, Graptopetalum, many Sedum) want strong sun.
- Full-sun types: aim for 6–8 hours of direct sun.
- Bright shade types (Haworthia, Gasteria): 2–4 hours morning sun or bright filtered light all day.
- Heatwave adjustment: above 100°F (38°C), light afternoon shade can prevent scorch, especially for pale varieties.
If your bed is against a reflective wall or on concrete, it may run hotter and dry faster. That can be good—up to a point. Scorched leaf tips are a clue you need a bit of shade cloth (30–40%) during extreme weeks.
Feeding: less than you think, and timed carefully
Succulents don’t want heavy feeding, and in wicking beds nutrients can linger. Too much fertilizer gives you fast, watery growth that’s more rot-prone and pest-prone.
A practical feeding plan
- Spring: one light feeding when nights stay above 50°F (10°C)
- Mid-summer: optional second feeding for actively growing types (not for dormant winter growers)
- Fall/Winter: stop feeding
Use a balanced liquid fertilizer at 1/4 strength (for example, if the label says 1 tsp/gal, use 1/4 tsp/gal), applied as a top-water. Or use a controlled-release fertilizer sparingly—about 1/2 tablespoon per square foot (7–8 g per 0.1 m²) in spring.
Overfeeding symptoms look like: sudden puffiness, leaves splitting, weak stems, and increased aphids/mealybugs.
Comparison: wicking bed vs standard raised bed vs pots (with actual trade-offs)
| Setup | Typical watering frequency (summer) | Root-zone moisture stability | Rot risk (succulents) | Best use case |
|---|---|---|---|---|
| Succulent-tuned wicking bed (2–4 in reservoir) | Every 10–21 days (plus periodic dry-down) | Moderate (buffered, not soggy if built right) | Medium (low if mix is 70–85% mineral and reservoir is allowed to empty) | Outdoor displays, hot climates, gardeners who travel 1–2 weeks |
| Standard raised bed (no reservoir) | Every 3–7 days in heat (depends on soil) | Low to moderate (swings fast) | Low (if soil is gritty and you control irrigation) | Large plantings, rain-exposed beds, easy reworking |
| Clay/terracotta pots | Every 4–10 days (small pots dry fastest) | Low (dries quickly) | Low to medium (depends on potting mix and saucers) | Collections, fine control, areas with heavy rain |
The data ranges reflect what I see in real gardens with 6–8 hours sun and temps around 80–95°F (27–35°C). The big win for wicking beds is vacation-proofing; the big danger is forgetting that “self-watering” can become “never-drying.”
Common problems (with symptoms you can actually diagnose)
Problem 1: Base rot and “melting” leaves
Symptoms: leaves turn translucent, mushy at the base; stem darkens; plant collapses even though soil isn’t bone-dry.
Likely causes:
- Reservoir too deep (6–8 inches is a common culprit)
- Soil too organic (compost-heavy mix)
- Reservoir kept constantly full in cool weather
- Poor overflow (water level rises above intended height)
Fix:
- Stop filling the reservoir immediately; let the bed dry for 2–3 weeks.
- Check overflow for blockage and verify the water line sits at 2–4 inches (5–10 cm).
- Remove affected plants, cut to healthy tissue, let callus 3–7 days, then re-root in dry gritty mix.
- Amend the bed by mixing in additional pumice/perlite (aim for 70–85% mineral). If the whole bed is composty, it’s worth rebuilding the top 8–12 inches.
Problem 2: Wrinkled leaves even though the reservoir has water
Symptoms: leaves wrinkle or fold; plant looks thirsty; reservoir is not empty.
Likely causes:
- Hydrophobic dry pockets in the soil layer
- Roots damaged from earlier overwatering (can’t uptake water)
- Wicking is weak because the soil is too coarse with no “bridge” zones
Fix:
- Top-water slowly in two passes, 10 minutes apart, until you see steady overflow for 30 seconds.
- For stubborn dry pockets, use a wetting approach: add a small amount of water with a watering can directly around the root zone every 2–3 days for one week, then return to normal.
- If the bed is extremely mineral and refuses to wick, add 2–3 narrow soil columns (“wicking bridges”) down to the fabric in a few spots.
Problem 3: Algae, fungus gnats, or a sour smell
Symptoms: green film on soil, gnats when disturbed, musty odor near fill pipe.
Likely causes: surface stays damp, too much organic matter, not enough airflow, shade.
Fix:
- Add 1/2 inch (1–1.5 cm) mineral top dressing and remove any exposed compost.
- Let the reservoir empty completely before refilling.
- Increase sun and airflow if possible; prune nearby plants that block breezes.
Problem 4: Leggy, stretched growth
Symptoms: rosettes open up, stems elongate, color fades.
Likely causes: insufficient direct sun; too much nitrogen; too warm and shaded.
Fix:
- Move the bed (or plants) to 6+ hours sun, or use reflective surfaces to boost light.
- Stop feeding for 8 weeks; resume at 1/4 strength only in active growth.
- Behead and re-root stretched rosettes if needed.
Three real-world scenarios (and what I’d do)
Scenario 1: You travel for 10–14 days in summer
This is where a succulent wicking bed shines—if it’s built right. A shallow 3 inch (7.5 cm) reservoir plus gritty mix can keep plants stable through a hot week without daily watering.
My routine:
- 2 days before leaving, top-water to flush salts and ensure even moisture.
- The day you leave, fill the reservoir to overflow.
- On return, do not refill immediately—check the top 2 inches (5 cm). If dry, wait another 3–5 days before refilling to re-establish a dry cycle.
Scenario 2: You live where summer storms dump heavy rain
Rain is the sneaky enemy of succulent wicking beds. A bed can start “perfect,” then a week of thunderstorms keeps everything wet and oxygen-starved.
My routine:
- Make sure the overflow is large enough (19 mm / 3/4 inch is a good baseline) and never clogged.
- Angle the bed slightly (a subtle slope helps surface shedding).
- Use a temporary rain cover (clear polycarbonate sheet raised a few inches for airflow) during multi-day rain events.
- Choose tougher genera: Sedum, Sempervivum (in cold climates), Delosperma, and some Aloe handle outdoor swings better than many Echeveria.
Scenario 3: You want a patio showpiece with mixed succulents
Mixed plantings are doable, but group by water needs. Haworthia and Gasteria can stay slightly more evenly moist than Echeveria and many cacti.
My routine:
- Create zones: put thirstier succulents closer to wicking bridge points and drier plants farther away.
- Use top dressing everywhere to keep leaves clean and reduce rot at soil contact.
- Rotate or reposition if one side gets harsher afternoon sun (heat stress is often lopsided in beds near walls).
Plant choices that match a wicking setup
Not all succulents are equally forgiving in self-watering systems. Start with the ones that tolerate a bit more moisture, then expand once you’ve proven your rhythm.
- More forgiving: Sedum (many species), Graptopetalum, Crassula ovata (jade), Aloe (many), Delosperma
- Moderate: Echeveria (needs strong sun and very gritty mix), Kalanchoe (watch winter moisture)
- Fussy in wicking beds: many globular cacti and rare mesembs (Lithops, Conophytum) unless you are extremely careful with reservoir use
For rot-sensitive plants, I often plant them in slightly raised mounds within the bed—just 1–2 inches (2.5–5 cm) higher than the surrounding grade. That small lift keeps crowns drier after rain and reduces the chance of moisture lingering at the stem.
Quick troubleshooting checklist (when something looks “off”)
If you only remember one diagnostic habit, make it this: check the wet line. Stick a finger or a small trowel down 3–4 inches (7–10 cm). If it’s cool and wet for days on end in mild weather, your system is too wet for succulents.
- Soft, translucent leaves: stop reservoir fills; increase mineral content; verify overflow height.
- Wrinkles + dry top soil: top-water in slow passes; fix hydrophobic spots; add limited wicking bridges.
- White crust on surface: flush every 6–8 weeks; reduce fertilizer; consider rainwater if your tap water is hard.
- Blackened stem base: unpot/remove and cut back to healthy tissue; re-root; rebuild wet mix.
- Leggy growth: add 2–4 more hours of sun; reduce nitrogen; prune and re-root.
One last note: “self-watering” doesn’t mean “no attention.” It means you’re shifting effort from daily watering to smart setup and occasional checks. When you get the balance right—shallow reservoir, gritty soil, strong light—you’ll have a bed that stays steady through heat, doesn’t punish you for missing a day, and keeps your succulents looking like they belong in a dryland garden instead of a bog.
Sources: University of Maryland Extension (2023); Iowa State University Extension (2022).