Fall Garden: Building a Leaf Mold Bay for Spring Mulch
The clock is running on fall leaf drop. If you wait until “later,” your best leaf mold ingredients will be packed into municipal bags, matted into wet layers, or frozen into place. The opportunity right now: capture clean leaves, contain them, and start decomposition while temperatures still hover above 40°F—warm enough for fungi and microbes to get established before winter slows everything down.
Leaf mold is not compost. It’s a fungal-led breakdown of leaves into a dark, crumbly mulch that excels at moisture retention, soil structure, and weed suppression. Built this fall, a leaf mold bay gives you a reliable pile of spring-ready mulch—especially valuable when spring is too wet to haul materials or too busy for big projects.
Use the priorities below as a working plan for the next 2–8 weeks, adjusted to your first frost date and USDA zone.
Priority 1: What to prepare now (this week) — build your leaf mold bay before the next big leaf drop
Timing triggers to use immediately
- Build the bay when nightly lows consistently hit 45–50°F and leaves begin dropping in volume. That typically lands 2–6 weeks before your average first frost.
- In many regions: aim for Sept 15–Oct 31. In colder zones (USDA 3–5): earlier (late Sept). In warmer zones (USDA 8–10): later (Nov–Dec).
- If your average first frost is Oct 10 (common in parts of zones 4–5), build by Sept 15–25. If your frost is Nov 15 (many zone 7 areas), build by Oct 15–31.
Pick a site that stays damp but not flooded
Leaf mold relies on steady moisture and airflow. Choose a spot with partial shade (north side of a shed works), close to your leaf source, and reachable with a wheelbarrow. Avoid low spots that pond water; waterlogged piles go anaerobic and turn sour.
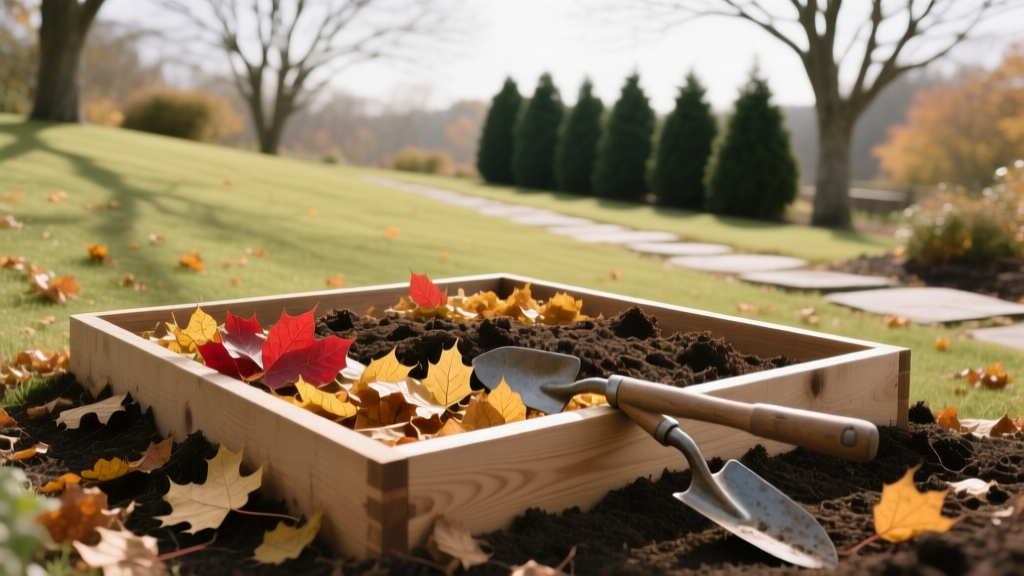
Choose a bay design that matches your yard and workload
Any container that holds leaves while letting air and rain in will work. Your goal is to confine the pile so it doesn’t blow away and to keep it easy to top up.
| Bay style | Best for | Approx. capacity | Build time | Notes |
|---|---|---|---|---|
| Wire cylinder (hardware cloth) | Fast setup, small yards | 3–6 cu yd depending on diameter | 20–40 min | Use 36–48" tall mesh; stake it to resist snow load. |
| Pallet bay (3-sided or 4-sided) | Suburban yards, steady leaf supply | 6–12 cu yd | 1–2 hrs | Zip ties or screws; leave a front panel removable for access. |
| 3-bin system (side-by-side) | High volume, organized workflow | 9–18 cu yd total | Half-day | One bin for fresh leaves, one “cooking,” one finished. |
| Leaf sacks / geotextile bags | Rental properties, tight spaces | 1–2 cu yd per bag | 5–10 min | Poke drainage holes; keep from drying out in wind. |
Recommended dimensions (simple and effective)
- Minimum working size: 3 ft x 3 ft x 3 ft (about 1 cubic yard). Smaller piles dry out too easily.
- Ideal home-garden size: 4 ft x 4 ft x 4 ft per bay if you have leaves.
- Wire cylinder quick build: 4 ft diameter x 4 ft tall cylinder = big volume with good airflow.
Build checklist (60 minutes or less)
- Hardware cloth or welded wire (36–48" height) OR 3–4 pallets
- 4–6 stakes (rebar, T-posts, or wooden stakes)
- Zip ties or fencing staples
- Garden hose with spray nozzle
- Optional: tarp or old carpet to cover in heavy rain/wind
- Optional: shredder, mower, or string trimmer (for shredding leaves)
Start the pile right: shred + moisten + layer (but keep it simple)
If you do one thing for faster leaf mold, do this: shred the leaves. Chopped leaves break down significantly faster than whole leaves because you increase surface area and reduce matting. Many university extension resources recommend shredding leaves for faster decomposition and easier management (e.g., University of Illinois Extension, 2019).
- Shred: Run a mower over dry leaves on the lawn, or use a leaf shredder.
- Moisten: Leaves should feel like a wrung-out sponge—damp, not dripping.
- Layer lightly: Add leaves in 6–12" lifts, wetting as you go.
- Add a “starter” (optional): A few shovels of finished compost or garden soil inoculates fungi and helps hold moisture, but it’s not required.
“Leaves that are shredded and kept moist break down much more quickly than whole, dry leaves; moisture is key to microbial activity.” — University of Illinois Extension (2019)
Temperature and moisture targets that actually matter
Leaf mold doesn’t need compost-heap heat. You’re aiming for consistent moisture and oxygen. Expect slowdowns when daily highs fall below 40°F and the pile freezes. That’s normal. The work you do now sets up a restart when spring temperatures return to 45–55°F.
Priority 2: What to protect — keep leaves (and your garden) from winter problems while the bay works
Stop pests from overwintering in your leaf stash
Leaf piles can shelter rodents and provide a winter hideout for pests. You can still make leaf mold without inviting trouble—focus on placement and sanitation.
- Keep the bay 15–25 ft from structures if rodents are an issue.
- Avoid adding diseased leaves from problem trees (apple scab, tar spot). Municipalities often remove leaves for a reason.
- Don’t add walnut leaves in large amounts to garden-bound leaf mold due to juglone concerns; small amounts are typically fine when well-aged, but don’t make it your main ingredient.
Prevent leaf matting and anaerobic stink
Oak leaves and thick, waxy leaves can mat. A matted pile sheds water and decomposition stalls.
- Shred thick leaves (oak, sycamore, magnolia) before they go in.
- Mix leaf types when possible; blend dry, papery leaves with tougher ones.
- If the bay smells sour, pull the pile apart with a fork and rebuild with more air space; add dry shredded leaves to rebalance moisture.
Protect perennials while you gather leaves
Fall cleanup can accidentally expose crowns and shallow roots. Use your leaf supply strategically: some goes into the bay, and some becomes immediate winter protection.
- After hard frost (around 28°F), mulch tender perennials with 2–4" of chopped leaves held in place with evergreen boughs or a light layer of straw.
- Keep mulch 2–3" away from crowns of peonies, bearded iris, and plants prone to rot.
- For garlic beds, plan on 4–6" of straw or chopped leaves after the ground cools (often late Nov in zones 6–7, earlier in zones 4–5).
Seasonal pest and disease prevention you should not skip
Fall is when many pathogens and insects settle in for winter. The choices you make now affect next year’s disease pressure.
- Remove diseased vegetable debris (tomatoes with blight, cucurbits with powdery mildew). Don’t add these to leaf mold bays unless you hot-compost separately.
- Rake fruit tree leaves if you had scab or fungal issues; dispose or hot-compost away from susceptible trees. Many extension services recommend sanitation to reduce overwintering inoculum (Cornell Cooperative Extension, 2020).
- Clean up fallen fruit to reduce codling moth and other pest carryover.
Priority 3: What to plant — quick wins that fit alongside leaf collection
Cool-season vegetables (plant now or within the next 2–3 weeks)
Leaf mold work pairs well with fall planting because you’re already outside every weekend. Use your first frost date as the anchor.
- Garlic: Plant 2–4 weeks before the ground freezes. In zones 4–6, that’s often mid-Oct to early Nov. Target soil temps around 50°F and falling.
- Spinach: Sow 6–8 weeks before first frost for fall harvest, or later for overwintering in mild climates (zones 7–8).
- Radishes: Sow 4–6 weeks before first frost; they’re fast and fill gaps.
- Cover crops: Cereal rye can be planted later than many covers—often up to 2–4 weeks after first frost in many regions, giving you a soil-protection option when beds empty out.
Bulbs and perennials (best planted before soil drops below 45°F)
If you’re building a bay, you’ll have shredded leaves available soon—perfect for mulching new plantings after the ground cools.
- Spring bulbs: Plant when soil temps are 50–60°F and trending down (often Sept–Nov depending on zone). Avoid early planting in warm soil, which can encourage rot.
- Perennials: Plant 4–6 weeks before hard freeze so roots establish. Water weekly until the ground cools.
Priority 4: What to prune — cut strategically, not aggressively
Hold off on most pruning until dormancy
In many climates, heavy pruning in early fall can stimulate tender growth that gets hit by frost. Use a light touch now.
- Do now: Remove dead, diseased, or broken branches any time.
- Wait until late winter (often Feb–Mar in zones 5–7): Major pruning of apples, pears, grapes, and many shrubs, unless your local guidance differs.
- Perennials: Cut back only those with disease issues or flopping stems you don’t want to overwinter; otherwise, leave seed heads for wildlife and cut in spring.
Pruning around leaf mold bays
If branches overhang the bay, prune lightly so you can add leaves easily and keep airflow. Don’t create big wounds on trees right before deep cold. Focus on access and safety.
Leaf mold timeline: what to do each month (and when you’ll get usable mulch)
| Month | What you do | What to expect inside the bay | Best use next season |
|---|---|---|---|
| September | Build bay; start first loads; shred and water | Leaves still fluffy; fungi begin colonizing | None yet—build volume |
| October | Fill aggressively; wet layers; add second bay if needed | Noticeable settling (up to 30–50%) | None yet—keep it moist |
| November | Top off after final leaf drop; cover lightly if windy | Decomposition slows as temps drop below 40°F | Potential for rough mulch in mild zones |
| December–February | Leave it alone; check moisture during thaws | Little activity when frozen; structure keeps leaves contained | None—patience phase |
| March | Turn or fluff if compacted; re-wet as needed | Fungal growth resumes around 45–55°F | Early bed mulch in zones 7–8 (partial) |
| April–May | Screen if you want fine texture; harvest dark lower layers first | Bottom becomes crumbly; top may still be leafier | Mulch for beds, paths; soil conditioner |
Many gardeners get usable, partially broken-down leaf mulch by spring, and fully finished leaf mold in 6–12 months, depending on shredding, moisture, and climate. Extension guidance commonly notes that shredded leaves decompose faster than whole leaves and that leaf mold is a slower process than hot composting (University of Illinois Extension, 2019).
Regional playbooks: three real-world scenarios (adjust your leaf mold plan to your climate)
Scenario 1: Cold winter, early freeze (USDA zones 3–5, Upper Midwest / Northern New England)
Your window is short, and freeze-up can come fast. If your first frost lands around Sept 20–Oct 10, prioritize speed.
- Build by mid-September if possible.
- Shred everything; whole leaves may still be intact next spring.
- Moisten heavily before freeze—a dry pile going into winter stays dry until spring rains penetrate.
- Expect spring leaf mold to be “half-finished”; use it as surface mulch around trees, shrubs, and paths, and let it finish in place.
Scenario 2: Wet fall and heavy clay soils (Pacific Northwest / parts of Northeast)
Your main enemy is saturation and compaction. If rain is steady and temperatures hover 45–55°F for weeks, decomposition can be good—if oxygen stays available.
- Use a wire cylinder or slatted pallet bay for maximum airflow.
- Do not tarp tightly; if you cover, leave sides open and use the cover only to prevent leaching during downpours.
- Mix in a small amount of coarse material (a few handfuls of wood chips per wheelbarrow) to prevent matting—especially with big maple leaves.
Scenario 3: Mild winter, long fall (USDA zones 7–9, Mid-Atlantic / South)
You can keep biology working much longer. Leaf mold may be surprisingly advanced by March if moisture is consistent.
- Build later: leaf drop can peak in November, sometimes into December.
- Watch drying winds: warm spells can desiccate piles; check moisture every 10–14 days.
- Plan to harvest in layers: the bottom may be ready for beds by March–April, while the top finishes by early summer.
Leaf mold bay management: the simple routine that keeps it moving
Weekly (during heavy leaf drop)
- Add leaves until the bay is full; expect settling and keep topping off.
- Water each new layer—especially if leaves are dry and crunchy.
- Kick the sides or poke with a garden fork if you see matting.
Monthly (late fall through early spring)
- Check moisture during dry spells: a hose trickle for 5–10 minutes can recharge a large bay.
- After windstorms, re-secure the bay and pull scattered leaves back in.
- In late winter thaws, poke a few air channels with a stake to help oxygen move.
Optional acceleration: when you want mulch by April
If you want the best chance of spring-ready mulch, use a two-stage approach:
- Stage 1 (Fall): Shred leaves, moisten well, pack the bay to full volume by late October (or late November in warm zones).
- Stage 2 (Early spring): Turn the pile once when temperatures consistently reach 45–55°F. Turning isn’t required for leaf mold, but it evens moisture and speeds breakdown.
What to do with the first finished leaf mold (and what not to do)
Best uses in spring
- Mulch for vegetable beds: Apply 1–2" after seedlings establish; keep 1" away from stems to reduce slug and rot issues.
- Mulch for perennials and shrubs: Apply 2–3" to stabilize moisture heading into summer.
- Soil conditioner: Mix 1–2" into the top few inches for lighter texture, especially in sandy soil.
- Potting blends (sparingly): Screened leaf mold can replace part of peat/coir for moisture retention; keep it a fraction of the mix and monitor drainage.
Common mistakes to avoid
- Using it too thick around crowns: A 4–6" wet layer against stems invites rot.
- Assuming all leaves are “clean”: If your trees had significant foliar disease, don’t bank on cold winter weather to solve it—use sanitation practices recommended by extension services (Cornell Cooperative Extension, 2020).
- Letting it dry out completely: A dry bay can stall for months. Moisture is the lever you control.
Right-now action plan: the next 21 days
Days 1–3: Set up and start
- Choose your bay location and build the frame.
- Collect the first round of leaves; shred if possible.
- Wet the pile thoroughly as you fill.
Days 4–10: Scale up as leaf drop accelerates
- Top off every 2–3 days during heavy drop.
- Keep a second holding area (even a loose pile) so you don’t lose leaves to rain or wind.
- Pull out any contaminated material (trash, seedheads of invasive weeds, diseased leaves).
Days 11–21: Lock in moisture before hard freezes
- Deep-water the bay before a forecasted cold snap below 28°F.
- If your area gets strong winter winds, add a loose cover (not airtight) to reduce drying.
- Label the bay with the start date so you know what’s oldest in spring.
If you build and fill your leaf mold bay before your first hard freeze and keep it moist through fall, you’ll have something priceless come spring: a homegrown mulch pile ready when beds are waking up and weeds are trying to get ahead of you. The work is mostly collection and containment—exactly the kind of fall task that pays you back when spring gets crowded.
Sources: University of Illinois Extension (2019), guidance on shredding leaves and moisture for faster breakdown; Cornell Cooperative Extension (2020), sanitation practices to reduce overwintering disease inoculum in orchards and home landscapes.