Spring Garden: Refreshing Mulch Without Smothering Plants
Spring moves fast: one warm week can wake perennials, push bulbs into bloom, and kick weeds into gear—while the soil is still cold enough to slow root growth. This is the window when fresh mulch pays off most: it suppresses early weeds, buffers temperature swings, and keeps spring rains from splashing soil-borne diseases onto new growth. But it’s also the easiest time to overdo it and bury crowns, rot stems, and create a slug hotel. The goal right now is simple: refresh what’s already there, keep mulch off plant bases, and time your work to soil temperature and frost risk—not the calendar alone.
Use this as your practical spring checklist and timing guide. Adjust the dates to your USDA hardiness zone and your local average last frost date (LFD). If you don’t know your LFD, look it up once and write it on your potting shed wall—you’ll use it every spring.
Priority #1: Refresh mulch the right way (without smothering)
When to start (temperature thresholds and timing)
Mulch too early and you keep soil cold and wet; mulch too late and weeds get a head start. Aim for one of these triggers:
- Soil temperature: begin when the top 2–3 inches of soil is consistently 50°F (10°C) for cool-season beds, and 55–60°F (13–16°C) for warm-season areas. A $10 soil thermometer is more reliable than guessing.
- Frost-date timing: refresh mulch 2–3 weeks before your average LFD for weed suppression, then do a second light touch-up 1–2 weeks after LFD if winter damage left bare spots.
- Rain timing: mulch after a soaking rain or after you irrigate deeply—mulch locks in that moisture.
How thick is “refresh” mulch in spring?
Most spring mulching should be a top-up, not a full replacement. Target these depths:
- Vegetable beds: 1–2 inches of clean straw or leaf mold around seedlings; keep it thinner early so soil warms.
- Perennial beds: 1–2 inches to refresh, building toward 2–3 inches total by late spring.
- Trees and shrubs: maintain 2–3 inches of wood chips in a wide ring (as wide as practical), but never piled against bark.
Extension guidance consistently warns against “mulch volcanoes” and overly deep mulch. Oregon State University Extension notes that mulch should be kept away from trunks to prevent disease and decay (OSU Extension, 2021). Similarly, Washington State University Extension advises keeping mulch several inches from tree trunks and avoiding deep piles that hold moisture against bark (WSU Extension, 2020).
“Keep mulch a few inches away from the trunks of trees and shrubs to prevent crown rot and rodent damage, and avoid the ‘mulch volcano’ effect.” — Extension guidance summarized from OSU Extension (2021) and WSU Extension (2020)
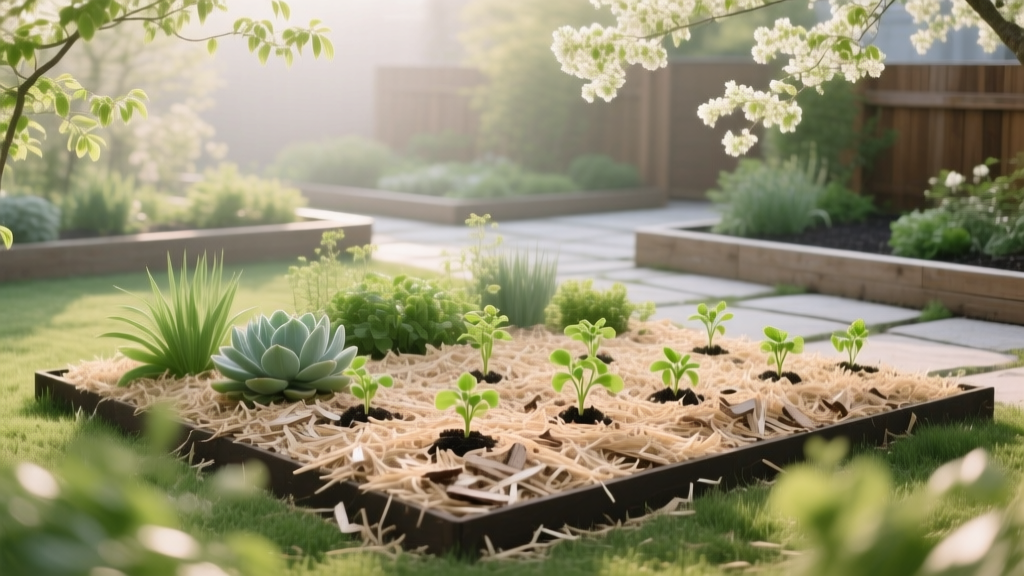
The “donut, not volcano” method (fast, safe, repeatable)
Use this pattern anywhere you mulch around living stems:
- Pull mulch back from plant crowns and stems first. You should see the crown flare on shrubs and the root flare on trees.
- Weed and scout the exposed soil for slugs, sowbugs, and emerging weed seedlings.
- Top-dress lightly (1–2 inches) and keep a 3–6 inch mulch-free ring around perennials and shrubs; for trees, keep a 6–12 inch mulch-free ring around the trunk.
- Feather the edge so mulch isn’t a steep berm that sheds water.
What to do with old mulch
If last year’s mulch is matted, sour-smelling, or moldy, don’t bury it under fresh material. Rake it aside, let it dry, and reuse it in paths or under established shrubs once it aerates. If it’s full of weed seeds or disease residue (common under roses, peonies, squash), remove it to compost hot—or discard.
Spring mulch material choices (quick comparisons)
| Mulch type | Best spring use | Watch-outs | Ideal depth (spring) |
|---|---|---|---|
| Arborist wood chips | Trees, shrubs, mixed borders | Keep off stems; may shelter slugs in wet climates | 2–3 inches |
| Shredded leaves / leaf mold | Perennials, woodland beds, pollinator gardens | Can mat if applied thick; fluff as needed | 1–2 inches |
| Clean straw | Vegetable rows, around transplants | Seed contamination if not clean; can harbor rodents | 1–2 inches |
| Compost (as top-dress) | Under mulch for fertility; planting beds | Not a weed barrier alone; don’t pile on crowns | 0.5–1 inch |
| Pine needles | Acid-loving beds, slopes, strawberries | Can drift in wind; may need edging | 1–2 inches |
Priority #2: What to plant right now (and how mulch affects it)
Cool-season sowing window (often 4–6 weeks before LFD)
As soon as soil can be worked and isn’t sticking in clumps, you can plant cool-season crops—usually 4–6 weeks before your average last frost date. If you mulch heavily, soil warms slower; use thinner mulch until seedlings are established.
- Direct sow: peas, spinach, lettuce, arugula, radishes, turnips.
- Plant sets/transplants: onions, shallots, early brassicas.
- Temperature cue: peas germinate well around 45–50°F soil; many greens prefer 50–65°F conditions.
Mulch tactic: keep rows bare until germination, then side-dress with 1 inch of straw or leaf mold. This prevents crusting and keeps spring rains from compacting the seedbed.
Warm-season timing (after LFD + soil warmth)
Warm-season crops suffer if planted into cold, wet soil—especially when mulch keeps it cooler. Use both frost date and soil temperature as your go/no-go:
- Wait until 1–2 weeks after LFD for tomatoes, peppers, basil, and cucumbers in most regions.
- Soil temperature targets: plant beans at 60°F; plant squash and cucumbers closer to 65°F for faster starts.
- Night temperature check: hold tender transplants until nights are reliably above 50°F.
Mulch tactic: delay mulching warm-season beds until plants are growing strongly. If you need weed suppression earlier, use black plastic or landscape fabric temporarily to warm soil, then switch to organic mulch once soil is warm.
Perennials and shrubs: plant first, mulch second
Spring is prime planting time for perennials and woody plants because roots establish before summer stress. Planting sequence matters:
- Plant and water in deeply.
- Top-dress with 0.5–1 inch compost, kept off crowns.
- Mulch to 2–3 inches, leaving the trunk/crown ring clear.
Priority #3: What to prune (and what not to touch yet)
Prune now: cleanup that helps mulch do its job
Mulch is most effective on tidy soil. Before you top up mulch, do a quick structural cleanup:
- Remove dead stems from perennials once you see new basal growth (often around 2–4 weeks before LFD in many zones).
- Cut back ornamental grasses before new blades are more than 2–3 inches tall.
- Prune summer-blooming shrubs (like panicle hydrangea) before leaf-out, as needed.
Hold off: spring-flowering shrubs and frost-prone plants
Don’t sacrifice blooms by pruning at the wrong time:
- Wait to prune spring bloomers (lilac, forsythia, azalea) until right after flowering.
- Delay hard pruning on borderline-hardy shrubs in USDA zones 5–6 until you see green buds break. Late cold snaps can turn fresh cuts into dieback.
Sanitation pruning to prevent disease spread
Early spring is when last year’s problems try to reboot. While you’re clearing beds:
- Remove and discard blackspot-infected rose leaves and any mummified fruit under trees.
- Cut out dead or cankered twigs 6–12 inches below visible damage, and disinfect pruners between cuts when disease is suspected.
Priority #4: What to protect (plants, soil, and beneficials)
Protect crowns and stems from mulch-related rot
The biggest spring mulching mistake is burying the growing point. These plants are especially sensitive to being covered:
- Strawberries: pull winter straw off crowns as soon as new growth appears, then tuck straw back between rows. Leave crowns exposed.
- Bearded iris: keep rhizomes partly exposed; mulch lightly around, not on top.
- Peonies: never bury eyes deeply; keep mulch thin around the crown to reduce botrytis risk.
Late frost protection timeline (use numbers, not hope)
Spring weather whiplash is normal. Plan protection around these benchmarks:
- 7–10 days before LFD: keep frost cloth, hoops, and anchors accessible.
- At forecast lows of 32°F (0°C): cover blooming fruit trees in containers, early tomatoes, and tender flowers.
- At forecast lows of 28°F (-2°C): double-cover tender crops or move containers into shelter; blossoms on peaches and apricots are especially vulnerable.
- After LFD + 14 days: reduce frost vigilance for most areas, but keep an eye on microclimates (low spots, open windy yards).
Mulch and frost: mulch moderates soil temperatures, but it won’t protect blossoms from a hard freeze. Use it to stabilize roots; use covers to protect tops.
Pest and disease prevention that pairs with spring mulching
Fresh mulch can either help or hurt pest pressure depending on how you use it. Handle these common spring issues proactively:
- Slugs/snails: in wet regions (Pacific Northwest, coastal Northeast), keep mulch thinner near seedlings, water in the morning, and create dry buffer rings around young plants. Hand-pick at dusk for a week after mulching.
- Rodents: deep mulch against trunks can invite voles. Maintain the clear ring and keep grass trimmed around beds.
- Damping-off in seedlings: avoid piling mulch against tender stems; ensure airflow and don’t overwater.
- Soil splash diseases: mulch reduces splash that spreads spores onto lower leaves (helpful for tomatoes, squash, and many ornamentals). Apply once seedlings are sturdy to get the benefit without chilling the soil.
For tree health, extension services repeatedly emphasize correct mulching depth and keeping mulch away from trunks to reduce disease and pest damage (OSU Extension, 2021; WSU Extension, 2020).
Priority #5: What to prepare (beds, edging, irrigation, and a month-by-month schedule)
Bed prep sequence (fast workflow that prevents overmulching)
Use this order of operations to avoid burying weeds and creating soggy layers:
- Rake and fluff existing mulch to break crusts and expose winter weeds.
- Weed now (especially chickweed, henbit, hairy bittercress) before they set seed.
- Top-dress compost (0.5–1 inch) where you need fertility.
- Refresh mulch to target depth (usually 1–2 inches added in spring).
- Edge beds to keep mulch from spilling onto lawns and pathways.
Monthly schedule (adjust by USDA zone and frost date)
| Timing | Mulch tasks | Planting tasks | Protection & prevention |
|---|---|---|---|
| Early spring (6–4 weeks before LFD) | Pull mulch back from crowns; spot-rake matted areas; remove diseased debris | Direct sow peas, spinach, lettuce where soil is workable | Scout for slugs; sanitize beds under roses and fruit trees |
| Mid-spring (3–1 weeks before LFD) | Top up 1 inch in perennials and shrubs; maintain trunk rings | Set out onions/brassicas; succession sow greens every 10–14 days | Stage frost cloth; cover at 32°F forecasts |
| Late spring (1–3 weeks after LFD) | Build mulch to full depth (2–3 inches) where soil has warmed | Transplant tomatoes/peppers when nights > 50°F; sow beans at 60°F soil | Begin regular irrigation checks; watch for cutworms and damping-off |
| End of spring (4–6 weeks after LFD) | Touch-up bare spots; keep mulch off stems as plants bulk up | Plant squash/cukes around 65°F soil; tuck mulch between rows | Monitor for aphids and fungal leaf spots; prune spring bloomers after flowering |
Spring checklists (printable-style)
Mulch refresh checklist (one bed at a time)
- Soil is not waterlogged and is near 50°F+ in the top few inches
- Pull mulch back 3–6 inches from crowns; 6–12 inches from tree trunks
- Remove winter weeds before they flower
- Top-dress compost 0.5–1 inch (optional)
- Add mulch 1–2 inches (refresh), aiming for 2–3 inches total
- Water once to settle, then avoid frequent shallow watering
Frost-readiness checklist (start 10 days before LFD)
- Know your average LFD and watch the 10-day forecast
- Frost cloth/row cover sized and staged
- Hoops/stakes ready so covers don’t press on foliage
- Containers grouped for quick moves
- Mulch kept off crowns to reduce cold, wet rot
Regional and real-world scenarios (mulch timing that fits your spring)
Scenario 1: Cold-spring Midwest/Northeast (USDA zones 4–6)
If your spring swings between 70°F days and 28–32°F nights, you’ll be tempted to mulch heavily early. Resist. Heavy mulch can keep soils cold and delay perennials and seed germination.
- Best move: do an early 1-inch refresh for weed suppression about 2–3 weeks before LFD, then add the second inch after the soil warms past 55°F.
- Perennials: keep crowns clear and wait to cut back borderline plants until you see strong new growth.
- Pest note: watch for voles under thick winter mulch; clear trunk rings and reduce cover near woody plants.
Scenario 2: Wet coastal climates (Pacific Northwest, parts of the Southeast in rainy springs)
In persistently damp springs, mulch can trap moisture and increase slug pressure and crown rot—especially in dense shade.
- Best move: use a thinner spring layer (1 inch) and prioritize airflow: pull mulch farther back from crowns (6 inches if plants are rot-prone).
- Material choice: avoid fine, soggy mats; choose coarse wood chips and fluff leaf-based mulches regularly.
- Disease note: mulch helps reduce soil splash, but remove last year’s infected leaves first to avoid burying inoculum.
Scenario 3: Warm early springs with surprise cold snaps (USDA zones 7–9)
When warm weather arrives early, plants leaf out fast—then a late cold front hits. Your mulch strategy should stabilize roots without pushing overly soft growth.
- Best move: mulch shrubs and trees to 2–3 inches early (root protection), but don’t overfertilize.
- Vegetables: warm-season planting still follows soil temps: beans at 60°F, cucurbits closer to 65°F.
- Protection: keep covers handy until 2 weeks after your local LFD, even if it feels like summer.
Scenario 4: High-altitude or mountain gardens (short seasons, intense sun)
At elevation, sun warms surfaces quickly while soil stays cold. Wind also dries beds fast.
- Best move: delay thick mulching until soil reaches 55°F, but use windbreaks and targeted mulch on the windward side to reduce drying.
- Frost: expect freezes beyond the “average” LFD; plan to protect tender plants at 32°F well into late spring.
- Tip: use darker compost top-dress under mulch to absorb heat, then keep mulch thin until growth accelerates.
Quick troubleshooting: common spring mulching mistakes and fixes
Problem: yellowing perennials or slow emergence
Likely cause: mulch applied too thick too early, keeping soil cold and oxygen low. Fix: rake back to 1 inch, open the crown area, and let sun warm the soil for a week.
Problem: stem rot at the base of plants
Likely cause: mulch touching stems and holding moisture. Fix: pull mulch back to create a dry ring; water at soil level in the morning; remove any rotting debris.
Problem: weeds popping through “fresh” mulch
Likely cause: too-thin layer or mulch mixed with soil. Fix: hand-weed now (before seed set), then add another 1 inch. Consider cardboard under chips for new beds, but keep it away from crowns and avoid piling layers in established perennials.
Problem: slug damage on seedlings after mulching
Likely cause: cool, wet shelter created near tender plants. Fix: pull mulch back from seedlings, reduce evening watering, and trap/hand-pick for 7–10 nights during peak activity.
Right-now timeline (two weekends that reset the garden)
Weekend 1 (about 3–2 weeks before LFD): Pull mulch away from crowns and trunks; clean up diseased litter; prune dead material; weed aggressively; apply a light 1-inch refresh in beds where perennials are clearly emerging.
Midweek check (after the next rain): Walk beds and look for hidden crowns, soggy mulch mats, and slug activity. Fluff mulch and reopen any “buried” plants.
Weekend 2 (about 1–2 weeks after LFD, or when soil is 55–60°F): Bring mulch up to final spring depth (2–3 inches in ornamental beds, 1–2 inches around vegetables after germination). Plant warm-season crops when night lows hold above 50°F and soil is warm enough.
Mulch is a spring tool, not a blanket. Apply it like a tailored layer—thin where soil needs to warm, thicker where roots need buffering, and always pulled back from crowns and trunks. Do that, and you’ll get the weed control and moisture stability you want without sacrificing the very plants you’re trying to protect.