Spring Seed Starting: Light Setup Essentials
Right now—before your last frost date is even on the calendar—your seed-starting lights decide whether spring seedlings grow stout and green or stretch, topple, and stall. The opportunity is short: most popular garden crops need a head start of 4–10 weeks indoors, and your light setup has to be ready before the first tray is sown. If you’re staring at seed packets that say “Start indoors 6 weeks before last frost,” this is your moment to set the lights, dial the schedule, and start sowing with confidence.
This guide focuses on what to do this week: build or tune a seed-starting light station, choose practical bulbs/fixtures, and match light intensity to crop timing. Along the way you’ll see specific timing targets (weeks, temperatures, frost dates), regional scenarios, pest/disease prevention, and a simple schedule you can follow.
Priority 1: Set up your seed-starting lights (do this before sowing)
If you do only one thing today, make it this: hang your lights so they can be adjusted easily, and start with the right distance to the canopy. Most indoor seedling problems—leggy stems, pale leaves, slow growth—trace back to insufficient light intensity at leaf level.
Choose your light type: LED shop light vs. T5 fluorescent vs. “grow” panels
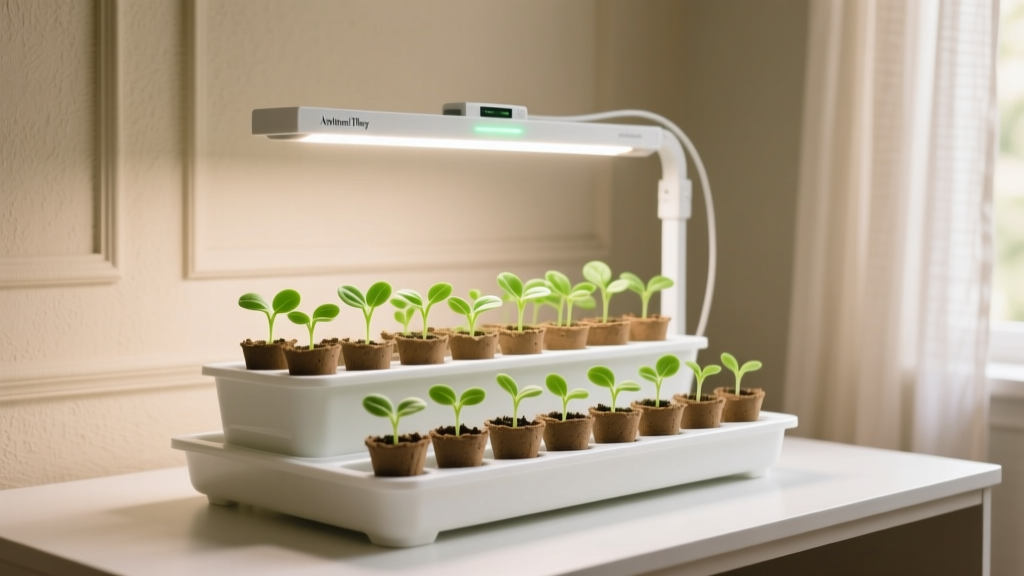
For most home gardeners, a 2-foot or 4-foot LED shop light (daylight spectrum) on an adjustable chain is the simplest, most cost-effective option. Purpose-built LED grow panels work well too, but you don’t need a high-end horticultural fixture to raise sturdy transplants.
- LED shop lights (daylight 4000–6500K): Efficient, cool-running, readily available. Great for shelving units and multi-tray setups.
- T5 fluorescents: Still effective, but bulbs need replacing over time and fixtures run warmer than LEDs.
- LED grow panels/bars: Can deliver higher intensity for fruiting crops (tomatoes/peppers) but cost more; choose models with published PPFD maps when possible.
Research-backed rule: seedlings need bright light close to the leaves. University guidance consistently emphasizes intensity and proximity over “special” colors. For example, Purdue Extension (2019) notes that seedlings require high light levels to prevent stretching and recommends keeping fluorescent fixtures close to seedlings and running them for long daylengths indoors.
Target numbers that matter (distance, duration, temperature)
Use these concrete targets to get predictable results:
- Light duration: 14–16 hours/day (set a timer). Avoid 24/7 lighting; seedlings benefit from a dark period.
- Starting distance (LED shop lights): Begin at 2–4 inches above the canopy for most seedlings; raise as plants grow to keep that gap.
- Starting distance (T5 fluorescents): Typically 1–2 inches above the canopy.
- Germination warmth: Many crops germinate best at 70–80°F (use a heat mat if your room is cool).
- Post-germination temperature drop: To reduce legginess, aim for days around 65–70°F and nights 55–65°F when possible (crop dependent).
“Provide 14 to 16 hours of light each day. Place the light source just a few inches above the seedlings and adjust it as the plants grow to prevent tall, spindly growth.” — Extension seed-starting guidance commonly echoed across land-grant universities (e.g., Purdue Extension, 2019; University of Minnesota Extension, 2020)
Build a no-fuss light station (1 hour setup)
A practical setup that works for most gardeners:
- Shelf: Wire shelving rack or a sturdy table.
- Fixture: One or two 2-ft/4-ft LED shop lights per shelf (more trays = more fixtures).
- Hanging method: Chains + S-hooks so you can raise/lower weekly.
- Reflective surfaces: White poster board, panda film, or even a white wall to bounce light back onto seedlings.
- Timer: Mechanical or digital. Set it and stop thinking about it.
- Air movement: Small oscillating fan on low to reduce damping-off risk and strengthen stems.
Checklist: Light setup essentials (before you sow)
- Light fixture mounted securely; height adjustable
- Timer set to 16 hours on / 8 hours off
- Lights positioned 2–4 inches above expected canopy (LED shop light baseline)
- Fan available for gentle airflow
- Thermometer at seedling level (don’t guess room temp)
- Clean trays and cells (sanitized)
- Watering plan: bottom-watering tray or careful top-watering
Priority 2: What to plant now (seed-starting timeline by frost date)
Your seed packets give a “weeks before last frost” instruction for a reason: indoor light can only compensate so much for crowded trays and overgrown starts. Use your local last frost date and count backward.
Concrete timing examples (adjust to your location):
- If last frost is April 15 (common in parts of USDA Zones 6–7), start tomatoes around March 1–15 (6–8 weeks prior).
- If last frost is May 15 (common in colder zones like USDA Zone 4–5), start tomatoes around March 20–April 5.
- Start peppers 8–10 weeks before last frost; start broccoli/cabbage 4–6 weeks before last frost.
- Many greens can be direct-sown when soil is roughly 40–45°F, while warm-season transplants wait until nights are reliably above 50°F.
Monthly schedule (use this as your seed-starting “almanac”)
| When (relative to last frost) | What to sow indoors | Light & temp focus | What to do outdoors |
|---|---|---|---|
| 10–8 weeks before | Peppers, eggplant, onions from seed, slow herbs | Heat mat to hold 75–80°F for germination; lights 2–4" above canopy after sprout | Check cold frames/row cover; prep beds when soil is workable |
| 8–6 weeks before | Tomatoes, basil, brassicas (broccoli/cabbage), lettuce for transplants | 14–16 hrs light; reduce temps slightly after germination to limit legginess | Direct-sow peas/spinach where soil is ~40–45°F |
| 6–4 weeks before | Cucumbers/squash only if you transplant young; flowers like marigold | Avoid overgrowing: strong light + spacing; pot up if rootbound | Prune fruit trees before bud break; protect early blooms if cold threatens |
| 4–2 weeks before | Fast annuals; succession lettuce; last round brassicas | Begin gentle hardening off on mild days; keep nights warm | Set out hardy transplants; watch for cutworms and slugs |
| After last frost + soil warm | Start warm-season seeds outdoors or transplant | Transplant when nights are consistently >50°F | Plant tomatoes/peppers; protect from cold snaps with covers |
Crop-specific light notes (what changes under lights)
Not every seedling behaves the same indoors. Plan for these realities:
- Tomatoes: Forgiving, but they stretch in weak light. Keep lights close (2–3 inches for LEDs), pot up once if needed, and brush tops lightly or use a fan to strengthen stems.
- Peppers/eggplant: Slower starters; they like warmer root zones (75–80°F to germinate). Under cool conditions they sulk even under good light.
- Brassicas (broccoli, cabbage): Easy indoors but can get leggy if too warm. Bright light + slightly cooler temps after sprouting helps.
- Cucurbits (cucumber, squash): Don’t start too early; they outgrow cells fast and resent root disturbance. If you start indoors, do it only 3–4 weeks before transplant.
Priority 3: What to prune (so your seedlings and garden don’t fight disease)
Seed starting is indoor work, but spring pruning affects airflow, disease pressure, and your transplant schedule. Do these before growth explodes.
Prune now (timed to buds, not the calendar)
- Fruit trees: Prune while dormant—generally late winter to early spring—before bud break for structure and light penetration. Clean tools between trees.
- Summer-flowering shrubs (e.g., panicle hydrangea, butterfly bush): Prune in early spring since they bloom on new wood.
- Hold off on spring-flowering shrubs (lilac, forsythia): Prune right after bloom to avoid removing flower buds.
Tip for seed starters: pruning woody plants and cleaning up leaf litter reduces the number of fungal spores and overwintering pests that can migrate into your greenhouse/cold frame area later.
Priority 4: What to protect (seedlings, transplants, and your light-grown work)
Spring protection is about two choke points: indoor damping-off and outdoor cold snaps. Handle both and you keep weeks of effort from collapsing overnight.
Prevent damping-off and indoor mold (high risk in March–April)
Damping-off fungi thrive in still air, saturated media, and cool conditions. Extension recommendations consistently emphasize sanitation, airflow, and careful watering. University of Minnesota Extension (2020) highlights clean containers, sterile media, and avoiding overwatering to prevent seedling diseases.
- Sanitize trays/cells: Wash and disinfect reused plastics.
- Use fresh seed-starting mix: Don’t reuse last year’s mix for seedlings.
- Watering discipline: Keep media moist, not wet; bottom-water when possible and let the surface dry slightly between waterings.
- Airflow: Run a fan on low for gentle movement; crack a nearby window on mild days if it doesn’t chill seedlings.
- Thin seedlings: Crowding traps humidity and blocks light.
Harden off on a schedule (don’t rush it)
Indoor light is steady; outdoors is wind, sun, and temperature swings. Start hardening off 7–10 days before transplanting.
- Days 1–2: 1–2 hours outside in bright shade, above 50°F, out of wind.
- Days 3–5: Increase to 3–5 hours; introduce gentle morning sun.
- Days 6–7: 6–8 hours; more sun; reduce watering slightly (no wilting).
- Days 8–10: Full day outside; bring in if nights dip below crop tolerance.
Frost thresholds: protect what matters on cold nights
Use these numbers to decide when to cover or delay planting:
- 32°F: A true freeze; most tender seedlings are done without protection.
- 36–38°F: Chilling injury risk for warm-season crops; cover tomatoes/peppers or keep them inside.
- 50°F night temps: A practical “green light” for many warm-season transplants to settle in faster.
Quick protection kit: floating row cover, buckets, milk jugs with bottoms cut out, and clamps. If a surprise frost threatens after you’ve started hardening off, prioritize covering tomatoes, peppers, basil, cucumbers first.
Priority 5: What to prepare (so your light station keeps pace with spring)
Seed starting isn’t just sowing—it’s maintaining spacing, nutrition, and transplant readiness as plants move from cotyledons to true leaves.
Potting up: the moment your light setup starts earning its keep
Under strong lights, seedlings grow faster and need space sooner. Pot up when:
- Roots are circling the cell or poking out the bottom
- Plants have 2–3 sets of true leaves
- Watering frequency becomes daily because the cell dries too fast
After potting up, reset light height again to keep the canopy in the 2–4 inch zone (LED baseline). This one habit prevents the “leggy rebound” after transplanting to bigger pots.
Feeding seedlings (light without nutrients still stalls)
Most seed-starting mixes have little to no fertility. Begin feeding when the first true leaves expand:
- Use a balanced liquid fertilizer at 1/4 to 1/2 strength every 7–10 days.
- Watch color: pale leaves can mean low nitrogen, but also weak light—confirm your light distance first.
Timeline: a tight 4-week indoor plan (example)
Use this if you’re starting tomatoes 6 weeks before last frost, but want a clear “what happens when” rhythm:
- Week 0 (sowing): Pre-moisten mix; sow; cover lightly; keep at 75°F until germination; lights can be on but aren’t critical until sprout.
- Week 1 (sprout): Remove humidity dome; place under lights immediately; set timer to 16 hrs/day; run fan low.
- Week 2: Thin to one per cell; rotate trays every few days; begin light feeding if true leaves are present.
- Week 3: Pot up if rootbound; maintain 2–4" light gap; avoid warm, still air.
- Week 4: Evaluate transplant size; if they’re racing ahead of your weather, reduce temps slightly and keep lights close rather than “holding” them in dim light.
Regional scenarios: adjust your light setup and timing to your spring reality
Seed starting advice fails when it ignores the weather outside your door. Use these scenarios to adjust quickly.
Scenario 1: Cold spring, late last frost (USDA Zones 3–5; last frost often May 10–May 30)
Your risk is outgrowing plants indoors while snow or cold rain drags on. Strategy:
- Favor compact lighting over early sowing: keep lights close and temps moderate after germination.
- Stagger sowing: start half your tomatoes at 8 weeks and half at 6 weeks before last frost to hedge.
- Have potting-up supplies ready; you may need one extra pot-up step if the outdoors won’t cooperate.
Scenario 2: Mild spring with early warm-ups (USDA Zones 7–9; last frost often March 1–April 1)
Your risk is getting lulled into planting tender crops outdoors too early, then getting hit with a late cold snap.
- Use your lights to keep seedlings steady until nights stay above 50°F.
- Prepare frost protection even if your forecast looks friendly—row cover is cheap insurance.
- Start succession trays: another sowing 2–3 weeks after the first gives you backups if early transplants get stressed.
Scenario 3: Cloudy coastal spring or low-light apartment setup (any zone, especially Pacific Northwest or shaded homes)
Your limiting factor is light intensity. Even “bright windows” often underperform compared to a simple LED shelf.
- Add reflective sides (white board) to concentrate light on leaves.
- Run 16 hours reliably; don’t shorten days during gloomy stretches.
- Prioritize fewer, better plants: one strong tray beats three trays of stretched seedlings.
Scenario 4: High-elevation sun with cold nights (mountain West; big day/night swings)
You can harden off earlier in the day but must protect at night.
- Harden off in sun gradually—high elevation sunlight can scorch indoor-grown leaves fast.
- Bring plants in at night until your forecast lows are consistently above 45–50°F for warm-season crops.
Pest and disease prevention tied to spring seed starting
Spring pests often begin indoors (fungus gnats) or strike right after transplant (cutworms, slugs). A few timely habits prevent the most common losses.
Fungus gnats: the indoor spring nuisance
- Let the surface of the mix dry slightly between waterings; gnats thrive in constantly wet media.
- Use yellow sticky cards to monitor adults.
- Bottom-water when possible to keep the top layer drier.
Cutworms and slugs: protect new transplants in cool, wet springs
- Use collars (cardboard strips or cut cups) around brassicas and tomatoes at transplant time.
- Clear weeds and thick mulch right at planting time; pests hide there during cool spells.
- Scout at dusk for slugs; handpick or use iron phosphate baits as needed, following label directions.
Early blight and other leaf diseases: prevent stress, don’t chase cures
- Keep seedlings from getting stressed (low light, overcrowding, overwatering) because weak plants succumb faster later.
- When transplanting tomatoes, avoid splashing soil onto leaves; mulch after soil warms to reduce spore splash.
- Provide spacing and airflow—your pruning and staking plan starts now.
Quick-reference: light setup comparison (pick what fits your space)
| Setup | Best for | Typical light distance | Strength | Watch-outs |
|---|---|---|---|---|
| LED shop light (2–4 ft) | Most seedlings; multi-tray shelves | 2–4 inches | Efficient, cool, affordable | Some fixtures are dim—use more than one if seedlings stretch |
| T5 fluorescent | Reliable seed starting where available | 1–2 inches | Even coverage | Bulb replacement over time; warmer than LED |
| LED grow panel/bar (horticultural) | High-light crops; larger starts | Varies by model (follow PPFD map) | Strong intensity potential | Easy to overpay or misjudge coverage; can scorch if too close |
Right-now action plan (next 72 hours)
If your last frost date is 4–10 weeks away, this is the order that keeps you on track:
- Today: Mount lights + timer; sanitize trays; stage seed-starting mix and labels.
- Within 24 hours: Sow long-season crops first (peppers/eggplant at 8–10 weeks before last frost).
- Within 48 hours: Check germination temps with a thermometer; adjust heat mat to hold 75–80°F for warm germinators.
- Within 72 hours: Set fan for gentle airflow; add reflective sides; confirm lights sit 2–4 inches above where sprouts will be.
Once the first seedlings emerge, your job becomes simple and repetitive: keep lights close, keep watering consistent, thin on time, and pot up before plants stall. Do that, and when your forecast finally lines up—soil workable, nights steady, frost risk fading—you’ll have compact, deep-green transplants ready to grow fast instead of merely survive.
Sources: Purdue Extension (2019) seed-starting and indoor lighting recommendations; University of Minnesota Extension (2020) guidance on preventing seedling diseases through sanitation, sterile media, and watering practices.