Summer Garden Prep: Mulch and Irrigation Setup
The next 2–3 weeks decide how your garden handles summer. If you wait until the first heat wave, you’ll be watering more, losing blooms, and fighting stressed plants that invite pests. Right now—before daily highs settle above 85°F and nights stay over 65°F—you can “lock in” moisture with mulch and set up irrigation that runs consistently, deeply, and efficiently. This is the window to prepare beds, tune watering, and protect soil so summer growth doesn’t stall.
Use this guide as a seasonal punch list: do the high-impact tasks first, then circle back for the fine-tuning. Numbers and thresholds are included so you can time work with your local conditions (and your local average last frost date, which still matters for late planting at elevation).
Priority 1 (This Week): Mulch for Moisture, Cooler Roots, Fewer Weeds
Mulch timing: install before sustained heat
Aim to mulch when soil has warmed and plant starts are established. For many regions, that’s late May through June. A practical benchmark: mulch once your soil is consistently above 60°F for warm-season crops (tomatoes, peppers, basil) and after spring weeds have been removed. If you’re in a cool-summer area or at elevation where nights can still dip into the low 40s°F in early June, delay heavy mulching around heat-loving crops by 7–10 days so the soil warms.
Concrete timing anchors: (1) Add mulch after the last spring frost date has passed (many Zone 6 locations: ~May 1–15; Zone 5: ~May 10–25; high-elevation Zone 4 pockets: into early June). (2) Apply mulch before forecast highs exceed 90°F for more than 3 days. (3) Recheck mulch depth after the first 1.0 inch soaking rain—settling is normal.
Mulch depth and material: match the bed
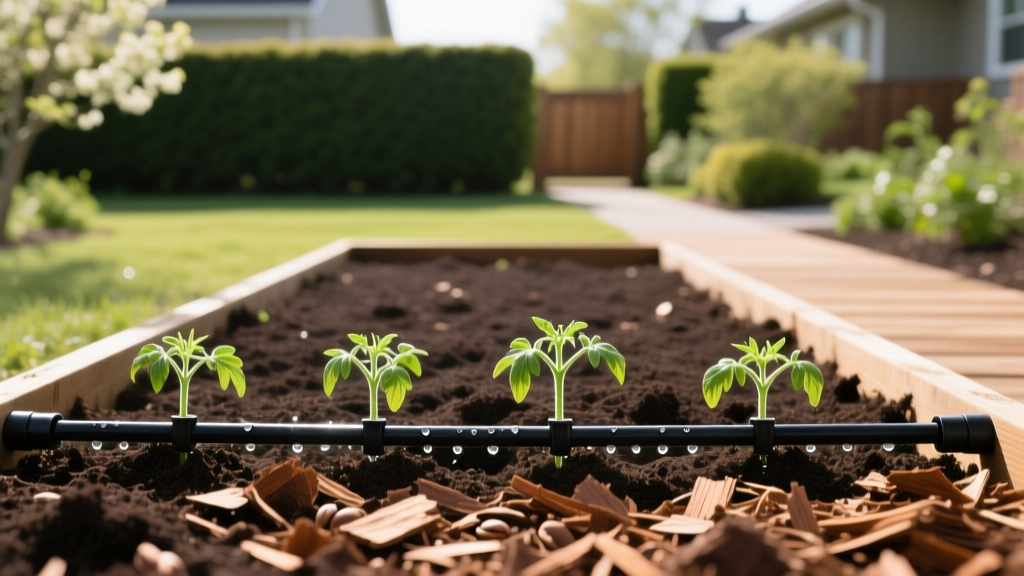
Most beds do best with 2–3 inches of organic mulch. Too thin and weeds break through; too thick and you can trap moisture against stems or slow soil oxygen exchange. Keep mulch 2–3 inches away from plant crowns and trunks to reduce rot and rodent damage.
- Vegetable beds: clean straw (not hay), shredded leaves, or composted bark in a 2-inch layer between rows. For tomatoes and peppers, straw keeps splash-down soil off leaves, which helps reduce early blight spread.
- Perennial borders: shredded bark or leaf mold at 2–3 inches. Top up thin spots rather than re-mulching everything.
- Trees and shrubs: 2–4 inches in a wide ring out to the drip line when possible; never “volcano mulch.”
“Organic mulches conserve moisture, moderate soil temperature, and reduce weed pressure—benefits that are most noticeable during hot, dry periods.”
—Extension horticulture guidance commonly summarized across state programs (e.g., Washington State University Extension, 2017)
Mulch checklist (60–90 minutes per bed)
- Pull or hoe weeds first; don’t mulch over seed heads.
- Water deeply, then mulch (mulching dry soil makes re-wetting harder).
- Lay mulch at 2–3 inches; feather thin near stems.
- Mark drip lines/emitters before mulching so you don’t bury access points.
- After 7 days, check moisture under mulch; adjust irrigation run time accordingly.
Priority 2 (This Week): Set Up Irrigation That Waters Deeply (and Predictably)
Choose your system: drip vs. soaker vs. sprinklers (quick comparison)
| System | Best for | Strengths | Watch-outs |
|---|---|---|---|
| Drip lines/emitters | Vegetable beds, raised beds, containers | Most efficient; keeps foliage dry; easy to automate | Needs filter/pressure regulator; emitter clogs if water is dirty |
| Soaker hoses | Long rows, informal beds | Simple setup; good for mulched beds | Uneven distribution on slopes; short lifespan in sun |
| Overhead sprinklers | Lawns, quick cooling, seedbed germination | Covers large areas fast | Wets leaves (higher disease risk); more evaporation in heat/wind |
Watering targets: how much, how often (use numbers, not guesses)
Many garden plants perform best with roughly 1 inch of water per week from rain + irrigation, adjusted for heat, wind, and soil type. Sandy soil may need smaller, more frequent cycles; clay needs slower, longer so water soaks in instead of running off.
A clear, actionable goal for most beds: wet the root zone down 6–8 inches for vegetables and annuals, and 12 inches for shrubs. Check with a trowel 30–60 minutes after watering. If the top 2 inches are wet but it’s dry below, you’re doing “sips,” not deep watering.
Temperature thresholds that change watering:
- 85°F+ highs: monitor daily wilting; expect faster drying and bump run time 10–25% if rainfall is absent.
- 90–95°F heat wave: prioritize deep morning watering; don’t rely on evening irrigation (more disease pressure, less evaporation relief).
- Windy days (15+ mph): overhead watering efficiency drops; use drip if possible.
Citation: Irrigating in the morning and avoiding prolonged leaf wetness is a consistent recommendation to reduce foliar disease risk (University of Minnesota Extension, 2019).
Simple drip setup that works in real gardens
For a typical home bed, you can install a reliable drip system in an afternoon:
- At the spigot: add a backflow preventer, filter, and pressure regulator (common drip pressure is 20–30 psi).
- Run mainline tubing along the bed edge.
- Branch with dripline (6–12 inch emitter spacing for veggies; wider spacing for shrubs) or use 1–2 gph emitters at plant bases.
- Stake lines so they don’t wander under mulch.
- Flush, then mulch: run water for 2 minutes with the line end open to push out debris, cap it, then mulch.
- Automate: add a battery timer. Set it for early morning starts (e.g., 5–8 a.m.).
Calibration test (do this once; it pays all summer)
Don’t guess your run time. Calibrate:
- Place 4–6 shallow containers (tuna cans work) in a sprinkler zone and run for 15 minutes; measure depth to estimate inches/hour.
- For drip, check emitter output (e.g., a 1 gph emitter should fill a quart jar in about 57 minutes). Then adjust duration to reach your deep-watering goal.
Citation: Efficient irrigation and careful scheduling reduce runoff and disease pressure; extension programs regularly emphasize matching application rate to soil infiltration (Colorado State University Extension, 2020).
Priority 3 (Next 7–14 Days): What to Plant for Summer Payoff
Plant heat-lovers once nights stay mild
If your garden still has gaps, early summer is prime time to plant warm-season crops once nighttime temperatures are steady. As a rule, tomatoes and peppers settle in better when nights are consistently above 55°F. Basil dislikes cold soil; wait until soil is near 65°F if it sulks in your area.
- USDA Zones 3–5 (shorter summers): focus on fast-maturing varieties; transplant rather than direct sow for tomatoes/peppers. Use black mulch or landscape fabric under organic mulch to warm soil if June is cool.
- USDA Zones 6–7: succession sow beans every 2–3 weeks through mid-summer; keep seedbeds evenly moist until germination.
- USDA Zones 8–10: plant heat-tolerant greens (Malabar spinach, amaranth) and plan a fall garden—start seeds in shade once highs routinely exceed 95°F.
Quick list: high-value summer plantings (now)
- Vegetables: bush beans, cucumbers, basil, okra (once soil is warm), sweet potato slips (Zones 7+).
- Flowers: zinnias, cosmos, sunflowers for pollinators and cut flowers.
- Herbs: basil, dill (sow every 2–3 weeks for steady harvest), lemongrass in warm zones.
Priority 4 (Now Through Mid-Summer): What to Prune (and What Not to Touch)
Prune for airflow—your best disease prevention tool
Summer humidity and overhead watering can turn dense growth into a disease factory. Focus on targeted pruning that increases airflow without sun-scalding plants.
- Tomatoes: remove lower leaves that touch soil and any foliage below the first fruit cluster once plants are established. This reduces soil splash and improves airflow.
- Cucumbers and squash: remove leaves that are yellowing or lying on wet mulch; don’t strip heavily—plants need leaf area for fruiting.
- Shrubs (general): prune dead, damaged, or crossing branches anytime. Avoid hard pruning in extreme heat (90°F+ stretches), which can stress plants.
Don’t prune spring bloomers at the wrong time
If a shrub blooms in spring (lilac, forsythia), it typically sets next year’s buds soon after flowering. Heavy pruning in summer can cut off next year’s display. If you must shape, keep it light and finish within 3–4 weeks after bloom.
Priority 5 (All Summer): What to Protect—Heat, Pests, Diseases, and Irrigation Failures
Heat protection: shade is a tool, not an admission of defeat
When a heat wave is forecast, protect plants before they wilt.
- Use 30–40% shade cloth over lettuce, spinach, and new transplants when highs push past 90°F.
- Mulch correctly to keep roots cooler; in full sun beds, mulch can reduce surface baking.
- Water early (morning) so plants enter the day hydrated.
Pest prevention that pairs with mulch and irrigation
Summer pests thrive on stressed plants and dense, damp foliage. Mulch and drip irrigation help, but you still need a scouting routine.
- Slugs/snails (cool, wet regions): thick mulch can shelter them. Keep mulch a little thinner (about 2 inches) and avoid overwatering. Handpick at dusk; use iron phosphate bait if needed.
- Spider mites (hot, dry stretches): common when highs sit above 90°F and plants are water-stressed. Drip irrigation keeps plants steady; rinse dust off leaves with a strong morning spray if infestations start.
- Aphids: often surge on lush new growth. Avoid high-nitrogen feeding during heat; spot-treat with water spray and encourage beneficial insects with flowering borders.
- Squash bugs: check undersides of leaves for bronze egg clusters weekly; remove by hand early before populations explode.
Disease prevention: keep leaves dry and soil from splashing
Two summer habits cut disease pressure dramatically: (1) water at the soil line, and (2) reduce soil splash. Mulch is your splash guard; drip irrigation is your leaf-dry strategy.
- Early blight and septoria (tomatoes): mulch to prevent soil splash, prune lower leaves, and avoid overhead watering.
- Powdery mildew (squash, phlox, bee balm): improve airflow, avoid excess nitrogen, and water early at the base. Remove heavily infected leaves to slow spread.
Irrigation failure planning (do this once)
Summer systems fail when you’re busiest or away. A simple backup prevents crop loss:
- Install a battery timer with a low-battery alert and replace batteries every 8–10 weeks.
- Keep spare end caps, couplers, and 10 feet of tubing in the shed.
- Walk your lines weekly for 5 minutes: look for geysers, dry spots, and chewed tubing.
What to Prepare: Soil, Beds, and a Watering Rhythm You Can Stick With
Monthly schedule (adjust by zone and weather)
| Timing | Mulch | Irrigation | Planting & care |
|---|---|---|---|
| Late May (Zones 5–7) / Early June (Zones 3–4) | Mulch established beds 2–3 inches | Install drip/soaker; calibrate run times | Transplant warm-season crops after nights >55°F |
| June | Top up thin spots after settling | Shift to deep morning watering; adjust +10–25% during hot weeks | Succession sow beans every 2–3 weeks; stake tomatoes |
| July | Keep mulch pulled back from stems; check for slug sheltering | Check emitters weekly; add shade cloth when highs >90°F | Start fall crops in hot zones; harvest consistently to keep plants producing |
| August | Rake mulch lightly to break crusting | Audit coverage; fix dry spots before late-summer stress | Plant fall brassicas in Zones 5–8; plan frost protection timing |
3 real-world scenarios (and what to do right now)
Scenario 1: Hot, dry interior West (low humidity, big day/night swings; Zones 5–8 at elevation). Your biggest win is deep, infrequent irrigation that actually penetrates. Run drip long enough to wet 8–12 inches, then wait until the top 2 inches begin drying before watering again. Add wind protection if afternoon winds exceed 15 mph—wind can double water demand. Use a 3-inch mulch layer on ornamentals, but keep veggie beds closer to 2 inches so soil warms at night.
Scenario 2: Humid Midwest/Southeast (Zones 6–9; frequent thunderstorms, high disease pressure). Mulch is still useful, but your focus is leaf dryness and airflow. Choose drip over overhead whenever possible, water at dawn, and prune for ventilation. After a rain event of 1 inch or more, pause irrigation for 2–3 days and reassess soil moisture under mulch to avoid waterlogged roots and fungal flare-ups.
Scenario 3: Coastal or marine climates (cool nights, summer fog; Zones 8–10 coastal pockets, but cool soil behavior). Mulch can keep soil too cool early in summer; apply a thinner layer (about 2 inches) until nights reliably stay above 55°F. Watch for slugs and fungal issues from lingering moisture. Water less often but still deeply—fog adds humidity, not root-zone water.
Scenario 4: Containers and raised beds anywhere (fast drying). Containers can require watering every 1–2 days when highs hit 85–95°F. Use a mulch layer (even 1 inch helps), group pots to reduce wind exposure, and consider micro-drip to each container. Raised beds warm and dry faster than in-ground beds—plan on more frequent irrigation cycles, especially the first week after planting.
Right-now timeline (next 21 days)
- Days 1–3: Weed beds, water deeply, lay mulch. Flag plant crowns and emitter locations.
- Days 4–7: Install irrigation hardware; flush lines; set timer for early morning. Calibrate output.
- Week 2: Plant remaining warm-season crops once nights are >55°F; stake/trellis immediately to avoid root damage later.
- Week 3: Fine-tune run times based on a trowel check (target 6–8 inches wet depth). Add shade cloth if a 90°F+ stretch is forecast.
Quick Checks That Prevent Mid-Summer Panic
Weekly 10-minute garden walk
- Lift mulch in 2–3 spots: is soil evenly damp 2–3 inches down?
- Look for dry zones near bed edges (common with drip layouts).
- Inspect tomato lower leaves and squash leaf undersides for pests/eggs.
- Make sure mulch is not touching stems or tree trunks.
- Confirm emitters are dripping; replace clogged ones immediately.
After heavy rain or a heat wave
- After 1+ inch rain: check for mulch displacement and soil compaction; pause irrigation until the root zone begins drying.
- After 3+ days over 90°F: check for dripline movement (hoses expand/shift), sunscald on exposed fruit, and spider mite stippling.
Mulch and irrigation aren’t glamorous, but they’re the summer backbone. Set them up while conditions are still workable, then let the system carry you through the hottest weeks with fewer weeds, steadier growth, and far less stress—for you and your plants.
Sources: Washington State University Extension (2017) mulch and water conservation guidance; University of Minnesota Extension (2019) irrigation timing and disease avoidance principles; Colorado State University Extension (2020) irrigation scheduling concepts and infiltration considerations.