How to Build a Drip Irrigation for Roses
It usually happens right after a hot spell: you step outside in the morning, and the roses that looked fine three days ago are suddenly droopy, with crisped leaf edges and buds that never open properly. You water “extra” to catch up, but then the lower leaves start yellowing and dropping. That swing—too dry, then too wet—is one of the fastest ways to stress roses into black spot, weak growth, and fewer blooms. A simple drip irrigation setup fixes the feast-or-famine cycle by delivering steady water right where roots need it, without splashing foliage.
I’ve installed drip systems for roses in postage-stamp city beds, long suburban borders, and sprawling mixed cottage gardens. The principles stay the same: know your soil, match emitters to your plants, keep the lines easy to flush, and water deeply on a schedule that responds to weather. This is the hard-won shortcut: you’ll spend a couple of hours setting it up once, then spend the rest of the season enjoying roses instead of babysitting them.
Watering roses the smart way: what drip irrigation is really solving
Roses aren’t “water hogs,” but they do best with consistent moisture in the root zone. Most rose roots are concentrated in the top 12–18 inches of soil, and they perform best when that zone is kept evenly moist—not saturated, not bone dry. Drip irrigation makes that possible because it applies water slowly (measured in gallons per hour), giving the soil time to absorb it.
University of California Agriculture & Natural Resources notes that drip irrigation improves efficiency by applying water directly to the root zone and reducing evaporation and runoff (UC ANR, 2020). For roses, there’s an added bonus: less leaf wetting means fewer opportunities for fungal disease spores to germinate.
How much water do roses actually need?
There’s no single number that fits every yard, but here are field-tested starting points you can adjust:
- Newly planted roses (first 4–6 weeks): about 2–4 gallons per plant, 2–3 times per week (more often in sandy soil or high heat).
- Established roses: about 3–6 gallons per plant per week, delivered in 1–2 deep waterings.
- Heat waves (90–100°F): increase run time by 25–50% or add a second cycle on watering days.
These are practical averages for home landscapes, not greenhouse rules. Your drip system lets you deliver those gallons consistently instead of guessing with a hose.
Soil, mulch, and why drip works differently in clay vs sand
Before you buy parts, take a minute to read your soil. Water behaves dramatically differently depending on texture:
- Clay soil: water spreads sideways well, infiltrates slowly, and holds moisture longer. You want slower application and longer intervals between watering days.
- Sandy soil: water moves downward fast and doesn’t spread much. You want more frequent watering and often more emitters per plant so the root zone is evenly covered.
Mulch is your drip system’s best friend. A 2–3 inch layer of wood chips or shredded bark reduces evaporation and keeps the surface from crusting. Keep mulch pulled back 2 inches from the rose crown to avoid constant moisture against stems.
“Drip irrigation applies water slowly, which can improve infiltration and reduce runoff compared with sprinklers—especially on slopes or heavy soils.” — UC Agriculture & Natural Resources, Landscape Watering guidance (2020)
Light and spacing: drip can’t fix a shady rose bed
Drip irrigation is powerful, but it won’t compensate for low light or crowded airflow. Most modern roses perform best with 6–8 hours of direct sun. If you’re working with 4–5 hours, keep watering tighter (avoid excess) and prune for airflow—shade plus dampness is a black spot invitation.
Also consider spacing: if you’re planting new roses, aim for roughly 24–36 inches between bushes (variety dependent). That space makes it easier to run distribution tubing, add emitters, and inspect for problems.
Feeding roses without waste: fertigation and smart timing
A drip system can deliver fertilizer efficiently (fertigation), but you don’t need to get fancy to get results. Even without fertigation, drip makes feeding easier because the root zone stays evenly moist—nutrients move into roots more reliably.
Here’s a grounded seasonal rhythm many home gardeners can follow:
- Early spring: as buds swell, apply a balanced granular fertilizer (follow label rates) and water it in.
- After the first big flush: feed again to support repeat bloom.
- Stop nitrogen 6–8 weeks before first frost to avoid tender growth that winter-kills.
If you choose to fertigate, use a fertilizer designed for injection and add a backflow preventer (more on that below). Many municipalities require it, and it’s simply good practice to protect your drinking water.
The EPA emphasizes that irrigation systems can create cross-connection risks and recommends proper backflow prevention for outdoor water systems (U.S. EPA Cross-Connection Control guidance, 2023).
Drip vs soaker hoses vs sprinklers (with real numbers)
Gardeners often ask if they should just lay soaker hoses. Sometimes that works, but roses benefit from the control drip provides—especially when plants are spaced irregularly or you’re expanding the bed over time.
| Method | Typical flow rate | Leaf wetting | Control per plant | Best use case |
|---|---|---|---|---|
| Drip emitters (point-source) | 0.5–2.0 GPH per emitter | None | High (add/remove emitters) | Roses spaced out, mixed beds, containers |
| Inline drip tubing | ~0.5–1.0 GPH per emitter, spaced 6–18 in | None | Medium (spacing fixed) | Rose hedges, long borders, uniform plantings |
| Soaker hose | Varies widely; pressure-sensitive | Low | Low | Simple rows, temporary beds, tight budgets |
| Overhead sprinkler | High (depends on head/nozzle) | High | Low (area-based) | Lawns, large uniform zones (not ideal for roses) |
For roses, the two most useful drip approaches are: (1) 1/2-inch mainline + 1/4-inch microtubing to each plant with button emitters, or (2) inline drip tubing snaked through a bed. If you like to tinker and tailor, go with microtubing and emitters. If you want simple and fast for a hedge, choose inline.
Parts list: what you actually need (and what’s optional)
A reliable rose drip system doesn’t require a cartload of gadgets, but it does need the right basics. Here’s a practical shopping list for a typical home spigot setup:
- Hose bib vacuum breaker/backflow preventer (critical if you ever fertigate; recommended regardless)
- Y-filter (150 mesh is common) to prevent emitter clogging
- Pressure regulator set to 25 PSI (most drip components are designed for 20–30 PSI)
- 1/2-inch poly tubing (mainline)
- 1/4-inch tubing (distribution lines)
- Emitters (start with 1 GPH or 2 GPH)
- Goof plugs, tees, elbows, end clamps
- Hole punch tool for clean connections
- Timer (battery or mechanical) so watering happens consistently
Optional but genuinely useful:
- Flush valve at the line end (or just a removable end cap) for easy maintenance
- Air vent/vacuum relief valve on larger systems to reduce suction of debris
- Pressure-compensating emitters if your bed is long or sloped
Step-by-step: how to build a drip irrigation system for roses
If you can assemble a simple shelf, you can build a drip system. The key is working in a logical order: protect the water supply, filter, regulate pressure, run your mainline, then add emitters.
1) Map your roses and pick an emitter strategy
Walk the bed with a notepad and count plants. Note if any are in hotter spots (near pavement) or in drier soil (under eaves). Decide:
- Button emitters per plant: best for mixed plantings and custom spacing.
- Inline drip tubing: best for rose hedges or evenly spaced borders.
A solid starting point for established shrub roses is 2 emitters of 1 GPH per plant, placed 8–12 inches from the crown on opposite sides. For sandy soil or large roses, bump to 3–4 emitters or use 2 GPH emitters.
2) Assemble the “head” at the spigot
Install components in this order (from spigot outward):
- Backflow preventer/vacuum breaker
- Filter
- Pressure regulator (25 PSI)
- Timer (some gardeners place timer first; follow your device instructions, but keep filtration/regulation for the drip line)
- Adapter to connect to 1/2-inch poly tubing
Hand-tight is usually enough. If you use thread tape, wrap it neatly (2–3 wraps) so you don’t crack fittings by over-tightening.
3) Lay out and secure the mainline
Run 1/2-inch poly tubing along the back edge of the bed, where it’s easy to hide under mulch but still accessible. Stake it every 3–5 feet (and at turns) so it doesn’t shift when you mulch or weed.
Leave yourself service loops. A little slack makes repairs easy.
4) Add 1/4-inch lines and emitters to each rose
- Use a punch to make a clean hole in the 1/2-inch mainline.
- Insert a 1/4-inch barb connector.
- Run 1/4-inch tubing to the rose’s drip zone (not right at the stem).
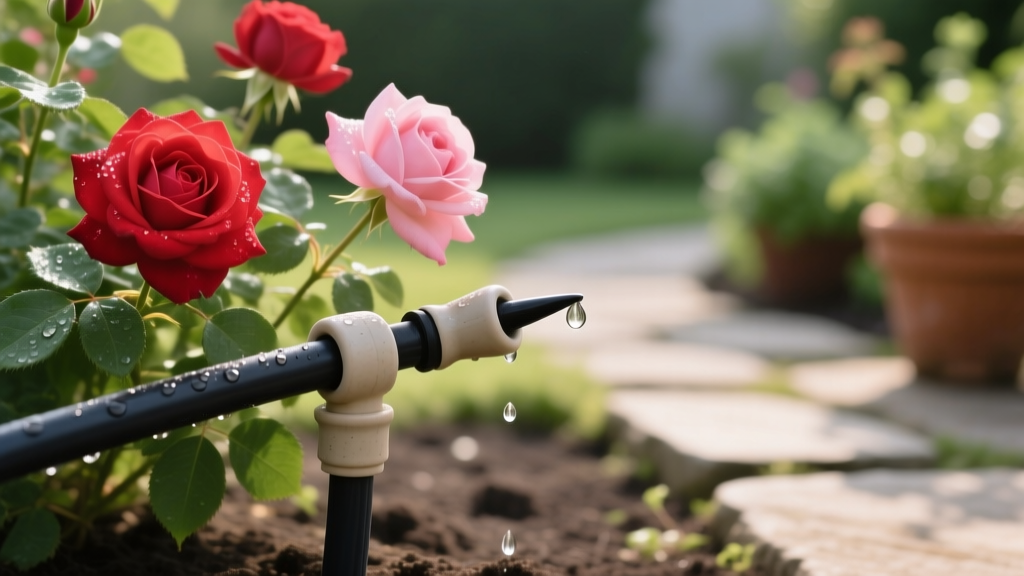
- Attach an emitter at the end (or use an emitter that inserts at the mainline and run plain 1/4-inch to a stake).
- Stake the emitter so it stays put.
Position emitters where you want roots to grow: around the drip line of the rose, not pressed against the crown. Over time, you can move emitters outward as the plant grows.
5) Cap the line and add a flush point
At the end of the mainline, install an end clamp or figure-8. Better yet, install a simple flush valve. Plan to flush the system:
- At setup time
- After fertilizing through the system (if you do)
- Every 4–6 weeks during peak season
6) Test, then mulch
Run water for 10 minutes and walk the bed. Look for popped fittings, weak flow, or emitters that aren’t dripping. Fix leaks now, then mulch over the lines, leaving emitters visible or lightly covered (don’t bury them in mud).
Programming your timer: run times that make sense
Drip systems fail most often because of run time mistakes: either short daily spritzing (shallow roots) or long runs in heavy clay (waterlogging). Use the emitter math.
Example: If a rose has two 1 GPH emitters, that’s 2 gallons per hour total. If you want to deliver 4 gallons, run that zone for 2 hours.
Practical starter schedules:
- Loam soil, established roses, mild weather (70–85°F): 1 watering every 4–5 days, run time based on 3–5 gallons per plant.
- Clay soil: 1 watering every 5–7 days (watch for sogginess).
- Sandy soil: 2 waterings per week, sometimes every 3 days in heat.
If your timer supports cycle-and-soak, use it in clay: split a 2-hour run into two 1-hour cycles separated by 30–60 minutes to reduce runoff and improve infiltration.
Three real-world setups (and what I’d do in each)
Scenario 1: A small rose bed against a sunny wall (hot microclimate)
Heat reflected off brick or stucco can push leaf temperatures well above air temperature. I’d use 2 GPH pressure-compensating emitters, two per plant, and water early morning. In a 95°F week, I’d increase water by about 30% and check soil moisture 6 inches down the next morning. If it’s dry, add another emitter rather than extending run time endlessly.
Scenario 2: A long rose hedge (20+ feet) where hand-watering is miserable
Inline drip tubing is the cleanest solution. Use 1/2-inch inline drip with emitters spaced 12 inches apart, and run a double line (one on each side of the hedge) if plants are big or soil is sandy. Add a flush valve at the end—hedges collect debris, and flushing saves you from mystery clogs mid-summer.
Scenario 3: Roses in containers on a patio
Containers dry fast, especially in wind. Use 1 GPH emitters (often 1–2 per pot), and water more frequently: in summer, it may be daily for small pots, or every 2 days for larger ones. Put each container on its own 1/4-inch line so you can adjust emitters as the plant grows. And don’t forget: containers need excellent drainage—drip won’t fix a pot with no drainage hole.
Common problems roses face (and how drip irrigation helps)
Black spot and powdery mildew
Overhead watering that wets leaves at night is a common trigger for fungal issues. Drip keeps foliage drier. Still, drip is not a disease cure-all: poor airflow, shade, and infected leaves on the ground can keep disease pressure high.
- Prevention: water at soil level, prune for airflow, clean up fallen leaves, avoid excessive nitrogen.
- If disease is established: remove infected leaves, improve spacing, and consider labeled fungicides if needed.
Bud blast (buds dry up and fail to open)
Bud blast often shows up during heat spikes or erratic watering. Drip reduces those moisture swings.
- Fix: water deeply before heat arrives; increase run time by 25–50% during extreme heat; add mulch to stabilize soil moisture.
- Also check: thrips and other pests can deform buds—inspect closely.
Weak growth and pale leaves
This can be underfeeding, but it’s often inconsistent watering that limits nutrient uptake.
- Fix: verify emitters are delivering expected flow; water to a consistent depth; then fertilize appropriately.
- Quick check: after a watering cycle, soil should be moist 8–12 inches down near the emitters, not just damp on top.
Troubleshooting your drip system: symptoms and fixes
Most drip problems are simple once you know what to look for. Use these quick diagnostics.
Symptom: Some roses thrive, others wilt (same zone)
- Likely causes: clogged emitters, kinked 1/4-inch lines, uneven pressure on slopes.
- Fixes:
- Pop off and rinse suspect emitters; replace if needed (they’re cheap).
- Shorten overly long 1/4-inch runs; avoid sharp bends.
- On slopes or long runs, switch to pressure-compensating emitters.
Symptom: Emitters barely drip or stop mid-season
- Likely causes: sediment in water, algae growth, missing/dirty filter.
- Fixes:
- Clean the filter monthly in summer.
- Flush the line end for 1–2 minutes every 4–6 weeks.
- If you’re on well water with grit, use a better filter and keep spare emitters on hand.
Symptom: Water pools on the surface near emitters
- Likely causes: clay soil infiltration is slow; run time too long; emitter flow too high.
- Fixes:
- Switch from 2 GPH to 1 GPH emitters.
- Use cycle-and-soak (two shorter runs with a soak break).
- Add compost over time to improve soil structure, and keep mulch consistent.
Symptom: A fitting pops off and sprays
- Likely causes: high pressure (no regulator), poor punch hole, heat expansion.
- Fixes:
- Confirm you have a 25 PSI regulator installed.
- Use a proper punch tool (not a nail or screw).
- Stake tubing and avoid tight, stretched runs—leave slack for hot days.
Seasonal maintenance: keep it working for years
Drip is low-maintenance, not no-maintenance. A few small habits prevent most failures:
- Spring start-up: flush mainlines before reconnecting emitters; replace any cracked tubing.
- Mid-season: clean filter; flush ends; walk the bed monthly while the system runs.
- After fertilizing through drip: run plain water for 10–15 minutes to clear lines.
- Before winter freezes: disconnect timers, drain filters/regulators, and cap line ends. In cold climates, store the timer indoors.
One more practical note: label your zones and keep a small bag of spare parts (tees, end clamps, goof plugs, a few emitters). When a problem pops up, you’ll fix it in five minutes instead of abandoning the system for the season.
If you build your drip layout with future you in mind—flush points, easy access, and a little flexibility—you’ll find roses become much more forgiving. The plants settle into a steady rhythm, leaf quality improves, and blooms come on with fewer setbacks. And on the next 95°F week, you’ll be the gardener who takes a calm morning walk with coffee while the roses water themselves.
Sources: University of California Agriculture & Natural Resources (UC ANR), guidance on drip irrigation efficiency and landscape watering (2020). U.S. Environmental Protection Agency (EPA), cross-connection control/backflow prevention guidance for outdoor water systems (2023).