How to Graft Peonies Successfully
The first time most gardeners try grafting peonies, it goes like this: you spend an hour making careful cuts, tie everything up like you’re wrapping a tiny present, plant it with high hopes… and three weeks later the scion shrivels while the rootstock throws up its own shoots like it’s mocking you. I’ve been there. The good news is peony grafting isn’t “mystical”—it’s mostly timing, clean cuts, tight contact, and planting depth. Once you understand what the plant is trying to do, your success rate jumps fast.
Tree peonies (Paeonia suffruticosa and hybrids) are most commonly grafted onto herbaceous peony roots because it’s efficient and produces a saleable plant quickly. But home gardeners can absolutely do this, too—especially if you want to save a rare cultivar, share a favorite, or turn one expensive plant into several over a few seasons.
What grafting actually accomplishes (and why failures happen)
A peony graft is a partnership: the scion (your desired tree peony stem piece) must knit together with the rootstock (usually an herbaceous peony root) so water and carbohydrates can move through the graft union. If the cambium layers don’t touch, if the union dries out, or if the rootstock outgrows the scion, the graft fails or “reverts” to rootstock growth.
“Successful grafting is primarily a matter of cambial alignment and preventing desiccation during callusing.” — Royal Horticultural Society guidance on grafting woody plants (RHS, 2023)
Tree peony grafting is a bit different from fruit tree grafting because you usually bury the graft union to encourage the scion to form its own roots over time—this is key for long-term vigor and preventing the rootstock from taking over.
Best timing and conditions for grafting peonies
If you want the simplest window for home success, graft in late summer to early fall, when roots are active and temperatures are mild. Commercial growers often graft around August–September. Aim for days where the air temperature is roughly 60–75°F (16–24°C); extreme heat dries the scion, and cold slows callusing.
According to the American Peony Society’s propagation notes, tree peonies are commonly grafted in late summer, then planted so the scion can root above the union over time (American Peony Society, 2020). Many university extension resources also emphasize sanitation and sharp tools to reduce disease during propagation (University of Minnesota Extension, 2022).
Three real-world scenarios (so you can pick the right approach)
Scenario 1: You bought a grafted tree peony and it’s sending up weird shoots. Those are often herbaceous rootstock shoots. Your job is to plant deep (or replant deeper) and remove rootstock shoots promptly.
Scenario 2: You have one tree peony and want backups. You can take scions from firm, pencil-thick current-season growth after flowering, graft onto spare herbaceous roots, and nurse them through their first winter.
Scenario 3: Your graft “took,” but growth is weak in year two. This is usually shallow planting (scion never rooted), drought stress, or the union was tight but not well-aligned—so the plant limps along. The fix is often deeper planting and better moisture management during establishment.
Tools and materials (don’t skimp here)
- Very sharp grafting knife or fresh utility blade (dull blades crush tissue)
- Isopropyl alcohol (70%) or disinfectant wipes for tool sanitation
- Grafting tape or parafilm; alternatively, rubber budding strips
- Label and waterproof marker (you’ll forget what you did)
- Clean potting mix or prepared bed
- Optional: grafting wax or tree wound sealant (use sparingly; tape usually suffices)
Sanitize your blade between plants. It feels fussy until you lose a batch to rot. University extension publications consistently stress tool sanitation as a first-line defense in plant propagation (University of Minnesota Extension, 2022).
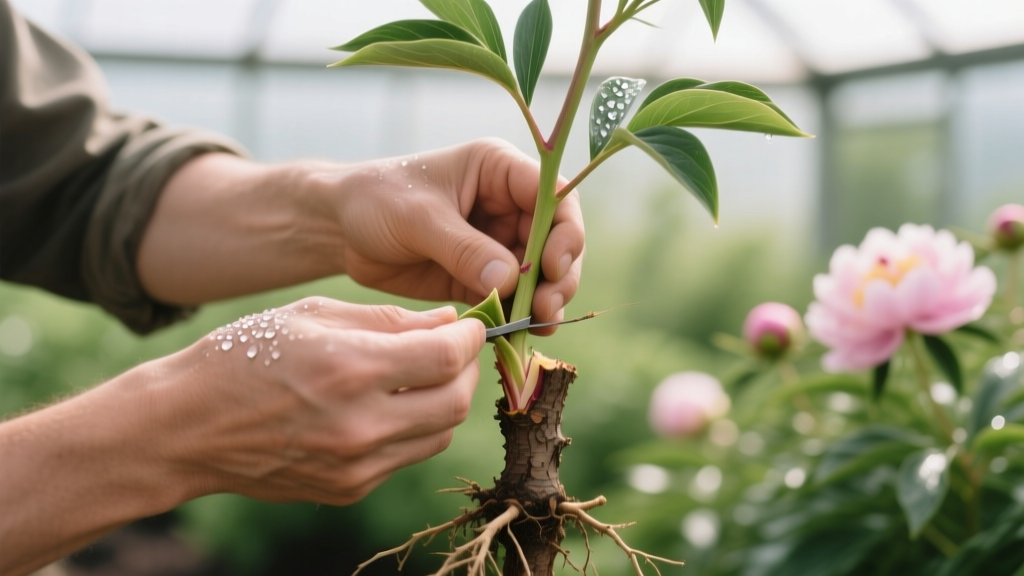
Step-by-step: a reliable tree peony graft method
This is the method I recommend for home gardeners because it’s forgiving and doesn’t require special equipment.
1) Prepare the rootstock (herbaceous peony root)
- Select a healthy, firm root section 4–6 inches (10–15 cm) long and roughly 1/2–1 inch (1.2–2.5 cm) thick.
- Trim off fibrous side roots; keep the main storage root.
- Make a clean, slanted cut at the top of the rootstock to create a long surface (about 1–1.5 inches / 2.5–4 cm).
- If using a wedge graft, split the top of the rootstock down the center about 1 inch (2.5 cm).
2) Prepare the scion (tree peony wood)
- Choose scion wood that is healthy and firm, ideally pencil thickness, with 2–3 buds.
- Cut the base into a wedge to match the rootstock split; make the wedge about 1–1.5 inches (2.5–4 cm) long.
- Keep scions shaded and slightly moist while you work (a damp paper towel in a cooler works well).
3) Join and bind the graft
- Insert the scion wedge into the rootstock split so at least one side of the cambium layers aligns. Perfect alignment on both sides is great but not always possible if diameters differ.
- Wrap firmly with grafting tape or parafilm, covering the union completely to prevent drying.
- Label immediately with cultivar and date.
4) Plant at the correct depth (this is where most home grafts fail)
Plant the graft so the union sits 4–6 inches (10–15 cm) below soil level. That depth encourages the tree peony scion to form its own roots above the union, which reduces rootstock takeover long-term.
- If planting in ground: choose a prepared bed with excellent drainage.
- If potting: use a deep pot (at least 10–12 inches / 25–30 cm deep) so the union can be buried properly.
Method comparison: grafting vs division vs cuttings (with real tradeoffs)
| Propagation method | Typical time to saleable/strong plant | Success rate (home setting) | Best for | Main drawback |
|---|---|---|---|---|
| Grafting tree peony onto herbaceous root | 1–3 years | Moderate (often 40–70% with practice) | Multiplying named tree peonies, faster results | Risk of rootstock suckers; technique-sensitive |
| Division (herbaceous peonies) | 1–2 years | High (often 80%+ if divisions have 3–5 eyes) | Sharing herbaceous peonies | Doesn’t apply to tree peonies; reduces parent clump temporarily |
| Tree peony cuttings | 3–5+ years | Low (often under 30% without controlled humidity) | Own-root tree peonies (no graft union) | Slow; higher loss rate at home |
If you want quicker flowering and you’re working with a named tree peony cultivar, grafting is usually the practical choice. If you hate dealing with rootstock shoots and have patience, cuttings (or buying own-root plants) can be worth it.
Soil: what grafted peonies need to thrive
Peonies aren’t complicated about soil, but they are stubborn about poor drainage. Your goal is a soil that holds moisture evenly yet never stays soggy.
- Drainage: If water sits in a hole for more than 2–3 hours after filling it, improve drainage or choose a different site.
- pH target: Slightly acidic to neutral is generally fine, around pH 6.5–7.5.
- Amendments: Work in 2–3 inches (5–8 cm) of compost in the top 10–12 inches (25–30 cm) of soil. Avoid fresh manure.
For heavy clay, I’d rather see you plant on a slight mound or raised bed than try to “fix” clay by mixing in sand (which can create concrete-like texture if done wrong). Compost plus drainage is the safer move.
Light: where grafted peonies actually perform best
Tree peonies want lots of light but don’t love baking heat. In many home gardens, the sweet spot is:
- 6–8 hours of sun in cool climates
- Morning sun + afternoon shade in hot climates
If your graft is newly planted, a little shade in the hottest part of the day reduces stress while it’s forming callus and establishing roots.
Watering: the make-or-break routine after grafting
New grafts fail from two opposite mistakes: letting the union dry out or keeping the soil wet enough to rot. You want steady moisture, not saturation.
Watering schedule (ground-planted grafts)
- First 4–6 weeks: Water deeply when the top 1–2 inches (2.5–5 cm) of soil is dry. In many gardens that’s about 1–2 times per week, depending on weather.
- Fall to freeze: Keep soil lightly moist; do not waterlog.
- Next spring: Resume deep watering during dry spells—aim for roughly 1 inch (2.5 cm) of water per week from rain + irrigation.
Watering schedule (potted grafts)
Pots dry faster. Check moisture every 2–3 days in warm weather. Water until you see drainage, then let the pot drain completely—no standing water in saucers.
Feeding: fertilize lightly and at the right times
Overfeeding is a sneaky cause of weak, floppy growth and fewer flowers later. For new grafts, think “support,” not “push.”
- At planting: Skip strong fertilizers in the planting hole. Compost is enough.
- Spring of year 1 or 2 (once growth begins): Apply a balanced slow-release fertilizer like 5-10-5 or 10-10-10 at a rate of about 1/4–1/2 cup per plant, scratched into the surface and watered in.
- After flowering (established plants): A light second feeding can help build reserves, especially on sandy soils.
Keep fertilizer a few inches away from stems to avoid burn and reduce rot risk around the crown area.
Common problems (and the fixes that actually work)
Problem: rootstock suckers taking over
Symptoms: Fast, vigorous shoots from below soil level; leaves may look different than the tree peony scion. You may get herbaceous-type stems that die back hard in winter.
What to do:
- Dig gently and locate where the shoot originates.
- Remove it at the source—tear or cut it flush against the rootstock, not above ground.
- If suckering is persistent, replant deeper so the graft union is 4–6 inches below soil level.
Problem: scion shrivels or blackens within weeks
Symptoms: Buds dry up; stem turns dark; union may look dry or loose.
Likely causes: Poor cambium contact, loose wrapping, hot/dry conditions during callusing, or scion wood that was too soft/green.
Fix:
- Graft during cooler weather (60–75°F is ideal).
- Make longer matching cuts (aim for 1–1.5 inch contact surfaces).
- Wrap tighter and fully seal the union with parafilm/tape to prevent dehydration.
Problem: graft rots (soft, smelly union)
Symptoms: Mushy tissue at the union; foul smell; collapse at soil line.
Likely causes: Waterlogged soil, poorly drained potting mix, planting in a low spot, or contaminated tools.
Fix:
- Improve drainage: raised bed, gritty mix, or different site.
- Water less frequently; never keep the area soggy.
- Sanitize tools with 70% alcohol between plants.
Problem: buds form but don’t open (or blooms are small)
Symptoms: Buds stall, brown, or open poorly; flowering is disappointing.
Likely causes: Too much shade, late frost damage, drought during bud swell, or the plant is still establishing.
Fix:
- Ensure 6+ hours of sun (or morning sun in hot areas).
- Water consistently during bud swell—don’t let the root zone dry out completely.
- In frost-prone sites, use a breathable frost cloth when temps threaten to drop below 28°F (-2°C) during bud stage.
Troubleshooting by symptom (quick diagnosis)
- Leaves yellowing from the bottom up + wet soil: suspect poor drainage/early root rot; reduce watering and improve drainage.
- Healthy leaves but no growth from scion in spring: scratch-test the scion; if brown and dry, it likely failed—watch for rootstock shoots.
- White powdery coating on leaves in late summer: powdery mildew; increase airflow, avoid overhead watering at night, and remove heavily infected leaves.
- Ants on buds: normal; they’re after nectar and don’t harm blooms.
Aftercare through the first winter (where many grafts are lost)
Your first winter goal is stable temperatures and a root system that doesn’t heave out of the ground. After the ground cools but before deep freeze, apply a loose mulch layer about 2–3 inches (5–8 cm) thick, kept a few inches away from stems. In very cold climates, a windbreak can help more than thicker mulch.
If your graft is in a pot, don’t leave it exposed on a sunny deck where it freezes and thaws repeatedly. Sink the pot into the ground or move it to an unheated garage that stays around 30–40°F (-1 to 4°C), watering just enough to keep the mix barely moist.
Planting depth, again—because it solves years of problems
I’ll repeat this because it’s the difference between a tree peony that improves every year and one that constantly fights you: bury the graft union 4–6 inches. This encourages the scion to develop its own roots, which:
- Reduces rootstock suckers
- Improves long-term vigor
- Prevents the “split personality” plant that grows two different types of stems
If you already have a grafted tree peony planted shallow, you can replant deeper in early fall. Dig wide, keep as much root as possible, and reset it at the correct depth.
A practical success checklist (use this before you start)
- Scion wood is firm with 2–3 buds, not soft and sappy
- Rootstock is healthy and thick enough (1/2–1 inch)
- Blade is sanitized and sharp (no crushed cuts)
- Cut surfaces are long enough (1–1.5 inches) for contact
- Union is wrapped airtight enough to prevent drying
- Planted with union buried 4–6 inches
- Soil drains well; watering is deep but not constant
When grafting goes right, you won’t see fireworks immediately. The first “win” is a scion that stays plump and alive through fall, then pushes clean growth the following spring. Keep notes—date, weather, scion thickness, planting depth. After a couple of seasons, you’ll know exactly what works in your yard, and you’ll be the person friends call when their peony “doesn’t look right.”
Sources: American Peony Society propagation guidance (2020); Royal Horticultural Society grafting guidance (RHS, 2023); University of Minnesota Extension propagation sanitation recommendations (2022).