When and How to Transplant Ferns
You go out to water and notice your fern has turned into a lopsided fountain—fronds flopping, the center getting woody, and the whole plant drying out faster than it used to. Or maybe the opposite: it’s thriving so hard it’s crawling into a walkway or shading out smaller perennials. Ferns are resilient, but they’re also creatures of habit. Transplant them at the wrong time or handle the roots like they’re a petunia, and they’ll sulk for months. Do it right, and they barely blink.
I’ve moved ferns out of foundation beds, out from under thirsty maples, and even rescued them from pots that turned into solid root bricks. The trick is matching timing to the fern type (evergreen vs. deciduous), prepping the new spot like you mean it, and keeping moisture steady for the first few weeks.
Best time to transplant ferns (and when to leave them alone)
If you remember one thing: transplant when the fern is least stressed and the soil is workable. For most home gardens, that means cool weather and evenly moist soil.
Sweet spots by season
- Early spring: When soil has thawed and daytime highs are around 50–70°F. Ideal for many deciduous ferns as new growth (fiddleheads) is just starting.
- Early fall: When nights cool to 45–60°F and you have 6–8 weeks before hard freeze. This is my go-to for most established clumps because roots keep growing while tops slow down.
- Summer: Possible only with extra care—shade, daily monitoring, and more water. I treat summer transplants as “emergency moves.”
- Winter: Avoid unless you’re in a mild climate and the ground isn’t frozen. Frozen soil + disturbed roots is a recipe for heaving and dehydration.
Extension guidance generally aligns with cool-season transplanting for perennials, emphasizing reduced water stress and faster root establishment. See University of Minnesota Extension (2020) on dividing and moving perennials, and NC State Extension (2022) guidance on perennial establishment and watering schedules after planting.
Evergreen vs. deciduous ferns: timing matters
Evergreen ferns (like Christmas fern) keep foliage through winter, so they transpire on mild days and can dry out. Deciduous ferns (like ostrich fern) die back and are often more forgiving.
| Fern type | Best transplant window | What you’ll see | Risk if moved at wrong time |
|---|---|---|---|
| Deciduous (e.g., ostrich, lady fern) | Early spring (as crowns wake) or early fall | Browned/dormant fronds or emerging fiddleheads | Summer move can scorch fronds and stall growth |
| Evergreen (e.g., Christmas fern) | Early fall is often easiest; spring also works | Green fronds year-round | Winter/summer transplant can dry the plant quickly |
| Indoor tropical (e.g., Boston fern) | Late spring to early summer indoors (stable temps) | Active growth with new fronds | Cold drafts <60°F can trigger leaf drop |
3 real-world transplant scenarios (and how I handle each)
Most fern moves fall into one of these buckets. Pick the scenario that matches your situation, then use the step-by-step section below.
Scenario 1: The fern is getting roasted—too much sun after a tree was removed
This is common after storm damage or pruning. Fern fronds bleach, crisp at the edges, and the soil dries fast. In this case, I transplant in early fall if I can wait. If it’s July and the fern is frying, I treat it like an urgent relocation: I move it on a cloudy day, cut fronds back by about 1/3 to reduce water loss, and baby it with steady moisture for 3–4 weeks.
Scenario 2: The clump is old and hollow in the center
Many ferns slowly creep outward, leaving a tired middle. That’s a classic sign it’s time to divide and replant the vigorous outer portions. I do this in early spring as buds swell, or early fall while soil is still warm.
Scenario 3: You’re moving a fern from pot to ground (or vice versa)
Pot-grown ferns often have circling roots and dry out fast. When moving to the ground, your biggest job is correcting the root ball and keeping the crown at the right height. When moving from ground to pot, your biggest job is matching moisture—pots can go from perfect to bone dry in a day.
Before you dig: set the new site up for success (soil, light, spacing)
Most transplant “failures” are really site problems. Ferns can survive rough handling, but they won’t thrive in the wrong light or soil moisture pattern.
Light: shade isn’t one-size-fits-all
- Dappled shade / morning sun: Ideal for many garden ferns.
- Deep shade: Works, but growth is slower and fronds may be thinner.
- Hot afternoon sun: Usually a problem unless soil stays consistently moist and the fern is sun-tolerant.
As a rule, if the spot gets more than 2–3 hours of direct afternoon sun in summer, expect to water more often or choose a different location.
Soil: what ferns actually want
Ferns like soil that holds moisture but drains well—think “wrung-out sponge,” not swamp and not dust. A loose, organic-rich loam is perfect.
- Target texture: Loam or sandy loam amended with organic matter
- Organic matter: Mix in 2–3 inches of compost into the top 8–10 inches of soil if the bed is thin or compacted
- pH: Many ferns are comfortable around 5.5–7.0 (species vary)
If the planting area puddles for more than 6 hours after rain, improve drainage or raise the bed. If the soil dries and cracks in summer, plan on compost + mulch and possibly drip irrigation.
Spacing: give them room to be ferns
Check mature spread, but a practical home-garden spacing is:
- Small ferns: 12–18 inches apart
- Medium ferns: 18–24 inches apart
- Large clumpers/runners (e.g., ostrich fern): 24–36 inches or more
Step-by-step: how to transplant ferns (the reliable method)
This is the method I use when I want the fern to settle in with minimal drama.
Tools and materials
- Sharp spade or garden fork
- Hand pruners
- Bucket or tarp (to keep roots shaded and damp)
- Compost or leaf mold
- Mulch (shredded leaves or fine bark)
- Water source (hose with gentle spray)
1) Water the fern first
Water the plant deeply 12–24 hours before you dig. Moist soil holds together around roots, and hydrated fronds handle the move better.
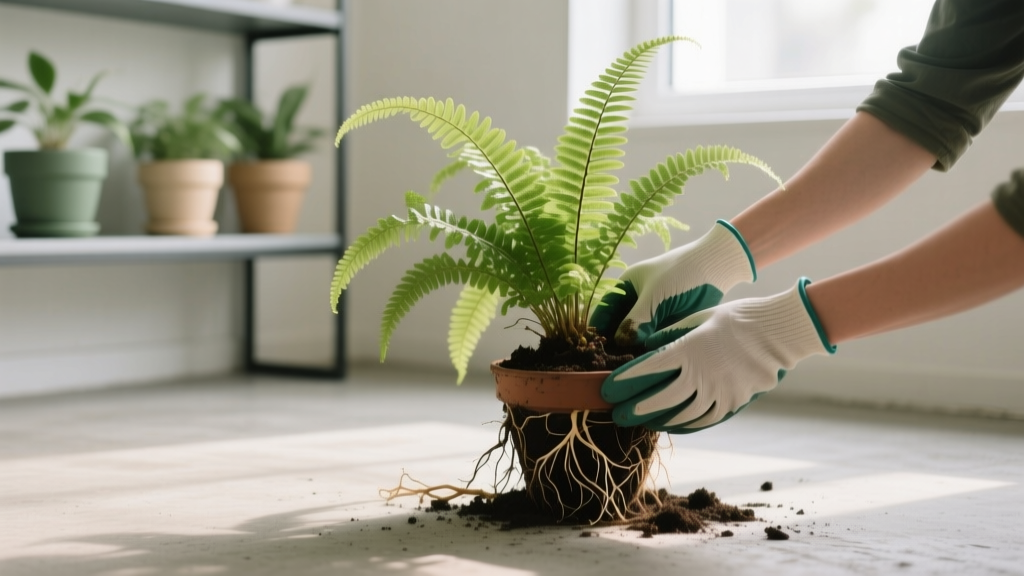
2) Dig a wide root ball
Start digging at least 6–8 inches out from the crown for small ferns; 10–12 inches for larger clumps. Go down about 6–10 inches (deeper if the fern has a thick crown).
- Use a spade to slice a circle.
- Switch to a fork to lift and reduce root tearing.
- Lift from multiple sides instead of prying from one spot.
3) Keep roots shaded and damp
Roots dry out fast, especially in wind. Set the clump on a tarp in shade and cover with damp burlap or a damp towel if there’s any delay. I try to replant within 30 minutes when possible.
4) Divide if needed (optional, but often smart)
If the clump is huge or hollow-centered, divide it.
- Identify vigorous outer sections with healthy crowns.
- Cut with a sharp spade or knife into portions—often 2–4 divisions from a mature clump.
- Discard (or compost) the dead, woody center.
“The best divisions come from the outside of the clump where growth is most vigorous; the center often declines with age.” — University of Minnesota Extension perennial division guidance (2020)
5) Plant at the right depth
Set the fern so the crown sits at the same level it was growing before. Planting too deep can encourage crown rot; too high exposes roots and dries them out.
- Backfill with native soil improved with compost (don’t create a fluffy “pot” in heavy clay).
- Firm gently—don’t stomp.
6) Water in thoroughly
After planting, water slowly until the root zone is soaked—typically 1–2 gallons for a small-to-medium transplant, more for large clumps. The goal is to settle soil around roots and eliminate air pockets.
7) Mulch to stabilize moisture
Add 2–3 inches of mulch, keeping it 1–2 inches away from the crown. Mulch is the difference between “constant babysitting” and “steady establishment.”
Watering after transplant: the make-or-break schedule
Ferns don’t like drying out, especially while rebuilding roots. But they also don’t want to sit in a soggy crater. You’re aiming for consistently moist soil.
Outdoor ferns (in-ground)
- Week 1: Check daily. Water when the top 1 inch of soil starts to dry. In warm weather, that may mean watering 3–5 times that week.
- Weeks 2–4: Water 1–2 times per week depending on rainfall and temperature, soaking the root zone each time.
- After 4–6 weeks: Transition to your normal fern watering rhythm: usually weekly in dry spells.
NC State Extension (2022) emphasizes deep, consistent watering during establishment for perennials; the same logic applies to ferns—especially in the first month.
Indoor/tropical ferns (pots)
- Keep temps steady: 65–75°F is a comfortable range for Boston-type ferns.
- Water when the top 1/2–1 inch of mix is dry.
- Aim for 40–60% indoor humidity if possible; dry air causes crispy tips.
Soil and potting mix choices (and a method comparison with real numbers)
If you’re transplanting into a container—or refreshing a container fern—your mix matters more than almost anything else.
| Method | Typical mix recipe | Drainage & watering frequency | Best use case |
|---|---|---|---|
| A: Moisture-retentive pot mix | 2 parts peat/coco-based potting mix + 1 part fine bark + 1 part perlite | Drains well; usually water every 3–5 days indoors (varies by pot size) | Boston fern indoors, bright indirect light |
| B: Fast-draining mix | 2 parts potting mix + 2 parts perlite + 1 part bark | Dries faster; may need water every 2–3 days in warm rooms | If you tend to overwater or pots stay wet too long |
| C: In-ground amended bed | Native soil + 2–3 inches compost worked into top 8–10 inches | Water 1–2x/week during establishment; less once rooted | Most hardy ferns outdoors |
Comparison analysis: Method A holds moisture longer, which reduces watering frequency by roughly 1–2 days compared with Method B in typical indoor conditions. Method B can be safer for gardeners who water “on a schedule” rather than by feel, because it reduces the odds of roots staying saturated for more than 48 hours.
Light after transplant: what to do if the old and new sites don’t match
Moving a fern from deep shade to brighter conditions is like moving a person from an office to a beach—there’s going to be a burn unless you acclimate.
- Shade to brighter shade: Expect some paling or minor scorch on older fronds. Keep evenly moist and let new fronds adapt.
- Shade to morning sun: Usually fine with mulch and moisture.
- Shade to afternoon sun: Use temporary shade cloth (30–50% shade) for 2–3 weeks, or plant where it gets protection after 1 p.m.
Feeding: when fertilizer helps—and when it backfires
Freshly disturbed roots don’t want a blast of fertilizer. I focus on soil organic matter first.
- At planting: Compost is enough. Avoid high-nitrogen fertilizers in the hole.
- After 4–6 weeks: If growth looks weak, apply a gentle, slow-release fertilizer at 1/2 strength (follow label rates), or top-dress with 1 inch of compost.
- Containers: Use a balanced fertilizer at low dose during active growth; stop feeding if fronds are stressed or browning.
Overfeeding tends to show up as weak, floppy fronds and browned tips—especially in pots where salts build up.
Common problems after transplant (symptoms, causes, fixes)
If a fern looks rough after a move, don’t panic. Most issues trace back to water balance, planting depth, or light shock.
Problem: Fronds wilt and collapse within 24–48 hours
- Likely causes: Roots dried during the move; root ball too small; hot/windy conditions.
- Fix: Water deeply immediately (slow soak). Add temporary shade. If the plant is badly wilted, trim back up to 1/3 of fronds to reduce transpiration. Keep soil consistently moist for 10–14 days.
Problem: Brown, crispy tips and edges
- Likely causes: Underwatering; low humidity (indoors); too much sun; fertilizer salts.
- Fix: Check soil moisture at 2 inches deep. Mulch outdoors. Indoors, raise humidity (pebble tray, humidifier) and keep away from heating vents. If fertilized recently, flush the pot with water equal to 3x the pot’s volume to rinse salts (let it drain fully).
Problem: Yellowing fronds, soft crown, or a sour smell
- Likely causes: Planting too deep; waterlogged soil; crown rot.
- Fix: Improve drainage immediately—pull mulch back, stop frequent watering, and consider lifting and replanting at correct depth. In containers, repot into a better-draining mix and ensure drainage holes are open.
Problem: No new growth for weeks (especially in spring)
- Likely causes: Normal transplant pause; cold soil; roots damaged; too much shade.
- Fix: Be patient up to 3–6 weeks in cool weather. Keep moisture steady. Don’t fertilize heavily to “force” growth. If it’s in deep shade and consistently cold, moving it to brighter dappled shade can help later in the season.
Problem: Chewed fronds or ragged holes
- Likely causes: Slugs/snails (very common on freshly watered transplants).
- Fix: Hand-pick at dusk, use iron phosphate bait as directed, and reduce hiding spots (boards, thick debris). A ring of coarse mulch can slow them down, but moisture still matters for fern recovery.
Troubleshooting by situation: quick calls I make in the garden
Here are a few “if this, then that” calls that save time.
If the fern must be moved in summer
- Move on a cloudy day or in the evening when temps are under 80°F.
- Pre-water the day before.
- Cut fronds back by up to 1/3 if the root ball is compromised.
- Use 2–3 inches mulch immediately.
- Plan on checking moisture daily for 2 weeks.
If you’re transplanting near tree roots
Tree roots steal water—fast. In that situation, I widen the planting hole, add compost, and commit to a real watering plan. If you can’t water during dry spells, pick a spot away from shallow-rooted trees like maples.
If the fern is a runner (spreads by rhizomes)
Ostrich fern and others can travel. When transplanting, include a wider section of soil and rhizomes, and consider edging or root barriers if you want to keep it in bounds. If you only grab the crown and leave rhizomes behind, you’ll often get “surprise ferns” popping up in the old spot next year.
Aftercare checklist: what I do for the first month
This is the routine that keeps transplants from turning into rehab projects.
- Days 1–7: Check moisture daily; water when top 1 inch dries.
- Week 2: Maintain even moisture; watch for slug damage.
- Weeks 3–4: Reduce watering frequency but increase depth per watering (so roots chase moisture down).
- At 4–6 weeks: Top-dress with compost if needed; only then consider light fertilizer.
- Keep mulch in place: Replenish to maintain 2–3 inches as it breaks down.
Sources that back up good practice
I’m a big believer in “garden experience + extension science.” Two solid references for timing and establishment practices:
- University of Minnesota Extension. Dividing and transplanting perennials (2020).
- North Carolina State University Extension. Watering and establishing landscape plants (2022).
If you time the move for cool weather, keep roots from drying out, plant at the original depth, and stay consistent with moisture for the first few weeks, most ferns reward you with fresh fronds and steady growth. And if they look a little rough right after transplanting? Give them shade, moisture, and time—ferns have a long memory, but they also have a strong will to live.