12 Garden Hacks for Pizza Garden Planning
The biggest pizza-garden mistake isn’t picking the “wrong” tomato—it’s planting everything like a regular veggie patch and then realizing your basil is shaded out, your oregano is taking over, and your sauce tomatoes are ripening all at once when you’re out of town. A pizza garden works best when it’s planned like a menu: you want a steady stream of ingredients, not one chaotic harvest week and a bed full of regret.
Below are 12 hacks I use (and have watched other gardeners use) to make a pizza garden feel almost unfairly easy—more flavor, fewer problems, and a lot less money spent at the garden center.
Plan Like a Pizzeria: Layout & Timing Hacks
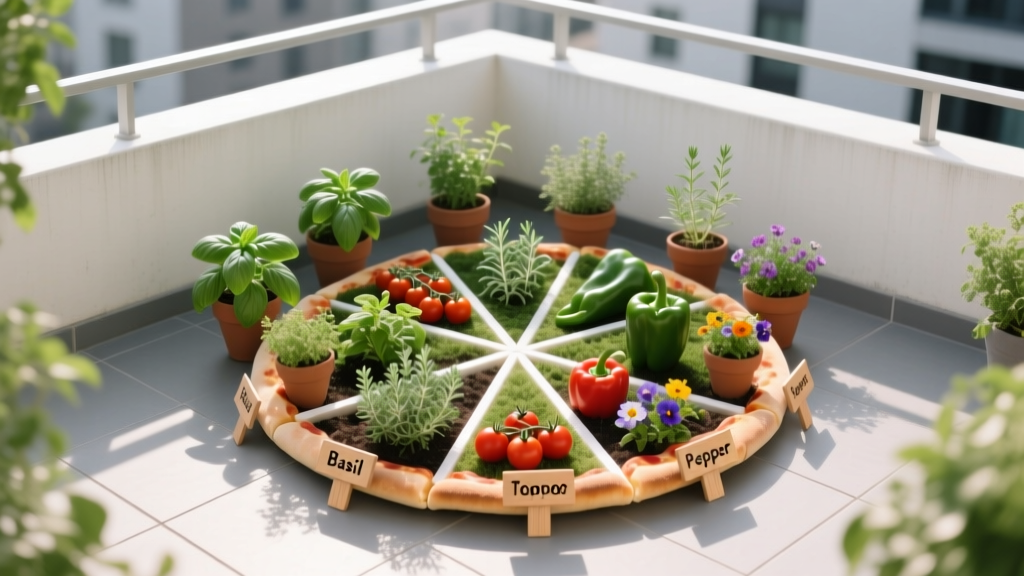
1) Build a “Slice” Bed So Every Plant Gets Its Job
Instead of rows, lay out a round bed (or a square divided into wedges) like pizza slices: one wedge for sauce tomatoes, one for basil, one for onions/garlic, one for peppers, one for oregano/thyme. Aim for a 6–8 ft diameter circle (or a 4x8 ft raised bed divided into 4–6 zones) so taller plants (tomatoes, peppers) go on the north side and herbs stay sunlit. This simple geometry prevents the classic mistake where basil gets leggy because the tomatoes grew into a wall.
Real-world example: In a 4x8 bed, place 2 tomato plants along the north edge (spaced 24–30 inches apart), 2 peppers in the middle (18 inches apart), and reserve the south edge for basil in a 12-inch-wide strip—your basil stays bushy instead of stretched.
2) Stagger Your Tomatoes on Purpose (So Sauce Isn’t a One-Week Event)
To avoid a single overwhelming harvest, plant two tomato “waves” 2–3 weeks apart, or mix varieties with different maturity dates (e.g., one at ~65 days and another at ~80 days). If you have a short season, do it with transplants: buy one 4-inch pot now and one slightly smaller transplant later, or start one indoors 14 days after the first. You’ll get a steadier stream of slicers and sauce tomatoes for weekly pizza nights.
Scenario: A busy family in Zone 6 planted all paste tomatoes on Memorial Day and got 30+ lbs in one burst in August—most went soft. The next year they planted one paste tomato on May 20 and one on June 10 and froze sauce in manageable batches.
3) Use the “1 Bed = 1 Meal” Spacing Rule to Prevent Overcrowding
Pizza gardens get overstuffed because the ingredient list is long. A quick rule that stops the madness: in a 4x8 ft bed, cap yourself at 2 tomatoes, 2 peppers, 6–8 basil plants, and one contained oregano/thyme plant (in a pot sunk into the soil). This keeps airflow up (fewer fungal issues) and gives you enough toppings without turning the bed into a jungle.
Specific numbers: Tomatoes need roughly 4 sq ft each, peppers ~2 sq ft, basil ~1 sq ft for 2–3 plants if you pinch regularly.
Soil & Nutrition Shortcuts (Flavor Without Fancy Bottles)
4) Do a 10-Minute Soil Test Hack Before You Buy Anything
Before adding random “tomato fertilizer,” get a basic soil test every 2–3 years; many county extension offices offer it for roughly $10–$20, and it can save you from wasting money on nutrients you already have. Penn State Extension notes soil testing is the best way to determine lime and nutrient needs (Penn State Extension, 2023). If your pH is off (common), you can chase deficiencies all season and never fix the real problem.
Example: A gardener kept adding fertilizer for yellowing leaves—turns out the soil pH was 5.2 and nutrients were locked up. After liming to the recommended range (often ~6.2–6.8 for vegetables), plants greened up within weeks.
5) Mix a “Pizza Compost Blend” That Feeds Slow and Steady
For raised beds and in-ground amendments, a simple blend works: 2 parts finished compost + 1 part coconut coir (or leaf mold) + 1 part native soil/topsoil. Add 1–2 cups of a balanced organic fertilizer per 10 sq ft at planting (follow label rates), then top-dress with compost midseason. This combo holds moisture (hello, basil) while keeping drainage decent for tomatoes and peppers.
DIY alternative: If coir is pricey, use shredded leaf mold from your own yard—free and incredibly effective after a year of breakdown.
6) Calcium Without the Eggshell Myth (Use the Right Fix, Fast)
Eggshells are fine long-term, but they don’t correct calcium issues quickly enough to prevent blossom end rot on tomatoes. If you suspect a calcium/pH issue, prioritize consistent moisture and proper pH; calcium uptake is often a watering/pH problem more than a “not enough calcium” problem. University of Minnesota Extension explains blossom end rot is linked to inconsistent watering and calcium movement in the plant (University of Minnesota Extension, 2020).
“Blossom end rot is caused by a lack of calcium in the developing fruit, often due to uneven watering rather than low calcium in the soil.” — University of Minnesota Extension (2020)
Actionable hack: Mulch immediately after planting with 2–3 inches of straw or shredded leaves and water deeply 1–2 times per week instead of light daily splashes—this stabilizes moisture so calcium can actually move into fruit.
Planting & Training Tricks for Compact, Productive Growth
7) Cage Tomatoes the “Tall and Tight” Way (And Stop Buying Flimsy Cages)
Those cheap cone cages buckle right when tomato season gets good. Use a 6–7 ft T-post and cattle panel (or concrete remesh) to make a sturdy vertical trellis; one 16 ft cattle panel (often ~$30–$40) can support 4–6 tomato plants for years. Train stems with soft ties every 8–10 inches—less breakage, better airflow, easier harvest.
Cost comparison: Two $8 cages that fail every year adds up fast; one panel setup can outlast a decade with minimal upkeep.
8) “Basil Border” Hack: Plant in a Strip, Not Random Clumps
Basil is a pizza garden MVP, but it works best as an edge planting you can harvest like a hedge. Plant basil 8–10 inches apart in a 10–12 inch wide strip along the sunniest edge; pinch tips once plants hit 6 inches tall to force branching. You’ll get more usable leaves and fewer lanky stems.
Scenario: A patio gardener planted basil between peppers “where it fit” and got spindly plants. Switching to a sunny border strip produced enough basil for weekly pesto plus pizza topping harvests all summer.
9) Contain Oregano Like It’s a Pet That Escapes (Because It Will)
Oregano and some thymes can spread aggressively and bully nearby plants. Sink a 1–3 gallon nursery pot into the bed and plant oregano inside it; the rim should sit 1 inch above soil level to block runners. You keep that classic pizza flavor without letting oregano turn your whole bed into an herb monoculture.
DIY alternative: No spare pot? Use a bottomless bucket or a cut-down plastic tote with drainage holes punched in.
Watering, Mulching & Microclimate Cheats
10) Install a $15 Gravity Drip Setup (No Timer Needed)
If you’re tired of guesswork watering, run a basic drip line from a raised rain barrel or elevated bucket—gravity-fed drip kits can be surprisingly affordable (often $15–$30). Put emitters at the base of tomatoes and peppers, then use a soaker line for the basil strip. This targets roots, keeps leaves drier (fewer fungal headaches), and uses less water than sprinklers.
Specific setup: Place 1–2 emitters per tomato (1 GPH each) and run the system for 45–90 minutes depending on heat—adjust based on soil moisture 2–3 inches down.
11) Mulch for Flavor: Keep Roots Even, Reduce Stress Spikes
Inconsistent moisture can make tomatoes split and herbs taste harsher or bolt faster. A 2–3 inch mulch layer (straw, shredded leaves, or untreated grass clippings dried first) reduces evaporation and buffers temperature swings. Leave a 2-inch gap around tomato stems to prevent stem rot issues.
Example: One gardener’s tomatoes split after every summer thunderstorm—adding mulch plus deeper, less frequent watering reduced splitting dramatically the next season.
Pest & Disease Moves That Save Your Harvest
12) Use “Sacrificial Greens” and Quick Covers to Outsmart Pests
Pizza gardens attract the same troublemakers: flea beetles on young peppers, aphids on herbs, hornworms on tomatoes. Plant a small “sacrificial” patch of fast greens (like arugula) 2–3 ft away to draw flea beetles early, and keep lightweight row cover on hand to protect transplants for the first 2–3 weeks. When tomatoes start flowering, remove covers so pollinators can do their job.
Scenario: A community garden plot kept losing pepper seedlings to flea beetles. Adding row cover hoops (made from 1/2-inch PVC) for the first 18 days turned pepper survival from “maybe” to nearly 100%.
Smart Swaps, Money Savers & Real-World Pizza Garden Setups
Tip Hack: Choose Varieties Based on Your Pizza Style (Not the Seed Packet Hype)
If you love crispy thin crust with quick bakes, go for smaller, less watery tomatoes (like paste types) plus compact basil. If you’re doing cast-iron or sheet-pan pizza, slicers plus a sturdier pepper can shine. Picking based on how you actually cook reduces waste—because you’ll use what you grow.
| Pizza Garden Goal | Method A | Method B | Best For | Tradeoff |
|---|---|---|---|---|
| Steady harvest | Stagger planting by 2–3 weeks | Mix early (65–70d) + mid (75–85d) varieties | Busy schedules, weekly pizza nights | Requires a little planning (labels matter) |
| Small-space growing | 1 determinate tomato + 2 peppers in a 20–30 gal container | 2 dwarf tomatoes in separate 10–15 gal containers | Patios, balconies | More frequent watering in containers |
| Budget support system | DIY cattle panel trellis (~$30–$40, multi-year) | Buy 2–3 heavy-duty cages ($15–$30 each) | High yield tomato growers | DIY takes an hour up front |
Case Example 1: The 4x8 Raised Bed “Friday Night Pizza” Plan
For a classic backyard setup: 2 indeterminate tomatoes on the north edge, 2 peppers mid-bed, basil strip along the south edge, and oregano contained in a sunk pot in one corner. Add 1–2 onions along the edge if you have space, or grow green onions in a separate pot to avoid crowding. This layout is easy to water, easy to harvest, and it doesn’t collapse into a shaded mess by July.
Case Example 2: The Patio Pizza Garden (3 Containers, Big Flavor)
No bed? Use three containers: one 20–30 gallon fabric pot for a determinate paste tomato with a stake, one 10–15 gallon pot for peppers (1–2 plants), and one window box for basil and thyme. Put all three where they get 6+ hours of sun, and group pots close so you can water efficiently. This setup also makes pest control easier—you can move plants if one gets hammered.
Case Example 3: The “I Travel in Summer” Low-Maintenance Setup
If you’re gone on weekends, prioritize consistency: mulch heavily (3 inches), use a gravity drip line from a rain barrel, and pick determinate tomatoes or dwarf varieties that don’t need constant pruning. Add a cheap moisture meter (often ~$10–$15) or do the finger test 2–3 inches down before you leave—then water deeply once rather than daily sprinkles. Your plants handle missed days far better when the root zone stays evenly moist.
Pizza gardens are one of the few garden projects where planning pays off immediately: your harvest matches your cooking habits, your bed stays organized, and you stop buying store-bought herbs that wilt in the fridge. Set up your “slices,” keep the aggressive herbs contained, and build a support system for tomatoes that won’t fold midseason—then let Friday night do the rest.