How to Build a Simple Garden Hose Reel
The fastest way to kill a perfectly good garden hose isn’t leaving it in the sun—it’s yanking it off the ground when it’s kinked and full of pressure. That one move can permanently crease the inner lining, and after a few repeats you’re stuck with a hose that “mysteriously” sprays weak and leaks at the worst time. A simple DIY hose reel prevents kinks, keeps fittings off the dirt, and makes watering feel like a one-hand job instead of a wrestling match.
Below are practical, build-it-this-weekend tips that’ll give you a reel that actually works (doesn’t tip, doesn’t bind, doesn’t shred your hose). I’ll also sprinkle in a few money-saving swaps and real-life setups so you can copy what fits your yard.
Before You Cut Anything: Plan for Your Hose and Your Yard
Tip: Measure the hose length and diameter—don’t guess
Hose reels fail when the drum is too small for the hose you own. Measure length (common: 50 ft, 75 ft, 100 ft) and the hose ID: 5/8 in is the typical “garden hose” size, while 1/2 in is lighter and 3/4 in is heavier-duty and bulkier. As a rough reality check, a 100 ft, 5/8 in hose wants a drum at least 12–14 in in diameter to coil without fighting you.
Tip: Put the reel where the hose naturally wants to live
Pick a spot within 3–6 ft of the spigot so your supply connection is short and tidy. Mounting too far away forces a long leader hose that gets stepped on and kinked—the exact mess you’re trying to avoid. Example: if your spigot is behind shrubs, mount the reel on the fence line and run a 3 ft leader to the spigot instead of dragging the entire hose through the plantings.
Tip: Decide up front—wall-mounted or freestanding
Wall-mounted reels are compact and stable, but only if you have solid framing (studs, posts, masonry). Freestanding reels are great for renters or places with no good mounting surface, but they need a wide base so they don’t faceplant when you pull. If you’re unsure, build freestanding first; you can always lag-bolt it later.
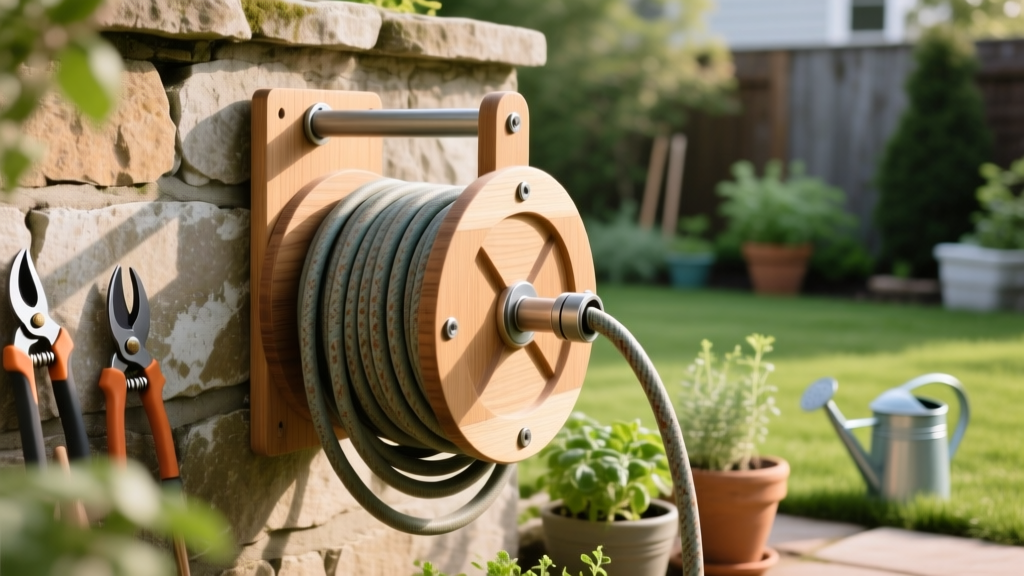
A Simple Build That Works: The Basic Reel Design
Tip: Use a “wide drum, big axle” layout to prevent binding
The easiest reliable design is two round sides (like wheels), spacers between them, and a central axle you can crank. Aim for an inside drum width of 10–12 in for a 5/8 in hose so it lays neatly without piling into a cone. A thicker axle (like 1/2 in steel rod or 3/4 in hardwood dowel) reduces wobble and keeps the crank smooth.
Tip: Keep your minimum bend radius generous
Hoses don’t like tight bends—kinks start where the curve is too sharp. Many hose and irrigation manufacturers recommend avoiding tight radii; bigger loops preserve flow and reduce stress on the reinforcement. A good DIY rule: if your drum is under 12 in diameter for a 5/8 in hose, you’ll feel it fight back during rewinding.
Tip: Choose materials based on where it will sit (sun, rain, sprinklers)
If your reel sits outdoors full-time, exterior-rated lumber and corrosion-resistant hardware matter more than fancy design. Use pressure-treated wood or cedar for the frame, and stainless or hot-dip galvanized screws/bolts where water will splash. If it’ll be under a covered porch, you can save money using ordinary pine plus a good exterior paint.
Shopping List and Cost Reality (So You Don’t Overspend)
Tip: Build it for less than a store-bought reel—with smart substitutions
A basic DIY reel usually lands around $35–$90 depending on what you already have. The two budget killers are fancy swivels and hardwood; skip both unless you need them. Real-world example: a simple wood-and-rod reel with a hand crank can be built from a half-sheet of exterior plywood and a few bolts—often cheaper than a mid-range cart reel.
| Option | Typical Cost | Best For | Watch Outs |
|---|---|---|---|
| DIY wood reel (plywood + 1/2 in rod) | $35–$90 | Custom size, sturdy, easy repairs | Needs weatherproofing; must align axle |
| Store-bought wall reel (plastic) | $45–$140 | Quick install, compact | UV brittleness; limited capacity |
| Store-bought cart reel (metal) | $90–$220 | Long hoses, move around yard | Wheels wobble; fittings leak if low quality |
Tip: Spend your money on the swivel—or skip it entirely
A swivel inlet keeps the leader hose from twisting while you crank, but not every reel needs one. If your spigot is close and the hose doesn’t twist much, you can connect directly and just “unwind” with your feet guiding the line. If you do buy one, look for a 3/4 in GHT (garden hose thread) brass swivel—often $12–$25—and seal threaded connections with 3–5 wraps of PTFE tape.
Tip: Use a short leader hose to protect your main hose
Your main hose is expensive; the leader is your sacrificial piece. Use a 2–3 ft leader from spigot to reel inlet so if anything gets kinked or sun-baked, it’s the cheap part. Example: keep a spare leader in the shed; replacing a $10 leader beats replacing a $45 hose.
Build Tips That Prevent Wobble, Splinters, and Frustration
Tip: Cut drum sides accurately—use a string compass
Perfect circles aren’t mandatory, but close counts: uneven drum sides make the reel wobble and scrape. For a simple “string compass,” screw a scrap strip to your plywood, drill a small hole at the radius you want (say 7 in for a 14 in diameter circle), and spin a pencil around a center point. Sand the edges smooth so your hose doesn’t abrade on every rewind.
Tip: Space the drum sides with blocks, not just bolts
If you only use long bolts as spacers, the sides can flex inward over time. Instead, use 3–4 solid spacer blocks (like 2x2 offcuts) between the circles to create a rigid drum. Example: place blocks at 12, 3, 6, and 9 o’clock positions so the drum stays square even when the hose is wet and heavy.
Tip: Add bushings (cheap!) for a smoother crank
Wood-on-metal friction gets squeaky, then grabby. Slip a pair of simple nylon bushings or even 1/2 in ID washers between the wood and the frame to reduce friction. It’s a small upgrade (often $2–$6) that makes the reel feel like a “real tool” instead of a homemade contraption.
Tip: Build a wide base so it doesn’t tip when you pull
The reel will tip the first time you tug at an angle unless the base is generous. For freestanding reels, aim for a base footprint around 18 x 24 in or larger, and keep the drum low—centerline around 12–16 in off the ground. A simple trick: add two “outrigger” feet that stick out 4–6 in on each side.
Hose-Friendly Details That Make It Feel Effortless
Tip: Install a hose guide so coils stack evenly
The biggest annoyance with a simple reel is the hose piling up on one side. A hose guide can be as basic as a U-shaped piece of smooth metal or PVC positioned right in front of the drum. Real-world example: a 3/4 in PVC U-bracket with rounded edges can guide the hose left-right as you crank, preventing “mountains” that jam the next rewind.
Tip: Round over every edge the hose touches
Sharp edges chew hoses slowly—like sandpaper you don’t notice until it’s too late. Use sandpaper or a router to round over the rim of the drum sides and any guide points. Spend 10 minutes here and you’ll save yourself from mystery pinhole leaks later.
Tip: Don’t store the hose under pressure
Leaving the hose pressurized stresses fittings and can worsen tiny leaks at the coupling. Many extension services recommend relieving pressure after use to reduce wear and improve safety. The habit: shut off the spigot, squeeze the spray nozzle for 3–5 seconds to bleed pressure, then reel it in.
“Coiling hoses neatly and storing them out of the sun helps extend hose life and prevents kinks and cracking.” — University of California Agriculture and Natural Resources (UC ANR), 2020
Weatherproofing and Longevity (So You Don’t Rebuild Next Year)
Tip: Seal plywood edges like you actually mean it
Plywood fails from the edges first. Brush on exterior wood glue or a dedicated edge sealer, then paint or stain once it dries—two coats is the sweet spot for DIY durability. Example: sealing the edges of the drum circles takes an extra 20–30 minutes but can add seasons of life if the reel sits in splash zones.
Tip: Keep it out of constant UV when possible
Sunlight degrades both hoses and many plastics over time. Texas A&M AgriLife Extension (2019) notes that UV and heat accelerate deterioration in many garden materials, especially when left exposed. If your only spot is sunny, add a simple shade board above the reel or mount it on the north/east side of a structure where it gets less afternoon sun.
Tip: Winterize with a 60-second routine
In freezing climates, trapped water can split fittings and crack hoses. Before first hard freeze, disconnect, drain, and store the hose—or at least reel it so the nozzle end points down to drain. If you keep the reel outdoors, pop the leader hose off and store it inside; that’s often the first piece to crack.
Three Real-World Builds You Can Copy
Scenario: Small patio garden with one spigot and tight space
Go wall-mounted: mount the frame to studs or masonry, and keep the drum narrow—around 10 in wide—so it doesn’t stick out like a shelf. Use a 50 ft 5/8 in hose and a 2 ft leader so the connection stays tucked close to the wall. Example: a townhouse patio setup benefits from a reel mounted 48–54 in high so you’re not bending down every time you rewind.
Scenario: Big yard with a 100 ft hose that always tangles
Build freestanding with a wide base and a larger drum diameter. Aim for a drum diameter of 14–16 in and a base at least 24 in wide so you can pull hard without tipping. Add a hose guide (even a simple eyelet on a short arm) so the coils lay evenly; this is where “simple” reels usually fail if you skip the guide.
Scenario: Community garden plot where theft and weather are concerns
Make it boring and lockable: use a compact wall mount on a shared shed or a heavy post, then thread a cable lock through the frame. Use galvanized hardware and paint everything a neutral color so it doesn’t “walk away.” Example: a reel built from treated lumber plus 3/8 in carriage bolts tends to survive shared use better than plastic reels that crack when someone drops them.
DIY Alternatives When You Want Even Simpler
Tip: The “bucket reel” hack for micro-gardens
If you’re working with a 25 ft hose on a balcony or tiny courtyard, coil it into a large utility bucket and cut a smooth notch near the rim for the hose end. It keeps the coil contained and off gritty concrete that abrades rubber. Cost is often $5–$12 if you already have a bucket, and it’s surprisingly tidy.
Tip: Repurpose a bicycle wheel as a reel side
Old bike wheels make great drum sides—light, rigid, and already round. Use two wheels with a simple spacer frame between them, then mount on an axle; the hose wraps around the spacer “drum.” Real-world example: a neighbor build using two 26 in wheels stored a 75 ft hose easily and looked oddly intentional once painted.
Tip: Use PVC for the drum if woodworking tools are limited
You can build a functional reel from 3/4 in PVC pipe and fittings: two end “squares” or circles and a central drum. PVC won’t rot, and it’s easy to cut, but it can get brittle in intense sun over years—paint helps. If you go this route, sand every cut edge because PVC burrs can scuff hoses fast.
Small Upgrades That Make a Big Difference
Tip: Add a parking spot for the nozzle so it doesn’t drip on your shoes
Mount a simple hook or short piece of PVC near the reel to hold the spray nozzle. This keeps the nozzle from dragging in dirt and saves the trigger from getting jammed with grit. Example: a $2 utility hook placed 6 in above the reel prevents the “mystery puddle” right where you stand.
Tip: Mark a “stop line” so you don’t crank the coupling into the drum
When you reel in too far, the metal coupling can slam into wood and eventually crack something. Wrap a bright tape band around the hose about 18 in from the end so you know when to stop cranking. It’s a tiny hack that protects fittings and keeps the reel looking new.
Tip: Use quick-connects only where they pay off
Quick-connect fittings are convenient, but cheap sets leak and restrict flow. Put one set at the nozzle end if you swap tools often, and keep the reel/spigot connections solid brass threaded where possible. Budget example: one quality quick-connect set might cost $12–$18; three cheap sets at $6 each can end up costing more once they start dripping.
A Few Proven Hose Habits That Keep the Reel Working
Tip: Rewind with light tension and a steady pace
Cranking too fast makes loose loops that collapse into kinks later. Keep a gentle pull on the hose as you wind—think “firm handshake,” not tug-of-war. Example: if you walk toward the reel while rewinding (instead of standing still), the hose tends to lay flatter and you’ll finish faster.
Tip: Rinse grit off before rewinding if your hose drags through soil
Sand and soil on the hose act like abrasive paste, especially on wood drums. If your hose crosses garden beds, spray it for 10–15 seconds with the nozzle as you walk it back—just enough to knock off grit. Your reel will stay smoother, and your hose won’t get that rough “aged” look as quickly.
Tip: Check fittings twice a season—spring and mid-summer
Most leaks start as a slow seep at the coupling washer. In spring, replace worn washers (they’re usually $1–$3 for a pack), and mid-summer snug any loosened connections by hand. This is also the moment to rewrap PTFE tape on threaded joints if you see persistent drips.
If you build your reel with a generous drum diameter, a stable base (or solid wall mount), and at least one hose-friendly detail like a guide or rounded edges, you’ll notice the difference immediately: fewer kinks, faster cleanup, and a hose that lasts longer than a season or two. And the best part is you can keep it simple—just smart geometry, decent hardware, and a couple of small “future you will thank you” upgrades.
Sources: University of California Agriculture and Natural Resources (UC ANR), 2020; Texas A&M AgriLife Extension, 2019.