DIY Tomato Cages from Concrete Remesh
The most expensive tomato cage in the store is usually the first one to collapse—right around the time your plants are loaded with fruit and you’re feeling smug. That classic cone-shaped wire “support” is often too short (3 feet doesn’t cut it), too flimsy, and too narrow, so the plant bulges out the sides like a busted suitcase. If you’re tired of rescue-staking tomatoes in July, concrete remesh cages are the shortcut: tall, sturdy, and basically indestructible.
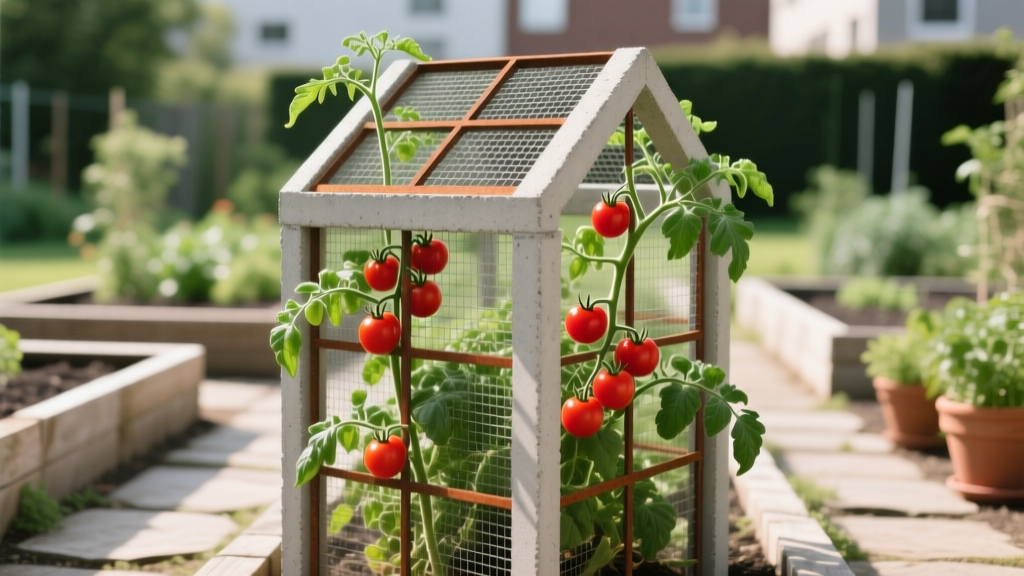
Concrete remesh (also sold as “reinforcing mesh”) is the heavy-gauge welded wire used in concrete slabs. In the garden it turns into a cage that can handle 6–8 feet of vine, wind, and a week you forgot to prune. The best part: you build once and reuse for years.
Remesh 101: pick the right material and plan your cage size
Tip: Buy the right panel so you’re not fighting your tools
Look for concrete remesh sheets with 6-inch squares, typically 5 ft x 7 ft panels. The 6-inch openings are big enough to get your hand through to harvest, but tight enough to corral stems. Avoid the tiny-grid “hardware cloth” style—harvesting becomes a knuckle-scraping chore.
Real-world example: If your local yard carries both 4-inch and 6-inch grid, grab the 6-inch. That extra 2 inches makes cherry tomato harvests faster and less prickly.
Tip: Size your cage to the tomato you actually grow
For indeterminate tomatoes (the ones that keep growing), a cage height of 5 to 6 feet is the sweet spot. For determinates (more compact), 4 feet is often enough and easier to store. A good general cage diameter is 18–24 inches; narrower cages get overcrowded and invite disease by restricting airflow.
Case example: Growing ‘Sungold’ or ‘Brandywine’? Go 6 feet tall. Growing ‘Roma’? A 4-foot remesh cage keeps fruit off the ground without wasting material.
Tip: Don’t skip airflow—tomatoes hate tight quarters
Cages work best when they keep foliage lifted and spread out, not packed into a green meatball. Wider cages increase airflow and reduce leaf wetness time, which helps limit fungal issues. Extension recommendations routinely stress spacing and airflow as a disease-management tool for tomatoes (University of Minnesota Extension, 2020).
Real-world example: If you’ve had early blight show up by mid-season, move from an 18-inch to a 24-inch cage and prune the lowest 8–12 inches of foliage once plants are established.
Build it once: cutting, forming, and de-spiking like a pro
Tip: Cut panels with bolt cutters—save your grinder for metalwork days
Use 24–36 inch bolt cutters to cut remesh cleanly and quickly. Angle grinders work, but they’re loud, throw sparks, and chew through discs. A decent set of bolt cutters (often $25–$45) pays for itself the first afternoon you don’t spend changing cutting wheels.
Real-world example: One 5x7 ft remesh sheet can yield one 6-foot cage with overlap, or two 4-foot cages depending on your diameter and cut layout.
Tip: Leave “hooks” on one edge so your cage laces itself together
When you cut the remesh, leave one side with 1–2 inch wire tails (the cut ends sticking out). Wrap the sheet into a cylinder and use those tails as built-in “stitches” by hooking them around the opposite edge. This avoids buying extra wire or wrestling with zip ties every spring.
Case example: If you make a 24-inch diameter cage, overlap the seam by one grid square (6 inches) for strength, then twist every other tail with pliers so it doesn’t snag shirts and arms.
Tip: De-spike the top and bottom so you don’t bleed for your tomatoes
Fresh-cut remesh is sharp. On the top edge, bend each cut wire inward with pliers so the rim is smooth. On the bottom edge, decide whether you want spikes (helpful for anchoring) or a flat base (safer around kids and pets); if you keep spikes, limit them to 1 inch and file any needle points.
Real-world example: In a family garden, cap spikes with short pieces of old hose or split irrigation tubing—cheap and surprisingly effective.
Anchoring that actually holds in wind and storms
Tip: Use two T-post clips or heavy zip ties per cage—no more “leaning tower” tomatoes
A tall cage needs an anchor point. Drive a 6-foot T-post 12–18 inches into the ground beside the cage and attach the cage with two fasteners—one near the top third and one near the middle. This prevents the cage from twisting when the plant gets top-heavy with fruit.
Case example: In open, windy yards, this setup beats the “three bamboo stakes” method because a single rigid post stops rotational wobble.
Tip: In raised beds, anchor outward—don’t destroy your bed frame
If your raised bed is framed with wood, driving stakes inside the bed can split boards and eat planting space. Instead, place the cage so it sits just inside the bed and anchor it to a stake driven outside the bed. A simple U-bolt or two large zip ties can connect the cage to the exterior stake.
Real-world example: In a 4x8 ft bed, four cages fit comfortably if you space them 24 inches apart and anchor each one just outside the long sides.
Tip: Sandy soil? Add a “deadman” tie
In very loose soil, a post can slowly creep during storms. Tie the cage to a short stake driven at a 45° angle away from the cage, or run a line to a ground anchor. It’s the same idea as tent guy-lines: you’re resisting pull, not just relying on friction.
Case example: Coastal gardeners with sandy loam often find one extra angled stake per two cages stops the late-summer lean when plants are heaviest.
Training tomatoes inside remesh cages (without turning it into a jungle)
Tip: Commit early—tuck stems weekly for the first 6 weeks
The easiest time to train tomatoes is when stems are flexible. For the first 6 weeks after transplant, do a quick weekly “tuck”: guide new growth back inside the cage squares. After stems thicken, forcing them can snap branches, so early tucking saves you from midseason heartbreak.
Real-world example: Make it part of your Saturday loop—tuck, pinch suckers you don’t want, then water. It’s a 5-minute routine per bed, not a weekend project.
Tip: Prune with a purpose: pick a lane (1–3 main stems)
Remesh cages can hold a lot, but airflow still matters. For indeterminates, choose 1 to 3 main stems and remove extra suckers below the first flower cluster to keep the plant organized. Better airflow reduces disease pressure; many extension resources emphasize sanitation and canopy management as key tools (NC State Extension, 2019).
Case example: In humid summers, a 2-stem approach inside a 24-inch cage gives you a strong yield without the dense interior that invites leaf spot.
“Most tomato diseases need moisture on the leaves to get started. Spacing, staking/caging, and pruning that improve air movement can reduce how long foliage stays wet.” — Clemson Cooperative Extension, 2021
Tip: Stop the “fruit on the ground” problem with a bottom lift
Once the plant sets its first fruit, remove leaves touching soil and clear the bottom 8–12 inches of foliage. This reduces splash-up from rain or watering and keeps fruit cleaner. It also makes it easier to spot pests and water at the base.
Real-world example: If you mulch with straw, do the prune first, then mulch—otherwise you’ll bury leaves and create a damp layer right where disease likes to start.
Money talk: what remesh cages cost (and how to make them cheaper)
Tip: Cost it out per cage before you buy anything
Prices vary, but a 5x7 ft remesh sheet often runs $15–$30. If you get one 6-foot cage out of it, that’s a $15–$30 cage that lasts many seasons; if you make two 4-foot cages, you’re closer to $7.50–$15 each. Compare that to store-bought heavy-duty cages that can hit $25–$50 apiece.
Case example: A gardener putting in 8 tomatoes could spend $200+ on “nice” retail cages, or build 8 remesh cages for roughly $80–$160 depending on sheet price and size.
Tip: Borrow tools and buy material like a builder
If you don’t own bolt cutters, borrow them or check a tool library—this is a once-a-year tool for most people. For remesh, call local rebar/concrete suppliers; they sometimes beat big-box prices, especially if you’re buying 10+ sheets. Ask if they have “drops” (offcuts) you can buy cheaply for smaller cages.
Real-world example: Community garden groups often do a bulk buy: one person with a truck grabs 20 sheets, and everyone splits the cost.
Tip: Use DIY fasteners instead of buying a bag of specialty clips
If you don’t want to rely on the wire tails, you can “sew” the seam with scrap wire. Cut 6-inch lengths of old coat hanger or thick galvanized wire, then twist with pliers. This holds better than lightweight twist ties and doesn’t degrade in sun the way cheap zip ties can.
Real-world example: One old wire hanger can make roughly 8–12 seam ties, depending on how long you cut them.
Remesh cages vs other supports (and when to choose what)
| Support method | Typical height | Strength in wind | Harvest access | Typical cost per plant |
|---|---|---|---|---|
| Concrete remesh cage | 5–6 ft | High (with T-post) | Good (6" openings) | $8–$30 (DIY) |
| Store-bought cone cage | 3–4 ft | Low–medium | Fair (often tight) | $10–$30 |
| Florida weave (stakes + twine) | 4–6 ft | Medium | Excellent | $2–$6 (but more labor) |
| Single stake + ties | 6–8 ft | Medium (depends on stake) | Excellent | $3–$12 |
Tip: Use remesh when you want low-maintenance structure
If you travel, garden on weekends, or just don’t want to tie vines every few days, remesh cages are forgiving. The cage does the organizing, and your job is mostly tucking and occasional pruning. It’s the best “set it and mostly forget it” option that still looks tidy.
Case example: For a rental property garden where you’re only there every other weekend, remesh cages keep plants upright even if you miss a week.
Tip: Choose Florida weave when you’re growing a row of paste tomatoes
If you’re planting 10–30 determinate tomatoes in a straight line, Florida weave can be faster and cheaper than making that many cages. You’ll need sturdy stakes every 2 plants and strong twine, and you’ll add another weave layer about every 8–12 inches of growth. It’s a great system, but it’s more “keep up with it” than cages.
Real-world example: A sauce-maker growing 20 ‘Roma’ plants can stake-and-weave for a fraction of the cost, then reserve remesh cages for the sprawling heirlooms.
Three real-life setups that work (steal these)
Scenario: Small suburban garden with 6 indeterminate plants
Build six 6-foot remesh cages at 24 inches diameter, and anchor each with a 6-foot T-post. Space cages 30 inches apart center-to-center if you can; you’ll thank yourself when you can walk between them to harvest. Tuck weekly through early summer, then prune lightly for airflow.
Scenario: Raised-bed gardener with a narrow path and kids running around
Go with 4–5 foot cages and bend all cut ends inward—no spikes. Anchor outside the bed so you don’t steal root space or create tripping hazards in the bed. Use a wider cage (24 inches) so you prune less and still get good airflow.
Scenario: Windy rural plot with heavy storms
Use 6-foot cages, but don’t rely on “spike it into the ground and hope.” Drive a T-post 18 inches deep and attach the cage at two points; add a second angled stake as a guy-line if your soil is sandy. This is the setup that stays standing after a summer squall when everything else is lying down.
Storage and longevity: keep them from becoming a rusty mess
Tip: Stack and store vertically to avoid “cage pretzels”
Remesh cages stack like cups: slide one inside another and store them upright against a fence or in a shed corner. If you toss them in a heap, they can warp over time, and warped cages are annoying to place and anchor. A simple rule: stack in a column no taller than 10 cages so the bottom ones don’t get crushed.
Real-world example: Label two cages “short” for determinates and keep them together—spring setup goes faster when you aren’t measuring everything again.
Tip: Don’t panic about surface rust, but do avoid soil contact in storage
Most remesh develops light surface rust; that’s normal and doesn’t ruin it for garden use. What shortens life is storing cages sitting in wet soil or grass all winter. Put them on pavers, scrap wood, or hang them so they dry out between rains.
Real-world example: If you’re in a wet climate, lean stacks under an eave—keeping them dry adds years.
DIY alternatives (if remesh is unavailable or you need a quick fix)
Tip: Cattle panel cages for mega-vigorous tomatoes
Cattle panels are heavier and often come in 16 ft lengths, so they’re great for building super-rigid cages or arched trellises. Cut and roll a section similarly, but plan for a larger diameter because the wire is stiffer. This option can be pricier up front, but it’s a lifetime build.
Real-world example: If you grow tomatoes and cucumbers in the same bed, a cattle panel arch can support both—tomatoes on one side, cukes climbing over.
Tip: “Emergency cage” from fencing and a single stake
If a plant is already flopping and you need support today, wrap a 4-foot piece of welded wire fencing into a cylinder and attach it to one sturdy stake. It won’t be as strong as remesh, but it’s fast and uses common materials. Aim for at least an 18-inch diameter so you’re not strangling the plant.
Real-world example: This is perfect for surprise volunteer tomatoes that pop up near the compost pile.
Tip: Stick-and-string “cage” for container tomatoes
For patio containers, three stakes plus tough garden twine can mimic a cage without heavy metal. Space stakes evenly around the pot, then add twine rings every 10–12 inches as the plant grows. It’s lighter, easy to store, and works especially well for compact determinates.
Real-world example: A 15-gallon grow bag with a determinate ‘Celebrity’ can stay neat with this system and won’t topple as easily as a tall wire cone.
Once you’ve used remesh cages for a season, the “store cage aisle” starts to look like a display of tomato heartbreak. Build them tall, give them a real anchor, and train early while stems are flexible—those three moves solve most tomato support problems before they start. And the nicest payoff is in August: you’ll be picking clean fruit off a plant that’s still standing straight, instead of trying to prop up a collapsing tangle with whatever stake you can find.
Sources: University of Minnesota Extension (2020) tomato disease prevention guidance emphasizing spacing/airflow; NC State Extension (2019) tomato staking/pruning recommendations; Clemson Cooperative Extension (2021) notes on reducing leaf wetness through staking/pruning for disease management.