How to Build a Garden Tool Organizer from Pallets
The most common mistake I see with “pallet organizers” isn’t sloppy construction—it’s using the wrong pallet. A surprising number of free pallets are chemically treated or contaminated, and that’s a big deal when you’re leaning your pruning saw next to the potting bench, storing gloves you’ll touch all day, or mounting the whole thing on a shed wall you brush past constantly. Build it once, build it safe, and you’ll end up with an organizer that actually gets used instead of becoming another “I’ll fix it later” project.
This article is packed with practical, proven shortcuts: how to pick safe pallets, how to break them down without splitting boards, and how to design an organizer that fits your tools (not someone else’s Pinterest photo). I’ll also share real-world setups for a tiny balcony, a muddy family garden, and a working shed—because the best organizer is the one that matches your mess.
Start with the Right Pallet (This Determines Everything)
Tip: Use HT-stamped pallets only (skip mystery wood)
Flip the pallet over and look for the stamp: HT means heat-treated, which is what you want. Avoid anything marked MB (methyl bromide fumigation) and skip pallets with chemical odors, dark stains, or spills—those can be oils or industrial residues. If you can’t find a stamp, treat it as unknown and pass; free wood is not free if it brings contamination into your garden workspace.
Example: A neighbor offered “perfect” pallets from behind an auto shop; they smelled faintly like solvent and had black staining near the center blocks. I walked away and got two HT pallets from a garden center delivery area—clean, dry, and safe to handle.
Tip: Choose a pallet style that’s easy to dismantle
Stringer pallets (long rails) tend to fight you during disassembly, while block pallets (with chunky blocks) can be easier to pry apart cleanly. For a tool organizer, you want boards that stay straight and intact, so pick pallets with thicker deck boards—around 5/8 in (16 mm) is a sweet spot. Thin boards split when you drill holes for hooks and tool slots.
Example: If you’re building a wall rack for a shed, a sturdier pallet with thicker deck boards lets you mount heavy tools like a spade or mattock without the board flexing.
Tip: Set a “cleaning timer” before you build
Give yourself 20 minutes to scrub and dry-brush the pallet wood before cutting. Dirt and grit dull blades fast and can mess with your measurements (especially when you’re trying to keep tool slots consistent). A stiff brush + a quick rinse, then a dry day in the sun, saves you time later.
Example: One muddy pallet cost me an extra jigsaw blade because sand got embedded in the board edges—$8 gone for no good reason.
Tip: Treat outdoor racks like outdoor furniture (because they are)
If your organizer lives outdoors, plan for rain and UV. A simple seal coat (exterior water-based polyurethane or an outdoor oil) keeps the wood from checking and splintering. If you want a low-chemical approach, an exterior-grade tung oil is a DIY-friendly option, but expect to re-coat yearly.
Example: A patio organizer got two coats of exterior water-based poly, and it still looked smooth after a season of sprinklers and sun—no snagging gloves on splinters.
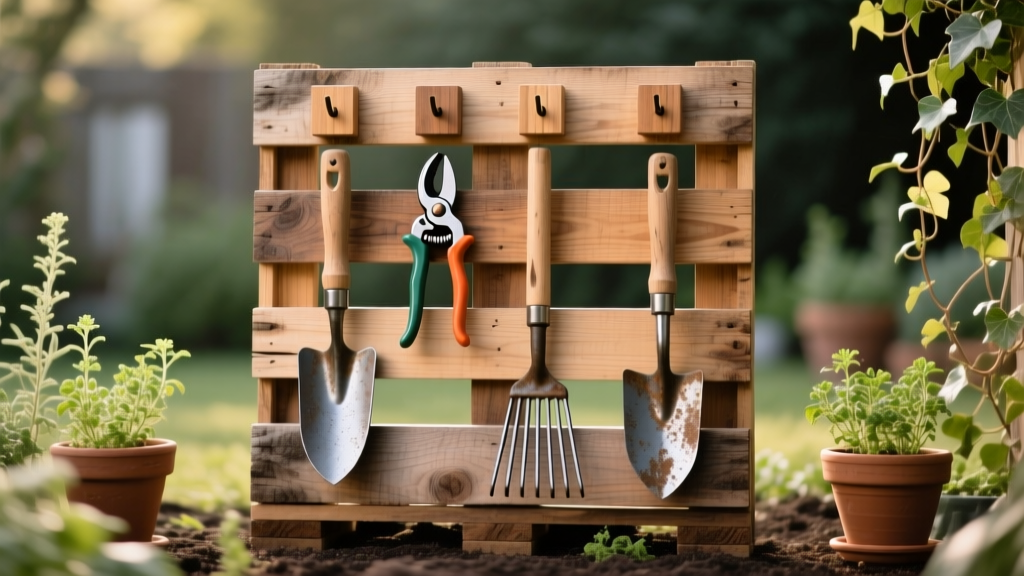
Design It Around Your Tools (Not a Generic Rack)
Tip: Do a “tool trace” layout on cardboard first
Before you cut a single board, lay your tools on cardboard and trace their outlines with spacing. Aim for 2–3 inches between hand tools so you can grab one without knocking three others down. This quick mock-up prevents the classic mistake: a beautiful rack that fits nothing you actually use.
Example: If your pruners are always paired with gloves, trace them side-by-side and plan one hook for gloves right above the pruner slot—your hands learn the pattern in a week.
Tip: Build to a “one-hand rule” for daily tools
Tools you grab daily (hand trowel, pruners, hori-hori, gloves) should be reachable with one hand—no lifting a tool over another. Put those at chest height, roughly 48–60 inches from the ground depending on your height. Heavy long-handled tools should sit lower so you aren’t wrestling weight at shoulder level.
Example: In a working shed, I mount pruners and snips at eye level, while shovels and rakes sit in a lower slot rail at about knee height.
Tip: Add a “dirty zone” and a “clean zone”
Separate muddy tools (spade, hoe, rake) from clean items (gloves, twine, seed packets). This can be as simple as one vertical divider board. It keeps grit off your glove hooks and prevents your seed box from turning into a dirt tray.
Example: In a family garden setup, the kids’ gloves and small tools go on the clean side, while the compost fork and soil scoop live on the dirty side.
Break Down Pallets Without Splitting Every Board
Tip: Cut nails instead of prying them (it’s faster and cleaner)
If you want intact boards, slide a reciprocating saw with a metal-cutting blade between boards and slice the nails. Prying alone often tears chunks out of the wood around nail heads. A $10 blade is cheaper than wasting half your pallet boards.
Example: For an organizer face panel, you want clean edges. Cutting the nails gave me smooth boards that lined up tight with no ugly gouges.
Tip: Use the “two-pry-bar shuffle” for stubborn sections
When you do pry, use two flat bars: one to lift slightly, the second to hold tension while you move along the board. Work in 2–3 inch increments instead of trying to pop the whole thing at once. This method reduces board splitting dramatically.
Example: I used this on an old pallet with twisty wood; the boards came off with minor dents instead of long splits that ruin mounting strength.
Tip: Keep board thickness consistent for easier assembly
As you dismantle, sort boards into “thick” and “thin” stacks. Mixing thicknesses makes your organizer wobbly, especially if you’re building a flat back panel. Consistent thickness also helps when you drill tool slots—your slot widths stay predictable.
Example: I used thicker boards for the base shelf and thinner ones for a back slat wall; the build felt square without a lot of shimming.
Build the Organizer in Practical Modules
Tip: Make a simple frame first (it keeps everything square)
Build a rectangle frame using 2x2s or pallet stringers cut straight, then attach slats to it. A common size that works well on shed walls is about 36 inches wide by 48 inches tall, but adjust to your space. Pre-drill screw holes to prevent splitting, especially near the ends of pallet boards.
Example: For a narrow side yard, I built a 24-inch wide organizer that fit between a hose reel and the gate—still held a week’s worth of tools.
Tip: Use screws, not nails, for anything that will hold weight
Deck screws bite better and are easier to repair when you inevitably tweak the design. For most pallet tool racks, 1-5/8 inch exterior screws handle slats and brackets well; step up to 2-1/2 inch for structural pieces. Nails loosen over time from tool vibration and seasonal wood movement.
Example: A shovel rack nailed together started squeaking and loosening after two months of daily use; the screw-built version stayed tight all season.
Tip: Add a bottom “mud shelf” with a lip
A shallow shelf at the bottom catches dirt and keeps long-handled tools from sliding. Make it 4–6 inches deep with a 1 inch front lip strip to stop handles from rolling out. This one feature makes the organizer feel like a real workstation instead of a decorative rack.
Example: In a rainy climate, the mud shelf collected clods that would otherwise end up on the shed floor—quick sweep, done.
Tip: Drill tool slots with a spacing pattern you can repeat
For long-handled tools, drill a series of holes along a rail and cut down into them to form slots (a jigsaw works well). A practical slot width is around 1-1/4 inches for many tool handles, but test your thickest handle first. Repeatable spacing (every 3 inches, for example) makes the rack expandable later.
Example: I spaced slots every 3 inches and left two blank spaces—when a new rake showed up, it slid right in without rebuilding.
Tip: Hang hand tools on a removable hook strip
Instead of mounting hooks directly into the organizer back, screw them into a separate strip board. That way you can reconfigure without Swiss-cheesing your main panel. If you don’t want to buy hooks, you can bend heavy wire or use short sections of old hose clamps as DIY hangers.
Example: A gardener friend switched from hand trowels to larger soil knives; the removable strip let her swap hook spacing in 10 minutes.
Choose Hardware That Won’t Fail Mid-Season
Tip: Match fasteners to exposure (rust ruins racks)
If the organizer is outdoors or in a humid greenhouse, use exterior-rated (coated) screws or stainless if you can swing it. Rust stains spread into pallet wood and weaken hook points. For many builds, coated deck screws are the best cost-to-durability balance.
| Fastener Type | Best For | Typical Cost (Approx.) | Downside |
|---|---|---|---|
| Coated deck screws (1-5/8" to 2-1/2") | Most pallet organizers indoors/outdoors | $8–$15 per 1 lb box | Coating can wear if constantly wet |
| Stainless screws | Greenhouse, coastal, constant moisture | $20–$40 per box | Higher upfront cost |
| Nails | Temporary assemblies | $5–$10 per box | Loosen with vibration; harder to adjust |
| Drywall screws | Not recommended | $5–$12 per box | Brittle; snap under tool weight |
Tip: Mount to studs or masonry properly—don’t trust pallet slats to “hold it”
A loaded organizer can weigh more than you think—especially with shovels, loppers, and a bucket of hand tools. Use a stud finder and anchor into studs with 3 inch screws, or use proper masonry anchors for block walls. If you’re renting, build a freestanding version with a wide base so you don’t rely on wall fasteners.
Example: One shed rack pulled out when it was mounted only into thin plywood sheathing; remounting into studs fixed it permanently.
Tip: Add one “sacrificial” board for impacts
The area where you bang tool heads in and out gets chewed up. Screw a replaceable strip board in that zone so you can swap it out after a season or two without rebuilding. This is especially useful if you store metal rakes and hoes that scrape the same spot.
Example: A sacrificial strip under the long-handle slots saved the main frame from getting shredded by shovel blades.
Weatherproofing, Safety, and Wood Hygiene
Tip: Sand only the touch points (save time)
You don’t need furniture-level sanding everywhere. Sand the edges you grab—handle slots, hook strip, and shelf lip—using 80 grit then a quick pass with 120 grit. This prevents splinters where your hands actually go and keeps the project moving.
Tip: Seal end grain first to reduce splitting
End grain drinks moisture like a straw and is where splits start. Brush a little exterior wood sealer (or even leftover exterior paint) on the cut ends before your full finish. It’s a small step that reduces checking when the organizer lives in a damp shed.
Tip: Don’t store oily rags on the rack
If you use linseed oil or certain finishes, oily rags can self-heat and create a fire risk if wadded up. Lay rags flat to dry outdoors or store them in a sealed metal container. This is basic shop safety, but it’s easy to forget during a “quick weekend build.”
“Spontaneous heating can occur when oil-soaked rags are improperly handled and stored.” — National Fire Protection Association (NFPA), 2023
Tip: Keep the organizer out of constant sprinkler spray
Even sealed wood breaks down faster if it’s soaked daily. If your organizer is outdoors, mount it under an eave or add a simple “roof” board that overhangs by 2 inches. This tiny overhang keeps water off the tool heads and reduces rust.
Three Real-World Builds (Steal What Works)
Scenario: The tiny patio gardener with five hand tools and zero wall space
Go vertical and freestanding: build a narrow organizer, about 18–24 inches wide, with a heavy base and a hook strip near the top. Add one small bin (an old coffee can screwed into a slat works) for plant labels and twine. Cost can be under $25 if the pallet is free and you already have screws and one small box of hooks.
Example: A patio gardener stored pruners, trowel, gloves, and a watering wand on the front, with seed packets in a zip pouch stapled to the side—everything stayed together, no drawer hunting.
Scenario: The muddy family garden where tools vanish daily
Use labeled zones: one side for “adult” tools, one side for “kid” tools, and a bottom shelf for a wash bucket. Set the lowest hooks at 36 inches so kids can hang tools themselves without you doing cleanup. Add a cheap timer habit: every evening, a 2-minute “reset” where tools go back on the rack.
Example: In one family garden, missing trowels went from weekly to basically never, because everyone knew there were three kid slots and three adult slots—empty slot meant “someone still has it.”
Scenario: The serious shed setup with long-handled tools and power tool batteries
Build a wider panel (around 36 x 48 inches) and include a dedicated charging shelf with a lip so chargers don’t vibrate off. Use a separate lower rail for long handles, plus a top row of hooks for loppers and pruning saws. Plan a “future bay” from day one—leave 6 inches of blank slat space for the tool you’ll buy next spring.
Example: A market gardener mounted the rack next to the shed door; daily tools sat at chest level, and the long-handle section kept rakes from becoming a floor pile that trips you at 6 a.m.
Insider Shortcuts That Make It Feel Custom
Tip: Add a simple “tool silhouette” outline for the tools that wander
Paint or marker-outline your most-borrowed tools on the back panel so it’s obvious what’s missing. This is the same trick used in workshops and it works shockingly well in gardens. Use a light-colored paint pen on dark wood, or a dark marker on light wood.
Example: Outline the pruners and hori-hori—if the silhouette is empty, you’ll notice before you start searching the compost pile.
Tip: Use a magnet strip for small metal items (cheap and brilliant)
A magnetic knife strip (often $10–$15) holds pruners, snips, and even small trowels if they’re steel. Mount it on a slat at shoulder height so you don’t drag metal edges across wood slots. If you want DIY, salvage strong magnets from old speakers and screw them behind a thin strip board (test first).
Example: A gardener who kept losing snips added a magnet strip—snips went from “somewhere” to always in the same spot.
Tip: Build a hose-nozzle parking spot (it stops the drip mess)
Screw a short section of PVC pipe (2–3 inches long, sized to your nozzle) onto the organizer side as a holster. Place it above the mud shelf so drips fall into the dirty zone. It’s a tiny add-on that keeps the rest of your rack dry and cleaner.
Tip: Keep a $2 brush on a string right on the organizer
Attach a stiff nylon brush with a short cord so you can knock dirt off tool heads before storing. This reduces rust and keeps your slots from turning into soil-filled wedges. It also makes your organizer “sticky”—people actually use it because the cleaning step is right there.
Sources Worth Trusting (So You’re Not Guessing)
Pallet safety and treatment stamps are widely referenced through international standards used in shipping wood packaging; if you’re unsure, default to HT-only pallets. For storage safety and chemical handling habits, established safety guidance matters more than internet lore.
Two solid references I keep in mind:
- National Fire Protection Association (NFPA), 2023 — guidance on handling oil-soaked rags and fire risk (spontaneous heating).
- USDA APHIS, 2020 — information tied to the international wood packaging standard (ISPM 15) and treatment markings like HT vs MB used on pallets in trade.
If you build your organizer with a safe pallet, a squared frame, and a layout based on your real tools, you’ll get that rare DIY win: a project that keeps paying you back. The first week it’ll feel “nice,” and by week three you’ll wonder how you ever gardened without a spot where the pruners, gloves, and shovel always land—no hunting, no tripping, no rusty pile in the corner.