Mulch vs Bare Soil: Impact on Plant Health
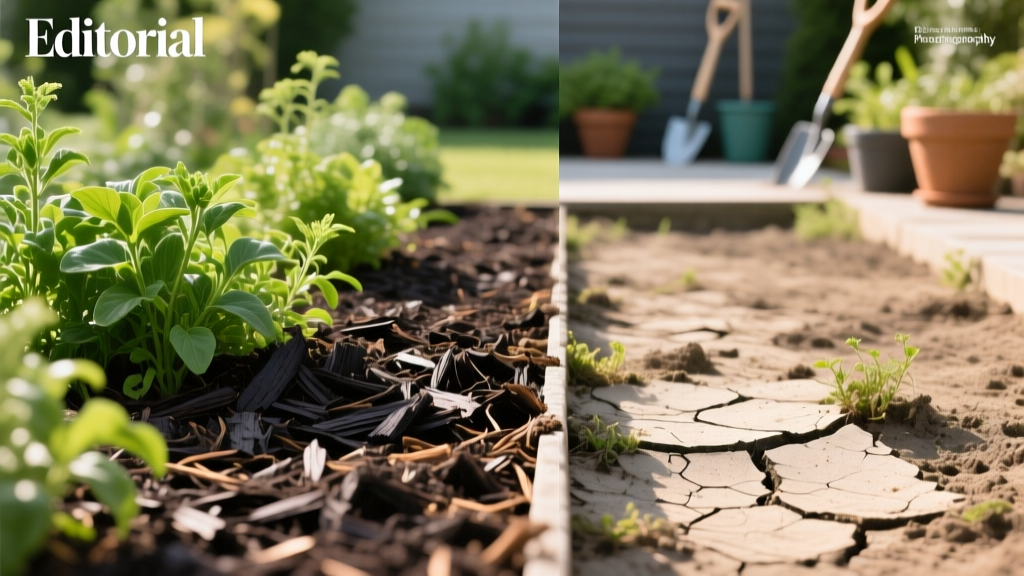
A lot of “mystery plant problems” aren’t pests, diseases, or bad luck—they’re the soil surface. One of the most common mistakes I see is lovingly improving the soil… then leaving it bare like a sunbaked parking lot. Bare soil loses moisture fast, crusts over after rain, and swings wildly in temperature—three things that quietly stress roots even when the plant looks “fine” up top.
Mulch isn’t just for looks. It changes how water moves, how roots breathe, how weeds compete, and even how many soil microbes show up for work. Below are practical, proven tips (with numbers) to help you decide when mulch is your best friend and when bare soil is the lesser evil.
What changes when you cover soil (and why plants care)
Tip: Treat soil like a living sponge, not a countertop
Soil functions best when it stays crumbly and consistently moist—mulch helps maintain that “sponge” state by slowing evaporation and reducing surface crusting. Bare soil forms a sealed layer after heavy rain or overhead watering, which can reduce infiltration and increase runoff. A 2–4 inch mulch layer is often enough to keep the surface from baking into a crust between waterings.
Example: If your raised bed dries out in one hot afternoon, try 3 inches of shredded leaves; you’ll usually notice the top inch stays damp the next day instead of turning dusty.
Tip: Use mulch as a temperature buffer—especially for shallow-rooted crops
Roots hate sudden temperature swings. Organic mulches moderate extremes—cooler soil during heat waves and less rapid cooling at night. That’s especially helpful for lettuce, strawberries, peppers, and newly transplanted seedlings whose roots sit near the surface.
Real-world shortcut: For summer lettuce, add a 2-inch straw layer and you can often stretch harvest by 1–2 weeks before it turns bitter from heat stress.
“Mulches moderate soil temperature, reduce evaporation, and suppress weeds—benefits that directly improve plant establishment and reduce stress.” — University of California Agriculture & Natural Resources (UC ANR), 2017
Tip: Decide based on the plant’s “crown” sensitivity
Mulch improves root-zone conditions, but some plants get cranky if mulch touches their crown (the base where stems meet roots). Keep mulch 2–3 inches away from crowns of tomatoes, peppers, squash, roses, and many perennials to reduce stem rot and slug hiding spots.
Example: Mulching right up against a tomato stem can keep it too damp overnight; pull mulch back into a donut shape and you’ll still get moisture control without inviting rot.
Water: where mulch beats bare soil (and when it doesn’t)
Tip: Mulch to cut irrigation—then actually cut it
Mulch reduces evaporation, so gardens often need less frequent watering. The hack is to adjust your routine: after mulching 3 inches deep, reduce irrigation by roughly 20–30% and watch plant response for a week (leaf posture at midday, soil moisture 2 inches down). Many gardeners overwater mulched beds because they keep the same schedule.
Example: If you ran drip for 45 minutes every other day, try 30–35 minutes every other day after mulching—then tweak based on how damp it is under the mulch.
Tip: Use the “two-inch check” before you water
Don’t guess from the surface—mulch can look dry while soil below stays moist. Push mulch aside and check soil 2 inches down; if it’s cool and holds together when squeezed, wait. This prevents shallow roots, fungus gnats in containers, and the slow decline that comes from constantly wet soil.
DIY tool: A $3 wooden chopstick works like a moisture probe—push it down 3–4 inches and see if it comes out damp and dark.
Tip: In rainy climates, thin mulch is safer than thick mulch
In areas with frequent rain or heavy clay, thick mulch can keep soils too wet and reduce oxygen at the root zone. In those beds, aim for 1–2 inches of fine-textured mulch (shredded leaves) or use coarser mulch (pine bark nuggets) that allows more airflow.
Case example: A coastal Pacific Northwest gardener with clay soil saw fewer slug problems by switching from 4 inches of straw to 1.5 inches of shredded leaves and keeping it pulled back from plant stems.
Weeds: stop feeding the seed bank
Tip: Use mulch thickness like a “weed dimmer switch”
Weed suppression depends heavily on depth. For most organic mulches, 3 inches blocks enough light to slow germination of small-seeded weeds; 1 inch usually looks nice but won’t stop much. Top up when your 3 inches compresses down to 1.5–2 inches (often after 2–4 months for fluffy materials like straw).
Example: If crabgrass is popping through, it’s typically a depth problem—add another inch, don’t just hand-pull and hope.
Tip: Cardboard + mulch is the lazy gardener’s reset button
For weedy areas, lay plain brown cardboard (no glossy print) overlapping by 6 inches, soak it, then cover with 3–4 inches of mulch. This blocks light immediately and breaks down over a season, adding organic matter. It’s faster than digging and avoids bringing buried weed seeds to the surface.
Cost note: Cardboard is often free from appliance stores; compare that to landscape fabric at $0.20–$0.60 per square foot, which can be a pain to remove later.
Tip: Skip landscape fabric in veggie beds (use it only for long-term shrubs)
Fabric can reduce weeds short-term, but it clogs with soil and organic debris, then weeds root right into it. In vegetable beds you’ll be replanting, amending, and digging—fabric becomes a wrestling match. If you want a semi-permanent solution around shrubs, fabric plus 2 inches of bark can make sense for 3–5 years, but it’s not a set-and-forget forever fix.
Example: Under blueberries (acid-loving shrubs), a weed barrier plus pine bark works well because you’re not disturbing the soil often.
Soil health: microbes, organic matter, and compaction
Tip: Feed soil life with “soft” mulches, not just woody chunks
Shredded leaves, grass clippings (thinly), and compost are easier for soil organisms to break down than large bark nuggets. Over time, that breakdown increases organic matter, improving water-holding and nutrient cycling. Aim for a mix: a thin compost layer (0.5–1 inch) under a 2–3 inch leaf or straw layer is a sweet spot for many gardens.
Example: In fall, collect leaves and run them over with a mower; the shredded leaf mulch stays put better and breaks down faster than whole leaves.
Tip: Prevent compaction by never leaving soil bare after harvesting
Bare soil takes a beating from rain impact, foot traffic, and drying/rewetting cycles. Mulch softens raindrop impact and keeps the surface friable, which means better infiltration and less puddling. After you pull a crop, cover the space within 24–48 hours—either mulch it or plant a quick cover crop.
Case example: A backyard gardener harvesting garlic in July mulched the open row with 3 inches of straw the same weekend; the following month, the bed was still easy to transplant into, while the bare sections crusted hard and needed aggressive loosening.
Tip: Watch nitrogen when using high-carbon mulches (wood chips, straw)
Fresh wood chips and straw are high in carbon and can temporarily tie up nitrogen at the soil surface as microbes decompose them. For established plants, it’s usually minor, but for seedlings or heavy feeders it can show as pale growth. The workaround is simple: keep woody mulch on top (don’t mix it in), and add a nitrogen source near the root zone if plants look hungry.
Specific fix: Apply 1–2 inches of compost around plants (under the mulch) or use a light sprinkle of an organic nitrogen fertilizer per label rates.
Source: Washington State University Extension notes that nitrogen tie-up is mainly an issue when woody materials are incorporated into soil rather than used as a surface mulch (WSU Extension, 2020).
Choosing the right mulch (and when bare soil is actually useful)
| Surface choice | Best for | Typical depth | Watch-outs | Budget note |
|---|---|---|---|---|
| Shredded leaves | Veg beds, perennials, improving soil over time | 2–4 inches | Can mat if applied too thick and unshredded | Often free (yard waste) |
| Straw (seed-free) | Veggies, pathways, keeping fruit clean (strawberries) | 2–3 inches | May harbor slugs; can blow around | Commonly $6–$12 per bale (varies by region) |
| Wood chips | Trees, shrubs, mulched paths | 3–4 inches | Keep 3 inches away from trunks; don’t mix into soil | Often free via arborist drops; bagged costs more |
| Compost (as mulch) | Top-dressing beds, quick nutrient boost | 0.5–2 inches | Weeds can germinate in it; doesn’t suppress weeds alone | DIY from kitchen/yard scraps saves big |
| Bare soil | Direct seeding tiny seeds; warming spring soil | N/A | Crusting, weeds, fast drying, erosion | “Free” but costs time/water later |
Tip: Leave soil bare briefly for tiny seeds—then mulch lightly
Some crops need light and a fine surface to germinate: carrots, lettuce, poppies, and many flowers. For these, keep soil bare (or covered with a very thin layer of sifted compost) until germination, then add a whisper-thin mulch like chopped straw at about 0.5 inch to reduce crusting without smothering seedlings.
Example: For carrots, sow, water, cover with a board for 5–7 days to hold moisture, then remove the board and add 0.5 inch of fine mulch once sprouts appear.
Tip: Use bare soil as a spring “solar panel,” then cover it
In cool springs, mulch can keep soil too cold for heat-loving plants. Pull mulch back 2–3 weeks before planting tomatoes and peppers to let the sun warm the soil, then reapply after transplants are established. This is a simple timing trick that improves early growth without giving up mulch benefits all season.
Specific timing: In many temperate regions, uncovering beds 14–21 days before your transplant date makes a noticeable difference in soil warmth.
Tip: Don’t mulch wet-loving disease-prone beds the same way
If you’ve battled fungal issues (powdery mildew on squash, blight splash on tomatoes), mulch choice matters. Coarse mulches like straw or shredded leaves reduce soil splash onto leaves, which can lower disease spread in rainy periods. But keep mulch from staying soggy against stems and avoid piling it too deep in humid microclimates.
Example: A tomato patch with early blight pressure often does better with 2–3 inches of straw (to prevent splash) plus pruning for airflow, rather than bare soil that splatters spores upward during storms.
Three real-world scenarios (what I’d do tomorrow morning)
Scenario 1: New raised bed that dries out daily
Tip: Mulch first, then adjust drip
Raised beds drain fast and heat up fast—classic recipe for stressed roots. Add 3 inches of shredded leaves or straw immediately, then reduce irrigation time by about 25% and check moisture 2 inches down for a week. If water still runs through too quickly, top-dress with 1 inch of compost under the mulch to increase water-holding.
Money saver: A free leaf-mulch layer can replace multiple extra watering sessions per week, which also saves on your water bill if you’re metered.
Scenario 2: Backyard orchard trees with struggling grass under them
Tip: Create a mulch ring the right size (and don’t volcano mulch)
Grass competes aggressively with young trees for water and nitrogen. Make a mulch ring at least 3 feet in diameter for young trees (wider is better), 3–4 inches deep, and keep mulch 3 inches away from the trunk so bark stays dry. This reduces mowing damage and usually improves growth more than extra fertilizer does.
Example: For a 2-year-old apple tree, a 36–48 inch ring of wood chips from a free arborist drop often outperforms a small 12-inch decorative ring.
Scenario 3: Slugs are partying under your mulch
Tip: Swap materials and create a dry “moat”
Slugs love cool, damp cover—straw and thick leaf layers can be prime real estate in wet climates. Thin the mulch to 1–2 inches, switch to a coarser material (pine bark or wood chips), and keep a 2–3 inch mulch-free moat around tender stems. Water in the morning so the surface dries by night, and use simple traps (boards you flip in the morning) to reduce numbers.
DIY tactic: Place a 1x6 board between rows; check under it at sunrise and remove slugs—surprisingly effective when done daily for 1 week.
Insider shortcuts that make mulch work harder
Tip: “Compost under, mulch over” for fast results
If you want plants to look better quickly, don’t rely on mulch alone. Add a 0.5–1 inch layer of finished compost around plants, then cover with 2–3 inches of mulch to protect that compost from drying out. This combo feeds soil life and improves moisture retention without encouraging as many weeds as a thick compost-only layer.
Example: Around peppers, a compost-under-straw setup often produces noticeably greener growth within 10–14 days compared to straw alone.
Tip: Use chopped leaves as “free premium mulch” (and store it)
Bagged mulch adds up fast, especially if you need multiple cubic yards. Shred fall leaves with a mower, then stash them in black contractor bags with a few air holes; you’ll have leaf mold-in-progress that’s easy to spread in spring. This turns a seasonal nuisance into a soil-building asset.
Cost comparison: Bagged mulch can run $3–$6 per 2 cu ft bag; covering 100 sq ft at 3 inches takes about 25 cu ft (roughly 13 bags), which can hit $40–$80 quickly. Leaves are usually free.
Tip: Measure mulch depth once—then eyeball forever
Most mulch mistakes are depth mistakes. Take a ruler outside one time: 2 inches is less than most people think, and 5–6 inches is a lot. Once you’ve seen it, you’ll spread more evenly, avoid smothering crowns, and get more consistent weed control.
Example: If you’re constantly weeding despite “mulching,” odds are you’re at 1 inch—bump it to a true 3 inches in open beds.
Tip: Mulch pathways differently than beds for maximum payoff
Beds benefit from softer, soil-feeding mulches; pathways benefit from long-lasting, foot-friendly mulches. Use wood chips 4 inches deep on paths to suppress weeds and keep shoes clean, and use shredded leaves/straw in planting zones. Separating the two prevents you from constantly replenishing expensive materials where they don’t need to be “soil food.”
Example: A 10-foot path that’s 3 feet wide needs about 10 cubic feet for a 4-inch layer—wood chips from an arborist drop can cover multiple paths for the price of a thank-you tip.
Sources you can trust (and why they matter)
Mulch advice gets noisy online, so I like to anchor recommendations to extension and research-based resources. UC ANR emphasizes mulch for temperature moderation, evaporation reduction, and weed suppression (UC ANR, 2017). Washington State University Extension explains why nitrogen tie-up is mainly a concern when woody mulches are mixed into soil rather than used on top (WSU Extension, 2020). If your local climate is extreme (very wet, very dry, very hot), your state/province extension office usually has region-specific mulch notes worth following.
Once you start looking at your garden through the “soil surface” lens, plant health gets simpler. Bare soil is occasionally useful as a short-term tool—warming beds in spring or germinating tiny seeds—but it’s rarely the best default. A smart mulch layer, applied at the right depth and kept off plant crowns, is one of the lowest-effort upgrades you can make for fewer weeds, steadier moisture, and calmer, happier roots.