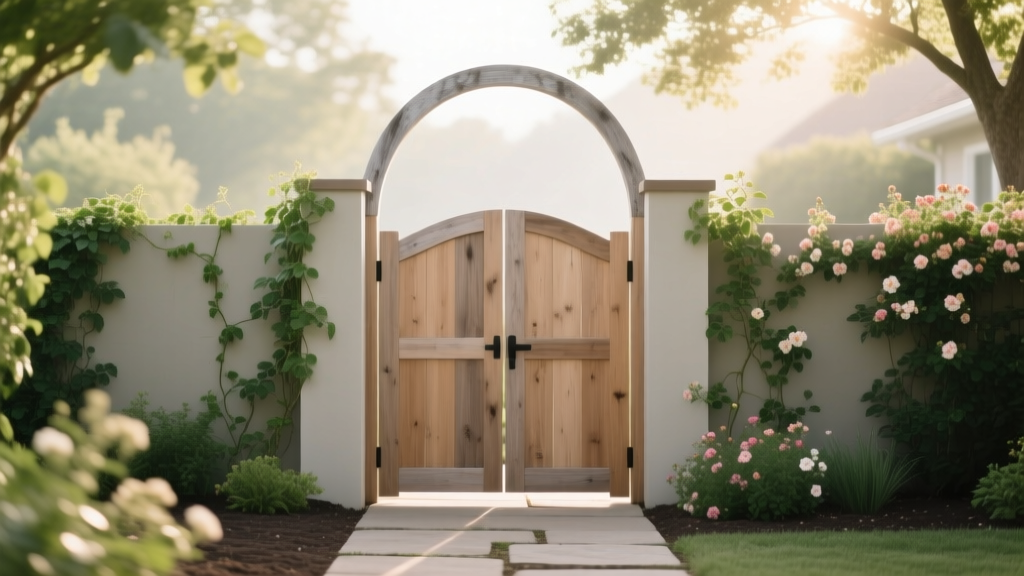
How to Build a Simple Garden Arched Gate
The most common mistake with arched garden gates isn’t the arch—it’s the posts. People build a gorgeous curved top, hang the gate, then watch the whole thing sag because the posts weren’t set deep enough (or the hinges weren’t aligned to fight gravity). The arch gets blamed, but the real culprit is usually a 20-minute shortcut taken on day one.
A simple arched gate can be sturdy, affordable, and fast to build if you treat it like a tiny outdoor structure: solid footings, weather-smart materials, and hardware that’s meant for a swinging load. Below are the shortcuts and proven tricks I use (and see pros use) to get a gate that closes cleanly in July and still closes cleanly in January.
Start with the “non-negotiables”: layout, clearance, and posts
Tip: Leave more ground clearance than you think you need
Gates don’t just swing—they also fight weeds, mulch, frost heave, and that one “helpful” top-up of gravel you’ll forget about later. Aim for 2–3 inches of clearance between the bottom of the gate and the finished ground level, or 4 inches if snow or heavy mulch is common in your yard. Example: if your path gets topped with 2 inches of wood chips every spring, a 2-inch clearance turns into a stuck gate by May.
Tip: Set posts deep enough to stop the slow lean
If the posts move, the best gate in the world won’t behave. A reliable rule for small structures is burying at least 1/3 of the post length, and going 24–36 inches deep for most garden gates—deeper if you’re in a frost zone. Many extension services recommend placing footings below frost depth to reduce heaving; check your local frost line before you dig (e.g., University of Minnesota Extension discusses frost depth and footing placement, 2021).
Tip: Don’t “eyeball” squareness—measure corner-to-corner
A gate opening can look square and still be off enough to cause binding. Measure the diagonals between opposite corners of your post opening; when both diagonals match, you’re square. Example: if one diagonal is 61 1/4" and the other is 60 7/8", you’re off by 3/8"—that’s enough to make a latch misbehave all season.
Tip: Use a temporary brace so posts don’t shift while concrete cures
Posts love to drift while you’re mixing, adjusting, and walking away “for just a second.” Screw a temporary 2x4 brace from each post to a stake, then check plumb with a level on two faces of each post. If you’re using fast-setting concrete, you’ve got roughly 10–15 minutes of working time—brace first, then mix.
Design the arch so it’s easy to build (and still looks great)
Tip: Pick an arch radius you can repeat without math headaches
A clean-looking arch is mostly about consistency. The easiest DIY method is a string-and-pencil compass on plywood: decide your gate width, then choose an arch rise of 6–10 inches for a gentle curve on a 36–42 inch wide gate. Real-world example: a 36-inch gate with an 8-inch rise looks “garden-y” without becoming a cathedral window.
Tip: Make a template once, then build both sides to match
Cut one arch template from scrap plywood or rigid foam board and trace it for both top rails (or both laminated arch pieces). This avoids the classic DIY look where one side is slightly flatter. Example: even a 1/4-inch mismatch shows up once you add pickets because the picket tops won’t line up to the curve.
Tip: Cheat the curve with laminations instead of carving thick lumber
Instead of cutting a full arch out of a 2x10 (wasteful and prone to warping), laminate two or three thinner strips—like 1x3 or 1x4—over a form. Glue and clamp, then screw while the glue sets so it behaves outside. This is one of those “pro-looking” tricks that’s actually easier than wrestling a thick board into shape.
Tip: Keep the arch from becoming a water trap
Flat surfaces collect water; curves can, too, if you create little ledges. Slightly bevel the top edge of the arch rail (a quick pass with a planer or sander) so water sheds. For extra insurance, add a narrow metal or cedar cap strip—think 1/2 inch thick—so the arch stays crisp instead of turning into a sponge.
Material and hardware shortcuts that prevent sagging
Tip: Spend on hinges, not fancy lumber
Hardware is where most garden gates win or lose. A pair of 10–12 inch heavy-duty strap hinges costs roughly $18–$35, and it’s money better spent than upgrading from standard cedar to premium clear cedar. Example: a $20 hinge upgrade can prevent the slow sag that makes you “lift-and-latch” the gate for the next five years.
Tip: Use a diagonal brace that works with gravity
For a gate that swings on the left (hinges on left), the diagonal brace should run from the bottom hinge-side up to the top latch-side. That orientation puts the brace in compression, which is what wood likes. If you reverse it, the brace acts like a hammock, and the latch corner slowly drops.
Tip: Pre-drill and use exterior-rated screws (not nails)
Outdoor gates rack and twist; screws hold through that movement better than nails. Use exterior structural screws like 2 1/2 inch for framing and 1 5/8 inch for pickets, and pre-drill near ends to avoid splitting. A real-world example: cedar pickets nailed near the edge often split within a season; pre-drilling fixes that in about 2 extra minutes.
Tip: Choose rot-resistant wood where it actually matters
If you’re trying to save money, put the best wood at the “wet zones”: the bottom rail, the lower 12 inches of pickets, and any piece that touches a post or sits near soil splash. Cedar, redwood, and pressure-treated pine are common; if you’re painting, pressure-treated framing plus painted pickets can be a solid budget combo. The USDA Forest Products Laboratory notes that moisture management and wood durability strongly influence decay resistance (USDA FPL, 2010).
| Option | Typical material cost (3'–4' gate) | Build difficulty | Best for |
|---|---|---|---|
| Cedar frame + cedar pickets | $90–$160 | Easy | Natural look, minimal finishing |
| Pressure-treated frame + painted pickets | $60–$120 | Easy (plus paint time) | Budget builds, matching house trim |
| Metal gate kit + wood infill | $120–$220 | Very easy | Zero sag, quick install, modern look |
Tip: Add a gate wheel only if your ground is stable
Gate wheels can feel like a miracle cure for sag, but they’re fussy on uneven paths or shifting soil. Use a wheel if your gate span is wide (48 inches+) or your gate is heavy, and your path is hard-packed or paved. Example: on a gravel path that ruts, a wheel can “steer” the gate into a bind—better to upgrade hinges and bracing first.
Build process tricks that make it faster and cleaner
Tip: Build the gate on a flat surface using spacers
Assemble your gate on a driveway, patio, or a sheet of plywood laid flat. Use 1/4-inch spacers between frame pieces so you don’t accidentally clamp it out of square. Example: I like using scraps of lattice as spacers because they’re consistent and easy to pull out after fastening.
Tip: Make picket spacing idiot-proof with a story stick
Instead of measuring every gap, cut a “story stick” that equals your picket width plus the gap (for example, 3 1/2 inches picket + 1/2 inch gap = a 4-inch stick). Slide it along as you fasten pickets and your spacing stays perfect. Real-world example: if you’re building two matching gates, a story stick keeps them visually identical even if your tape-measure math drifts.
Tip: Seal end grain like it’s a separate material
End grain drinks water faster than face grain, which is why gate bottoms rot first. Brush on an exterior wood sealer or primer specifically on cut ends—two quick coats takes maybe 10 minutes and pays you back in years. Example: even if you skip staining the whole gate this weekend, sealing the ends right now prevents that dark, fuzzy rot line later.
Tip: Use clamps as “extra hands” when hanging the gate
Hanging is where gates get dinged, scratched, and sworn at. Clamp a temporary ledge (a straight 2x4) to the posts at your desired bottom clearance, then rest the gate on it while you attach hinges. This keeps your reveal consistent—aim for about 1/4 inch gap on the hinge side and latch side so seasonal wood movement doesn’t cause binding.
“Most gate problems trace back to movement—either wood movement from moisture or post movement from insufficient footing. If you control those two, the hardware can do its job.” — Site carpenter advice echoed in extension recommendations on footings and moisture management (University of Minnesota Extension, 2021; USDA FPL, 2010)
Weatherproofing that doesn’t ruin the look
Tip: Finish parts before assembly for fewer bare spots
If you’re staining or painting, coat the arch pieces, frame, and pickets before final assembly. You’ll get coverage in the tight corners where water sits, especially where pickets meet rails. Example: a single missed strip behind a picket can become the first place mildew shows up—pre-finishing prevents that without fancy tools.
Tip: Match your finish to your maintenance personality
Transparent stains look great but typically need refreshing sooner than paint or solid stain, especially on sun-facing gates. If you want low maintenance, consider a solid-color exterior stain and plan a refresh every 3–5 years rather than touching up yearly. Real-world example: one side of a gate facing west can fade twice as fast as the shaded side—solid stain hides that unevenness better.
Tip: Keep soil and mulch from touching the bottom rail
Even rot-resistant wood loses the fight if it’s buried in wet mulch. Maintain that 2–3 inch air gap and trim back plants so the gate can dry after rain. Example: I’ve seen beautiful cedar gates turn black at the bottom simply because a bed edge kept creeping up with compost.
Three real-world builds (and what they did right)
Scenario: The “weekend gate” for a 36-inch veggie garden entry
Goal: a simple arch that looks charming, built in two days. The homeowner used two 4x4 posts set 30 inches deep with fast-setting concrete, built a 36-inch wide gate with an 8-inch arch rise, and hung it with 12-inch strap hinges. The time-saver was pre-cutting all pickets to length and using a 4-inch story stick—spacing stayed uniform without constant measuring.
Scenario: The budget build for a side yard path with pets
Goal: keep a dog in, keep costs down, and stop sagging. They used a pressure-treated frame, inexpensive dog-ear pickets, and spent the “saved” money on better hinges and a lockable latch—about $35 in hardware total. A diagonal brace plus 1/4-inch side gaps prevented binding during humid weeks when the wood swelled.
Scenario: The heavy gate under a rose-covered arbor
Goal: a gate that still swings freely after climbing roses add weight and wind load. This gardener used a metal gate frame kit (no sag), then attached cedar slats and built a laminated arch topper to match the arbor. Total materials were closer to $200, but it eliminated the yearly hinge-adjust routine—especially important once thorny canes started weaving around the latch area.
DIY alternatives when you don’t want to cut an arch
Tip: Fake the arch with a curved topper instead of a curved frame
If cutting a true arched frame feels intimidating, build a standard rectangular gate and add an arched “crown” piece above the top rail. Use a thin board (like a 1x6) cut to an arc and attach it with exterior screws. Example: from five feet away, it reads as an arched gate, but the structure stays simple and square.
Tip: Use cattle panel or wire mesh to lighten the gate
Solid pickets add weight; wire infill keeps it airy and reduces sagging force. Staple galvanized welded wire (like 2x4 inch mesh) to the inside of the frame, then add a few decorative slats if you want privacy. This is a smart hack for tall gates—less weight means less hinge stress.
Tip: Repurpose materials for the arch form
You don’t need a fancy jig to laminate an arch—use what you have. A sheet of plywood, a few screws, and scrap blocks can create a form in 15 minutes; even an old plastic barrel can serve as a curve guide for smaller arches. Example: I’ve seen a perfect gentle arch made by bending strips around a 24-inch diameter stock tank.
Final checks that keep your gate behaving for years
Tip: Test swing and latch before you fully tighten hardware
Hang the gate, close it, and check gaps before cinching everything down. Adjust hinge position until the latch lines up without lifting the gate, then tighten. Example: moving a hinge by even 1/8 inch can fix a latch that otherwise feels “almost right” forever.
Tip: Plan for seasonal movement with adjustable latches
Wood expands and contracts; a slightly adjustable latch saves you from re-drilling later. Look for latches with slotted mounting holes or add a latch shim plate so you can shift it. If your summers are humid, expect the tightest fit in late July—set your latch so it still closes then, not just on a dry spring day.
Tip: Do one 5-minute maintenance check each year
Once a year, tighten hinge screws, check for post movement, and re-seal any fresh cuts or exposed end grain. If you catch a small sag early, a hinge adjustment or a longer structural screw can correct it before it becomes a gate that drags. Example: swapping two hinge screws for 3-inch structural screws into the post can firm up a wobbly hinge side without rebuilding anything.
If you build the arch however you like—but set posts deep, brace the frame correctly, and treat end grain like the weak link—you’ll get that satisfying “click” when the latch meets the strike. And once it’s swinging right, it becomes one of those garden features you stop noticing… because it just works.