The Simple Trick for Transplanting Without Shock
Most transplant shock isn’t “the plant being dramatic.” It’s us accidentally tearing off the tiny feeder roots that do 90% of the drinking. The common mistake is pulling a plant out by the stem, shaking soil loose, and then trying to “make up for it” with extra watering—right when the plant has fewer working roots to absorb that water.
The simplest trick that prevents this mess: pre-water the root ball, then move it with the soil intact—and match moisture between the old root zone and the new hole so the roots never hit a sudden dry/wet boundary. Everything else in this article supports that one move.
“Most of the water absorbed by plants is taken up via fine, young roots and root hairs—damage to these during digging and planting is a common cause of transplant stress.” — University of Minnesota Extension (2020)
The “No-Shock” Core Trick: Keep Roots Working
Tip: Water the Plant Before You Move It (Not After)
Water 12–24 hours before transplanting so the root ball holds together like a firm brownie, not dry crumbs. Aim for moisture about like a wrung-out sponge: damp, not dripping. This keeps feeder roots cushioned in soil and reduces tearing when you lift.
Example: When I move basil or lettuce seedlings, I water the flats the evening before; the next morning the plugs slide out intact and settle in fast with almost zero wilt.
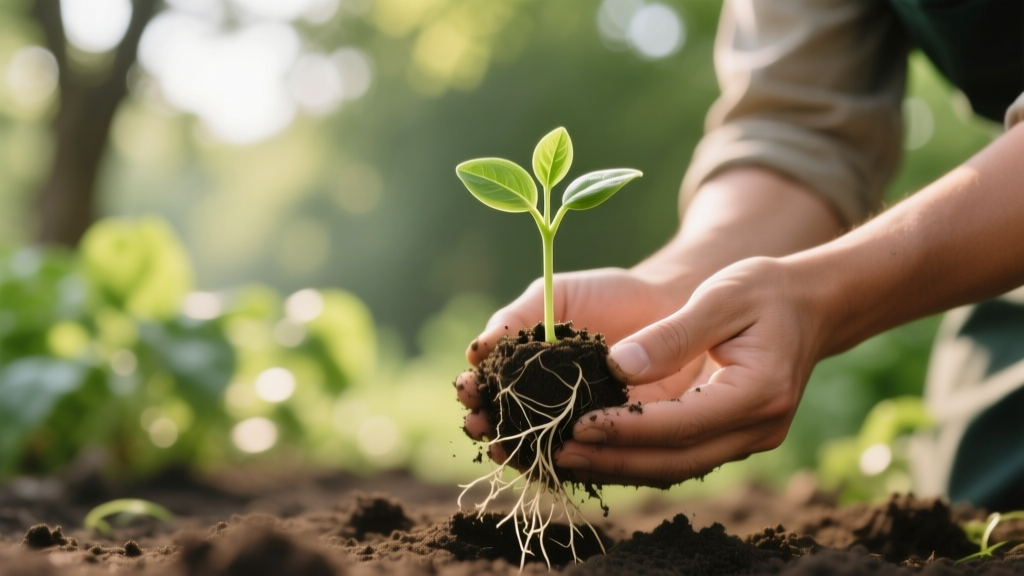
Tip: Lift by the Root Ball, Not the Stem
Stems are handles only in cartoons. Use a trowel to pry from underneath and support the soil mass with your palm. If it’s in a pot, tap the rim and slide it out sideways so the plant isn’t dangling by its neck.
Example: Tomato starts snapped at the soil line are almost always from yanking the stem; lifting from below avoids that heartbreak.
Tip: Match Moisture in the New Hole (The “No Boundary” Hack)
If you drop a moist root ball into bone-dry soil, the surrounding soil steals moisture and roots stall; drop a dry root ball into a soggy hole, and oxygen disappears. Pre-wet the planting hole with 2–4 cups of water for small transplants (up to 4-inch pots), or 1–2 gallons for shrubs, then let it soak in for 5–10 minutes before planting.
Example: In sandy soil, I water the hole twice—once to wet the sides, once right before planting—so the root ball doesn’t dry out in the first afternoon.
Timing Tricks That Cut Shock in Half
Tip: Transplant at Dusk (Or on a Cloudy Day)
Midday sun forces leaves to evaporate water faster than stressed roots can replace it. Transplanting after 6 pm (or during steady overcast) gives plants a full night to rehydrate and settle without heat pressure.
Example: Peppers that wilt hard when planted at noon often look perfectly normal the next morning when planted at dusk—same plant, different timing.
Tip: Follow the “50°F Soil Rule” for Warm-Season Crops
Tomatoes, peppers, basil, cucumbers—these stall in cold soil and act “shocked” even if you do everything right. Use a cheap soil thermometer (often $8–$15) and wait until soil is consistently 50–60°F depending on the crop; tomatoes are happier closer to 60°F.
Example: Planting tomatoes into 45°F soil can pause growth for weeks; planting the same variety two weeks later at 60°F often catches up and passes the early planting.
Tip: Avoid the 3 Worst Days: Windy, Hot, or Right Before a Freeze
Wind is a leaf-desiccation machine. Heat spikes crank transpiration. Frost threatens already stressed tissue. If you must plant in suboptimal weather, use temporary shade cloth and extra wind protection for 48–72 hours.
Example: A $3 roll of painter’s plastic + two stakes makes a quick windbreak for tender annuals during spring gusts.
Root Ball Prep: The Details Most People Skip
Tip: Fix Circling Roots in 20 Seconds
Plants in pots often have roots wrapping around like a cinnamon roll; if you plant that as-is, the roots keep circling instead of moving outward. For 4–6 inch pots, rough up the outer 1/2 inch of the root ball with your fingers; for tighter mats, make 3–4 vertical slices about 1/4 inch deep with a clean knife.
Example: Box-store perennials almost always need this—especially lavender and rosemary—because they’ve been sitting in pots too long.
Tip: Don’t “Tease” Wet Roots—Tease Them Damp
Teasing roots when the ball is sopping wet smears soil and snaps fine roots. Do it after your pre-watering has soaked in (damp, not dripping). The goal is to free the outer ring without shredding the interior.
Example: If you can squeeze the root ball and water streams out, wait 30 minutes; then loosen gently.
Tip: Keep Root Exposure Under 60 Seconds
Fine roots dry quickly in sun and wind. Stage your work so the hole is ready, mulch is nearby, and the plant is out of its pot only when you’re ready to set it in. If you’re doing batches, cover root balls with a damp towel in the shade.
Example: When planting a 24-pack of marigolds, I prep all holes first, then pop plants out one by one—no roots sitting around.
Planting Hole Tricks (That Actually Matter)
Tip: Dig Wide, Not Deep
Most transplant roots want to spread sideways in the top soil layers where oxygen lives. Dig the hole 2–3× the width of the root ball but only as deep as the root ball height, so the plant doesn’t settle too low and suffocate.
Example: For a 4-inch pot (about 4 inches wide), dig an 8–12 inch wide hole; you’ll be amazed how quickly roots colonize loose soil.
Tip: Set the Crown at the Right Height (One Exception: Tomatoes)
For most plants, the soil line in the pot should match the garden soil line. Planting too deep invites rot; too high exposes roots. The exception is tomatoes: you can bury 1/3 to 1/2 of the stem to encourage extra rooting along the buried stem.
Example: Leggy tomato seedlings can be planted deep or even sideways in a trench, leaving only the top cluster of leaves above ground.
Tip: Skip “Fertilizer in the Hole” for Tender Transplants
High-salt fertilizers can burn fresh roots, and phosphorus myths are overplayed for many home soils. If you want nutrition, top-dress lightly after 7–10 days when you see new growth. Extension guidance consistently warns against direct contact between fertilizer and roots at planting.
Source note: Purdue University Extension (2018) emphasizes avoiding fertilizer burn by not placing fertilizer in direct contact with roots at planting.
Watering That Prevents Shock (Not the Usual “Water More” Advice)
Tip: Use “Soak, Wait, Soak” to Remove Air Pockets
Air gaps around roots cause dry spots even when the surface looks wet. After backfilling halfway, add water until it settles; wait 2 minutes, then finish backfilling and water again. This seats soil against roots without stomping hard.
Example: This is especially useful for woody herbs like thyme and lavender, where dry pockets lead to sudden wilt.
Tip: Make a Temporary Water Basin (Then Remove It Later)
Build a 1–2 inch tall soil ring around the transplant to catch water and direct it to the root zone. Keep it for the first 10–14 days, then level it out so water doesn’t pool against stems during heavy rain.
Example: For new shrubs, this basin turns a quick hose pass into a deep soak instead of runoff down the slope.
Tip: Measure Once: The 1-Inch Rule for Establishment Watering
A reliable target is about 1 inch of water per week (rain + irrigation) during establishment for many garden plants, adjusted for heat and soil type. Use a straight-sided container (like a tuna can) to see what your sprinkler actually delivers in 15 minutes.
Source note: This weekly water benchmark is widely cited by extension services for general landscape and garden watering; always adjust for your soil and crop (e.g., UC ANR guidance on irrigation scheduling, 2017).
Microclimate Hacks: Shade, Wind, and Humidity
Tip: Give 40–60% Shade for 2–3 Days (DIY Is Easy)
A little shade right after transplanting reduces leaf water loss while roots reconnect. Use 40–60% shade cloth or DIY with an old bedsheet clipped to stakes; keep it up for 48–72 hours, then remove gradually.
Example: Newly planted lettuce in late spring can go from bitter and bolting to crisp and steady just from a short shade break during heat spikes.
Tip: Windbreak First, Stakes Second
Staking a floppy transplant doesn’t stop wind from stripping moisture; it just keeps it upright while it dries out. Block wind on the windward side with a panel (cardboard, burlap, plastic with holes) placed 6–12 inches away so air still circulates.
Example: A $2 piece of cardboard held by two sticks can save a row of brassicas on a blustery day.
Tip: Use Mulch Like a “Moisture Lid,” But Keep It Off the Stem
Apply 1–2 inches of fine mulch (leaf mold, straw, shredded leaves) around transplants to reduce evaporation and soil temperature swings. Leave a bare donut 1–2 inches around the stem to prevent rot and fungus gnats near tender crowns.
Example: Strawberry transplants establish faster with straw mulch, but crowns buried in mulch are prone to rot—keep the crown clear.
Money-Saving Tools and Product Swaps (With Real Numbers)
Tip: Root Drench Options—From Free to Store-Bought
People love “transplant tonics,” but you can get most of the benefit from good moisture management and a gentle root drench. If you want a helper, choose one that supports roots without over-fertilizing.
| Method | What you do | Approx. cost | Best use | Watch-out |
|---|---|---|---|---|
| Plain water + soak/wait/soak | Water hole, plant, water again | $0 | Most transplants, all gardens | Overwatering in heavy clay |
| DIY sugar water (skip it) | Adding sugar to “feed roots” | $0.10–$0.30 | Honestly, none | Can feed microbes in unhelpful ways; not needed |
| Seaweed/kelp extract drench | Mix per label; drench root zone | $0.25–$0.75 per plant (varies) | High-stress moves (heat, bare-root) | Don’t use as a fertilizer replacement |
| Mycorrhizal inoculant (targeted) | Dust roots or sprinkle in hole | $0.20–$1.00 per plant | Perennials, shrubs, disturbed soils | Not a magic fix; needs living roots and time |
Real talk: If you’re on a budget, put your money into shade cloth and a soil thermometer before buying bottles of “transplant miracle.” A $12 thermometer prevents weeks of stalling in cold soil—bigger payoff than most additives.
Tip: A $5 Turkey Baster Makes a Perfect Seedling Watering Tool
For tiny plugs, overhead watering can flatten seedlings and expose roots. A turkey baster (or large syringe) delivers water directly to the root zone—about 1–2 oz at a time—without washing soil away.
Example: This is my favorite trick for transplanting onion seedlings and keeping them upright in the first week.
Real-World Scenarios (What to Do When Life Isn’t Ideal)
Scenario 1: Heat Wave Tomorrow, but You Have to Plant Today
Tip: Use “2-Day Shade + Deep Morning Water” Protocol
Plant at dusk, water in with the soak/wait/soak method, then install 50% shade until the heat breaks. The next morning, water early (before 9 am) to recharge the root zone; skip evening watering if nights are warm and humid to avoid disease.
Example: I’ve saved basil and cilantro transplants during 90°F spikes by shading them for 48 hours—no fancy products, just reduced leaf stress.
Scenario 2: Heavy Clay Soil That Turns Into Bricks or Soup
Tip: Plant Slightly High and Mulch Wide
In clay, oxygen is the limiting factor, not water. Set the root ball so it sits 1 inch above grade, then taper soil up to it like a gentle mound. Mulch a wide circle (18–24 inches for shrubs) to stabilize moisture without waterlogging the crown.
Example: New hydrangeas in clay often droop from “too much love” (wet feet); planting high keeps roots breathing while they establish.
Scenario 3: Bare-Root Plants (Roses, Strawberries, Fruit Trees)
Tip: Soak Roots for a Set Time—Then Plant Immediately
Soak bare roots in plain water for 30–60 minutes (not overnight unless the supplier specifically says so). While they soak, prep the hole so planting happens fast; spread roots outward like spokes and backfill with native soil.
Example: Strawberry crowns fail when planted too deep; keep the crown right at soil level, then water in gently and mulch around—not over—the crown.
Scenario 4: You Forgot to Harden Off Seedlings
Tip: “Emergency Hardening” in 72 Hours
If indoor seedlings go straight into full sun, leaves scorch and plants look shocked even with perfect watering. Do 3 days of stepped exposure: day 1 = 1–2 hours morning sun, day 2 = 3–4 hours, day 3 = half-day; plant after day 3 at dusk with temporary shade.
Example: This works especially well for cucumbers and zinnias, which can sulk hard after sudden UV exposure.
Fast Diagnostics: Is It Shock or Something Else?
Tip: Check the New Growth, Not the Old Leaves
Old leaves often droop or yellow after transplanting, even when the plant is recovering. The real signal is the newest growth: if tips are firm and bright after 4–7 days, you’re fine. If new growth is limp and gray-green, roots are still struggling.
Example: Pepper plants may drop a couple leaves after moving, but if the top is pushing new leaves by day 7, you’re back in business.
Tip: The Gentle Tug Test (Do This Once)
After about 7–10 days, give the plant a very gentle tug at the base. Resistance means new roots are anchoring. If it slides easily, you likely have poor root-to-soil contact or the root ball dried out early.
Example: This is a great check for cabbage family transplants—brassicas should root in quickly when planted correctly.
The Insider Routine I Use When I Need Near-Perfect Success
Tip: The 10-Minute Setup That Makes You Look Like a Pro
Before you pull a single plant, line up everything: dug holes, mulch pile, watering can/hose, and shade/wind protection. Then: pre-watered root ball comes out, roots are loosened/sliced if circling, plant goes in at correct height, soak/wait/soak, mulch donut, and shade if needed. The whole plant spends less than 1 minute “in the air,” which is the quiet secret behind low shock.
Example: When planting 12 tomato starts, staging the holes first cut my total time by half—and every plant took off without the classic droop-and-pout phase.
If you only steal one habit from this article, make it this: water the day before, keep the root ball intact, and match moisture in the new hole. Do that consistently and transplant shock stops being a mystery and starts being a rare exception—usually tied to weather timing or circling roots, both of which you now know how to handle.
Sources: University of Minnesota Extension (2020) on transplant stress and root function; Purdue University Extension (2018) guidance on fertilizer placement and root injury; UC Agriculture and Natural Resources (2017) irrigation scheduling principles and establishment watering considerations.