Deck Railing Planter Box Ideas
The deck is perfect—until you notice what’s missing. You’ve got a view, a chair you actually like, maybe string lights at dusk… and then your eye lands on that blank railing: a long, empty line that feels like a missed opportunity. You try a few pots on the floor, but they clutter the walkway, and watering turns into an obstacle course. The railing itself is sitting there like a ready-made planting shelf—if you design it with intention.
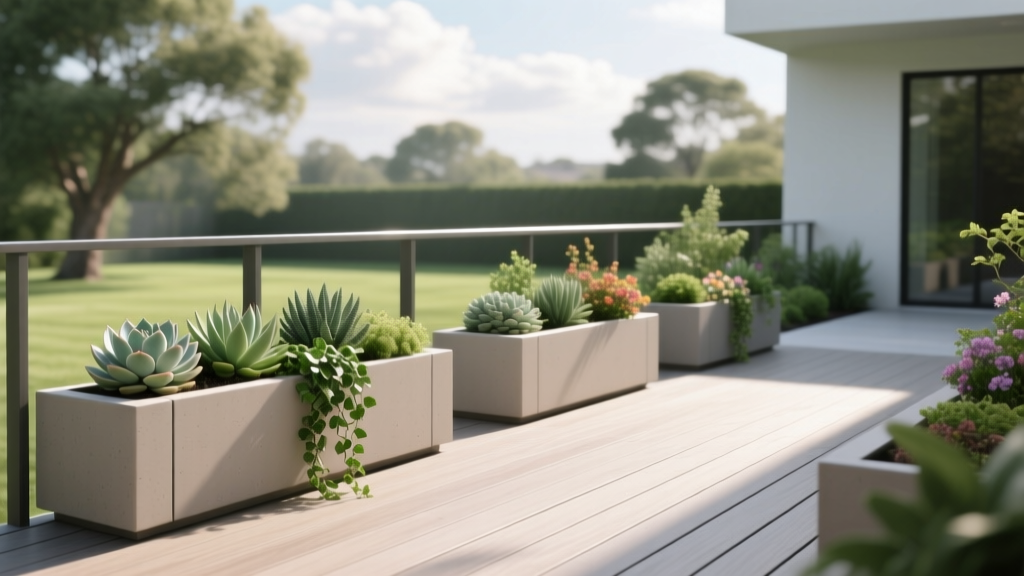
This is where railing planter boxes shine: they add privacy, soften hard edges, and pull color up to eye level without eating your precious deck square footage. Below is a designer’s approach to planning the layout, choosing plants that truly thrive in tight soil volumes, and making the whole setup stable, safe, and easy to maintain—especially if you’re renting or working with a small footprint.
Start with the railing: measure, load, and sightlines
Before you buy anything, treat the railing like a piece of architecture. Your planter boxes should fit, but also look proportional and stay secure in wind and storms.
Measure three things (and write them down)
Grab a tape measure and note:
- Railing width (top cap thickness): common caps are 2.5–5.5 inches wide.
- Railing height: typical deck rails are about 36 inches tall; some are 42 inches depending on code and elevation.
- Post spacing: often 48–72 inches between posts; posts affect where planter brackets can clamp or screw.
Then decide what you want your planter boxes to do visually. A simple trick: keep the top of the plants (at maturity) around 12–24 inches above the railing. Higher than that can feel top-heavy and may block views—unless privacy is the goal.
Weight and drainage: practical reality
Planters get heavy fast. A single 24-inch box can hold roughly 12–18 quarts of potting mix depending on depth; wet soil weighs more. You don’t need to calculate precise loads like an engineer, but you should avoid long, fully saturated boxes hanging from flimsy brackets.
Drainage matters just as much. Use planters with drain holes and add drip trays if the deck below must stay clean. If water dripping onto a neighbor’s patio is a concern, choose self-watering railing boxes (they cost more, but they prevent runoff).
Layout strategies that look designed (not “stuck on”)
The most attractive railing planters follow the same rules designers use for borders: rhythm, repetition, and focal points.
Strategy 1: Repeat a module for instant order
Choose a “module”—a repeating planter size and planting recipe. For example, four identical 24-inch railing planters spaced evenly along one rail reads as intentional architecture. It also simplifies watering and seasonal swaps.
Spacing guideline: leave 6–12 inches of open railing between planter boxes when you want separation, or butt them closer (1–2 inches) for a continuous “living hedge” effect.
Strategy 2: Frame the view with “bookend” planters
If your deck faces a yard, lake, or skyline, use two larger planters near the ends of the railing as bookends, then use smaller boxes in between. The ends feel anchored, and the center stays airy.
Strategy 3: Build a privacy band without losing light
Privacy doesn’t have to mean a wall of tall plants. Aim for a layered screen:
- Back layer (height): airy grasses or upright herbs
- Mid layer (bulk): mounding flowers
- Front edge (spill): trailers that soften the box edge
For comfort, target a total screen height of about 54–66 inches from deck floor (a 36-inch railing plus 18–30 inches of plant height). That blocks neighbor sightlines while still letting breezes through.
Pick the right planter box style for your railing (and your lease)
Not every deck allows drilling, and not every railing can hold the same hardware. Here’s a practical comparison you can use while shopping.
| Planter type | Best for | Typical size | Approx. cost (USD) | Notes |
|---|---|---|---|---|
| Clamp-on railing planter | Renters, no-drill installs | 24" L x 7" W x 6" D | $25–$60 | Check clamp range (often 1.5"–4"). Tighten seasonally. |
| Over-the-rail saddle planter | Quick setup, standard rail caps | 30" L x 10" W x 8" D | $30–$90 | Can wobble in wind; add stabilizer straps if needed. |
| Bracket-mounted wood box | Homeowners, custom lengths | 36"–48" L x 8"–10" W x 8"–12" D | $40–$140 (DIY materials) | Seal wood; pre-drill; consider liner to protect boards. |
| Self-watering railing box | Hot decks, frequent travel | 24"–36" L | $45–$120 | Reduces watering; heavier when reservoir is full. |
Planting design: the “thriller, filler, spiller” method that actually works on railings
Railing boxes are shallow compared to in-ground beds, so plant choices have to be both ornamental and resilient. The classic container formula—one upright focal plant (thriller), one mounding mass (filler), and one trailing plant (spiller)—creates a full look without overplanting.
“Right plant, right place is the foundation of sustainable landscapes—match the plant’s requirements to the site conditions and you reduce inputs like water and fertilizer.” — Principles emphasized in University of Vermont Extension guidance on sustainable gardening (UVM Extension, 2020)
Think of your deck’s microclimate. A south- or west-facing deck can act like a heat reflector; a railing box can dry out in a single windy afternoon. Most flowering annuals perform best with 6–8 hours of sun; leafy ornamentals and many herbs are happy with 4–6 hours.
Sun-loving plant recipes (6–8 hours of sun)
These varieties are reliable performers in containers and bring strong color at eye level:
- Thriller: Salvia ‘Mystic Spires Blue’ (upright, pollinator favorite; handles heat)
- Filler: Calibrachoa ‘Superbells’ (nonstop blooms, less deadheading than petunias)
- Spiller: Sweet potato vine ‘Marguerite’ or ‘Blackie’ (fast spill, dramatic foliage)
Spacing: In a 24-inch box, plant 3–5 plants total. Overcrowding looks good for two weeks, then struggles all summer.
Part-sun recipes (4–6 hours)
- Thriller: Coleus ‘ColorBlaze Rediculous’ (bold leaf color, no flowers required)
- Filler: Impatiens ‘Beacon’ series (downy mildew resistance; good color in shade/part shade)
- Spiller: Creeping Jenny (Lysimachia nummularia ‘Aurea’) for lime spill; best where it won’t bake
Edible railing boxes (the “kitchen deck” layout)
If you cook often, herbs on the railing feel like cheating—in a good way. Choose compact varieties that don’t mind frequent pinching:
- Basil: ‘Prospera’ (bred for downy mildew resistance; great flavor)
- Thyme: ‘Doone Valley’ (variegated, trailing habit works as a spiller)
- Chives: common chives or garlic chives (vertical texture, edible blooms)
- Strawberries: ‘Albion’ (day-neutral, good container performance; sweet berries)
For food safety and better growth, use potting mix labeled for containers (not garden soil). Container media drains well but needs regular feeding.
Fertilizing data point: Apply a slow-release fertilizer once (e.g., 5–6 month formulation) and supplement with liquid feed every 2 weeks for heavy bloomers.
Research supports compost and organic amendments in potting systems, but moderation matters; too much compost can reduce drainage in small containers. The Royal Horticultural Society notes the value of improving soils with organic matter for long-term fertility and structure (RHS, 2023).
Three real-world deck scenarios (and what actually works)
Design looks different when you’re dealing with rentals, wind tunnels, or tiny spaces. Here are three scenarios I see constantly—and layouts that solve them.
Scenario 1: The renter’s no-drill balcony with strict rules
Problem: You can’t screw into railings, and the building doesn’t want water dripping onto balconies below.
Design move: Use self-watering clamp-on planters with a reservoir and internal overflow control, and keep plant height moderate to reduce wind leverage.
Planting: Coleus + begonias + trailing bacopa. These tolerate part shade and don’t need constant deadheading.
Budget: 4 planters at $50 each = $200, plus potting mix ($15–$25 per bag) and plants ($40–$80 total depending on size). For a lower-cost alternative, use standard clamp-on boxes plus fitted drip trays ($5–$10 each).
Scenario 2: The sunny, windy deck that bakes in July
Problem: Afternoon sun and wind dry railing boxes fast; plants wilt daily.
Design move: Go deeper if you can: choose boxes at least 8–10 inches deep, and prioritize self-watering or add a hidden drip irrigation line. Place planters on the inside of the rail if possible for wind protection.
Planting: Salvia + lantana + trailing verbena. Add one upright ornamental grass like Pennisetum setaceum ‘Fireworks’ only if your box is large and stable.
Maintenance expectation: In peak heat, expect watering 5–10 minutes/day unless self-watering; with a reservoir, more like 10–15 minutes twice a week.
Scenario 3: The narrow deck where every inch of walking space matters
Problem: Floor pots steal space, but you still want lushness.
Design move: Keep the rail planters slim (6–8 inches wide), and treat them as a “green border” that runs the length of the deck. Visually, it expands the space by pulling your eye outward.
Planting: A repeating module: dwarf fountain grass (or upright rosemary in warm climates) + white calibrachoa + trailing dichondra ‘Silver Falls’ for a clean, modern look.
Proportion tip: If your deck is only 5 feet deep, skip plants that sprawl aggressively; choose compact, fine-textured varieties to keep it calm.
Step-by-step: install and plant a railing planter layout that holds up
This is the setup sequence I use so you don’t end up redoing hardware after everything’s planted.
- Dry-fit the planters first. Place empty boxes on the railing where you want them and step back. Check sightlines from inside the house and from seating areas.
- Confirm clearance. Ensure doors, grills, and stair paths have at least 36 inches of comfortable passage where possible (tight decks may manage with less, but avoid pinch points).
- Secure hardware. Tighten clamps or brackets. If you’re using saddle planters, add a stabilizing strap (a simple nylon strap can prevent sway).
- Add drainage management. Insert liners if needed, confirm drain holes, and add drip trays where dripping is an issue.
- Fill with potting mix. Leave 1 inch at the top for watering space so soil doesn’t spill over.
- Place plants before planting. Arrange the nursery pots in the box to confirm spacing and height relationships.
- Plant and firm gently. Don’t compact heavily; roots need oxygen. Water thoroughly until you see consistent drainage.
- Mulch lightly. A 1/2-inch layer of fine bark or coco husk helps reduce evaporation without sealing the surface.
- Label your “sun map.” Note how many hours of direct sun the planters get now; it shifts through the season as trees leaf out.
Design details that make a railing planter look custom
Small choices push the look from “store-bought” to integrated.
Color palette: repeat two colors, then add one accent
Pick two reliable colors and repeat them down the rail—like white + purple—then add a single accent (lime foliage, silver foliage, or a hot coral bloom) every other box. The repetition calms the long line of a railing.
Use foliage as structure (flowers are the sparkle)
On a deck, flowers can get shredded by wind and rain. Foliage plants (coleus, heuchera in cooler shade, sweet potato vine, dichondra) carry the design even when blooms pause.
Match planter finish to the architecture
Black metal railings look sharp with matte charcoal or cedar boxes. White vinyl railings pair nicely with espresso or clean white planters. If your deck boards are a warm brown composite, a cedar planter sealed with a natural-tone oil reads cohesive.
Budget planning and DIY alternatives (without sacrificing safety)
Costs vary wildly, but you can plan a realistic range.
Typical cost breakdown for a 12-foot railing run (using four 24-inch planters):
- Planters: $100–$240 total
- Potting mix: $30–$60
- Plants: $60–$140 (depending on annuals vs. perennials and plant size)
- Fertilizer and trays: $15–$40
DIY option: Build a simple cedar box at 36 inches long, 8 inches wide, and 8–10 inches deep, then mount it on heavy-duty railing brackets. Material costs often land around $40–$80 per box depending on cedar prices and hardware. Line the interior with a planter liner to slow rot and make seasonal soil refresh easier.
If you’re renting, you can still DIY a “slip-over” box that straddles the rail using a U-shaped design and interior bumpers to prevent scratching—no screws into the property required.
Maintenance expectations: what it really takes week to week
Railing planters are small-volume containers, so they ask for consistent care—but not a huge time commitment if you set them up right.
Weekly time: plan on 20–40 minutes/week total for a typical set of 4–6 boxes: watering checks, deadheading, and quick pruning.
Weekly tasks
- Watering: Check moisture with a finger; water when the top 1 inch is dry. In hot spells, this may be daily.
- Grooming: Snip leggy growth; remove spent blooms (calibrachoa is low-maintenance; geraniums need more deadheading).
- Rotate if needed: If one end gets more sun, rotate boxes monthly (only feasible with lighter clamp-on styles).
Seasonal tasks (spring, mid-summer, fall)
- Spring: Refresh the top 2 inches of mix, check hardware tightness, and replace cracked trays.
- Mid-summer: Cut back tired annuals by 1/3 to trigger a flush of fresh growth; feed afterward.
- Fall: Swap to cool-season color (ornamental kale, pansies, dwarf mums) or evergreen mini-structure (small conifers in pots nearby, with rail boxes filled with hardy greens).
In freezing climates, empty and store lightweight planters to prevent cracking. For fixed wooden boxes, remove dead annual roots and keep soil slightly drier over winter to reduce heaving and rot.
Plant combinations that hold their shape (and don’t bully the box)
Railing planters reward plants with compact roots and steady habits. Here are dependable mixes that won’t turn into a tangle by July.
Classic cottage color (sun)
Salvia ‘Mystic Spires Blue’ + calibrachoa in soft yellow + trailing bacopa (white). This gives you vertical spikes, dense bloom coverage, and a clean spill over the edge.
Modern monochrome (sun to part sun)
Pelargonium (zonal geranium) in white + dichondra ‘Silver Falls’ + a deep burgundy coleus. Strong contrast, crisp edges, and the silver spill makes the railing look lighter.
Pollinator-friendly and low-fuss (sun)
Lavender (compact variety like ‘Munstead’ if your box is deep enough) + lantana + trailing verbena. Bees and butterflies will find it quickly, and heat tolerance is excellent.
One caution: true lavender wants excellent drainage and doesn’t love constantly wet soil; if you use self-watering planters, keep lavender in a separate, drier container and let the rail boxes focus on thirstier bloomers.
Once your railing boxes are planted, the deck stops feeling like an exposed platform and starts reading as a garden room—one where the railing isn’t a boundary, but a growing edge. You’ll feel it most in the evening: you sit down, and the flowers are right there at arm’s reach, softening the view, catching the last light, and making the whole space feel intentionally finished.
Sources: Royal Horticultural Society (RHS), “Improving soil” (2023). University of Vermont Extension (UVM Extension), sustainable gardening guidance emphasizing right plant/right place principles (2020).