Kitchen Regrowing Scraps Garden
The cutting board is covered in the usual suspects: scallion roots, the pale nub of a romaine base, carrot tops you don’t quite have the heart to trash. The compost bin is already full, and the herb pots on the windowsill are doing that sad, leggy stretch toward the glass. You don’t need a bigger yard or a greenhouse—you need a layout that turns those scraps into a small, reliable supply of fresh greens with almost no shopping list.
Think of this project like designing a tiny “edible utility zone” that sits at the intersection of kitchen habit and garden space. You’ll build a system that moves scraps through three stages: a water-start station indoors, a transition nursery, and a final grow-out area (container, raised bed, or even a narrow balcony rail). Each stage has a job; the design keeps the whole thing tidy, productive, and easy to maintain.
Design principles that make regrowing scraps actually work
Design around the three-stage flow: Water → Potting mix → Garden
Most regrown scraps fail because they get stuck in stage one—roots in a glass forever, turning slimy or stalled. Instead, design your layout so you can move pieces along quickly.
- Stage 1 (Water-start): 3–7 days for scallions, lettuce bases, celery hearts. Goal: visible new growth and fresh roots, not a full plant.
- Stage 2 (Transition nursery): 2–3 weeks in small pots so roots learn to work in soil.
- Stage 3 (Grow-out): the productive zone where you harvest repeatedly.
This flow is supported by plant science: many kitchen scraps regrow because they contain meristematic tissue (growth points) capable of producing new leaves and roots. For example, lettuce “stumps” can push new leaves from the central growing point if kept moist and then moved to soil at the right time.
“A well-designed garden is a workflow first—paths, staging areas, and storage matter as much as the plants.” — Rick Darke, landscape designer and author, The American Woodland Garden (2002)
Put the “messy work” where water already lives
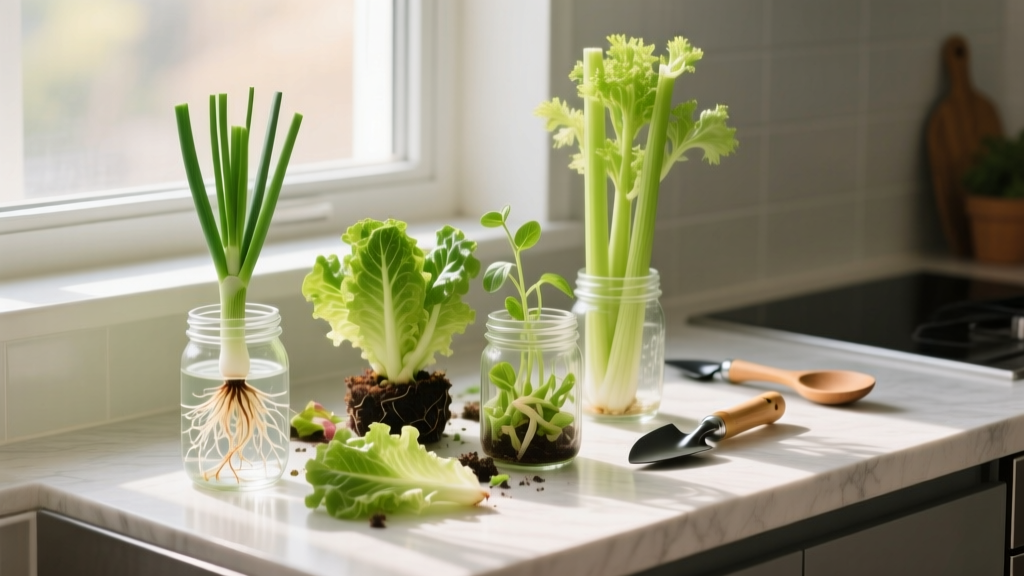
Place your water-start station within arm’s reach of the sink. That’s your hygiene and convenience anchor. A narrow tray (about 18 in × 6 in) on the counter can hold 6–10 small jars without looking like a science project. If counter space is precious, use a window ledge or a wall-mounted shelf above the sink.
Keep it simple: clear jars, labeled. Change water every 2 days to reduce bacterial buildup. The visual clarity also makes it easier to notice when a scrap is ready to move on.
Match your grow-out layout to sunlight hours (not wishful thinking)
Scrap regrowing is forgiving at first, but long-term harvest needs real light. Use these targets:
- Leafy regrows (scallions, lettuce, celery): 4–6 hours of sun, or bright shade with strong ambient light.
- Fruiting regrows (peppers from seed, not true scrap regrow): 6–8+ hours of sun.
If you’re unsure, track sun for one day: note when direct rays hit your balcony/yard window. A surprising number of “sunny” patios only get 3 hours—still workable for greens, but design accordingly.
For reference, University of Minnesota Extension notes most vegetables require at least 6 hours of direct sunlight for best production (University of Minnesota Extension, 2020).
Design for tight spacing—then add breathing room where rot starts
Scrap-grown plants often begin with tender, water-adapted tissue. Airflow prevents mildew and stem rot. In containers, space slightly wider than seed packets suggest for intensive harvest:
- Scallions: 2 in apart for quick harvest, 3 in apart for thicker regrowth.
- Lettuce stumps: 8–10 in apart so outer leaves dry quickly after watering.
- Celery hearts: 10–12 in apart; they’re thirsty and benefit from airflow.
Layout strategies: choose a footprint that matches your home
Option A: The “Counter-to-Container” micro pipeline (renters’ favorite)
Footprint: a windowsill + one container outside or near a bright window.
Suggested grow-out container: 24 in long window box, at least 8 in deep (deeper is better for moisture stability).
Planting pattern: scallions as a border (tight spacing), lettuce in the center (wider spacing).
Budget: Expect $25–$60 total if you buy a sturdy window box and fresh potting mix. DIY option: a food-safe storage tote with drainage holes drilled (cost as low as $8–$15), plus a saucer.
Option B: The raised-bed “Scrap Nursery Strip” for homeowners
Footprint: a narrow bed section dedicated to regrows, ideally close to the kitchen door.
Recommended size: a strip 12 in × 48 in along the edge of a 4 ft × 8 ft bed.
Why it works: You’re not betting the whole bed on unpredictable regrowth. You’re creating a tidy lane for experiments and quick wins.
Add a small path or stepping stone beside it so you can harvest without compressing soil—compaction reduces root oxygen, and scrap-regrown plants already start with a compromised root system.
Option C: The balcony rail + vertical pockets (the “no-floor-space” layout)
Footprint: rail planters plus a vertical pocket planter on a wall.
Dimensions to aim for: two rail planters 24 in long each + a pocket panel about 12 in × 24 in.
Design trick: put water-loving regrows (celery, lettuce) in pockets that you can easily monitor and water, and put scallions in the rail planters where they tolerate drying slightly between waterings.
Cost: rail planters often run $15–$30 each; felt pocket panels can be $20–$40. DIY alternative: repurpose sturdy bottles cut lengthwise and zip-tied to a rail (check safety and stability).
Step-by-step setup (a designer’s build sequence)
- Pick your grow-out zone first. Choose the sunniest workable spot. Measure it. If you have 24 in of length and 10 in of depth, you can run a productive greens strip.
- Build the water-start station. Set an 18 in × 6 in tray near the sink, add 6–10 jars, and label: scallion, lettuce, celery, basil (cuttings), “trial.”
- Stock a transition nursery. Keep 6 small pots (3–4 in diameter) and a bag of potting mix ready. This prevents the “stuck in water” problem.
- Prep soil and drainage. Use fresh potting mix in containers. For a window box, aim for 8–10 in soil depth. Add drainage holes if missing.
- Move scraps on schedule. Water-start for 3–7 days, then pot up for 2–3 weeks, then transplant into the grow-out zone.
- Design your planting map. Draw a quick plan: scallions at 2–3 in spacing on the edge; lettuce at 8–10 in; celery at 10–12 in.
- Add one fertility habit. A weekly half-strength liquid feed or top-dress with compost keeps regrows productive (they’re often running on stored energy at first).
Plant selection: the scraps that earn their space
Not all kitchen scraps deserve a spot in your layout. Choose those that respond reliably and fit your light and container depth. Below are top performers, plus specific varieties that tend to give good results.
Scallions / green onions (Allium fistulosum and Allium cepa)
Why they work: Fast regrowth, compact footprint, high harvest frequency. They tolerate containers and partial sun.
- Variety to buy once, then maintain: ‘Evergreen Hardy White’ (bunching type). It keeps producing without needing a bulb to swell.
- Spacing: 2–3 in.
- Harvest rhythm: snip greens weekly; leave 1–2 in above the soil line to regrow.
Romaine lettuce bases (Lactuca sativa)
Why it works: You’ll get a second flush of leaves quickly. It won’t usually form a perfect new head, but it will provide sandwich greens.
- Variety to purchase for better long-term garden performance: ‘Parris Island Cos’ (romaine type). Heat-tolerant and sturdy in containers.
- Spacing: 8–10 in.
- Light: 4–6 hours sun for acceptable leaf quality; more sun improves density.
Celery hearts (Apium graveolens)
Why it works: Celery regrows leaves from the center. It’s best treated as a leaf celery source (soups, stocks, chopping) rather than expecting thick supermarket stalks.
- Variety to try from seed alongside scraps: ‘Tango’ (known for good flavor and relative tolerance).
- Spacing: 10–12 in.
- Moisture needs: consistently moist soil; shallow containers dry too fast.
Basil from cut stems (not a scrap base, but a kitchen hero)
Why it works: Basil roots readily from cuttings, giving you a high-value plant for almost no cost. Treat it as part of the “scraps garden” because it thrives in the same pipeline system.
- Varieties: ‘Genovese’ (classic pesto basil) and ‘Prospera’ (downy mildew resistant, great for humid patios).
- Rooting time: often 7–14 days in water.
- Spacing: 8–10 in.
Garlic greens from sprouted cloves (Allium sativum)
Why it works: When cloves sprout in the pantry, plant them for garlic greens. You’ll harvest the tops like scallions.
- Depth: plant cloves 2 in deep.
- Spacing: 4–6 in.
Food safety note: if a scrap is slimy, smells off, or shows mold, compost it instead of regrowing.
Comparison table: what to regrow, and where it shines
| Scrap/Plant | Best Stage 1 Method | Time to First Usable Harvest | Grow-out Spacing | Best Location |
|---|---|---|---|---|
| Scallion roots | Jar with 1/2 in water | 7–14 days | 2–3 in | Window box, balcony rail planter |
| Romaine base | Shallow dish, keep crown above waterline | 10–21 days | 8–10 in | Deep window box, raised bed strip |
| Celery heart | Shallow dish, frequent water changes | 14–28 days | 10–12 in | Deep container with steady moisture |
| Basil cutting | Jar, bright light | 21–35 days | 8–10 in | Sunny balcony/patio, bright window + grow light |
| Sprouted garlic clove | Direct plant in soil | 14–30 days (greens) | 4–6 in | Container or bed edge |
Real-world scenarios: three layouts, three different lives
Scenario 1: The apartment windowsill + one sunny window (no outdoor space)
Challenge: Light is limited, and indoor air can be dry. You’re also trying to keep things attractive—no one wants a row of cloudy jars next to the coffee maker.
Design solution: Use the three-stage flow, but keep Stage 3 indoors with a small grow light. A 12 in LED bar mounted under a cabinet can transform a dim kitchen corner. Place a 24 in window box on a waterproof tray near the brightest window, and reserve it for scallions, garlic greens, and a compact basil.
Numbers that matter: Plan on 15–20 minutes twice a week for water changes and trimming. A basic LED grow bar can cost $25–$45, but it often pays off in healthier regrowth and fewer failed starts.
Practical tip: The U.S. EPA recommends cleaning and sanitizing food-contact surfaces to reduce microbial risks (U.S. Environmental Protection Agency, 2023). Treat your scrap station similarly: rinse jars well and don’t let water stagnate.
Scenario 2: The rental balcony with wind and harsh afternoon sun
Challenge: Containers dry out fast, and wind can shred tender new leaves. Regrown lettuce especially can get bitter if stressed.
Design solution: Put taller, sturdier plants on the windward side—like a pot of ‘Prospera’ basil or even a non-scrap evergreen herb—then tuck lettuce and celery in the lee. Use a container at least 10–12 in deep for celery so moisture stays stable. Add a simple shade cloth for heat spikes; even a 30% shade fabric can soften afternoon scorch without sacrificing growth.
Budget approach: If buying new containers hurts, prioritize one high-quality deep pot ($20–$35) for celery and use repurposed containers for scallions. Drill drainage holes and elevate pots on scraps of wood so water can escape freely.
Scenario 3: The suburban kitchen door bed—high convenience, high payoff
Challenge: Homeowners often have space but still “forget to harvest,” letting greens bolt or get tough.
Design solution: Put the regrow strip where you pass daily. A 12 in × 48 in dedicated lane along the bed edge becomes a living reminder. Install a simple edging board so it reads as intentional. Plant scallions in a tidy row at 3 in spacing, romaine at 10 in, and leave a pocket for rotating experiments (like sprouted garlic or carrot tops grown for greens, not roots).
Maintenance reality: Expect 30–45 minutes per week in peak season: watering, harvesting, and replanting transitions. The payoff is consistency—greens within arm’s reach, no special trip required.
Budget planning and DIY alternatives (so the system doesn’t stall)
A scraps garden is supposed to save money, but it can quietly become a shopping spree if you don’t set boundaries. Here’s a practical way to think about costs: spend where it improves survival (light, drainage, soil), and improvise where it doesn’t (jars, labels, staging trays).
- Must-buy (most situations): fresh potting mix ($8–$15), because old mix can be compacted or depleted.
- Worth buying: one deep container (10–12 in deep) for celery/lettuce stability; often $20–$35.
- DIY easily: jars (saved pasta sauce jars), labels (masking tape), staging tray (thrifted baking sheet).
- Optional upgrade: small grow light ($25–$45) if your light is under 4 hours of sun.
If you want a hard cap, a realistic starter budget is $40: one affordable container, a bag of mix, and everything else repurposed. If you’re building a balcony system with rail planters and vertical pockets, plan closer to $80–$150.
Maintenance expectations: what you’re signing up for
This is not a “set it and forget it” garden, but it’s also not demanding if the layout is right. The key is short, frequent touches that prevent problems.
Weekly routine (about 30–60 minutes total)
- Water-start station: change water every 2 days; rinse jars. (5–10 minutes per change.)
- Transition nursery: check moisture; water when the top 1 in dries. (10 minutes.)
- Grow-out zone: deep water 1–3 times weekly depending on heat; harvest as you go. (15–30 minutes.)
Seasonal tasks that keep it productive
- Spring: refresh the top 1–2 in of container soil with compost or new mix; re-map spacing for airflow.
- Summer: add shade during heat waves; harvest lettuce smaller to avoid bitterness; watch for aphids on tender regrowth.
- Fall: restart scallions and garlic greens; lettuce regrowth often improves in cooler nights.
- Winter (indoors): rely more on scallions and basil cuttings under light; reduce watering frequency as growth slows.
One candid note: regrown lettuce bases and celery hearts are best treated as “bonus greens.” For steady yields, blend regrows with a small amount of traditional planting (a packet of romaine seed is usually under $4). Your scraps garden becomes a hybrid: part regeneration, part intentional production.
When you step back, the design is doing the heavy lifting. Scraps stop being clutter because they have a place to go. The transition pots prevent stalled regrowth. The grow-out zone is sized to your real sunlight, not an imaginary ideal. And the best part is how quietly it changes your kitchen habits: you chop, you save a base, you rinse a jar, and a week later you’re snipping something fresh that used to be trash.
Once the system is running, you’ll start to see your space differently—not as “too small,” but as efficiently staged. A counter corner becomes a propagation bench. A window box becomes a harvest strip. And those scraps on the cutting board? They’re not leftovers. They’re planting material.