Balcony Compact Rain Barrel Garden Setup
The first time you notice it, it’s usually mid-summer: your balcony pots look a little tired, the forecast says “no rain for 10 days,” and you’re carrying watering cans back and forth like you’re training for something. Meanwhile, every time it does rain, all that clean water rushes off the roof, into a downspout, and disappears. A balcony can feel like the least forgiving garden space—small, exposed, and thirsty. But with a compact rain barrel setup and a layout designed around gravity and access, that same balcony can run smoother, greener, and with far fewer trips to the sink.
This project is written like I’d walk you through it on-site: we’ll measure, place the barrel where it actually works, and build a planting plan that thrives in containers while respecting weight limits, sun patterns, and real-life routines.
Start With the Balcony Reality Check: Sun, Weight, and Water Path
Before you buy anything, take 15 minutes with a tape measure and a notepad. Rain barrels fail on balconies for three reasons: they’re placed where you can’t reach them, they don’t have enough elevation for watering, or they’re simply too heavy for the space.
Measure the “useable rectangle,” not the whole balcony
Most balconies have dead zones: the door swing, a walkway, the spot where you need to stand to water. For a compact rain barrel garden, aim to keep a clear path of 24 inches (61 cm) minimum from the door to the far end. In a tight setup, 18 inches (46 cm) can work, but you’ll feel it.
Typical renter balcony sizes I see often: 4 ft × 8 ft or 5 ft × 10 ft. For this article, I’ll design around a 5 ft × 10 ft (50 sq ft) balcony with a sliding door on one short end.
Understand rainwater weight (this is not optional)
Water is heavy. One gallon of water weighs about 8.34 lb. So a compact 20-gallon barrel holds about 167 lb of water, plus the barrel itself and stand. A 55-gallon barrel (common in yards) would hold about 459 lb—often inappropriate for balconies.
If you’re unsure of the balcony load rating, treat that as a hard constraint. Many balconies are designed for specific live loads, but the exact number varies by building and code. When in doubt: keep storage volumes small, distribute weight (more containers, smaller reservoirs), and ask building management.
Confirm rainwater collection is allowed and feasible
Rules vary by location. Some municipalities encourage rainwater harvesting; some buildings restrict modifications to downspouts or balcony edges. Also, balcony collection is usually not a direct roof-downspout feed unless you have access to a downspout on your balcony line.
As a reference point on safety and best practices, the U.S. EPA notes that harvested rainwater can pick up contaminants from catchment surfaces and storage, and should be used appropriately (especially around edible crops). See U.S. EPA rainwater harvesting guidance (U.S. Environmental Protection Agency, 2013). Another useful technical benchmark is the American Rainwater Catchment Systems Association (ARCSA) guidance on system components and screening (ARCSA, 2020).
Layout Strategy: Put the Barrel Where Gravity Can Work for You
A compact balcony barrel setup succeeds when watering is effortless. The goal is to let gravity do the work—no lifting, no awkward siphons, no dragging hoses through your living room.
The three-zone balcony plan
I like to divide small spaces into three zones:
- Utility zone: rain barrel, watering can, small shelf for tools.
- Production zone: herbs and vegetables placed where sun is strongest.
- Comfort/green zone: a chair, a narrow bench, or just breathing room with pollinator-friendly plants.
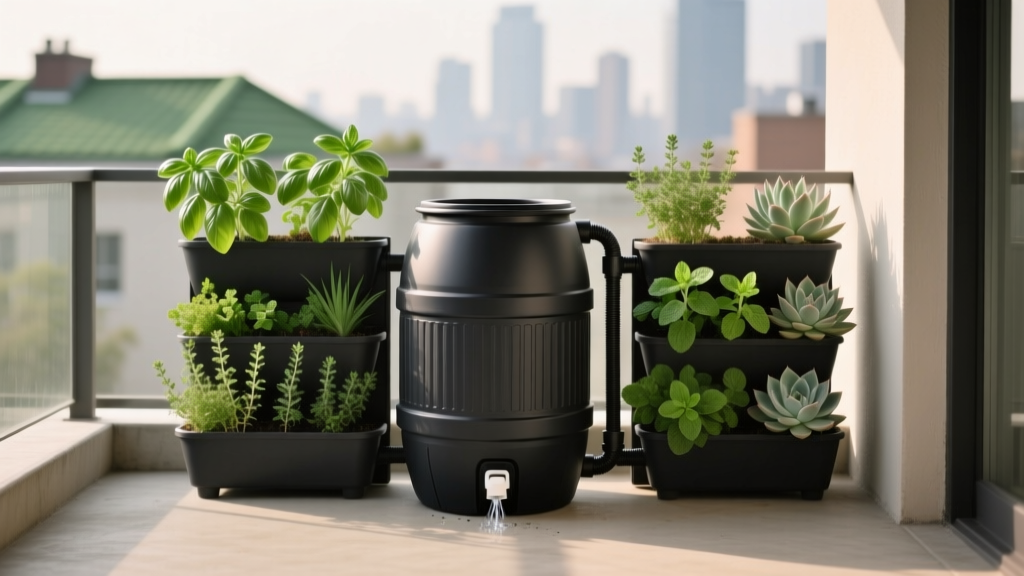
On a 5 ft × 10 ft balcony, place the utility zone in the far corner closest to the water source (a downspout access point or a balcony edge where rain can be captured) but not where you’ll trip over it. A compact barrel footprint is typically 18–24 inches in diameter. Reserve a corner square of about 24 in × 24 in for the barrel, plus a small shelf above or beside it.
Elevation: the secret to usable pressure
Spigots on small barrels are often low. If your spigot is only 6 inches above the floor, filling a watering can is annoying. Aim to elevate the barrel so the spigot is 12–18 inches above the balcony floor. That usually means a stand about 10–16 inches tall.
DIY stand options: a sturdy plastic crate rated for weight, stacked concrete pavers, or a small pressure-treated platform. Keep it level. A barrel that leans is a barrel that eventually fails.
Overflow is part of the design, not an afterthought
Every barrel needs an overflow route that won’t annoy neighbors below. Use a hose to direct overflow to a drain point or back to a safe discharge path. Plan for at least 6–10 ft of overflow hose if you need to route it along the railing to a corner drain.
“Good garden design makes routine actions—watering, pruning, harvesting—feel inevitable and easy. If a step feels awkward, the design will be abandoned.” — Adapted from design principles discussed by landscape architect Thomas Rainer on habit-forming public planting design (Rainer, 2017).
Choose a Compact Rain Barrel System That Fits Balcony Life
Balcony systems need to be light, clean, and easy to disconnect. Below is a comparison of common compact options that I’ve seen work well for renters and homeowners alike.
| System Type | Typical Capacity | Footprint | Approx. Cost (USD) | Best For |
|---|---|---|---|---|
| Slim wall tank | 20–40 gal | ~12–16 in deep × 24–30 in wide | $120–$250 | Against a wall; narrow balconies |
| Round compact barrel | 15–25 gal | ~18–22 in diameter | $70–$180 | Corner placement; simple installs |
| Stackable modular reservoir | 10–30 gal (stacked) | Varies; often 16–20 in square | $90–$220 | Incremental growth; renters |
| Food-grade jerry cans + drip tray | 5–15 gal total | Small; flexible | $25–$80 | Ultra-light, DIY, tight rules |
If your building restricts barrels, the jerry-can approach is often acceptable: you collect rain from a small balcony catchment (more on that soon), then decant as needed. Not glamorous, but highly controllable.
Step-by-Step Setup: A Practical Balcony Build
This is the cleanest “designer-approved” installation sequence I’ve found for small spaces. Adjust it to fit your building rules and your downspout situation.
- Measure and mark placement: tape out a 24 in × 24 in square in the chosen corner; confirm you still have a 24-inch walkway.
- Place a waterproof mat: a recycled rubber utility mat or boot tray helps protect balcony surfaces and catches drips. Budget $15–$35.
- Build or set a stand: target spigot height 12–18 inches above floor. Ensure the stand is level and rated for at least 250 lb for a 20-gallon system.
- Add inlet screening: use a fine mesh screen to reduce mosquito access and debris. Budget $8–$20. ARCSA recommends robust screening and sealed inlets for vector control (ARCSA, 2020).
- Set up collection method: connect to a downspout diverter if permitted, or use a small rain-capture surface (like a removable awning/gutter-to-barrel adapter). If you can’t legally connect, use a clean tarp funnel approach that’s only deployed during rain.
- Install an overflow hose: route overflow to a safe drain/discharge point using 1/2-inch to 3/4-inch tubing. Budget $12–$30.
- Attach a spigot adapter: many barrels use garden-hose thread (GHT). Add a quick-connect to make filling cans simple. Budget $10–$18.
- Test with 2–3 gallons first: check for leaks, wobble, and drainage behavior before filling fully.
Ballpark costs for a compact, tidy setup typically land between $120 (DIY container + screening) and $300 (sleek slim tank + diverter + stand + fittings). If you already own planters and tools, water infrastructure is the main expense.
Planting Design: Containers That Match Your Water Supply
The trick is to design a balcony garden that can ride out a dry spell using stored rainwater, without requiring daily intervention. That means: choose varieties that produce well in containers, use soil volumes that buffer moisture, and group plants by thirst level.
Container sizing and spacing that actually works
Here are reliable container targets for a compact rain-barrel-supported balcony:
- Tomatoes/peppers: 10–15 gallon pot per plant; space pots 18–24 inches apart.
- Leafy greens: window boxes 6–8 inches deep; sow thickly, then thin to 4–6 inches.
- Herbs: 1–3 gallon pots for individual plants; group on a tray for efficient watering.
- Strawberries: 8–10 inch hanging basket or rail planter; 8–10 inches between plants.
With a 20-gallon barrel, assume you can comfortably cover about 1–2 weeks of supplemental watering for a small balcony garden, depending on heat and plant load. In full sun, containers dry quickly; a single 10-gallon tomato pot can need 0.5–1 gallon/day at peak summer heat. That’s why grouping and smart selection matter.
Sunlight planning: design for your hours, not your hopes
Track sunlight for a day. Many balconies are “bright shade” rather than true full sun. Use these benchmarks:
- Full sun: 6–8+ hours direct sun (best for fruiting crops)
- Part sun: 4–6 hours (greens, herbs, some peppers)
- Bright shade: 2–4 hours (greens, mint, chives, some flowers)
Plant Selection: Specific Varieties That Perform on Balconies
Below are balcony-proven picks—varieties bred for containers, shorter internodes, or reliable production in limited root space. I’m choosing plants that make sense with a compact rain barrel: steady growers, not constant-drama varieties.
Edibles that earn their footprint
1) Tomato: ‘Tumbler’ (cherry, trailing)
Perfect for a railing or hanging basket; it produces heavily without needing a 20-gallon pot. Trailing habit lets you keep floor space open.
2) Tomato: ‘Patio Choice Yellow’
Compact, sturdy, and less likely to overwhelm a small trellis. Put it in a 10–12 gallon pot with a simple cage.
3) Pepper: ‘Lunchbox Red’ or ‘Lunchbox Orange’
These stay manageable and produce sweet snack peppers in a container. They like consistent moisture, so place them in the “priority watering” zone nearest the barrel.
4) Cucumber: ‘Spacemaster’
Bred for containers. Train it up a vertical trellis to keep airflow and reduce mildew pressure on a cramped balcony.
5) Lettuce: ‘Little Gem’ (romaine type)
Compact heads, quick turnaround. Great for a window box in part sun. Harvest outer leaves to stretch your sowings.
6) Basil: ‘Genovese’ + ‘Prospera Compact DMR’
Classic Genovese for flavor; Prospera Compact is selected for downy mildew resistance in many climates. Basil is a “water-is-worth-it” plant—when it’s happy, you feel like a chef.
Pollinator-friendly flowers that don’t drink you dry
1) Nasturtium ‘Alaska’
Edible leaves/flowers, tolerates container life, and spills beautifully over edges. Moderate water needs once established.
2) Marigold ‘Gem’ series (Lemon Gem/Orange Gem)
Compact, tough, and helpful for visual rhythm. Also handy near tomatoes and peppers for a lively, classic kitchen-garden look.
3) Lavender ‘Hidcote’ (if full sun and fast-draining mix)
A water-wise anchor plant. Use a 12-inch pot and don’t overwater—lavender prefers to dry slightly between waterings.
Three Layout Blueprints for Real-World Balcony Scenarios
Let’s make this feel real. Here are three scenarios I regularly see, with layouts that respect limitations while still giving you a satisfying garden.
Scenario 1: The renter balcony with strict rules (no downspout connection)
Challenge: You can’t attach anything to the building exterior, and you don’t want a complaint from below about dripping overflow.
Solution: Use a 10–15 gallon modular reservoir or two 5–7 gallon jerry cans, filled from a removable catchment during rain (a small tarp funnel angled into a screened opening). Deploy only during storms, then store it.
Planting plan: herbs (basil, chives, parsley), ‘Little Gem’ lettuce, nasturtiums. These crops let you cook from the balcony without needing the water budget of large fruiting plants.
Design note: Keep everything on trays so you can lift, move, and clean quickly at inspection time.
Scenario 2: The sunny corner unit (6–8 hours sun, wind exposure)
Challenge: Heat and wind spike water demand. Containers dry out fast.
Solution: A 20–25 gallon slim wall tank placed against the most sheltered wall, elevated so you can fill a can easily. Add a simple windbreak: a trellis panel with climbing nasturtium or a lightweight reed screen (check building rules).
Planting plan: ‘Patio Choice Yellow’ tomato in a 12–15 gallon pot, ‘Lunchbox’ peppers in 5–7 gallon pots, ‘Spacemaster’ cucumber on a vertical trellis, marigolds at the base.
Spacing: Keep the tomato and cucumber pots at least 18 inches apart to maintain airflow.
Scenario 3: The bright-shade balcony (2–4 hours sun, lots of reflected light)
Challenge: Fruiting crops underperform; mildew can appear if airflow is poor.
Solution: Focus on greens and herbs and make the layout feel lush. A compact 15–20 gallon barrel is still useful because shade balconies often have consistent moisture needs, just less evaporation.
Planting plan: ‘Little Gem’ lettuce, arugula, mint (in its own pot), parsley, chives, and shade-tolerant flowers like violas. You’ll harvest often, and the garden will look full without chasing tomatoes that never sweeten.
Design Details That Make the Whole Setup Feel Intentional
A balcony garden can look like a yard sale of pots unless you give it structure. Here are the design moves I use to make compact systems feel calm and cohesive.
Repeat materials and colors
Pick one container color (matte black, terracotta, or charcoal) and repeat it. Use one wood tone for any shelving. Repetition reads as “designed,” even if you built it from budget pieces.
Layer heights: low, mid, tall
Use three height bands:
- Low (0–12 inches): greens, trailing nasturtiums
- Mid (12–30 inches): herbs, compact peppers
- Tall (30–72 inches): trellised cucumber, tomato cage, or a narrow shelf with vertical planters
Keep tall elements on the far side of the balcony so they don’t crowd the door and so you can enjoy the view of the plants from inside.
Group by watering needs (hydrozones)
This is where the rain barrel really shines. Put thirstier fruiting crops closest to the barrel for quick access. Put drought-tolerant herbs (thyme, oregano, lavender) farther away. Your watering routine becomes a short loop, not a scavenger hunt.
Budget Planning and DIY Alternatives
If you want the cleanest setup, buy a purpose-made slim tank with screened inlet and spigot. If you want the cheapest functional version, DIY is fine—just don’t skip screening and overflow control.
Example budgets (typical):
- Lean DIY ($90–$140): food-grade container ($35), fittings ($25), mesh/screening ($10), overflow hose ($15), stand materials ($20–$50).
- Mid-range ($160–$260): 20–25 gal compact barrel/tank ($120–$200), stand ($30–$60), fittings and hose ($20–$40).
- Polished build ($250–$400): slim tank + diverter kit + quality stand + quick-connects + drip irrigation add-ons.
DIY alternative for irrigation: instead of a pump, use gravity-fed drip lines only if your spigot elevation is adequate. For many balconies, a watering can is the simplest and most reliable tool—especially when you’re working with 20 gallons or less.
Maintenance Expectations: What It Takes Week to Week
A compact rain barrel garden is not zero-maintenance, but it can be pleasantly predictable. Plan on 30–60 minutes per week in peak season for checking water level, watering, pruning, and harvesting. During heat waves, you may add two quick 5-minute checks.
Weekly rhythm (growing season)
- Check barrel screen and inlet: 2–3 minutes to clear debris.
- Inspect overflow hose: ensure it’s still routed correctly and not kinked.
- Watering: 10–30 minutes depending on container count and weather.
- Prune and tie plants: especially tomatoes/cucumbers—10 minutes.
- Harvest: frequent small harvests keep plants productive.
Seasonal tasks
Spring: sanitize containers, refresh potting mix (top-dress with 1–2 inches compost), check fittings for leaks, and test the barrel with a partial fill.
Summer: mulch container tops with 1 inch of straw or fine bark to reduce evaporation; deadhead flowers; watch for aphids and spider mites in hot, dry corners.
Fall: drain and clean the barrel, remove hoses, and store fittings. If freezing occurs in your climate, don’t leave a full barrel outside—ice expansion can crack components. The EPA also emphasizes maintaining storage to prevent contamination and vector breeding (U.S. Environmental Protection Agency, 2013).
Winter: if you keep plants outside, shift to evergreens or hardy herbs in sheltered positions; keep the utility zone tidy and dry.
A Few Designer Tricks to Make Rainwater Feel Like a Luxury
Add a small hook near the barrel for your watering can so it’s always in the same place. Keep a narrow shelf (even 6 inches deep) above the barrel for pruners, plant ties, and a roll of mesh. These tiny organizational moves are what keep a balcony garden from becoming clutter.
If you want one upgrade that changes the daily experience, install a quick-connect fitting at the spigot. That $10–$18 part makes filling a can clean and fast, and you’ll use the system more consistently.
Once your layout is set, the balcony stops feeling like a place you manage and starts feeling like a place you visit. Rain becomes part of the garden’s rhythm: it fills your reserve, the plants respond, and your role shifts from hauling water to shaping growth. That’s the sweet spot for a compact balcony—designed, practical, and surprisingly abundant.
Sources: U.S. Environmental Protection Agency (EPA). Rainwater harvesting and reuse guidance (2013). American Rainwater Catchment Systems Association (ARCSA). Rainwater catchment system components and screening guidance (2020). Thomas Rainer. Public planting design and maintenance-aligned design principles (2017).