Deck Privacy Hedge in Containers
You step onto the deck with coffee in hand, ready for a quiet ten minutes—until the neighbor’s upstairs window catches the whole scene. Maybe it’s a shared townhouse view, a busy alley, or a second-story balcony across the way. You don’t need a fortress. You need a living screen that feels intentional: tall enough to block sightlines, soft enough to move with the breeze, and contained enough to work for renters and small spaces.
This is where a deck privacy hedge in containers shines. You can place it exactly where the view is worst, adjust it season to season, and design it to match your outdoor style—modern, cottage, coastal, or minimalist. I’ll walk you through it like a site consult: we’ll map the problem angles, pick container sizes that won’t tip in wind, choose plant varieties that actually perform in pots, and build a layout that looks like it belongs.
Start with sightlines, not plants
Privacy design works best when you treat it like architecture. Before you buy a single shrub, stand in the places you actually use: the grill, the lounge chair, the dining table, the door threshold. Identify where eyes can land on you.
Do a 10-minute “view audit”
- Sit in your main chair (not standing). Privacy is a seated problem 80% of the time.
- Mark the “worst” view angles with painter’s tape on the deck rail or floor.
- Measure the height you need to block from your seated eye level (typically 42–48 inches from the deck surface) to the neighbor’s sightline. Most decks need a screen that reaches 60–72 inches tall to feel comfortable.
- Note sun exposure: count direct sun hours. Many decks are 4–6 hours (part sun), but south/west decks can hit 6–8 hours.
If you need to block an upper window, your container hedge may need to reach 72–84 inches to be effective. That’s not a reason to give up—it’s a reason to choose the right plant form and container volume.
Layout strategies that feel designed (not like a row of pots)
The fastest way to make container screening look accidental is to line up identical pots, evenly spaced, with plants that don’t fill in. Instead, use rhythm, layering, and a few anchoring moves that mimic how hedges are designed in-ground.
Strategy 1: The “broken hedge” (best for renters)
Instead of one continuous wall, create sections: two tall evergreens, a gap for light, then a tall grass or flowering shrub. This feels airy while still blocking key sightlines.
- Works well on decks under 10 feet long or where fire codes require airflow.
- Use 24–30 inch wide containers for the tallest plants so they don’t top-heavy in wind.
Strategy 2: The corner wrap (best for diagonal views)
If the neighbor’s view is from one corner angle, wrap your screen around that corner like an L-shape. You’ll often need fewer plants than you think.
- Place the tallest plant at the corner, then step down in height as you move away (a simple “stair-step” profile).
- Allow 6–12 inches behind containers so leaves aren’t smashed against railings and airflow reduces mildew.
Strategy 3: The “double row” for maximum density (best for close neighbors)
When you need a true visual barrier, stagger two rows like bricks. You get depth, better coverage, and a more natural look.
- Front row: grasses or medium shrubs in 16–20 inch pots.
- Back row: evergreen columns in 20–30 inch pots.
- Stagger spacing: keep plant centers about 18–24 inches apart depending on mature width.
Container sizing, spacing, and stability (the unglamorous part that makes it work)
Privacy plants fail in containers for three predictable reasons: undersized pots, inconsistent watering, and wind. Solve those and you’re 80% there.
Pick container size by root volume, not plant height
As a baseline for screening shrubs:
- Minimum for tall shrubs/evergreens: 15–25 gallons (often a 18–24 inch wide pot).
- For a truly stable, long-term deck hedge: 20–30 gallons.
- For grasses and medium shrubs: 7–15 gallons.
Plan for drainage. Every container needs unobstructed drain holes; standing water is a root-rot invitation. The University of Minnesota Extension notes that “most container plants die from overwatering and poor drainage,” emphasizing drainage as a primary requirement for container success (University of Minnesota Extension, 2020).
Spacing that fills in without becoming a tangled mess
In containers, plants often grow slightly smaller than in-ground, but don’t rely on that. Use mature widths as your guide:
- Narrow column evergreens (2–3 ft wide): space containers 18–24 inches apart.
- Broader shrubs (3–5 ft wide): space 24–36 inches apart, or plan a staggered layout.
Wind and weight: keep tall screens upright
If your deck is exposed, stability matters as much as privacy. Aim for containers that are heavier at the base (tapered or straight-sided), and consider adding ballast.
“In exposed sites, stability is part of plant health—wind doesn’t just break stems, it dries soil quickly and causes root-rock that can weaken establishment.” — Royal Horticultural Society guidance on wind effects (RHS, 2023)
DIY stability trick: set each pot on a rubber mat, and add 10–20 lb of gravel in the bottom only if drainage remains free and you’re not making the container impossible to move. (Alternative: use a heavier pot material like fiberstone or terracotta.)
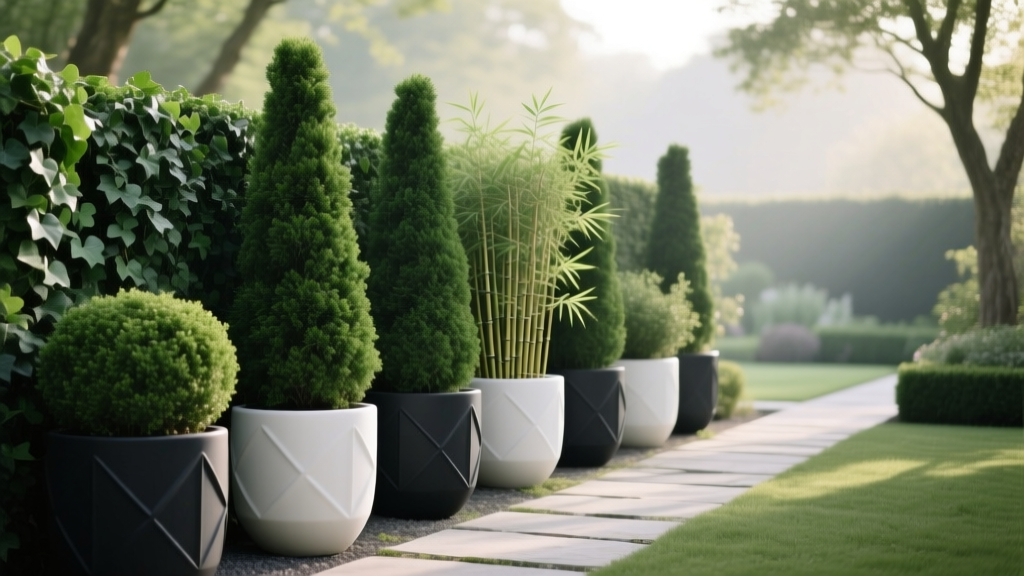
Plant choices that actually succeed as a privacy hedge in pots
The best container privacy plants share three traits: dense branching, tolerance of root restriction, and good looks year-round. I’m also prioritizing varieties that are commonly available in North America.
Evergreen backbone (year-round privacy)
1) Emerald Green Arborvitae (Thuja occidentalis ‘Smaragd’)
Why it works: naturally narrow (often 3–4 ft wide), tidy, and dense. In containers it can stay a bit smaller, which is a plus on decks. Give it consistent moisture and protect from drying winter wind.
2) Sky Pencil Holly (Ilex crenata ‘Sky Pencil’)
Why it works: one of the most vertical plants you can use—ideal when floor space is tight. It’s also easier to “slot” into modern designs. Best in part sun to sun; in deep shade it thins.
3) Hicks Yew (Taxus × media ‘Hicksii’)
Why it works: shade tolerance is stronger than many evergreens, and it responds beautifully to pruning if you want a crisp hedge face. (Note: yew is toxic if ingested—skip if pets chew plants.)
Fast seasonal coverage (for softness and summer screening)
4) Feather Reed Grass ‘Karl Foerster’ (Calamagrostis × acutiflora)
Why it works: upright, narrow footprint, and visually light—great in front of evergreens. In many climates it reaches 4–5 ft with plumes. Cut back in late winter.
5) Bamboo (clumping types, not running)
Why it works: quick screen and a beautiful sound in wind. Choose clumping species like Fargesia (often more cold-hardy and less invasive than running bamboos). In containers, even clumpers stay more controlled.
Flowering privacy (when you want a screen that feels like a garden)
6) Hydrangea paniculata ‘Little Lime’ or ‘Bobo’
Why it works: dense summer mass, reliable flowering, and container-friendly size. Great for part sun decks. You’ll get privacy when you use the deck most (late spring through early fall).
7) Rose of Sharon (Hibiscus syriacus) — compact cultivars
Why it works: upright shrub form with summer flowers and decent height in a pot. Choose compact cultivars and expect leaf drop in winter (so pair with an evergreen if winter privacy matters).
A practical comparison table: best plants for common deck conditions
| Plant | Best Sun | Container Size (recommended) | Screening Season | Notes |
|---|---|---|---|---|
| Thuja ‘Smaragd’ (Emerald Green) | 6+ hours | 20–30 gal | Year-round | Needs consistent moisture; protect from winter wind |
| Ilex ‘Sky Pencil’ | 4–8 hours | 15–25 gal | Year-round | Very narrow; great for tight footprints |
| Taxus ‘Hicksii’ | 3–6 hours | 20–30 gal | Year-round | Prunes well; toxic if ingested |
| Calamagrostis ‘Karl Foerster’ | 4–8 hours | 7–15 gal | Spring–winter (straw color in winter) | Cut back once/year; excellent front layer |
| Hydrangea paniculata (‘Bobo’, ‘Little Lime’) | 4–6 hours | 10–20 gal | Late spring–fall | Flowers add beauty; leafless in winter |
Three real-world layout scenarios (with dimensions and plant counts)
Let’s make this tangible. Here are three common deck situations and a layout that works without overbuying plants.
Scenario 1: Apartment balcony, 6 ft long × 3 ft deep (tight, but doable)
Goal: block a side view from a neighboring balcony without crowding walking space.
Layout: “broken hedge” with two vertical anchors.
- 2 × Sky Pencil holly in 18-inch tall, narrow planters (about 15–20 gal)
- 1 × ‘Karl Foerster’ grass in a 14–16 inch pot to soften the edge
Spacing: place planters 12–18 inches apart; leave at least 24 inches of clear walking lane if possible.
Budget snapshot: planters ($60–$150 each), plants ($40–$90 each), soil ($20–$35). A realistic total is $250–$600 depending on pot material.
Scenario 2: Townhouse deck, 12 ft long × 8 ft deep (classic “neighbor window” problem)
Goal: create a comfortable dining zone without feeling watched from the side fence line.
Layout: corner wrap in an L-shape, 7–8 ft of coverage.
- 3 × Emerald Green arborvitae in 24-inch wide containers (20–30 gal)
- 2 × Hydrangea paniculata ‘Bobo’ in 18–20 inch containers for seasonal bloom
Spacing: arborvitae containers at 24 inches on center; hydrangeas tucked between or slightly forward for depth.
Cost reality: three large containers can run $300–$900 alone. This is where DIY planters pay off (more on that below).
Scenario 3: Rooftop deck, 20 ft long, windy and sunny (needs stability + irrigation)
Goal: strong year-round screening and wind buffering along the rail.
Layout: double row staggered for density.
- Back row: 5 × Hicks yew in 24–30 inch containers
- Front row: 5 × ‘Karl Foerster’ grass in 16–18 inch containers
Spacing: yews 30 inches apart; grasses staggered in front, offset by 15 inches so gaps don’t align.
Time-saver add-on: a simple drip line kit ($30–$80) connected to a timer helps prevent drought stress in wind.
Step-by-step: setting up a container privacy hedge that lasts
- Confirm weight limits and rules. For renters/condos, check balcony load guidelines and any restrictions on drilling or railing attachments.
- Choose container dimensions first. For evergreen screening, prioritize 20–30 gallon containers when possible.
- Use a high-quality potting mix. Avoid garden soil (too dense). Plan on 2–4 cubic feet of mix per large container depending on size.
- Add drainage and elevation. Ensure open drain holes; lift pots slightly with pot feet or thin strips so water can exit freely.
- Plant at the correct height. Keep the top of the root ball slightly above the soil line (1 inch) to reduce water pooling at the stem.
- Water deeply on install day. Water until it runs out the bottom, then again after 10 minutes to fully hydrate the root ball.
- Mulch lightly. Add 1–2 inches of bark mulch to reduce evaporation (keep it off stems).
- Position for privacy and plant health. Leave 6–12 inches behind pots for airflow; avoid pressing foliage into railings.
- Stake only if necessary. If wind is severe, use discreet staking inside the container rather than tying to railings (which can abrade plants).
Budget-smart options (and DIY alternatives that still look polished)
Privacy is one of the quickest ways to spend money outdoors—mostly because large containers are pricey. Here’s how to keep it under control without sacrificing design.
Three budget tiers you can plan around
Lean ($150–$400): fewer, larger “anchor” plants + one or two fillers. Use plastic/resin pots with a good finish.
Midrange ($400–$900): coordinated containers, a fuller run of evergreens, and upgraded soil/fertilizer.
Investment ($900–$2,000+): large fiberstone pots, drip irrigation, and mature plants (5–7 ft specimens).
DIY planter box option (high impact per dollar)
If you’re handy, build one long planter instead of buying multiple large pots. A 72-inch long × 18-inch wide × 18-inch tall box creates a continuous hedge look and can be cheaper per gallon of soil volume.
- Line with pond liner or heavy plastic (leave drainage gaps).
- Add hardware cloth if rodents are an issue.
- Use rot-resistant lumber and elevate slightly for drainage.
Want a renter-friendly version? Use trough planters or modular planter boxes that sit on the deck without fasteners.
Maintenance expectations: what you’re signing up for
A container hedge is more like a pet than a painting—it needs regular check-ins, especially in summer. The good news: the routine is simple and predictable.
Weekly time estimate
Plan on 20–40 minutes per week during the growing season for a 3–6 container setup: watering checks, deadheading (if flowering), and a quick look for pests. In heat waves, watering can become 5–10 minutes daily, especially on windy rooftops.
Seasonal tasks (keep these on your calendar)
- Spring (1–2 hours total): top-dress with compost, slow-release fertilizer, and refresh mulch.
- Early summer (30 minutes): light prune to keep columns tight and encourage density (especially holly/yew).
- Late summer (15 minutes): check for spider mites on evergreens—common in hot, dry spots.
- Late winter (30 minutes): cut ornamental grasses down to 4–6 inches before new growth.
For watering guidance, Extension resources consistently emphasize matching irrigation to container conditions: sun, wind, pot material, and plant size all change how quickly pots dry (University of Minnesota Extension, 2020).
Winter planning (especially important for evergreens)
Evergreens in pots can desiccate in winter because leaves lose moisture while roots are cold. If you live where winters freeze:
- Group containers together against a wall for shelter.
- Wrap pots with burlap or insulation wrap when temperatures drop below 20°F for extended stretches.
- Water during warm spells when soil is thawed.
Design details that make it feel intentional
Once the plants are placed, the difference between “privacy screen” and “outdoor room” comes down to finishing touches.
Repeat materials: match container color to one existing deck element (rail color, furniture frame, or door trim). Repetition reads as design.
Light it softly: a warm LED uplight at the base of one or two containers makes the hedge feel like architecture at night. Even 2 small uplights can transform the mood.
Leave one breathing space: a hedge wall across every inch can feel claustrophobic. A 12–18 inch intentional gap for a lantern, small side table, or tall ceramic accent keeps it from looking like a barricade.
When the hedge is in, you’ll notice something subtle: you stop scanning for who can see you. The deck becomes usable again—coffee, dinner, phone calls, bare feet after a long day—without that background feeling of being on display. And because it’s container-based, you can keep adjusting until the privacy feels just right, one pot at a time.
Sources: University of Minnesota Extension. “Container Gardening” (2020). Royal Horticultural Society (RHS). Guidance on wind effects and garden exposure (2023).