Front Yard Rock Garden Ideas
You pull into the driveway after a long day and the front yard gives you… nothing. Maybe it’s a patchy slope that bakes in the afternoon sun, a skinny strip between sidewalk and porch, or a lawn that demands mowing at the exact moment you’d rather be doing anything else. Rock gardens shine in these tricky spots because they look intentional, handle heat and drought, and can be scaled from a renter-friendly “pots and pebbles” setup to a full-on dry creek bed that turns your entry into a destination.
Let’s design one like a landscape designer would: start with what the space wants to do (drain, slope, sun), then lay out stones as structure, and finally tuck in plants that thrive on benign neglect. Along the way, I’ll give you real dimensions, spacing, costs, and a few case examples so you can translate ideas into a buildable plan.
Design principles that make rock gardens look intentional (not like a gravel spill)
1) Start with a “view-from-the-street” focal line
Front yards are read quickly—often from a car—so the layout needs a clear gesture. Choose one strong line:
- A diagonal ribbon (like a dry creek) that leads the eye from sidewalk to steps
- A crescent bed that hugs the walkway
- A cluster of boulders that anchors the corner nearest the street
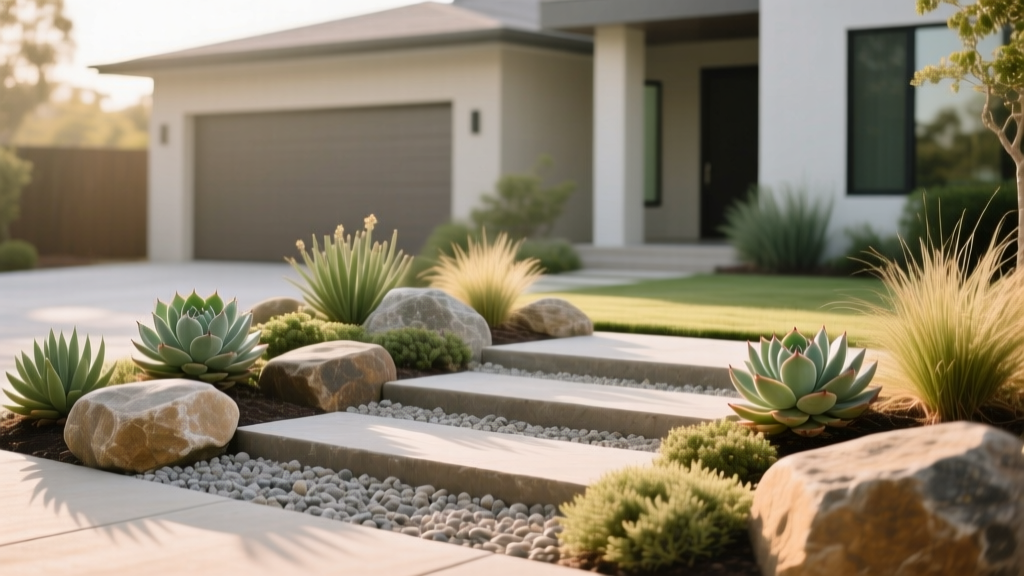
A practical rule: design the rock feature to be legible from 30–40 feet away. If your “big” stones are fist-sized, they’ll disappear at that distance. In most front yards, you want at least 2–3 anchor stones in the 18–24 inch range (height or width) plus medium stones around them for transition.
2) Use the “largest stone first” layout strategy
Place your biggest rocks first—before gravel, before plants—because they set the scale. Bury each anchor stone so it looks like it emerged naturally: aim to sink 1/3 of the stone below finished grade. This also prevents rocking and frost heave.
3) Match rock size to house scale
A one-story ranch can carry boulders; a small bungalow with a narrow front walk may look better with cobbles and a few modest “feature” stones. As a rough guide:
- Small beds (under 80 sq ft): 1–2 feature rocks (12–18 inches), plus 2–3 inch gravel
- Medium beds (80–200 sq ft): 2–4 feature rocks (18–30 inches), plus 3/8–1 inch gravel
- Large beds (200+ sq ft): multiple boulders (24–48 inches), plus a mix of gravel sizes for realism
4) Design drainage on purpose (especially near foundations)
Rock gardens are often paired with gravel, which sheds water differently than turf. Keep finished grade sloping away from the house at roughly 5% (about 6 inches drop over 10 feet) when possible. If you’re working close to the foundation, leave a visible inspection strip: 6–12 inches of bare ground or gravel between plants/mulch and siding, and don’t pile rock against the wall.
On heavy clay soil, think “raised and rocky.” A mound that’s 8–12 inches higher than surrounding grade can be the difference between thriving sedums and soggy crowns.
5) Repeat materials for calm, then add one contrast for spark
The easiest way to make a rock garden feel designed is repetition: one gravel color, one boulder type, and a limited plant palette. Then add one contrast element—like a single driftwood piece, a dark basalt boulder among pale gravel, or a ribbon of steel edging.
Layout strategies you can copy (with real dimensions)
The “entry-hugging crescent” bed (great for small front yards)
If your front walk is straight and your lawn feels like a green rectangle, a crescent bed adds movement without eating the whole yard. Start the bed 18 inches off the walkway edge, then flare it to 4–6 feet wide near the porch, tapering back to 2–3 feet at the driveway end.
Place one anchor boulder near the widest point, then drift smaller rocks toward both ends. Plant low, tidy species near the walkway (think thyme and blue fescue) and slightly taller accents closer to the house (like dwarf conifers) so the view stays open.
The “dry creek” that solves runoff (best on slopes)
If water races down your front yard during storms, a dry creek bed can turn that problem into a feature. Make the creek 18–30 inches wide for small yards; go 3–4 feet wide for larger slopes. Lay a shallow swale (depressed channel) about 4–6 inches deep, line with landscape fabric only if you must, and place larger stones along the edges to define the banks.
Avoid perfectly even edges—meander it. The creek should “collect” at a planted basin or rock outcrop, not dead-end abruptly.
The “boulder island” for lawn-to-rock transition (clean and modern)
This is my go-to when you still want some lawn but hate mowing the awkward corner. Create an oval island bed roughly 6 feet by 10 feet (or scaled to your space), edged with steel or a crisp spade-cut edge. Group 3 boulders in an offset triangle, then fill with gravel and drought-tough plants. The lawn stays easy to mow because the island is one smooth shape.
Material choices and cost planning (so your budget doesn’t get crushed)
Costs vary widely by region and delivery distance, but these ranges help you plan:
- Gravel: $40–$120 per cubic yard (plus delivery). A 100 sq ft bed at 3 inches deep needs about 0.9 cubic yards.
- Landscape fabric (optional): $0.20–$0.60 per sq ft. Use sparingly; many designers prefer thick gravel + diligent weeding instead of fabric that can surface over time.
- Boulders: commonly priced by the ton or by piece; expect $150–$500+ delivered for a small set, depending on stone type and size.
- Steel edging: often $2–$5 per linear foot.
- Plants (4-inch to 1-gallon): $5–$25 each; dwarf conifers cost more but provide year-round structure.
A note on depth: a decorative gravel layer is typically 2–3 inches deep. Much deeper and it shifts underfoot; much thinner and weeds find light. If you’re using gravel as a mulch over soil for plants, 2 inches is plenty around crowns to avoid rot.
Comparison table: pick the right rock style for your front yard
| Rock/Gravel Type | Best Use | Typical Size | Look & Feel | Notes |
|---|---|---|---|---|
| Pea gravel | Flat areas, filler around plants | 3/8 inch | Soft, casual | Can migrate onto sidewalks; use edging. |
| Decomposed granite (DG) | Paths and patios within rock gardens | Fines to 3/8 inch | Compact, natural | Needs proper base/compaction for paths. |
| River rock | Dry creek beds and accents | 1–3 inch | Rounded, water-worn | Can look “polished”; best in flowing forms. |
| Crushed stone (angular) | Modern designs, stable groundcover | 3/8–1 inch | Crisp, architectural | Stays put better than rounded gravel. |
| Boulders | Structure, focal points | 18–48 inches+ | Bold, permanent | Bury 1/3 for a natural look and stability. |
Plant selection: specific varieties that thrive in rock gardens
Most rock gardens live in 6–8 hours of sun, reflected heat, and lean soil. Choose plants that prefer sharp drainage and won’t flop over your stones. A simple design trick: mix three layers—groundcovers (spill), mounding perennials (cushion), and a few upright accents (exclamation points).
Sun-loving, rock-garden classics (reliable and widely available)
- Hens-and-chicks (Sempervivum tectorum): Tight rosettes handle drought and poor soil; plant 8–12 inches apart. Great for tucking into crevices.
- Stonecrop (Sedum spurium ‘Dragon’s Blood’): Fast groundcover with red tones in sun; space 12 inches apart for quick fill. Helps visually tie rocks together.
- Creeping thyme (Thymus serpyllum ‘Elfin’): Fragrant, low, and tidy along edges; plant 8–10 inches apart. Handles foot brushing near paths.
- Blue fescue (Festuca glauca ‘Elijah Blue’): A clean, modern tuft that contrasts gravel; space 12–18 inches apart. Looks best repeated in drifts.
- Lavender (Lavandula angustifolia ‘Hidcote’): Structure, scent, and pollinator value; give it 24–30 inches of room and full sun. Loves the heat reflected by stones.
Upright accents that stay neat (front-yard friendly)
- Dwarf mugo pine (Pinus mugo ‘Mops’): Evergreen backbone; place as a focal point and give it 3–4 feet clearance. Strong winter presence.
- Yucca filamentosa ‘Color Guard’: Bold, architectural stripes; best in full sun with sharp drainage. Use sparingly—one plant can anchor a small bed.
- Dwarf iris (Iris reticulata): Early spring color; tuck bulbs between rocks in fall, 4 inches deep and about 3 inches apart.
Part-sun solutions (for east-facing entries or under light tree shade)
- Coral bells (Heuchera ‘Caramel’ or ‘Palace Purple’): Colorful foliage that reads from the street; space 12–18 inches apart. Great where sun is 3–5 hours.
- Creeping phlox (Phlox subulata ‘Emerald Blue’): Spring bloom carpet; plant 12–18 inches apart. Works well spilling over rock edges.
- Japanese painted fern (Athyrium niponicum): For the shadier side yard/front corner; pair with darker stones for contrast and keep soil slightly richer than typical rock beds.
A practical note on water-wise landscaping
After establishment, many rock-garden plants only need deep watering during prolonged dry spells. The EPA notes that outdoor watering can account for a significant portion of household water use, and improving irrigation efficiency and plant choices can reduce waste (U.S. Environmental Protection Agency, 2023). Rock gardens fit nicely into that strategy when designed for your climate.
“Put plants where they will thrive, and maintenance becomes editing rather than rescuing.” — Thomas Rainer, landscape designer and author (Rainer & West, 2015)
Three real-world front yard scenarios (and how I’d lay them out)
Scenario 1: The hellstrip between sidewalk and street (renter-friendly and tough)
Space: a narrow strip, often 3 feet wide and 20 feet long, blasted by heat and dog traffic.
Layout: Skip big boulders (they’re hard to place safely near sidewalks). Use a repeating pattern: groups of 3 plants spaced evenly down the strip, with a few flat stones as stepping/visual breaks.
Planting plan: Creeping thyme + Sedum spurium + blue fescue. Keep plants 12 inches off the curb line to reduce salt/snowplow stress in cold climates.
DIY renter tip: If you can’t dig, use 24-inch wide trough planters filled with gritty potting mix and top-dressed with gravel. You get the rock-garden look without altering the ground.
Scenario 2: A sloped front yard that erodes in storms
Space: a 12 feet wide slope dropping 2 feet from house to sidewalk.
Layout: Build a dry creek down the natural drainage line, then terrace the sides with boulders as “check dams.” Keep the creek bed 24 inches wide, with a shallow swale 5 inches deep.
Planting plan: On the banks: creeping phlox to knit the edges, lavender higher up where it stays driest, and a dwarf mugo pine near the top as a visual anchor.
Budget note: Put your money into stone placement first (it solves erosion), then fill plants in over a season or two. Even adding 6–10 plants per year can complete the look without a single large bill.
Scenario 3: A modern, small front yard that needs year-round curb appeal
Space: a 10 feet by 12 feet area near the entry, visible from the street all year.
Layout: Go with a boulder island inside a gravel bed, edged cleanly with steel. Use one gravel type (crushed stone) for a crisp look. Place 3 boulders offset, then repeat blue fescue in a rhythmic pattern (think: five clumps in a loose arc).
Planting plan: A dwarf conifer (mugo pine) + yucca ‘Color Guard’ + drifts of Sedum ‘Dragon’s Blood’. Add a few spring bulbs (Iris reticulata) for early color that doesn’t clutter summer structure.
Lighting upgrade: One low-voltage spotlight aimed at the main boulder transforms the garden at night, and fixtures are often $20–$60 each depending on brand and build quality.
Step-by-step setup instructions (a build that lasts)
- Measure and mark the bed. Use a hose or marking paint to lay out curves. Stand in the street and adjust until the shape reads clearly from 30–40 feet away.
- Call before you dig. Confirm utility lines and local rules, especially near sidewalks and street trees.
- Remove turf and loosen soil. Strip grass and excavate for gravel depth: typically 3 inches of gravel plus 1 inch for leveling irregularities.
- Improve drainage where needed. In clay, mix in grit (small gravel) or create an 8–12 inch raised mound so plant crowns sit above wet zones.
- Place boulders first. Set the largest stones, burying about 1/3 of each. Step back and adjust spacing; triangles and odd-number groupings look natural.
- Add medium stones and define edges. Use cobbles to transition from boulder to gravel, and install steel edging or create a spade-cut edge to keep gravel off the sidewalk.
- Plant before final gravel top-dress. Set plants at correct spacing (many groundcovers fill in at 12 inches; shrubs need 3–4 feet). Water in thoroughly.
- Top-dress with gravel. Spread 2–3 inches of gravel, keeping it slightly away from plant crowns to prevent rot.
- Water to establish. For the first 2–4 weeks, water deeply 1–2 times per week depending on heat and soil drainage, then taper.
DIY alternatives that still look designed
If you want the rock garden aesthetic without heavy hauling, here are designer-approved shortcuts:
- “Rock mulch” only: Keep existing shrubs, remove lawn in one bed, and top-dress with 2 inches of gravel plus a few feature stones. This can be done in a weekend.
- Use smaller feature stones: If boulder delivery is expensive, use 12–18 inch stones you can move with a hand truck. Cluster three together so they read as one composition.
- Buy plants small: 4-inch pots fill in quickly for sedums and thyme. Spend on one focal plant (like a dwarf conifer), then save on the rest.
- Skip fabric, commit to weeding: In many gardens, fabric becomes visible over time. A thick gravel layer and consistent early weeding can be cleaner long-term.
Maintenance expectations (what you’ll actually do, week to week)
A well-designed rock garden is lower maintenance than lawn, but it isn’t zero. Plan on about 15–30 minutes per week in the growing season for quick weeding, checking irrigation, and tidying. Here’s the seasonal rhythm:
Spring (1–2 hours total over a month): Cut back winter-browned grass tufts, remove fallen leaves trapped in gravel, and top up gravel in thin areas. This is also when you’ll notice any stones that shifted during freeze-thaw; re-seat them before plants hide the problem.
Summer (15 minutes/week): Spot-weed while weeds are small, and deep-water new plants during heat waves. Most drought-tolerant plants prefer a deep soak rather than frequent sprinkles.
Fall (30–60 minutes): Shear back thyme if it’s encroaching onto sidewalks, divide or replant overgrown sedums, and plant bulbs (like Iris reticulata) for early spring color.
Winter (as needed): Brush heavy leaf piles off evergreen shrubs to prevent breakage. If you use de-icing salt near sidewalks, choose salt-tolerant plants and keep a buffer zone of gravel near the pavement.
Two finishing touches that elevate the whole look
1) Edge discipline. The cleanest rock gardens have crisp boundaries. If you can’t install steel edging, a simple 4–6 inch deep spade-cut trench edge along the lawn keeps gravel where it belongs.
2) Repeat one plant in multiples. Instead of buying one of everything, repeat a few. Five clumps of blue fescue, or a drift of seven sedums, reads as a designed composition rather than a plant collection.
When you stand back from the street, you want to see three things: strong stone placement, a clear line that guides the eye toward the entry, and plants that look like they were meant to live there—because they are. Build the structure first, keep the palette tight, and let the rock garden settle in over a season. By next year, that once-awkward front yard spot becomes the part of the house that looks finished—even when you haven’t touched a mower in weeks.
Sources: U.S. Environmental Protection Agency (EPA), “WaterSense: Outdoor Water Use” (2023); Rainer, T. & West, C., Planting in a Post-Wild World (2015).