Kitchen Windowsill Micro Herb Garden
You’re halfway through making dinner, the pan is hot, and the recipe calls for “a handful of fresh basil.” You open the crisper drawer and find a limp plastic clamshell—three sad leaves left, already darkening at the edges. This is the moment a kitchen windowsill earns its keep. Not as decoration, not as a “cute DIY,” but as a working little growing strip that produces flavor on demand, inches from the cutting board.
As a designer, I treat a windowsill like a micro-site: it has a specific light pattern, a tight footprint, and one job—deliver clean, repeatable harvests without making your kitchen messy. The goal is to turn that narrow ledge into a tidy “herb rail” with predictable spacing, drainage control, and a planting plan that fits your cooking habits.
Read the windowsill like a site plan
Measure first, then design (not the other way around)
Start with two measurements: the length of the sill and its usable depth (the flat surface before trim, blinds, or window cranks get in the way). In many homes, the usable depth is only 4–6 inches. If you’re working with a classic apartment sill—say 36 inches long and 5 inches deep—you’re designing a one-row garden. That’s not a limitation; it’s clarity.
Also measure the clearance above the sill to the bottom of the window frame. Some herbs (especially when leggy) will press against glass. A practical height target for a windowsill micro garden is 6–10 inches tall from sill to plant tip, which keeps foliage off cold glass in winter and reduces scorching in summer.
Light requirements: be honest about hours
Most culinary herbs perform best with strong light. University Extension guidance commonly recommends full sun (roughly 6–8 hours of direct sun) for many herbs; however, a bright windowsill often provides fewer hours of true direct light due to overhangs, trees, and seasonal sun angle. A south-facing window might deliver 4–6 hours of direct sun in winter and more in summer; an east-facing sill may give 2–4 hours of morning sun, which can still work with the right plant list.
For a reality check, track your windowsill for two days: note direct sun windows in 30-minute chunks. If you average under 3 hours, plan on either shade-tolerant herbs (mint family members, chives, parsley) or a compact grow light. Penn State Extension notes that most herbs “grow best in full sun,” a useful benchmark when deciding whether you’ll supplement light (Penn State Extension, 2023).
Temperature and glass: the hidden stress factor
Windows are microclimates. On a cold night, the glass can chill leaves; on a sunny afternoon, that same glass can amplify heat. Keep pots 1–2 inches back from touching the pane, and avoid placing tender basil directly against winter glass. If your kitchen runs dry, a shallow pebble tray under pots can raise humidity slightly—just don’t let pot bottoms sit in water.
Layout strategies that keep it tidy and productive
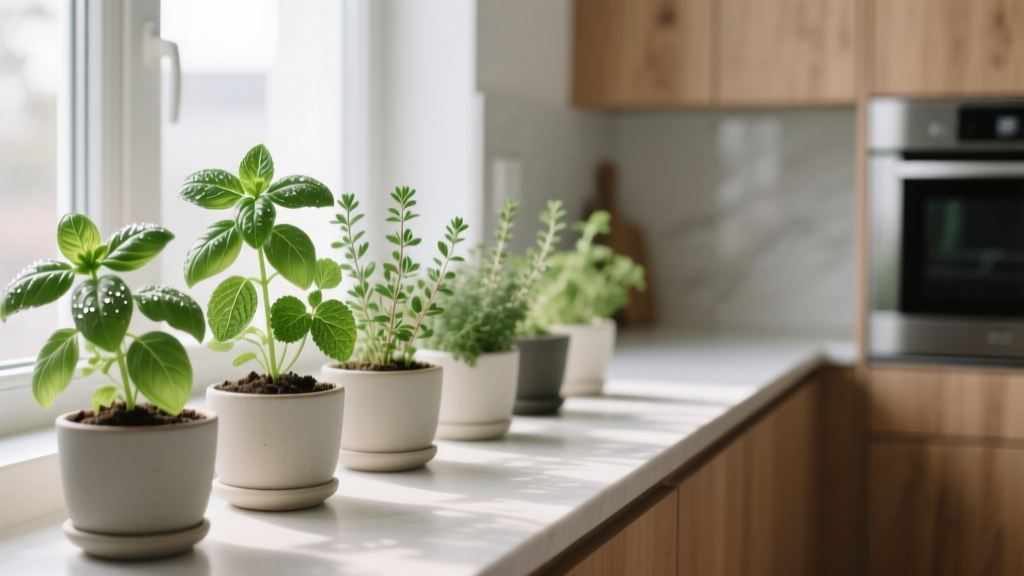
The “herb rail” layout: one row, standardized containers
For narrow sills, standardization is your friend. Choose containers with the same footprint so you can swap plants without rearranging the whole line. A designer’s sweet spot is 4-inch pots (about 4.5 inches wide including rim). On a 36-inch sill, you can fit 7 pots with about 0.5 inch breathing room between them (7 × 4.5 = 31.5 inches, leaving 4.5 inches to distribute).
If your sill is deeper—8–10 inches—you can run a double row, but be cautious: the back row may get less light and airflow. In most kitchens, a single row with consistent access is more reliable.
Drainage without puddles: nested trays and “no-leak” rules
Soil health matters, but kitchen surfaces matter too. Use a two-layer approach:
- Inner pot with drainage holes (plastic nursery pot or slotted pot).
- Outer cachepot or a fitted saucer to catch water.
Keep a simple rule: no standing water for more than 30 minutes after watering. Empty saucers promptly. This reduces fungus gnats and prevents root rot—two common “windowsill failures.”
Soil volume and root space: why micro herbs like smaller pots
“Micro herb garden” here means compact plants harvested frequently, not necessarily microgreens. Herbs kept in 4-inch pots stay manageable and respond well to regular trimming. Larger pots hold more moisture and can slow dry-down on a cool sill, increasing the risk of soggy soil. If you prefer fewer containers, a narrow trough planter can work, but mixing herbs with different water needs in one long planter is often where beginners (and pros) get annoyed.
Designing for harvest: put fast movers closest to your dominant hand
Good garden design reduces friction. If you cook daily, place your top two herbs—often basil and chives—closest to where you naturally stand at the counter. If you’re right-handed and your prep zone is to the right of the sink, keep the most-used pots on the right side of the sill so you can pinch leaves without shuffling pots around.
“Design is not just what it looks like and feels like. Design is how it works.” — Steve Jobs (quoted in Isaacson, 2011)
That quote applies perfectly to a windowsill herb strip: the best layout is the one you’ll actually harvest from on a Tuesday night.
Plant selection: compact varieties that behave indoors
Choose herbs that tolerate container life, rebound after cutting, and stay reasonably compact under window light. Below are varieties I’ve used repeatedly in small residential installs, with notes on why they work.
Basil (Ocimum basilicum): pick compact cultivars
Best varieties: ‘Spicy Globe’ (naturally compact, small leaves), ‘Greek Columnar’ (upright habit), ‘Genovese’ (classic flavor, but needs strong light).
Why it works: Basil rewards frequent pinching—exactly what a kitchen garden is for. In lower light, choose ‘Spicy Globe’ because it stays dense instead of stretching.
Pot & spacing: one plant per 4-inch pot; pinch tips weekly to keep under 8–10 inches.
Chives (Allium schoenoprasum): the dependable windowsill workhorse
Best varieties: standard common chives, or garlic chives (Allium tuberosum) if you prefer a mild garlic note.
Why it works: Chives handle cooler windows well and don’t mind being cut hard. They also regrow consistently with moderate light.
Pot & spacing: a dense clump in one 4–5 inch pot; harvest by snipping leaves down to 1–2 inches.
Parsley (Petroselinum crispum): steady yields in medium light
Best varieties: ‘Italian Flat Leaf’ (strong flavor, better for cooking), ‘Forest Green’ (compact growth).
Why it works: Parsley tolerates less-than-perfect light better than basil, and it’s productive when you harvest outer stems regularly.
Pot & spacing: one plant per 4–6 inch pot; keep evenly moist, not wet.
Thyme (Thymus vulgaris): small leaves, big payoff
Best varieties: ‘German Winter’ thyme, lemon thyme for brighter flavor.
Why it works: Thyme likes drying slightly between waterings, making it ideal for people who occasionally forget. It stays compact and doesn’t demand constant trimming.
Pot & spacing: one plant per 4-inch pot; let top inch of soil dry before watering.
Mint (Mentha spp.): great indoors, but contain it
Best varieties: spearmint, peppermint, or ‘Mojito’ mint.
Why it works: Mint is forgiving and grows happily in moderate light. The key is keeping it in its own pot—never in a shared trough—because it spreads aggressively.
Pot & spacing: one mint per pot, ideally 5–6 inches if you have depth; cut back often to keep it bushy.
Oregano (Origanum vulgare): choose a compact culinary type
Best varieties: Greek oregano (Origanum vulgare subsp. hirtum) for strong culinary flavor.
Why it works: Like thyme, oregano prefers to dry slightly; it’s a good “set and trim” herb that doesn’t demand daily attention.
Compare your top options at a glance
| Herb | Light needed (windowsill target) | Best pot size | Water rhythm | Harvest style |
|---|---|---|---|---|
| Basil (‘Spicy Globe’) | 4–6 hrs direct or bright + grow light | 4-inch | Even moisture | Pinch tips weekly |
| Chives | 3–5 hrs direct or bright ambient | 4–5 inch | Moderate | Snip leaves to 1–2 inches |
| Parsley (‘Italian Flat Leaf’) | 3–5 hrs direct preferred | 4–6 inch | Even moisture | Cut outer stems at base |
| Thyme | 4–6 hrs direct best | 4-inch | Let top inch dry | Clip sprigs as needed |
| Mint | 2–4 hrs direct or bright ambient | 5–6 inch | Moderate | Cut back often for bushiness |
Three real-world windowsill scenarios (and the layouts that fit)
Scenario 1: The renter with a narrow sill and strict “no mess” rules
Site conditions: 24-inch sill, 4.5-inch depth, east-facing window with 2–3 hours of morning sun. Countertops are laminate, and water rings are a dealbreaker.
Design solution: Four 4-inch pots (parsley, chives, mint, thyme) each nested in a matching cachepot. Add one slim boot tray (24 × 6 inches) under the whole line as insurance. The tray turns “oops” water into a contained event.
Plant logic: Skip basil unless you’ll add a light; choose herbs that tolerate medium light. Mint stays in its own pot and becomes your “always-green” anchor.
Scenario 2: The homeowner with a sunny south window who wants cooking-volume harvests
Site conditions: 48-inch sill, 8-inch depth, south-facing with 5–7 hours of direct sun in summer. Plenty of light, but the kitchen heats up.
Design solution: Six pots total: three 4-inch (thyme, oregano, chives), two 5-inch (parsley, mint), and one dedicated basil in a 6-inch pot for extra root room. Keep basil slightly back from glass to avoid heat spikes.
Plant logic: This is the rare windowsill where ‘Genovese’ basil behaves like it should. Harvest aggressively and you’ll actually keep it compact.
Scenario 3: The low-light kitchen that still wants fresh herbs every week
Site conditions: North-facing window with bright ambient light but only 0–1 hour of direct sun. The homeowner cooks often but has killed basil repeatedly.
Design solution: Install a 12-inch under-cabinet LED grow bar (look for 5000K daylight spectrum) positioned 6–10 inches above plant tops. Run it 12–14 hours per day on a timer. This turns a “decorative” sill into a functional growing site.
Plant logic: Basil returns to the roster once light is consistent. Keep parsley and chives as steady producers.
Budget and materials: a realistic cost plan (with DIY alternatives)
A windowsill herb rail can be done neatly without designer-level spending. Here’s a practical budget range:
- Containers: 6 pots at $2–$6 each (nursery pots are cheapest; ceramic cachepots cost more).
- Saucers or tray: a boot tray or plant tray typically $8–$20.
- Potting mix: 8–12 quarts total, usually $8–$15.
- Herb starts: $3–$5 per plant (often cheaper than seed for immediate harvest).
- Optional grow light: $20–$60 for a simple bar plus a $10 timer.
DIY alternatives: Reuse food containers as cachepots (yogurt tubs, takeout containers) but keep herbs in inner nursery pots with drainage. If you want a cohesive look, spray-paint mismatched cachepots with a single matte color—just cure them fully before bringing them indoors.
Step-by-step setup (designed like a small installation)
- Measure your sill (length, usable depth, height clearance). Decide how many pots fit: aim for 0.5–1 inch gap between pots for airflow and easy removal.
- Choose your container system: inner drainage pots + outer cachepots/saucers, or one tray under everything.
- Pick herbs based on light: under 3 hours direct sun, prioritize chives/parsley/mint; above 4 hours, add basil and thyme confidently.
- Fill pots with fresh mix, leaving 0.5–1 inch headspace at the rim so watering doesn’t spill over.
- Plant starts at the same depth they were in their nursery pots. Firm soil lightly—don’t pack it down.
- Water thoroughly once until excess drains, then empty saucers after 30 minutes.
- Place pots in a working order: most-used herbs closest to prep space; drought-tolerant herbs (thyme/oregano) slightly farther back.
- Set a maintenance cue: keep small scissors in a drawer nearby. Harvesting is your pruning plan.
- If using a grow light, set it 6–10 inches above plants and run 12–14 hours daily.
Maintenance expectations: what it actually takes per week
A well-designed windowsill herb garden should feel like part of cooking, not a separate hobby. Expect 15–30 minutes per week total for watering checks, light trimming, and cleanup.
Weekly rhythm
- Water check 2–3 times/week: pick up pots to feel weight. Water when the top 1 inch is dry for thyme/oregano, slightly sooner for basil/parsley.
- Harvest/prune 1 time/week: basil gets pinched; chives get snipped; parsley gets outer stems removed.
- Rotate pots a quarter turn weekly for even growth, especially on one-directional light.
Seasonal tasks (quick but important)
Winter: move pots 1–2 inches off cold glass; watch for dry indoor air and heater blasts. Basil may slow down—this is normal.
Summer: check moisture more often. A hot south window can dry a 4-inch pot fast, sometimes in 1–2 days.
Every 8–12 weeks: refresh the top 1 inch of potting mix or add a light top-dress of compost to maintain vigor in small soil volumes.
Troubleshooting by design (small fixes that prevent big failures)
Leggy, pale growth: It’s almost always light. Move plants to the brightest part of the sill, clean the glass, and consider a grow light. The National Gardening Association notes most herbs need at least 5 hours of sun daily for best growth (National Gardening Association, 2022).
Fungus gnats: Usually from consistently wet soil. Switch to bottom watering occasionally, let the surface dry a bit more between waterings, and empty saucers promptly.
Mold on soil surface: Increase airflow (slightly more spacing, small fan on low nearby), reduce overwatering, and scrape off the top layer of mix.
Flavor is weak: Many herbs develop better flavor with strong light and moderate (not excessive) fertilizing. Also, harvest more often—new growth is usually the most aromatic.
A sample planting plan you can copy
If you want a balanced lineup for everyday cooking in a typical bright kitchen window, this six-pot plan is a strong starting point:
- 1 basil (‘Spicy Globe’ if light is moderate; ‘Genovese’ if sun is strong)
- 1 chives (standard common chives)
- 1 parsley (‘Italian Flat Leaf’)
- 1 thyme (‘German Winter’)
- 1 oregano (Greek oregano)
- 1 mint (spearmint or ‘Mojito’ mint, kept contained)
Set it up once, then let your cooking habits edit it over time. If you never reach for oregano, replace it with cilantro (short-lived indoors, but great in cool seasons) or dill (more light-hungry, but doable in the sunniest spot). A windowsill micro herb garden isn’t meant to be permanent like a landscape bed—it’s a working planting that evolves as your kitchen does.
When the herbs are right there—clean, upright, and easy to snip—the kitchen stops asking you to “remember to buy basil.” The window becomes part of prep, like a cutting board or a good knife. And that’s the quiet win of a well-laid-out windowsill garden: it makes fresh flavor the default, not the exception.
Sources: Penn State Extension (2023), “Growing Herbs Indoors” (guidance on light and herb culture). National Gardening Association (2022), “Herbs” growing guidance (sunlight benchmarks). Isaacson, Walter (2011), Steve Jobs (quote on design and function).