Backyard Stargazing Garden Layout
The porch light next door clicks on right as your eyes start adjusting. A car rolls by, headlights sweep the fence, and the Milky Way you were hoping for fades back into “maybe.” If you’ve ever dragged a lawn chair around the yard chasing the darkest corner, you already know the problem: stargazing doesn’t fail because you don’t love the sky—it fails because the yard isn’t designed for it.
A stargazing garden is part layout, part lighting discipline, and part plant choice. Done well, it gives you a predictable, comfortable viewing spot with enough darkness for your pupils to work, enough openness for a wide slice of sky, and enough softness—fragrance, texture, gentle sound—to make you want to stay out for an hour. Let’s design one the way a landscape designer would: start with the view cone, then build the “darkness envelope,” then layer in plants and paths that support nighttime use.
Start with the sky: sightlines, “view cones,” and the 30–60° rule
Before you pick a single plant, stand in your yard at night and look up. Your goal is a clear view of the sky from roughly 30° above the horizon to straight overhead. In many suburban yards, fences and shrubs block the lowest band, while trees block the zenith. You don’t need a perfect dome of sky; you need one intentional window.
Map your best viewing wedge
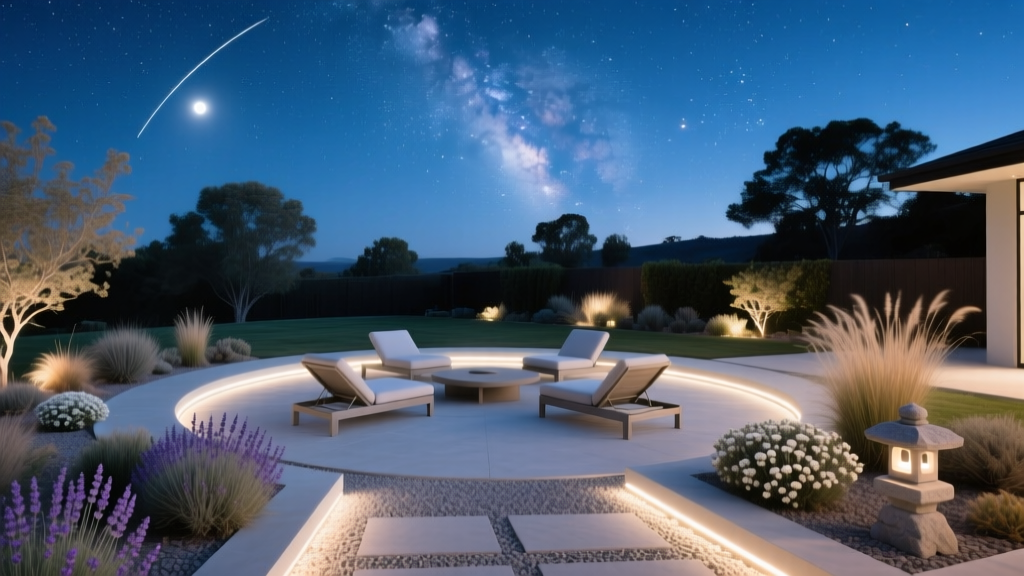
Pick the spot where you can see the most sky with the least glare. In a typical 40 ft x 60 ft backyard, the “best” location often lands 8–15 ft away from the house (far enough to escape interior light spill, close enough to feel safe and convenient). Mark a circle with a radius of 6 ft—that’s your core viewing pad size for two loungers plus a small table.
If you can, orient the pad so your primary viewing direction points away from the brightest street or neighbor lights. Even rotating your seating 30 degrees can move a glare source behind your head, which feels dramatically darker.
Minimum space that feels generous
For comfortable stargazing, I design the viewing pad at 10 ft x 12 ft when space allows. This gives room for two recliners with a 3 ft circulation strip so you’re not stepping over furniture in the dark. If you’re working with a small patio or rental yard, you can scale down to 6 ft x 8 ft and still get a usable setup.
Designing darkness: lighting discipline and glare control
Stargazing is less about “no light” and more about “no glare.” The difference is critical: you can have safe, low-level lighting and still protect night vision if the fixtures are shielded and warm-toned.
“The light that does the most damage to night skies is light that shines upward or sideways—glare is wasted light.” —International Dark-Sky Association, guidance on outdoor lighting (IDA, 2020)
Use the three-layer lighting plan (and keep it warm)
Plan lighting like a designer: task lighting where you need it briefly, pathway lighting that stays low, and “no light” in the viewing zone. The International Dark-Sky Association recommends fully shielded fixtures and minimizing blue-rich light at night (IDA, 2020). Practically, that means:
- Color temperature: choose 2200K–2700K warm LEDs (amber-toned) for any outdoor lights near the viewing area.
- Shielding: use downlights with a visible hood; avoid exposed bulbs and bright globes.
- Controls: install a motion sensor on any required security light and set it to the shortest run time you can tolerate (often 1–5 minutes).
Also consider insects: research has shown different wavelengths attract insects differently, and reducing blue/UV components can reduce attraction in many cases (van Langevelde et al., 2011). Warm lighting is often a better neighbor to both stargazing and summer nights.
Build a “glare screen” without blocking the sky
If a neighbor’s window or light is your main offender, you don’t necessarily want a tall hedge that also blocks constellations. Instead, place a 6–7 ft screening element on the glare side only—think trellis panels, a small ornamental tree positioned to mask a specific sightline, or a vertical planting strip that stops at eye level from the seating position.
A good rule: block the bulb, not the sky. Sit in your chair, identify where the glare hits your eyes, and place screening at that angle.
Core layout options (choose one that fits your yard)
Below are three layout strategies I use most often. Each balances openness (sky) with enclosure (comfort). You can mix elements across them.
Layout A: The “Open Pad + Moon Garden Border”
This is my go-to for medium yards. Place your viewing pad in the most open spot, then plant a crescent-shaped border behind and to the sides of the seating. Keep plants under 30 inches in front of your main view direction to preserve low-horizon sightings (meteor showers love that).
Suggested footprint: viewing pad 10 ft x 12 ft, border depth 3–5 ft, with a 3 ft path connecting to the house.
Layout B: The “Pergola Edge + Dark Center”
In brighter neighborhoods, a pergola placed at the edge of the viewing area gives you a place to mount a dim, fully shielded downlight for setup, then turn it off when you’re ready to watch. Train fragrant vines along the pergola sides (not the roof) so the overhead remains as open as possible.
Suggested footprint: pergola 8 ft x 10 ft, with the viewing pad extending another 4–6 ft beyond it into a darker zone.
Layout C: The “Courtyard Corner for renters”
If you can’t dig or change lighting permanently, create a portable stargazing corner: outdoor rug, two zero-gravity chairs, tall planters on the glare side, and a collapsible privacy screen. You’re aiming for a defined “night room” you can dismantle at move-out.
Suggested footprint: 6 ft x 8 ft, plus two planters (at least 18–24 inches wide) to visually anchor it.
Step-by-step setup: from rough sketch to first clear night
This is the practical build sequence I’d follow on-site. Adjust materials to match your budget and whether you own or rent.
- Do a night walk: at 10–11 p.m., stand in 3–4 spots and note glare sources and the biggest slice of open sky. Pick the best spot for your viewing pad.
- Mark the pad: stake out 10 ft x 12 ft (or 6 ft x 8 ft minimum). Sit in a chair and confirm sightlines.
- Choose a surface: for DIY, use compacted decomposed granite or gravel at 2–3 inches depth over landscape fabric. For a softer feel, add a weatherproof rug on top.
- Install a low-glare path: keep path width at 36 inches for comfortable walking. Use shielded, low-lumen lights spaced 6–8 ft apart, or skip fixtures and use reflective path edging.
- Create a glare screen: place a trellis or tall planters on the brightest side; test at night from a seated position.
- Plant the border: group plants in clusters of 3–7, placing taller plants behind seating and lower plants toward the view edge.
- Set your “red light” station: keep a red flashlight or headlamp in a weatherproof box near the door for preserving night vision.
- Do a trial night: spend 20 minutes outside and adjust: move chairs, rotate seating, re-aim shields, and identify any surprise glare.
Plant selection: moonlit color, fragrance, and low-noise structure
Your plant palette should do three jobs: reflect low light (so the garden reads at night), smell good in the evening, and create soft enclosure without building a wall that steals your sky. Aim for plants that look good in grayscale—silvers, whites, pale blues—and that release fragrance after dusk.
Best performers for a stargazing border (with spacing and why)
White and silver “moon garden” backbone
- Lamb’s ear (Stachys byzantina) — Silvery leaves glow in low light; soft edge for paths. Spacing: 12–18 inches.
- Dusty miller (Jacobaea maritima) — Strong silver contrast; heat-tolerant in many regions. Spacing: 12–15 inches.
- White coneflower (Echinacea purpurea ‘White Swan’) — Upright structure, pollinator-friendly, seed heads add winter interest. Spacing: 18–24 inches.
Evening fragrance (place near seating and path entries)
- Sweet autumn clematis (Clematis terniflora) — Powerful late-summer fragrance for pergola sides; vigorous, so give it room and prune annually. Spacing: 3–4 ft from other climbers.
- Moonflower (Ipomoea alba) — Night-blooming white flowers; great annual vine for renters in pots. Pot size: 12–16 inches wide with a small trellis.
- Nicotiana (Nicotiana alata ‘Fragrant Cloud’) — Evening scent, pale flowers that catch moonlight. Spacing: 12–18 inches.
Quiet structure and screening (block glare without blocking sky)
- Serviceberry (Amelanchier canadensis) — Multi-season interest, airy canopy that doesn’t feel like a ceiling. Mature width: often 10–15 ft; plant 8–10 ft from seating to avoid overhang.
- Clumping bamboo (Fargesia spp.) — Non-running types can create a vertical screen; check local suitability. Spacing: 3–5 ft depending on variety.
- Feather reed grass (Calamagrostis ‘Karl Foerster’) — Upright, tidy, catches dew and moonlight. Spacing: 18–24 inches.
Sunlight and siting: match plants to your actual light
Most of these plants prefer 6+ hours of sun for strongest flowering. If your yard is part shade (3–5 hours), lean harder on foliage brightness: hostas with light margins, Japanese forest grass (Hakonechloa) for glow, and white astilbe for shaded borders. For the viewing pad itself, prioritize an area that dries quickly (avoid low spots) so you’re not dealing with damp seating after evening dew.
Comparison table: surfaces and seating choices
| Element | Option | Typical cost (USD) | Best for | Tradeoffs |
|---|---|---|---|---|
| Pad surface | Decomposed granite (2–3 in depth) | $1.50–$3.00 per sq ft | DIY installs, natural look, good drainage | Needs edging; can track indoors |
| Pad surface | Pavers | $8–$20 per sq ft | Permanent patios, smooth rolling chairs | Higher cost; more glare if very light-colored |
| Seating | Zero-gravity chairs | $60–$150 each | Comfortable neck support; easy to store | Less “designed” look unless paired with a rug |
| Seating | Chaise lounges with cushions | $200–$800 each | Permanent luxury feel | Cushions need dry storage; mildew risk |
| Lighting | Shielded path lights (warm LED) | $20–$60 per fixture | Safe walking while preserving night vision | Too many fixtures adds brightness—use sparingly |
Real-world scenarios: three gardens, three constraints
Here are three realistic setups I’ve designed variations of, with the kinds of compromises homeowners and renters actually face.
Scenario 1: Small suburban yard with neighbor glare (40 ft x 60 ft)
Problem: A neighbor’s second-story window and a bright garage sconce spill into your yard. Goal: Create a reliable dark pocket without building a tall hedge wall.
Layout move: Place a 10 ft x 12 ft gravel pad 12 ft from the house, then install a 7 ft trellis panel on the glare side only (two panels wide, about 8 ft total). Plant a serviceberry 6–8 ft away from the trellis to soften it over time without sealing off the sky.
Planting: A crescent border behind the seating: lamb’s ear at the edge, ‘Karl Foerster’ grasses in clumps of 3 for vertical sheen, and white coneflowers for summer brightness. Add Nicotiana near the path entry so fragrance hits as you step into the space.
Budget snapshot: Gravel pad for 120 sq ft at $2.25/sq ft ≈ $270 plus edging (~$80). Two shielded lights and warm bulbs ≈ $90–$180. Plants (18–25 perennials + a small tree) ≈ $250–$600 depending on pot size.
Scenario 2: Rental patio or shared backyard (6 ft x 10 ft usable corner)
Problem: You can’t dig, and you share space with others who want the string lights on. Goal: A portable stargazing setup you can pack up, plus a social-friendly compromise.
Layout move: Define a 6 ft x 8 ft zone with an outdoor rug. Put two tall planters (each 20 inches wide) on the brightest side and a folding screen behind them to block direct glare. Negotiate a “lights off at 10:30 p.m.” window once or twice a week, or ask for warm, shielded bulbs instead of bare cool-white strings.
Planting: Moonflower vines in pots with a trellis; dusty miller and white bacopa spilling from containers; a pot of fragrant tobacco (Nicotiana) near the chair.
DIY alternative: Instead of buying planters, use fabric grow bags (often $5–$12 each) inside inexpensive baskets for a cleaner look. Use mulch to reduce moisture loss.
Scenario 3: Larger yard with trees (65 ft x 100 ft, partial shade)
Problem: Gorgeous mature trees block overhead viewing and drop debris on furniture. Goal: Keep the trees, but create a “sky window” and a clean, low-maintenance pad.
Layout move: Position the viewing pad in the most open gap between canopies—even moving 10 ft can change what you see overhead. Keep the pad surface hard and cleanable (pavers or compacted stone) and locate it outside the main drip line if possible to reduce leaf litter.
Planting: In part shade, focus on luminous foliage: variegated hosta cultivars (choose slug-resistant types in your area), white astilbe for plumes that read at dusk, and clumps of Japanese forest grass for movement. Place screening only where needed (one side), using clumping bamboo or a tall ornamental grass band.
Maintenance strategy: Plan for a quick sweep routine: a stiff broom and a lidded cushion box near the door. If you’ll use the space weekly, this is the difference between “we should go out there” and actually going out there.
Budgeting and DIY swaps that don’t compromise the sky
A stargazing garden can be built in phases. If you’re watching costs, spend first on the layout and glare control—plants can fill in over time.
- Phase 1 (often $200–$600): define the pad (gravel + edging), add two comfortable chairs, and solve the worst glare with a screen or tall planters.
- Phase 2 (often $250–$900): add a border planting focused on silvers/whites and evening fragrance, plus a simple path.
- Phase 3 (variable): upgrade seating, add a pergola, or install professional lighting controls.
If you’re tempted by bright landscape uplights on trees, skip them. They’re beautiful, but they erase stars quickly. Instead, use a single warm downlight under a pergola for setup, then turn it off. Your garden can still feel designed with reflective foliage and pale blooms doing the visual work.
Maintenance expectations: what it takes to keep it inviting
Plan for 30–60 minutes per week during the growing season if your plantings are mostly perennials with mulch. Container-heavy rental setups can take closer to 60–90 minutes per week in hot weather because pots dry faster.
Weekly (spring through early fall)
- 5 minutes: quick glare check—make sure no fixture got bumped upward and no new bulb got installed in a harsh color temperature.
- 10–20 minutes: deadhead fragrant annuals (nicotiana, moonflower if needed), tidy spent blooms so the space feels cared-for at night.
- 10–30 minutes: water as needed; prioritize new plantings and containers.
Seasonal tasks that matter for stargazing comfort
- Spring: refresh mulch at 2 inches depth to suppress weeds (weeds feel twice as annoying when you’re walking carefully in low light).
- Mid-summer: prune or tie back anything that leans into your view cone; keep the “sky window” open.
- Fall: cut back perennials selectively—leave some seed heads for winter texture, but clear the seating zone so chairs stay clean.
- Winter: check path traction; if you get frost, consider a textured surface or anti-slip strips on steps.
Make it feel like a night room (without adding more light)
The final layer is comfort: a place to set a mug, a blanket basket, a low-profile side table that won’t trip you, and a clear route from the door. If you’re serious about seeing more than a handful of stars, keep a small red light by the exit and avoid checking your phone screen once you’re settled. Give your eyes 20–30 minutes to adjust, and your garden will suddenly feel bigger—like it extends into the sky.
When the layout is right, you stop chasing darkness around the yard. You step into your viewing pad, the plants read in soft silver, the fragrance shows up right on cue, and the lights you kept low and shielded stay politely out of the way. Then the sky does what it’s always done—only now you have a place designed to notice it.
Sources: International Dark-Sky Association (IDA), outdoor lighting guidance, 2020. van Langevelde, F. et al., “Effect of spectral composition of artificial light on the attraction of moths,” Biological Conservation, 2011.