Herb Spiral Design and Planting Guide
You step outside with a mug of coffee and a handful of seed packets, only to realize your “herb garden” has become a string of pots that dry out by noon, tip over in wind, and crowd the one sunny corner you actually need for tomatoes. The basil is sulking, the mint is plotting a takeover, and every time you cook you’re walking farther than you want for a sprig of thyme. A herb spiral solves that mess with one small, sculptural build: a compact mound that creates multiple microclimates—hot and dry at the top, cool and moist at the bottom—so you can grow more herbs in less space with fewer containers.
I’ll walk you through a layout that works in real yards and real rental situations, with dimensions, spacing, plant picks, and a few design “save yourself later” details. Think of it like building a tiny terraced hillside that feeds your kitchen.
Start with the site: light, access, and the way you actually cook
Sunlight: aim for 6–8 hours, but design for what you’ve got
Most culinary herbs want strong light. Plan for 6–8 hours of sun on the sunniest side of the spiral (usually the south or southwest side in the Northern Hemisphere). If your space only gets 4–5 hours, you can still do this—just bias your plant list toward parsley, chives, mint (contained), cilantro, and lemon balm, and keep sun-lovers like rosemary and thyme closer to the top edge where light is strongest.
The spiral’s height matters: a 24–36 inch rise gives you meaningful microclimates without becoming unstable. Taller than that and it’s harder to water evenly, especially for new gardeners.
Access: build it where you’ll harvest daily
Place the spiral within 15–25 feet of your kitchen door if you can. Design research consistently shows that proximity increases use; in garden terms, closer means more harvesting and better pruning (and better pruning means healthier plants). Also leave a comfortable harvest path: a 24–30 inch walkway around at least half the spiral so you’re not stepping into beds to reach the back side.
Drainage and slope: use gravity rather than fighting it
A herb spiral is happiest on a slight slope, but it’s not required. If your site is dead flat or heavy clay, build a simple rubble base under the spiral: 3–4 inches of gravel or broken brick (even chunky urbanite) to keep the base from staying soggy. The goal is a gradient: fast drainage at the top for Mediterranean herbs, more moisture at the base for leafy herbs.
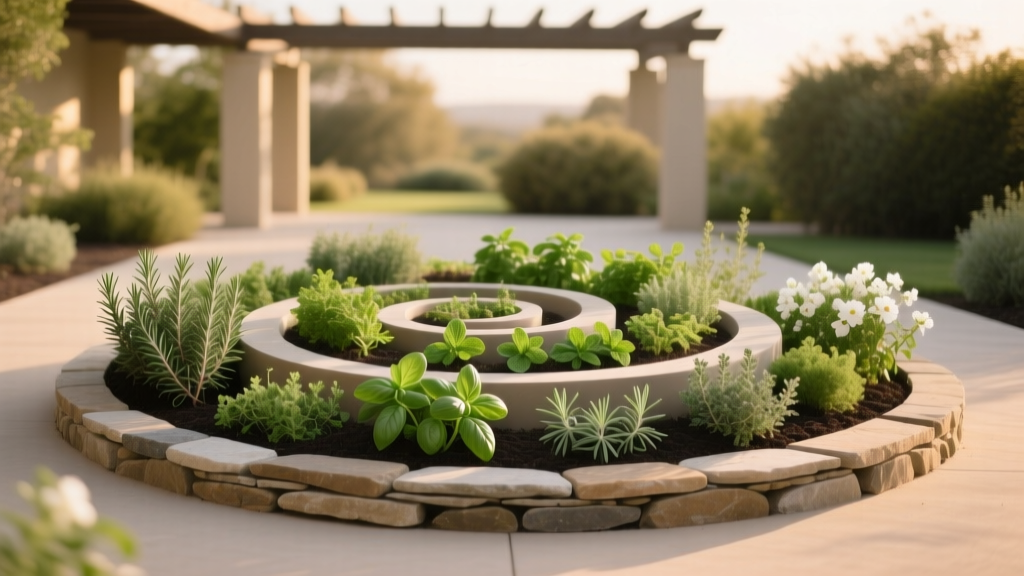
Herb spiral geometry: a layout that’s easy to build and easy to plant
Recommended dimensions (a “sweet spot” for most homes)
For a first spiral, I like these measurements because they fit in small yards, patios, and community plots while still holding a real amount of soil:
- Overall diameter: 5–6 ft (1.5–1.8 m)
- Height at center: 30 in (76 cm)
- Path width (the spiral walkway/terrace width): 12–18 in (30–45 cm)
- Stone/brick wall height per “tier”: 6–10 in (15–25 cm)
At 6 ft across, you can comfortably plant 15–25 herb plants (depending on variety and how often you harvest). If you’re renting or working on a balcony, you can scale down to a 3–4 ft diameter “mini spiral” using a large container and stacked stones—more on that in the scenarios.
Orientation: set the dry side and the moist side on purpose
To make the microclimates work, orient the spiral so the top and outermost edge face the strongest sun. In the Northern Hemisphere, that’s generally the south/southwest. Place moisture-loving herbs on the lower, slightly shadier side. If you can, tuck a small water-catching pocket (a shallow basin or mini bog) at the lowest point—this is optional, but it’s a great spot for watercress or a pot of mint that you want to keep contained.
Materials: stone looks “designed,” but DIY options can be just as solid
You can build with dry-stacked stone, reclaimed brick, pavers, or even durable urbanite (broken concrete). Dry-stacking is ideal for beginners because it’s forgiving and drains well. A 6 ft spiral typically uses:
- Stone/brick: roughly 0.5–1 ton depending on size (often 40–80 standard bricks or equivalent rock)
- Soil/compost mix: about 1–1.5 cubic yards total fill
- Gravel base (optional but helpful): 6–10 bags of 0.5 cu ft each
Cost reality check: If you buy everything new, a medium spiral often lands around $150–$400 (stone/brick, soil, compost). If you source reclaimed brick and use homemade compost, you can often get it under $100. Bagged herb starts add $3–$6 per plant, so a full planting can be another $60–$150 if you don’t start from seed.
Step-by-step build: from flat ground to planted spiral
Set aside a relaxed afternoon for building and another for planting. If you’re moving material by wheelbarrow, plan on 3–6 hours total work time for a 6 ft spiral.
- Mark the circle. Use a stake and string to draw a 5–6 ft circle. Stand back and check that it feels right in the space—this is the moment to adjust.
- Strip grass and level. Remove sod inside the circle. Level as best you can. If you have a slope, place the lowest point where you want the moist zone.
- Add a drainage base (optional but recommended). Spread 3–4 inches of gravel or rubble, especially in clay soils or rainy climates.
- Dry-stack the first ring. Lay your first course of stone/brick along the circle line. Keep it slightly wider at the base than the top for stability.
- Build the spiral wall inward. From the outer ring, begin curving inward to form the spiral, rising as you go. Think of it as a gently climbing path: each turn steps up 6–10 inches. Stagger joints like brickwork for strength.
- Backfill as you build. Add soil behind each section of wall before you go higher. This locks stones in place and prevents later slumping.
- Create soil zones. Blend your fill differently by level:
- Top third: add extra sand/grit (about 20–30% by volume) for fast drainage.
- Middle: standard garden soil + compost.
- Bottom: richer mix with more compost and a little extra water-holding material (leaf mold or coconut coir).
- Water and settle. Water thoroughly to settle soil. Top off low spots. Let it sit 24–48 hours if you can, then plant.
Planting design: use the microclimates like rooms in a house
I design herb spirals like a tiny neighborhood: sun-baked “rooftops” for woody herbs, comfortable mid-level terraces for everyday cut-and-come-again greens, and a cool bottom edge for herbs that like consistent moisture. Spacing matters because crowded herbs get leggy and disease-prone.
Spacing rules that keep everything productive
- Woody perennials (rosemary, sage, thyme, oregano): plant 12–18 inches apart depending on variety.
- Leafy herbs (parsley, cilantro, basil): plant 8–12 inches apart.
- Spreading herbs (mint, lemon balm): grow in a pot sunk into the soil, or give them a dedicated contained pocket.
Don’t be tempted to plant everything at the top. The spiral works because you distribute plants where they naturally thrive. The result looks better and needs less babysitting.
Recommended herb varieties (and where to put them)
Below is a planting palette that performs well in a typical 6 ft spiral in temperate climates. Adjust for your hardiness zone, but keep the same logic: drought-tolerant up high, thirsty down low.
Top zone (hotter, drier, maximum drainage)
Rosemary ‘Arp’ (more cold-hardy than many), Thyme ‘English’ (Thymus vulgaris), and Oregano ‘Greek’ belong up here. They hate wet feet. This is also a great spot for Lavender ‘Hidcote’ if you have room—just remember lavender wants lean soil and excellent drainage.
Why these work: Their Mediterranean origins match the spiral’s top conditions. They also reward frequent harvest with denser growth.
Middle zone (balanced moisture, easy harvesting)
Put your kitchen workhorses here: Basil ‘Genovese’ (warm season), Parsley ‘Italian Flat Leaf’, Chives, and Sage ‘Berggarten’ (a tidy, broad-leaf sage that looks designed, not messy). Mid-zone soil stays evenly moist but still drains—perfect for leafy herbs that resent drought stress.
Why these work: They tolerate the mild swings in moisture and temperature and are easy to reach, so you’ll actually use them.
Lower zone (cooler, moister, more organic matter)
This is where I place Cilantro ‘Santo’ (slower to bolt), Dill ‘Bouquet’, and Chervil if you enjoy French cooking. If you can keep the bottom consistently moist, tuck in Watercress in a small lined pocket—or simply place a shallow tray or pot that holds water.
Why these work: They’re the first to bolt or turn bitter when stressed by heat and drought. The lower zone buffers them.
Containment corner: mint without regret
Mint is useful, but it spreads aggressively. University extension guidance commonly recommends physical barriers or containers for mint to prevent it from taking over beds (for example, University of Minnesota Extension, 2020). Sink a 10–12 inch nursery pot into the bottom zone and plant Spearmint or Peppermint inside it. You get the flavor without the invasion.
Comparison table: match herb choices to spiral zones
| Herb (variety) | Best spiral zone | Sun needs | Typical spacing | Design note |
|---|---|---|---|---|
| Rosemary (‘Arp’) | Top | 6–8+ hrs | 18 in | Keep soil gritty; avoid soggy winter spots |
| Thyme (English) | Top / edge | 6+ hrs | 10–12 in | Let it spill over stones for a soft look |
| Basil (‘Genovese’) | Middle | 6+ hrs | 10–12 in | Pinch weekly for bushy growth |
| Parsley (Italian flat-leaf) | Middle / lower | 4–6+ hrs | 8–10 in | Handles partial sun; great filler plant |
| Cilantro (‘Santo’) | Lower | 4–6 hrs | 8–10 in | Cooler zone slows bolting |
| Mint (spearmint, in pot) | Lower (contained) | 4–6+ hrs | 1 plant per 10–12 in pot | Always contain to prevent spreading |
Real-world scenarios: three ways this design fits actual lives
Scenario 1: Small suburban yard with a sunny corner (the “high-use kitchen spiral”)
You’ve got a 7 ft x 7 ft patch near the patio that bakes in afternoon sun. Build the standard 6 ft spiral and keep the planting tight to what you cook weekly: rosemary, thyme, oregano, basil, parsley, chives, cilantro, and a contained mint. Use stone or brick that matches your house edging for a cohesive look.
Smart tweak: Add a simple drip line or a single adjustable emitter near the top. One $15–$25 micro-irrigation kit can save the top zone from drying out in heat waves while still letting the bottom stay moist.
Scenario 2: Rental home with restrictions (the “no-dig, movable-ish spiral”)
If you can’t excavate or you expect to move, build a 3–4 ft diameter mini spiral in a stout circular bed: use a stock tank, a half wine barrel grouping, or a ring of stacked pavers on top of landscape fabric. Keep height modest—18–24 inches—to reduce weight and keep it stable.
Budget strategy: Use bagged topsoil + compost and keep plant count to 8–12 high performers. Start from seed for cilantro, dill, and basil to cut costs. Many extension services note that herbs generally perform well in containers given adequate light and drainage (Royal Horticultural Society, 2023).
Scenario 3: Community garden plot with heavy clay (the “drainage rescue spiral”)
Clay soil can drown Mediterranean herbs, especially in wet springs. Here the spiral is more than a space-saver—it’s a drainage fix. Build the base with 4 inches of gravel and incorporate extra grit into the top half. Keep rosemary and lavender at the very top; reserve the lower zone for parsley and chives, which tolerate heavier soils better.
Design insurance: Don’t plant woody perennials in the lowest zone of a clay site. They’ll look fine in summer and then rot over winter. Put annuals there instead and rotate.
Scenario 4: Hot, dry climate with water limits (the “Mediterranean-forward spiral”)
If your summers are intense and watering is restricted, shift the palette: double down on thyme, oregano, sage, rosemary, marjoram, and compact lavender. Limit basil to one or two plants in the middle zone where it gets a little more moisture. Mulch with gravel (not wood chips) in the top half to reduce evaporation while keeping crowns dry.
Water plan: Expect to water deeply 1–2 times per week in peak summer, instead of daily sprinkles. Deep watering encourages deeper roots and sturdier plants.
Design details that make it look intentional (not like a science project)
A spiral can read as “pile of rocks” if you don’t give it a few intentional lines. Choose one material and repeat it: all brick, all stone, or consistent urbanite pieces. Let a few plants cascade over the edge—thyme, creeping savory, or oregano—so the stonework looks anchored to the planting.
“Right plant, right place is the fundamental rule of gardening.” —Royal Horticultural Society (RHS), 2023
That principle is exactly what the spiral formalizes: you’re building “places” in miniature.
Maintenance expectations: what it really takes week to week
A well-planted herb spiral is not high maintenance, but it does respond to attention. Plan on 20–40 minutes per week during the growing season for harvesting, quick pruning, and checking moisture. In the first month after planting, you’ll likely spend closer to 10 minutes every other day monitoring water as roots establish.
Weekly rhythm
- Harvest/pinch: Basil and oregano especially benefit from weekly pinching to prevent flowering and keep plants compact.
- Water check: Feel the soil 2 inches down in the top zone; if it’s dry, water deeply. The bottom may stay moist longer—don’t assume the whole spiral needs water just because the top does.
- Edge patrol: Make sure mint stays contained and that creeping herbs aren’t smothering neighbors.
Seasonal tasks
- Spring: Top-dress with 1–2 inches of compost in the middle and lower zones; go lighter on the top zone to keep it lean.
- Summer: Mulch thoughtfully. Gravel mulch in the top zone, leafier mulch lower down if needed.
- Fall: Cut back woody herbs lightly (don’t hard-prune rosemary late in the season in cold climates). Replant cool-season herbs like cilantro for a fall run.
- Winter: In freeze-prone areas, protect rosemary with a breathable cover, or grow it in a pot sunk into the spiral so you can pull it into a sheltered spot.
If you notice the spiral settling after a season (common), simply top up soil and re-seat any loose stones. Dry-stacked systems are meant to be adjusted.
Budget and DIY alternatives: spend where it shows, save where it doesn’t
If you want the spiral to look like it belongs in the landscape, put your budget into the wall material (what you see) and save on fill (what you don’t). A practical budget split for a 6 ft spiral:
- Wall material: $80–$250 (reclaimed brick can be nearly free)
- Soil/compost: $50–$150 (cheaper if you buy bulk; cheapest if you generate compost)
- Plants/seeds: $30–$150 (seed-heavy planting is the best value)
DIY fill trick: Use “hugelkultur-light” in the core—sticks and small logs in the bottom center, then cover with soil. This reduces the amount of purchased soil and improves moisture management over time. Just keep woody material deeper in the center and avoid placing it right under rosemary and lavender pockets where you want the leanest, driest conditions.
Low-cost wall options: Urbanite is often free on neighborhood exchange boards. If using it, choose pieces with at least one flat face so you can stack securely.
Citations and planting notes you can trust
Two reliable reference points as you plan: guidance on containing invasive herbs like mint (University of Minnesota Extension, 2020), and established horticultural best practices emphasizing plant placement and suitability (Royal Horticultural Society, 2023). Both reinforce the practical heart of a spiral: match the plant to the conditions you’ve built.
Once your spiral is planted and you’ve harvested from it a few times, it stops feeling like a project and starts feeling like part of your daily routine—a quick snip of thyme at the top, a handful of parsley in the middle, a cool patch of cilantro below. The best compliment a garden feature can earn is that you use it without thinking, and a well-placed herb spiral gets there fast.