Patio Outdoor Living Room Garden Edging
You step outside with a drink, aiming for “outdoor living room,” and instead your eye lands on the messy edge: mulch spilling onto pavers, a hose snaking through scraggly plants, and that awkward strip where the patio meets the lawn—too narrow for shrubs, too wide to ignore. The furniture is fine. The patio is fine. It’s the edge that makes the whole space feel unfinished.
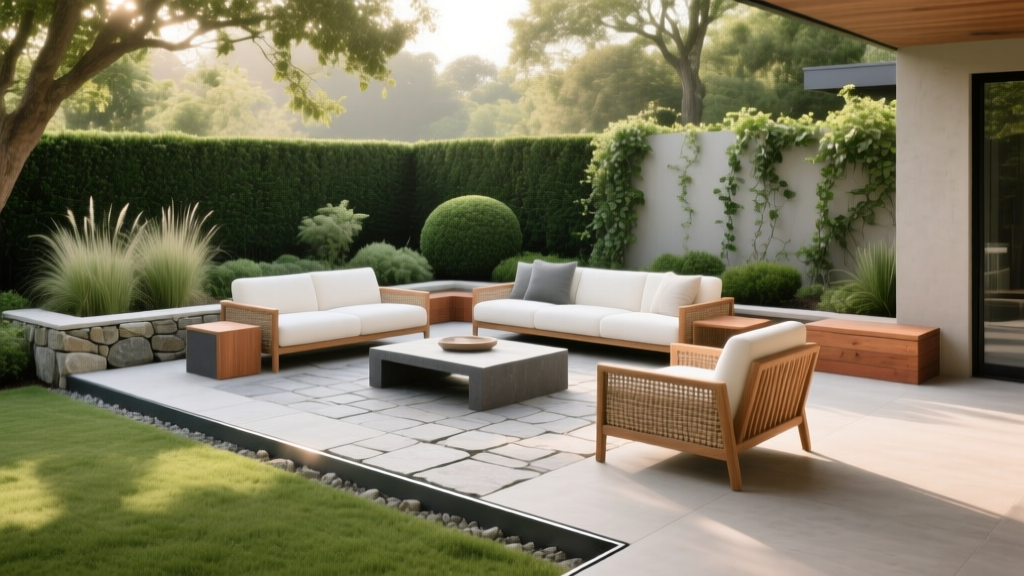
Good edging is more than a line in the dirt. It’s the moment your patio becomes a room—defined walls (plants), a clean threshold (edging), and a layout that controls foot traffic, mess, and maintenance. Let’s design it like a landscape pro would: set the boundaries, choose materials that match your life, then plant with purpose.
Start With the “Room Line”: Layout Before Materials
Before you buy edging, sketch the living room you want outside. The edge should support how you move and how you sit—otherwise it becomes something you trip over, mow around, or constantly repair.
Use a simple measuring rule: 3 zones
Stand on the patio and look outward. Most patio “living rooms” work best when you design three bands:
- Hard zone (patio): furniture + walking.
- Edge zone (the transition): edging + planting strip.
- Garden zone (beyond): lawn, beds, or larger plantings.
For a comfortable edge planting strip, aim for 18–30 inches wide. Under 12 inches, plants struggle and maintenance feels fiddly. Over 36 inches, it becomes a “bed,” not an edge, and you’ll want deeper structure (shrubs, layered perennials).
Keep circulation honest: 36 inches is your friend
If your patio connects to a gate, grill, or shed, protect that pathway. A common standard for comfortable passage is 36 inches wide for a walkway. If the edge planting threatens that, keep the edge low (groundcovers) and move taller plants to corners where they feel intentional, like end tables.
Sunlight check: match the edge to the exposure
Patio edges often have tricky microclimates—heat reflecting off pavers and dry soil under eaves. As a baseline:
- Full sun: 6–8+ hours of direct light.
- Part sun/part shade: 3–6 hours.
- Shade: under 3 hours.
Track your sun for one day (morning, noon, late afternoon). You don’t need perfection—just an honest category so your plants don’t fail on the “hot edge.”
Edging Materials That Feel Like Furniture Trim
Think of edging like baseboard inside a house: it hides gaps, protects the wall, and makes everything look intentional. Your edging choice should match the patio style and your tolerance for upkeep.
| Edging Type | Best For | Typical Height/Depth | DIY Difficulty | Cost Range (materials) |
|---|---|---|---|---|
| Steel edging (powder-coated or raw) | Modern patios, crisp curves, long-term neatness | 3–5 in visible; 3–6 in buried | Medium | $2–$6 per linear foot |
| Brick set on edge | Traditional patios, cottage gardens | ~4 in visible; 4 in base | Medium-High | $3–$10 per linear foot |
| Paver soldier course (matching patio) | Seamless look, high durability | Same as patio thickness | High | $6–$15 per linear foot |
| Natural stone (cobbles/flat stone) | Organic edges, rustic gardens | Varies; aim 2–4 in proud | Medium | $5–$20 per linear foot |
| Composite/plastic edging | Quick installs, renters (with care) | 2–4 in visible | Low | $1–$3 per linear foot |
The cleanest look: keep edging nearly flush
For patios used daily, avoid tall edging that catches toes and chair legs. A sweet spot is 1/2 inch to 1 inch above the patio surface—enough to stop mulch migration, but low enough to feel invisible.
Plan for water: a subtle slope protects the “room”
Your patio should generally shed water away from the house. Many hardscapes are built with a slope around 1/8 inch per foot to move water without feeling tilted. If your edge traps water against the patio, plants rot and paving stains. Keep soil level slightly below the patio edge or use a narrow gravel strip (2–3 inches wide) as a drainage buffer.
“A well-designed landscape is as much about managing water as it is about beauty.” — U.S. Environmental Protection Agency, Green Infrastructure guidance (EPA, 2023)
Source note: The EPA’s green infrastructure resources emphasize using landscape features to handle runoff at the source (EPA, 2023).
Three Layout Strategies That Make Patios Feel Like Living Rooms
1) The “Frame”: continuous edging with a consistent planting band
This is the most living-room-like approach. You run one continuous edging line around the patio perimeter (or the seating portion), then plant in a consistent depth—typically 24 inches wide. It reads like a border, not a collection of random plants.
Design tip: Keep plant height lower along the long sides (12–24 inches tall), and reserve taller “corner anchors” (30–48 inches) for the ends—like floor lamps in a room.
2) The “Corners + Thresholds”: define entries and views, not every inch
If your patio is tight or you rent, focus on corners and transitions. Use edging only where mulch meets hardscape (often 8–12 linear feet at a time), and place large planters elsewhere. This reduces cost and avoids digging up a landlord’s yard.
Where to spend: the spot where you step out the door, the path to the grill, and the view from your favorite chair.
3) The “Green Skirt”: soft edge with groundcovers that drape
Instead of a hard edging line, you use a narrow restraint (steel or brick) and let plants slightly spill toward it. The restraint keeps soil in place, while the plants create softness. This works beautifully with thyme, sedum, ajuga (in shade), or low grasses.
Maintenance reality: You’ll trim the “skirt” 2–4 times per growing season, but you’ll weed less because groundcovers shade the soil.
Step-by-Step: Install Patio Garden Edging Like a Pro
This approach assumes a typical patio edge transitioning to soil or lawn. Adjust depth if you’re working next to a thick paver base.
- Mark the line. Use a garden hose for curves or stringline for straight edges. Step back and check it from inside the patio seating area.
- Measure and budget. Count linear feet. Example: a 12' × 14' patio perimeter is 52 linear feet. Add 10% for cuts and mistakes.
- Cut the edge trench. Remove sod in a 4–6 inch wide strip. Dig to the edging depth recommended by the manufacturer (often 3–6 inches buried).
- Set a stable base. For brick/stone edging, add 1–2 inches of compacted paver base or gravel; for steel edging, tamp the soil firmly.
- Install edging. Keep the top 1/2–1 inch above patio grade. Use stakes every 18–24 inches (or per product instructions).
- Backfill and compact. Soil should be firm against both sides to prevent movement.
- Mulch or gravel. Apply 2 inches of mulch (not volcano-mulch against plant crowns) or a 1–2 inch gravel band for a modern look.
- Plant and water deeply. Water new plantings to soak the root zone, not just the surface.
Plant Selection: Varieties That Behave at the Patio Edge
Patio-edge plants need good manners: they shouldn’t swallow chairs, drop messy fruit, or flop into walkways. They also need to tolerate heat, reflected light, and occasional dryness.
Sunny edges (6–8+ hours)
Low, tidy “baseboard” plants (front row, 8–14 inches tall):
- Thymus serpyllum (creeping thyme) — aromatic, drought-tolerant, and can handle light foot brushing. Space 10–12 inches apart.
- Sedum spurium (‘Dragon’s Blood’ stonecrop) — durable, color-rich, excellent for hot edges. Space 12 inches apart.
- Lavandula angustifolia ‘Hidcote’ (English lavender) — structure and scent; great near seating. Space 18–24 inches apart.
Mid-layer “armrest” plants (18–30 inches tall):
- Salvia nemorosa ‘Caradonna’ — upright, long bloom, pollinator magnet without being floppy. Space 18 inches apart.
- Nepeta ‘Walker’s Low’ (catmint) — soft edging haze; shear back after first bloom to keep it neat. Space 24 inches apart.
Corner anchors (30–48 inches tall):
- Hydrangea paniculata ‘Bobo’ (fuller sun than bigleaf hydrangeas) — compact, strong stems. Space 3 feet apart.
- Panicum virgatum ‘Northwind’ (switchgrass) — vertical and clean; minimal mess. Space 24–30 inches apart.
Part shade edges (3–6 hours)
- Heuchera ‘Caramel’ or ‘Obsidian’ (coral bells) — color all season, tidy mounds. Space 14–18 inches apart.
- Hakonechloa macra ‘Aureola’ (Japanese forest grass) — graceful, softens hard lines. Space 18–24 inches apart.
- Hydrangea arborescens ‘Incrediball’ (if you have morning sun) — bold blooms, strong presence. Space 4 feet apart.
Shade edges (under 3 hours)
- Helleborus (Lenten rose) — evergreen-ish structure, early blooms, not fussy. Space 18–24 inches apart.
- Epimedium (barrenwort) — reliable groundcover for dry shade near foundations. Space 12–18 inches apart.
- Carex oshimensis ‘Evergold’ (sedge) — tidy, bright, tough. Space 12–18 inches apart.
Why these work: they hold their shape, tolerate the patio’s heat/dry cycles, and look good from 6 feet away (the distance you’ll often view them from a chair).
Three Real-World Layout Scenarios (With Numbers and Budgets)
Scenario 1: Tiny renter patio (6' × 10') that needs a clean edge—without digging a trench
Problem: You want a finished look, but you can’t install permanent edging in the ground.
Layout strategy: “Corners + Thresholds” using planters as the border.
- Place 2 rectangular planters (about 36" long × 16" wide × 16" tall) along the patio’s open edge.
- Add 2 tall pots (18–20" diameter) to create “doorway” emphasis.
- Plant with one spiller, one filler, one thriller: creeping thyme + heuchera + dwarf grass (like Pennisetum ‘Little Bunny’ if sunny).
Budget: Expect $160–$350 for planters (depending on material), plus $60–$120 for potting mix and plants. DIY alternative: use inexpensive resin planters and upgrade the look with a top dressing of pea gravel.
Scenario 2: Suburban paver patio (12' × 14') where mulch constantly washes onto the pavers
Problem: Messy edge and constant sweeping after rain.
Layout strategy: “Frame” with steel edging and a consistent 24-inch planting band.
Materials plan: Install about 52 linear feet of steel edging at $3.50/ft = $182 (materials). Add stakes and connectors, bringing it closer to $220.
Planting plan (sun):
- Front row: 10 creeping thyme plants at 12" spacing.
- Mid layer: 6 ‘Caradonna’ salvia at 18" spacing.
- Corners: 2 ‘Bobo’ hydrangeas.
Expected cost: Plants often run $6–$18 for perennials and $35–$60 for compact shrubs depending on pot size and region. A realistic plant budget for this edge is $220–$450. Mulch: 8–10 bags at 2 cu ft each, typically $4–$7 per bag.
Why it works: steel gives a crisp barrier so mulch stays put, and a repeated plant palette reads calm from the seating area.
Scenario 3: Older concrete patio (10' × 12') with shade and root competition from mature trees
Problem: Dry shade makes plantings fail, and you’re tired of replanting.
Layout strategy: “Green Skirt” with a narrow gravel buffer.
- Install a simple edging line and add a 2–3 inch gravel strip against the patio to reduce splash and rot.
- Create a 18-inch planting band beyond the gravel.
- Plant: epimedium (groundcover) + hellebores (structure) + sedges (movement).
Water strategy: Use a soaker hose looped through the bed for deep watering. Many soaker hoses run $15–$35 depending on length; for this bed, a 25-foot hose is often enough.
Why it works: these plants handle dry shade better than typical “shade annuals,” and the gravel edge keeps the patio looking cleaner.
Budget Planning: Where to Spend, Where to Save
If you want your patio to feel like an outdoor living room, spend money where your eye lands and where failure is annoying: edging stability and a few structural plants.
- Spend on: steel edging or properly set brick/stone; 2–4 anchor plants (dwarf shrubs or ornamental grasses).
- Save on: repeating perennials in small pots (they fill in by year 2), mulch instead of decorative stone, DIY gravel strips.
DIY alternative edging: For a temporary clean line, cut a crisp spade edge (a “trenched” edge) and maintain it every 4–6 weeks in growing season. It costs almost nothing, but it’s more hands-on.
For renters, aim for portable definition: planters, a narrow outdoor rug, and a row of pots that creates a visual boundary. You can still use the same plant logic—low at the front, taller at corners.
Spacing and Density: The Trick to Looking Finished Faster
Most patio-edge plantings look sparse because people under-plant to save money, then weeds move in. A designer trick: plant in “modules.”
- Perennials: space by mature width, not current pot size. If a plant matures to 18 inches wide, plant it 18 inches on center.
- Groundcovers: for quick coverage, plant 10–12 inches on center and expect it to knit in within one growing season (varies by climate).
- Shrubs: don’t crowd the patio. Keep woody plants at least 24 inches back from chair legs and main circulation lines.
Want it to feel lush immediately? Add a temporary layer of annuals (like calibrachoa in sun or impatiens in shade) tucked between perennials the first year. Budget $30–$60 for seasonal color, then reduce as the perennials fill in.
Maintenance Expectations: Keep the “Outdoor Room” Crisp
A patio-edge garden should make life easier, not add a second job. Here’s a realistic rhythm for a well-designed edge:
- Weekly (growing season): 20–40 minutes per week to deadhead a few blooms, pull visible weeds, and do a quick edge tidy.
- Monthly: check mulch depth (keep around 2 inches), trim spillers back off the patio, and inspect edging for movement after heavy rain.
- Spring: cut back ornamental grasses, clean up perennials, refresh mulch, and feed lightly if needed.
- Summer: deep water during hot spells—aim for a thorough soak rather than frequent sprinkles. Many garden references recommend around an inch of water per week for many landscapes, adjusting for soil and weather.
- Fall: cut back floppers, leave some seedheads for winter interest, and clear leaves off low groundcovers to prevent rot.
For water guidance, many university extension resources emphasize deep, infrequent irrigation to encourage roots to grow down. One practical reference for home landscapes is Colorado State University Extension’s lawn and garden watering guidance (CSU Extension, 2022), which reinforces adjusting watering to weather, soil, and exposure.
Two Design Details That Make It Feel Like a Real Living Room
Repeat materials from the patio
If your patio is gray concrete, echo it with gray gravel or steel edging. If it’s warm-toned pavers, echo it with brick edging or bronze-toned grasses. Repetition is what makes it feel designed, not decorated.
Build “privacy without walls”
Instead of a fence of tall shrubs, use airy plants that filter views. Ornamental grasses like ‘Northwind’ or a clump of hydrangea can create a sense of enclosure while still feeling open. Place them where you want the room to feel protected—usually behind seating, not in front of the best view.
And keep the scale realistic: if your seating area is 8' × 10', you don’t need 6-foot shrubs. Plants in the 30–48 inch range often provide the right enclosure without turning the patio into a tunnel.
The edge is the detail that quietly does the heavy lifting. Once the line is crisp and the plants behave, you stop noticing the transitions—and start noticing how often you’re choosing to sit outside. That’s when a patio stops being a slab and starts being a room.
Sources: U.S. Environmental Protection Agency (EPA), Green Infrastructure guidance and stormwater resources (2023). Colorado State University Extension (CSU Extension), home landscape watering principles and best practices (2022).