Rooftop Native Plant Habitat Garden
The first time you step onto a rooftop with a bag of potting mix, it’s usually windy enough to make you rethink your life choices. The sun feels closer, the heat bounces off the membrane roof, and every pot you set down seems to scoot a little in the gusts. Still—this is the kind of blank canvas designers love: bright light, open sky, and an opportunity to build a habitat where there wasn’t one.
The common problem I see with rooftop gardens is that they’re treated like patios with plants added as decoration. A habitat garden flips that. We start with ecology—food, shelter, water, seasonal continuity—then we design circulation and seating around it. The goal is a rooftop that looks good from your door, supports native pollinators and birds, and stays manageable when you’re tired after work.
Start with rooftop realities: load, wind, and water
Before we talk layout, get clear on the constraints. Rooftops are not ground-level gardens: wind is stronger, sunlight is more intense, soil dries faster, and structural load limits matter. If you’re renting, you’re also designing for reversibility—everything in containers, nothing that penetrates the roof membrane.
Check weight limits and build a lightweight system
If you have access to building documentation, look for allowable live load (often expressed as pounds per square foot). If you don’t, ask your building manager or landlord. For a practical planning number, keep your planting zones to a conservative 40–60 lb/sq ft unless you have confirmation you can exceed it. Saturated soil is heavy, and planters add concentrated loads.
Design tip: spread weight with long, low troughs or planter benches instead of a few massive pots. Use mineral aggregates like expanded shale or pumice in your mix to reduce weight while improving drainage.
Map sun and wind in one week
Native plant habitat gardens thrive when you match species to conditions. Spend 7 days observing your roof at three times: morning, midday, late afternoon. Most rooftops offer 6–10 hours of direct sun in summer, but shadows from penthouses or neighboring buildings can create pockets of part sun.
Wind: on exposed roofs, constant wind can shred broad leaves and desiccate pots. Your layout should include wind baffles (trellis panels, slatted screens, or dense grasses) placed upwind of seating and the most tender plants.
Plan for water: drought tolerance + efficient irrigation
Even drought-tolerant natives need consistent moisture while establishing. The practical rooftop approach is a simple drip line on a hose-end timer. Plan for 1–2 deep waterings per week in the first season and then taper for prairie-style natives. The National Wildlife Federation emphasizes that wildlife gardens need reliable water and native plant structure to support local species (National Wildlife Federation, 2020).
Layout strategies that feel designed (and function like habitat)
A rooftop habitat garden works best when you think in zones. I like three: (1) an arrival and seating zone, (2) a core planting “meadow” zone, and (3) an edge zone that protects plants from wind and makes the space feel intentional.
Use the “U-shaped habitat border” to create a calm interior
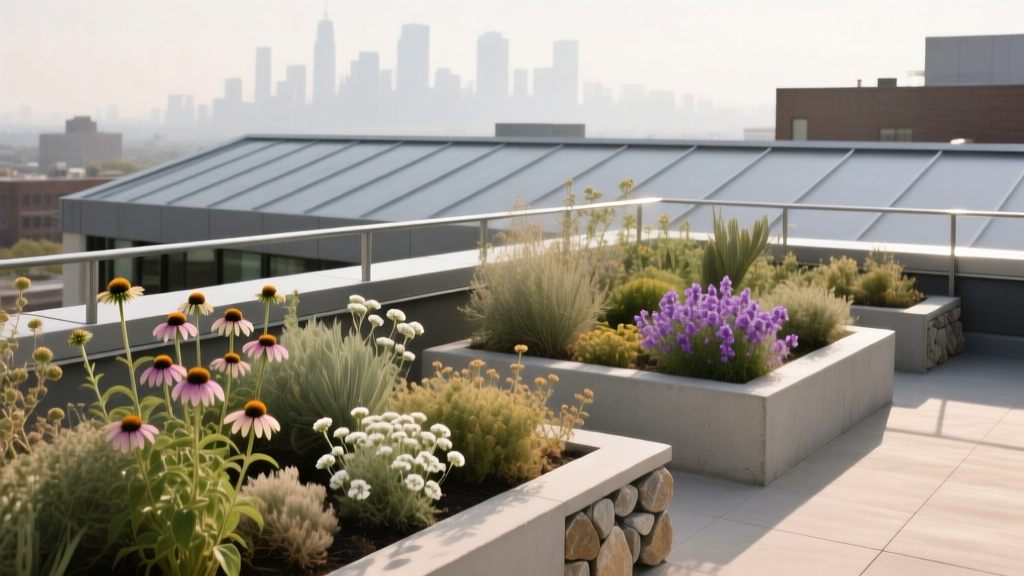
On a typical roof deck, you’re exposed on all sides. A U-shaped border of planters creates a microclimate: calmer air, slightly higher humidity, and a sense of enclosure. The open part of the U frames your best view and provides access for moving pots or cleaning drains.
Concrete dimension example: On a 12 ft x 18 ft rooftop (216 sq ft), reserve a 7 ft x 10 ft seating pad (70 sq ft) and build the U-shaped border with 18–24 inch deep planters around two sides. That leaves a central path of about 30–36 inches—comfortable for carrying watering cans and for two people passing.
Design for layers: groundcover, flowers, grasses, and “perches”
Habitat isn’t just blooms. You want layers that provide cover and nesting material, plus seedheads that persist into winter. The Xerces Society notes that native plants are foundational for pollinators, providing nectar/pollen and larval host resources (Xerces Society, 2011).
Think in four layers on the roof:
- Low matrix: sedges, low prairie grasses, groundcovers to shade soil and reduce evaporation.
- Flower layer: long-blooming perennials for continuous nectar.
- Structure layer: bunchgrasses and sturdy stems that hold winter interest and shelter.
- Perch points: a small snag-like branch in a pot, a trellis, or a tall grass clump—birds use these as lookout points.
Keep circulation crisp: one main path, two “pause points”
On rooftops, messy circulation makes maintenance harder. Create one main path (minimum 30 inches wide) from door to seating. Then add two pause points: a spot to stand near the best flowers and a spot near your water source. This turns the garden into a sequence rather than a ring of pots.
Three rooftop habitat layouts (pick the one that matches your life)
Here are three real-world scenarios I design for constantly. Each uses the same ecological principles, but the layout responds to budget, building rules, and how you actually use the roof.
Scenario 1: The renter’s reversible habitat (no drilling, no permanent irrigation)
You have a lease, a small budget, and you need the roof to return to “as found.” Choose lightweight containers, self-watering trays, and a modular plan.
Example layout on a 8 ft x 14 ft roof nook (112 sq ft):
- 3 rectangular planters, each 36 in x 16 in x 16 in, along the windward side for a grass/screen mix.
- 6 medium pots (14–18 inch diameter) grouped in threes for visual weight and easier watering.
- 1 shallow dish or micro-pond (see water section) placed where it won’t slosh in wind.
DIY alternative: use food-grade tote bins (with drainage holes and a false bottom) as lightweight planters. They’re not glamorous, but they’re renter-friendly and surprisingly durable.
Scenario 2: The family roof deck (kid-safe paths, sturdy plants, season-long interest)
Your priority is durability: plants that handle occasional trampling, fewer spiky textures near play space, and a layout that keeps the center open.
Example layout on a 14 ft x 20 ft deck (280 sq ft):
- Keep a 10 ft x 12 ft open activity zone in the center.
- Build a perimeter of 20-inch deep trough planters (or planter benches) for a meadow edge.
- Include a “butterfly window” planter: a 4 ft long mixed bloom trough positioned at kid eye-level near seating.
Scenario 3: The serious habitat gardener (high biodiversity, drip irrigation, research mindset)
You’re willing to invest in an irrigation timer and a more complex plant palette. You’re also okay letting seedheads stand through winter.
Example layout on a 16 ft x 24 ft roof (384 sq ft):
- 60% of space in planted modules (planters arranged as “islands” with access paths).
- Drip irrigation split into 2 zones: one for drier prairie plants, one for moisture-loving species near a micro-pond.
- Add a small trellis with a native vine (regional selection) as a wind filter and vertical habitat.
“Urban green roofs can provide valuable habitat for invertebrates when designed with diverse native plantings and varied structure.” — Brenneisen, study on biodiversity in green roofs (2006)
Plant selection: native choices that excel in containers and rooftop conditions
Native doesn’t have to mean wild-looking. The trick is choosing species that (1) handle drought and wind, (2) stay upright in containers, and (3) provide long seasonal coverage. Because “native” is regional, treat these as a menu: choose the species native to your ecoregion or swap to close regional equivalents from local native nurseries.
Sunny, windy rooftop core (6–10 hours sun): prairie-style container mix
Use a matrix of grasses/sedges with flowering perennials woven through. For containers, I aim for 1 plant per 1–2 sq ft for a filled-in look by midseason (a bit tighter than in-ground spacing because pots dry faster and roots are constrained).
- Purple coneflower (Echinacea purpurea) — sturdy stems, long bloom, seedheads feed finches; handles heat well.
- Butterfly weed (Asclepias tuberosa) — monarch host plant; drought tolerant once established; prefers sharp drainage.
- Prairie dropseed (Sporobolus heterolepis) — elegant mound, incredible fragrance, strong structure in wind.
- Little bluestem (Schizachyrium scoparium) — blue-green summer foliage, copper fall color; excellent winter habitat structure.
- Black-eyed Susan (Rudbeckia hirta) — fast color in year one, good for filling gaps while slower perennials mature.
Part-sun pockets (3–6 hours sun): pollinator support without flopping
- Wild geranium (Geranium maculatum) — early nectar, softens edges, tolerates part shade.
- Bee balm (Monarda fistulosa) — magnet for bees; choose a mildew-resistant selection if your roof gets humid.
- Fox sedge (Carex vulpinoidea) — adaptable, tidy clump, great “green glue” between flowers.
Dry edge and windbreak planters: tough structural plants
- Switchgrass (Panicum virgatum) — upright, great screen; choose a compact variety if your roof is small.
- New England aster (Symphyotrichum novae-angliae) — late-season nectar when pollinators need it most; pinch once in early summer to keep it bushy in pots.
- Goldenrod (Solidago rugosa or regional Solidago spp.) — powerhouse for late pollinators; modern cultivars can be more compact, but straight species often perform best ecologically.
Rooftop water element planting (optional but powerful)
If you can keep a small water feature topped up, it changes everything—pollinators and birds find the space faster. Use a wide, shallow basin rather than a deep container for safety and stability.
- Cardinal flower (Lobelia cardinalis) — hummingbird favorite; wants consistent moisture, so place it near the water feature.
- Blue flag iris (Iris versicolor) — architectural foliage; tolerates wet feet in a lined container.
Comparison table: container strategies for rooftop natives
| System | Best for | Typical soil depth | Watering need (summer) | Ballpark cost |
|---|---|---|---|---|
| Individual pots (14–20 in) | Renters, modular layouts, easy rearranging | 12–18 in | 2–4x/week in heat waves | $25–$60 per pot + soil |
| Rectangular trough planters | Windbreaks, meadow borders, tidy design lines | 16–24 in | 1–3x/week | $80–$250 each |
| Self-watering planters | Busy schedules, travel, consistent moisture | 12–18 in (with reservoir) | Top up 1–2x/week | $60–$180 each |
| DIY fabric grow bags | Low budget, lightweight, good root aeration | 12–18 in | 3–5x/week (dries faster) | $6–$20 each |
Step-by-step setup: build your rooftop habitat in a weekend (plus follow-up week)
This is the workflow I use to keep projects practical and prevent expensive mistakes.
- Measure and sketch. Mark door swing, drains, vents, and the path you’ll actually walk. Tape out a 30–36 inch path with painter’s tape so you can feel it.
- Place windbreak planters first. Put your tallest grasses or screen planters on the prevailing wind side. On many roofs, that’s the west or northwest, but verify with your observations.
- Set the seating pad. Give yourself at least a 7 ft x 10 ft zone for two chairs and a small table, or 6 ft x 6 ft for a compact bistro setup.
- Group containers into habitat “rooms.” Use clusters of 3 or 5 pots rather than a scattered collection. Clusters reduce wind toppling and look intentional.
- Mix soil deliberately. For rooftop natives, aim for a fast-draining mix: roughly 60% high-quality potting mix + 30% mineral aggregate (pumice/perlite/expanded shale) + 10% compost. Avoid heavy garden soil.
- Plant tight enough to shade soil. In a 36 in x 16 in trough (4 sq ft), plant 3–5 perennials/grasses depending on mature size. For example: 1 grass + 2 flowering perennials + 1 sedge.
- Add a simple water source. Use a heavy ceramic dish 16–20 inches wide with stones for insect landing zones. Refresh every 2–3 days in hot weather.
- Mulch lightly. Use 1 inch of shredded bark or gravel mulch to reduce splash and slow evaporation. Keep mulch off crowns.
- Water in thoroughly. After planting, water until it runs out the bottom. This settles soil and eliminates dry pockets.
- Follow-up week: adjust and stake. After 5–7 days, check which pots dry fastest. Add discreet stakes for tall asters or coneflowers if wind is persistent.
Budget planning and DIY alternatives (so the project doesn’t stall)
A rooftop native habitat can be built in phases. Here are three realistic budget tiers for a small-to-medium roof area, assuming you’re planting roughly 80–140 sq ft of containers.
Lean DIY (around $300–$600): fabric grow bags, recycled containers, bagged potting mix, and smaller native plugs. Expect more frequent watering and a less “finished” look in year one.
Mid-range (around $900–$1,800): a mix of quality trough planters and pots, a hose timer, and larger 1-gallon natives for faster fill. This is the sweet spot for most homeowners and long-term renters.
Designer build (around $2,500–$5,000+): large fiberglass or metal planters, drip irrigation with two zones, seating integrated into planter edges, and mature plants. Lower daily fuss, higher upfront cost.
DIY swaps that work well on roofs:
- Wind screens: cedar lattice panels strapped to freestanding posts in heavy planters (no drilling).
- Planter benches: two long troughs with a removable wood plank between them for seating.
- Micro-pond: a watertight stock-tank style container or a glazed ceramic bowl placed inside a wider secondary tray for stability.
Maintenance expectations: what it really takes week to week
If you’re aiming for “pretty but not needy,” the biggest lever is irrigation consistency in year one. After that, native perennials generally settle into a rhythm.
Weekly time: plan on 30–60 minutes per week for watering checks, deadheading a few key plants, and tidying. In heat waves above 90°F, you may spend 10 minutes every other day checking the driest pots.
Seasonal task list
- Spring (March–May): cut back grasses and perennials to 6–8 inches before new growth; top-dress with compost (about 1/2 inch); refresh mulch if needed.
- Early summer (June): pinch asters once to keep them compact in containers; check for irrigation clogs; rotate pots if one side is scorching.
- Late summer (July–August): deep water during dry spells; watch for spider mites on stressed plants (common on hot roofs); add shade cloth temporarily if a new planting is struggling.
- Fall (September–November): leave seedheads standing; reduce watering as temperatures drop; plant a few late-season natives for next year if you find gaps.
- Winter (December–February): avoid heavy pruning; check pots after freeze-thaw cycles; if your roof is very windy, cluster pots tighter to prevent tipping.
One practical note: leaving stems through winter is not mess—it’s habitat. Many native bees overwinter in hollow stems, and birds forage seedheads. If you need a tidier look, “edit” instead of clearing: cut back only the plants closest to seating and leave the rest standing until spring.
Finishing touches that make the habitat feel intentional
Design is often the difference between “a bunch of pots” and “a rooftop garden.” Use repetition: repeat one grass (like little bluestem) in at least 3 containers to unify the space. Use a limited pot palette—two colors maximum—so the plant diversity doesn’t look chaotic.
Lighting helps too. A warm string light over seating plus one small solar uplight aimed at a grass clump makes the garden feel alive at night without over-illuminating habitat areas.
When you’re standing at the door, you should see three things: a clear path, a focal planter with the best seasonal bloom, and a sense of enclosure from your windbreak border. Everything else can be discovered as you step in—bees working the monarda, finches picking at coneflower seedheads, and that subtle shift where the rooftop stops feeling exposed and starts feeling like a place.
Citations: Xerces Society for Invertebrate Conservation (2011), guidance on native plants and pollinator habitat value; National Wildlife Federation (2020), wildlife garden principles emphasizing native plants and essential resources; Brenneisen, S. (2006), research on biodiversity potential of green roofs with diverse plantings.