Hanging Garden Ideas for Patios
You step onto the patio with a mug of coffee, hoping for a little green therapy—then reality hits. The floor is already spoken for: a grill, two chairs, maybe a bike, and that one corner that always collects random stuff. You want plants, but you don’t want to live inside a jungle gym of pots you have to sidestep every day. The answer isn’t “more containers.” It’s using the air you’re already paying rent or mortgage for.
A hanging garden can turn a blank wall into a leafy backdrop, soften a metal railing, and make a small patio feel designed rather than improvised. Below, I’ll walk you through layout strategies I use as a designer—where to hang, how high, what to plant, and how to keep it from becoming a dripping, tangled mess by midsummer.
Design principles that make hanging gardens feel intentional
Start with circulation: keep the floor clear and the path honest
Before you buy a single hook, decide where people walk and where chairs slide back. On most patios, you want a comfortable walkway of 30–36 inches from door to seating or grill zone. Hanging gardens shine when they avoid that path and frame it instead—like greenery “walls” that float above ground level.
Designer rule of thumb: anything that swings (like a hanging basket) should be at least 18 inches away from the main walking line so it doesn’t smack shoulders or get bumped constantly.
Use vertical layers: canopy, mid-story, and accent
The best hanging patios don’t rely on one row of baskets. Think in three layers:
- Canopy layer (6–7 feet high): overhead hooks, beams, pergola crossbars, or tension rods. This is where trailing plants create shade and softness.
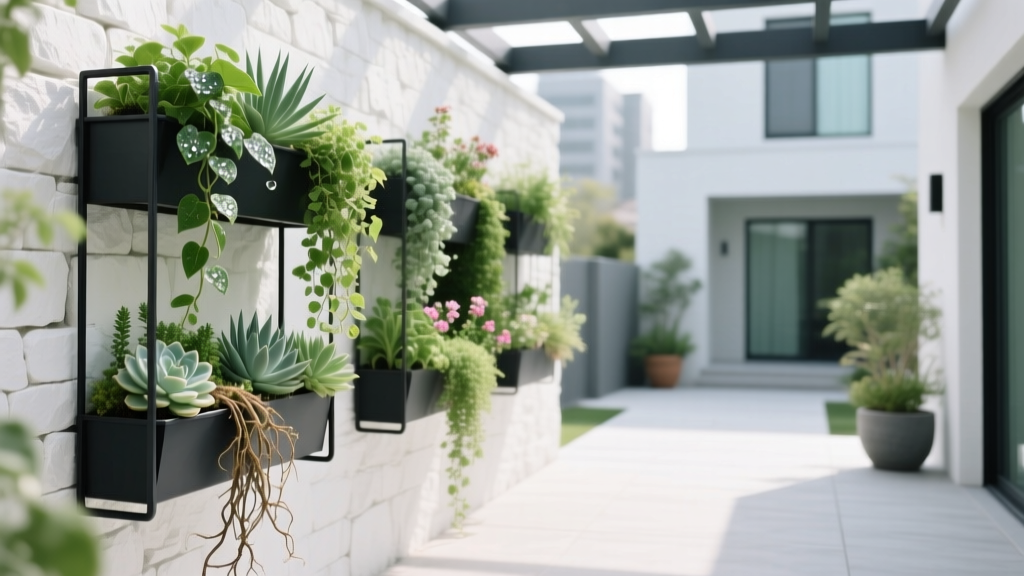
- Mid-story (3–5 feet high): wall planters, pocket panels, railing planters, and tiered shelves. This is your “green wall” zone.
- Accent layer (table height): one or two small pots on a side table or a narrow ledge—just enough to tie the look together without eating floor space.
Keep your lowest hanging plant parts (the trailing tips) at least 78 inches above the finished floor in any area people routinely walk under. Over a bistro table, you can drop lower, but aim for 60–66 inches above tabletop so guests can see each other.
Plan for water: drip control is design
If you’ve ever watered a hanging basket and watched it pour onto your neighbor’s balcony below, you already know: hanging gardens are as much about water management as aesthetics.
Use saucers, self-watering inserts, or lined baskets. And group thirsty plants together so you’re not watering everything daily just to keep one fuchsia alive. The U.S. Environmental Protection Agency notes that outdoor water use can be significant—often a large share of household consumption (EPA, 2023). On patios, “significant” can also mean “annoying,” especially when runoff stains concrete or wood.
Match scale to the patio: fewer, bigger gestures
On a small patio, many tiny items read cluttered. Instead of ten little pots, do:
- 2–3 statement hangers (12–14 inch baskets) as focal points
- 1 vertical panel (around 24 inches wide) for herbs or foliage
- 1 railing run for rhythm and color
As a reference, a typical 12-inch hanging basket holds about 3–5 plants depending on vigor. A 14-inch basket can carry 5–7 if you mix trailing and mounding types with similar water needs.
Layout strategies (with dimensions you can actually use)
The “green backdrop wall” (best for privacy and renters)
If you’re staring at a blank fence or a neighbor’s view, build a hanging composition that reads like a living mural.
What it looks like: A row of wall-mounted planters or a pocket panel at eye level, with two hanging baskets above to soften the top edge.
Recommended dimensions:
- Mount the main panel so the center sits at 54–60 inches from the floor (comfortable viewing and tending height).
- Leave 8–12 inches between wall planters for airflow and easier watering.
- Hang baskets so the hook point is at 84–96 inches high, depending on trailing length.
DIY alternative for renters: Use a freestanding grid trellis (often 72 inches tall) leaned against the wall and weighted with heavy planters. Clip small pots to the grid with S-hooks—no drilling required.
The “railing ribbon” (best for narrow balconies/patios)
Railings are prime real estate because they give you linear planting without consuming floor depth.
Spacing guidance: Place railing planters every 18–24 inches for a continuous look without overcrowding. If wind is strong, tighten to 18 inches so the mass reads intentional and stable.
Safety note: Use railing planters with locking brackets rated for outdoor use. If you’re on an upper floor, choose enclosed-bottom boxes or add drip trays to prevent runoff.
The “ceiling grid” (best for pergolas, covered patios, and big impact)
If you have overhead structure—even a simple pergola—you can create a ceiling garden that feels like an outdoor room.
Layout strategy: Install hooks in a grid and repeat two basket sizes (for rhythm). A practical grid is 24 inches on center (hook to hook). That spacing keeps mature baskets from tangling while still reading lush.
Weight planning: A well-watered 12–14 inch basket can weigh 15–25 lb. Make sure your beam, bracket, or ceiling anchor is rated appropriately and installed into solid structure—not just thin trim.
“Vertical and hanging plant systems succeed when maintenance access is designed in from the start—easy reach, easy drainage, and predictable irrigation.” — Royal Horticultural Society guidance on vertical planting (RHS, 2021)
Choosing containers and hardware: what to buy (and what to skip)
The container is not just a holder—it’s your watering schedule, your plant health, and your mess control.
| Hanging system | Best for | Typical cost (USD) | Watering frequency (summer) | Notes |
|---|---|---|---|---|
| Coir-lined wire basket (12–14") | Classic flowers, trailing mixes | $12–$30 each | 3–5x/week | Add a plastic liner to reduce drip and drying. |
| Self-watering hanging basket | Busy schedules, hot patios | $25–$60 each | 1–3x/week | Great for consistent moisture lovers like fuchsia. |
| Wall pocket felt panel | Herbs, small foliage plants | $20–$80 | 2–5x/week | Can dry fast; best with drip line or careful hand watering. |
| Railing planter box (24–30") | Linear color, herbs, privacy | $18–$55 each | 2–4x/week | Use drip trays; check bracket security. |
| DIY bottle/pipe planters | Ultra-low budget, renters | $0–$15 | 2–5x/week | Works best for drought-tolerant plants; watch heat buildup. |
If you want a single upgrade that makes everything easier, spend on quality potting mix and a moisture-retentive amendment. A bag of premium container mix is often $12–$20, and it’s the difference between “watering constantly” and “watering normally.”
Plant selection: specific varieties that earn their keep
First, match plants to sunlight hours on your patio
Use a simple rule: track direct sun for one day. Most patios fall into one of these categories:
- Full sun: 6+ hours of direct sun (hot, bright exposures)
- Part sun/part shade: 3–6 hours direct sun
- Bright shade: under 3 hours direct sun, but good ambient light
According to the Royal Horticultural Society, most flowering plants perform best with adequate light and consistent watering, while shade-loving foliage plants tolerate lower light but still need moisture management (RHS, 2021). That’s exactly why patios do well with foliage-forward designs in shade and flower-forward designs in sun.
Reliable trailing plants for hanging baskets (and why they work)
For full sun (6+ hours):
- Calibrachoa (Million Bells): nonstop blooms, handles heat, trails neatly; great in 12–14" baskets.
- Verbena ‘Tapien’ series: vigorous trailing, pollinator-friendly, thrives in sun and wind.
- Sweet potato vine (Ipomoea batatas) ‘Marguerite’ or ‘Blackie’: bold foliage, fast coverage; use as the “draping” element.
- Trailing lantana: heat-tough color; excellent for hot concrete patios.
For part shade (3–6 hours):
- Fuchsia (trailing types like ‘Dark Eyes’): dramatic blooms; keep evenly moist, avoid harsh afternoon sun.
- Bacopa (Sutera cordata): delicate flowers that soften edges; loves consistent moisture.
- Lobelia erinus (trailing): cool-season sparkle; strongest in spring/early summer in many regions.
For bright shade (under 3 hours):
- Pothos (Epipremnum aureum) in summer outdoors: forgiving trailing foliage; bring inside before cool nights.
- Boston fern (Nephrolepis exaltata): classic hanging texture; best with higher humidity and regular watering.
- Scindapsus pictus: silver-splashed leaves that read “designed” even without flowers.
Herbs that behave in vertical and hanging setups
Herbs are practical, but only if you choose varieties that won’t outgrow their pockets immediately.
- Thyme ‘Creeping’: drapes well, drought-tolerant, stays compact.
- Oregano ‘Greek’: trailing habit, tough in containers, great for sunny railings.
- Mint (in its own pot): vigorous—use it as a “feature plant” alone so it doesn’t bully others.
- Basil ‘Genovese’: best in a mid-story planter where you can pinch weekly; needs 4–6 hours sun for strong growth.
For edible hanging baskets, keep spacing generous: plant herbs about 6–8 inches apart so airflow reduces mildew risk and harvesting is easy.
Step-by-step: build a hanging patio garden that stays tidy
Use this sequence to avoid the classic mistake: buying plants first and then improvising hardware.
- Map the patio in 10 minutes. Sketch the footprint and mark the clear walking zone of 30–36 inches. Note sun hours (full sun, part, bright shade).
- Pick one main vertical surface. Fence, wall, railing, or overhead beam—choose the one you see most from inside.
- Choose two container types max for cohesion. For example: (a) railing boxes + (b) 2 hanging baskets. Or: (a) pocket panel + (b) 2 matching baskets.
- Install hardware properly. Use anchors rated for outdoor use and the expected load. Assume 20 lb per wet basket; don’t guess.
- Pot up with the right mix. Fill containers with quality potting mix, leaving 1 inch headspace to catch water.
- Plant in a simple formula. One “trailer” (like sweet potato vine) + one “mounder” (like calibrachoa) + one “spiller/filler” (like verbena) per 12" basket—then adjust based on vigor.
- Water deeply once to settle. Water until it runs slightly, then stop. Add drip trays or liners where needed.
- Set a maintenance rhythm. Put a small watering can or hose quick-connect near the door so care is frictionless.
Three real-world patio scenarios (with design fixes)
Scenario 1: The renter’s no-drill patio (6' x 10') with a blank wall
The problem: You can’t drill into stucco, and floor space is limited. You still want greenery visible from the sofa inside.
The layout: A 72-inch freestanding grid trellis leaned against the wall, weighted by two heavy containers at the base. Add 6–8 clip-on pots and one hanging basket from the top bar using an S-hook.
Plant palette: Pothos for trailing reliability, scindapsus for visual texture, and a pot of mint isolated so it doesn’t take over. Add one sun-tolerant flower basket if you get at least 4 hours of sun (calibrachoa is a safe bet).
Budget snapshot: Trellis $35, hooks/clips $12, pots $24, potting mix $18, plants $60–$90. Total: about $150–$180 depending on plant size.
Scenario 2: A sunny patio with pergola beams (12' x 12') that feels harsh at noon
The problem: The space is bright and usable, but it lacks softness and shade—everything feels exposed.
The layout: Install a hook grid at 24 inches on center across two pergola bays. Hang 4 baskets (two 14" and two 12") in an alternating pattern so it looks designed, not random. Keep the central seating zone clear and hang baskets around the perimeter for a “green ceiling” effect.
Plant palette: Trailing lantana + verbena for heat tolerance, plus sweet potato vine for bold drape. Add one basket with trailing rosemary (sunny, fragrant) if you can water consistently.
Cost snapshot: Four baskets $80–$180 depending on style, plants $120–$200, potting mix $30, heavy-duty hooks/chain $25. Total: roughly $255–$435.
Scenario 3: A narrow balcony/patio with railing exposure and wind
The problem: Wind dries everything out and whips hanging baskets around. You need stable planting that won’t constantly drip or snap.
The layout: Skip swingy baskets and go with railing planters every 18 inches. Add one wall-mounted pocket panel on the most sheltered wall for herbs.
Plant palette: Thyme (creeping) and oregano in railing boxes, plus compact sedums for drought tolerance. For color, choose calibrachoa (sun) or bacopa (part shade) but keep irrigation consistent.
Maintenance upgrade: A simple gravity-fed drip kit can cost around $30–$60 and is often worth it on windy exposures where hand-watering becomes daily.
Budget considerations and smart DIY swaps
A hanging patio garden can be done three ways: thrifted and clever, mid-range and cohesive, or premium and low-maintenance.
- Low-budget ($50–$120): DIY bottle planters, thrifted baskets, basic potting mix, and tough plants like pothos, sedum, thyme. Trade-off: more frequent watering and a more “eclectic” look.
- Mid-range ($150–$350): Matching railing boxes or baskets, better mix, a consistent color palette, a few statement plants. Trade-off: still some hand-watering in summer.
- Higher-end ($350–$800+): Self-watering systems, drip irrigation, premium containers, larger plant sizes for instant impact. Trade-off: upfront cost, but less time weekly.
DIY alternative I recommend often: line a coir basket with a cut-to-fit plastic liner (even a reused nursery pot sleeve) and poke a few drainage holes low on the sides rather than the bottom. That reduces staining and directs drips into a saucer.
Maintenance expectations (so it stays pretty after the first month)
Most hanging gardens fail for one reason: they dry out faster than ground-level pots. Expect this baseline:
- Time per week: 20–40 minutes for a small setup (2–4 baskets + railing boxes), including watering and deadheading.
- Watering: In peak summer heat, many baskets need water 3–5 times per week; self-watering containers can reduce that to 1–3 times.
- Feeding: Apply a liquid fertilizer every 7–14 days for heavy bloomers like calibrachoa and verbena, or use a slow-release fertilizer at planting and supplement as needed.
- Grooming: Pinch basil weekly; trim back leggy trailers by 1/3 midseason to refresh growth.
Seasonal tasks:
- Spring: Refresh the top 2 inches of potting mix; check hardware for rust or loosening.
- Mid-summer: Deep soak baskets in a tub for 10–15 minutes if water starts running through too fast (a sign the mix is hydrophobic).
- Fall: Bring tender plants (pothos, scindapsus, some fuchsias) indoors before cold nights; compost annuals and store hardware.
If you want the lowest-effort routine, design for it: choose drought-tolerant plants, reduce the number of containers, and invest in drip trays or self-watering baskets so care stays consistent even when life gets busy.
Once your hanging garden is up, you’ll notice the patio changes behavior. People sit longer. The hard edges soften. And the space feels taller—like you borrowed a few extra feet of room from the sky. Keep the floor clear, keep water under control, and let the plants do what they’re good at: making a small outdoor space feel like a real garden.
Sources: U.S. Environmental Protection Agency (EPA), 2023; Royal Horticultural Society (RHS), 2021.