Terrace Gardening Tips for Urban Homes
The lift doors open onto your terrace and—there it is again: a bright, wind-swept slab that cooks in afternoon sun, collects dust in the corners, and somehow makes every plant you’ve tried look a little tired. You want shade, something fragrant near the chair, maybe tomatoes you can actually pick, but you don’t want to drill into waterproofing or spend every weekend hauling watering cans. The good news: a terrace is less a “small garden” and more a design puzzle. Once you treat it like a livable outdoor room with sun, wind, weight, and water as your four constraints, the layout becomes clear.
I’m going to walk you through terrace design the way I would on a site visit: measure first, place the big elements, then choose plants that match the microclimate you’ve created. Along the way, you’ll see three real-world setups (renter-friendly, family terrace, and high-rise windy corner), specific dimensions and spacing, and a few budget-conscious swaps that keep the project practical.
Start with constraints: sun, wind, weight, and water
Map your sun in 10 minutes
Before buying a single pot, do one simple observation day. Check the terrace at 9:00 am, 12:00 pm, and 3:00 pm. Note which areas get direct sun and for how long. Most fruiting crops (tomatoes, peppers, basil) want 6–8 hours of sun; leafy greens and many ornamentals can thrive with 3–5 hours.
Keep your notes simple: “Hot zone” (6+ hours), “Bright shade” (3–5 hours), “Low light” (under 3 hours). This will determine not just plants, but also where you place seating—no one relaxes in a heat funnel at 3 pm.
Read the wind like a designer
High-rise terraces behave like wind tunnels. A steady breeze dries containers fast and can shred tender leaves. If your railing is open metal, assume you’ll need a windbreak for anything taller than 60–90 cm. Your easiest fix is a permeable screen (reed fencing, shade cloth) that reduces wind without creating turbulence.
“Windbreaks are most effective when they are porous—about 40 to 50 percent open—so they slow wind rather than forcing it up and over.” — University of Minnesota Extension, Windbreak design guidance (2020)
Check weight limits and drainage realities
Many terraces are engineered for a distributed live load, but you still want to avoid concentrating extreme weight in one corner. Wet soil is heavy. As a rough planning number, a 40-liter container filled with moist potting mix can weigh around 20–30 kg depending on materials and moisture. Spread large planters along structural lines (near walls/columns) rather than clustering them in the middle.
Drainage matters just as much. Assume you will spill water. Use saucers for small pots, but for large containers, place them on pot feet or risers so water doesn’t stain surfaces or pool against waterproofing seams. If you can’t let water run freely, plan for a catch-tray system and water more slowly.
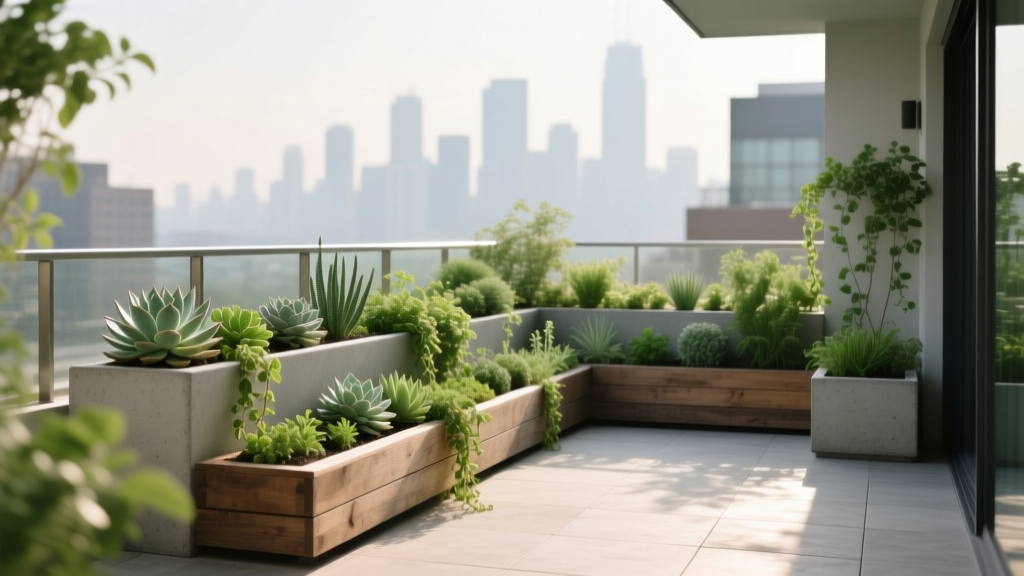
Layout strategies that make a terrace feel bigger (and work better)
Think “zones,” not “pots everywhere”
A terrace garden becomes satisfying when each area has a job. I typically design three zones:
- Living zone: chair/bench + side table + fragrance or soft foliage nearby.
- Growing zone: sunniest strip for edibles and high-light ornamentals.
- Utility zone: watering, storage, compost bucket, and a place to stage plants.
Even on a compact terrace, these zones can be as small as 0.9 m x 1.2 m for seating and 0.6 m deep for a growing run along a wall or railing.
Use the “edge run” to save floor space
The easiest way to keep a terrace walkable is to run planters along edges, leaving a clear central path. Aim for a minimum walking clearance of 75–90 cm. If your terrace is narrow, choose rectangular planters that are 25–35 cm deep (front-to-back) and go vertical with trellises.
Build vertical structure first: trellis, screen, and one anchor plant
Structure is what makes a terrace feel designed rather than cluttered. Place:
- One vertical element (trellis or screen) about 1.5–1.8 m tall for privacy and to cut wind.
- One anchor plant with strong form (a dwarf citrus, an olive in a pot, or a clumping bamboo in a contained planter where appropriate).
- Two to three mid-height layers (shrubs, herbs) and then smaller spillers at the edge.
This layered approach improves shade, reduces evaporation, and gives you places to tuck seasonal color without redesigning everything.
Right-size containers to the job
Container size is the difference between thriving and constant watering. As practical standards:
- Tomatoes: minimum 30–40 liters per plant; stake or trellis immediately.
- Peppers/eggplant: 15–25 liters per plant.
- Herbs: 3–10 liters each (larger for rosemary and mint—mint should be isolated).
- Leafy greens: 15–20 cm soil depth; trough planters work well.
If you’re buying new, expect basic plastic planters at roughly $10–$25 for medium sizes and $35–$80 for large, depending on finish. DIY food-grade buckets can drop that cost to $3–$8 each (drill drainage holes and add a saucer).
Step-by-step: set up a terrace garden that stays tidy
Here’s the setup order I use so the space looks good quickly and functions for years.
- Measure your terrace (length, width, and door swing). Mark a 75–90 cm walking lane with painter’s tape.
- Track sun for one day and label zones: hot, bright shade, low light.
- Place the living zone first: chair/bench positioned so you’re not staring into the sun at 3 pm.
- Add your vertical element (freestanding trellis or screen). For renters, use weighted bases or planters as anchors—no drilling.
- Set the largest containers along edges or near structural walls. Leave at least 10–15 cm gap from walls for airflow and cleaning.
- Install irrigation: a simple drip kit on a timer is usually cheaper than replacing stressed plants. A basic kit can run $30–$70 plus a timer around $20–$45.
- Fill with the right mix: use a quality potting mix (not garden soil). Add 10–20% compost for nutrition and moisture retention.
- Plant by height: tallest near the screen/wall, mid-layer in front, spillers at edges.
- Mulch the top with 2–3 cm of coco chips or fine bark to slow evaporation and keep the surface neat.
- Light and safety check: ensure the path is clear and you can access drains and taps without moving heavy pots.
Plant selection that actually works on terraces
Terraces are extreme environments: reflected heat, gusty wind, and faster drying. Your best plants are either tough Mediterranean types, compact cultivars bred for containers, or edibles that you can keep productive with consistent moisture.
Edibles for the “hot zone” (6–8 sun hours)
Choose compact and container-bred varieties that won’t punish you if you miss a watering once.
- Tomato ‘Sungold’ (cherry): exceptionally productive in containers; fruit sets well in warmth. Give one plant a 40-liter pot and a trellis.
- Tomato ‘Roma’ (paste): more forgiving shape for small spaces; good for balcony sauces. Use a 30–40 liter pot.
- Chili pepper ‘Apache’: compact, heavy fruiting, great for 15–20 liter pots; handles heat well.
- Sweet pepper ‘California Wonder’: productive with 6+ hours sun; use 20–25 liter containers.
- Basil ‘Genovese’: loves warmth; plant 2–3 in a 10–15 liter pot, spaced 15–20 cm apart.
For pollination support, tuck in marigold ‘Tagetes patula’ and nasturtium as edible flowers that also soften planter edges.
Plants for bright shade (3–5 sun hours)
This is where terraces become lush. Bright shade is perfect for foliage and steady harvests.
- Lettuce ‘Little Gem’: compact heads; harvest in 30–50 days. Space 15–20 cm.
- Swiss chard ‘Bright Lights’: colorful stems, long season, tolerant of partial sun; space 25–30 cm.
- Mint (Mentha): vigorous and forgiving, but keep it isolated in its own 5–10 liter pot.
- Parsley ‘Italian Flat Leaf’: reliable in containers; steady cutting herb.
- Begonia (wax or tuberous types): excellent container performers for filtered light; continuous color without fuss.
Wind- and drought-tolerant ornamentals (great for exposed terraces)
When wind is constant, go for smaller leaves and tougher textures.
- Lavender (Lavandula angustifolia ‘Hidcote’): thrives with sun and sharp drainage; fragrance near seating is a design win. Use a 10–20 liter pot.
- Rosemary ‘Arp’ or ‘Tuscan Blue’: resilient, architectural, and useful in the kitchen; give it a larger pot (15–25 liters) for longevity.
- Geranium (Pelargonium): classic terrace plant; handles heat and wind better than many flowering annuals.
- Dwarf olive (Olea europaea): strong form, silvery foliage, and heat tolerance; best in a substantial container (40+ liters).
Plant choice aligns with what research consistently shows about microclimates: urban surfaces increase heat and dryness. The U.S. EPA notes that urban areas can run significantly warmer than surrounding rural areas due to the heat island effect (EPA, 2023). On terraces, that difference is amplified by reflected sunlight and wind exposure.
Comparison table: choose the right container strategy
| Container approach | Best for | Typical size | Pros | Watch-outs | Approx. cost |
|---|---|---|---|---|---|
| Rectangular trough planters | Rail edges, herbs, greens | 80–100 cm long, 20–30 cm deep | Maximizes edge space; clean lines | Dries faster in wind; needs consistent watering | $25–$90 |
| Large single pots (30–50 L) | Tomatoes, citrus, anchor plants | 35–50 cm diameter | Stable moisture; strong visual structure | Heavier; move less often | $35–$120 |
| Grow bags | Renters, seasonal edibles | 20–40 L | Lightweight; breathable; budget-friendly | Needs more frequent watering in heat | $6–$20 |
| Vertical pocket planters | Strawberries, small herbs | 50–100 cm tall panels | Big planting area with tiny footprint | Uneven watering; top pockets dry first | $20–$75 |
Three real-world terrace scenarios (and how I’d design each)
Scenario 1: The renter’s terrace (no drilling, minimal mess)
Space: 1.2 m x 3 m terrace, bright shade in the morning and strong afternoon sun on one end. Goal: privacy + herbs + a few flowers without permanent fixtures.
Layout move: Create a privacy-and-green wall using two 90–100 cm trough planters placed end-to-end along the railing, each with a lightweight trellis inserted into the soil. Add a narrow bench (30–35 cm deep) against the wall so the center remains walkable.
Planting plan:
- Bright shade trough: parsley, chives, lettuce ‘Little Gem’ in succession sowings every 2–3 weeks
- Hot end: rosemary + basil ‘Genovese’ + marigolds for color
- One grow bag with tomato ‘Sungold’ where sun is strongest
DIY alternative: Use food-safe buckets and a freestanding clothing rack as a trellis frame. Total starter spend can be kept around $80–$150 if you reuse containers and buy small plants.
Scenario 2: A family terrace that needs shade and durability
Space: 2.5 m x 4 m terrace, full sun for 7+ hours. Goal: shade, kid-safe circulation, and plants that survive missed waterings.
Layout move: Put a shade element first: a cantilever umbrella with a 3 m canopy or a shade sail fixed to non-invasive anchor points. Keep a clear run from the door to seating at 90 cm.
Planting plan:
- Two large anchor pots (45–50 liters) with dwarf olive or a standard bay (Laurus nobilis) to frame the seating area
- Edible strip: two 40-liter containers for tomatoes (‘Roma’ + ‘Sungold’) and one 25-liter pot for peppers
- Underplant with geraniums for color and toughness
Practical safety tip: Use heavier ceramic-look resin planters instead of lightweight plastic near railings; in gusty weather, a tall light pot can tip. If you need to reduce weight, widen the base: choose squat planters with a 40–50 cm diameter instead of narrow columns.
Scenario 3: The high-rise windy corner (plants keep snapping, soil dries daily)
Space: 1.8 m x 2.2 m corner terrace, open railing, strong wind most afternoons. Goal: a green screen and dependable plants, low maintenance.
Layout move: Build a porous windbreak. Attach reed screening to a freestanding frame placed inside two heavy planters. Leave a small gap under the screen so air can bleed through—this reduces turbulence.
Planting plan:
- Lavender ‘Hidcote’ and rosemary as the backbone (tough, aromatic, wind-tolerant)
- Pelargoniums for color (they don’t mind the exposure)
- Strawberries in a vertical pocket planter placed in the most sheltered spot (they like sun but hate drying winds)
Water strategy: In windy conditions, hand-watering can become a daily chore in summer. A basic dripline on a timer, set to 5–10 minutes in the early morning, often pays for itself in saved plants within one season.
Soil, feeding, and watering: keep it simple and consistent
Terrace plants fail more from inconsistent moisture than from “black thumb” issues. Containers heat up and dry out fast, especially on reflective tile or concrete.
Potting mix that doesn’t collapse
Use a quality potting mix designed for containers. Avoid digging soil from the ground—it's too dense and can suffocate roots in pots. For long-term planters (rosemary, olive, citrus), refresh the top 5–8 cm of mix each spring with compost and a slow-release organic fertilizer.
Fertilizer expectations for edibles
Tomatoes and peppers are hungry. Plan on feeding every 10–14 days during peak growth with a tomato-friendly fertilizer. If you prefer low-effort: mix a slow-release fertilizer into the potting mix at planting time and supplement with liquid feed when flowering starts.
For food safety and best practices, follow established guidance on compost and manure use. The USDA’s National Organic Program outlines intervals between raw manure application and harvest to reduce food safety risks (USDA, 2022). Even if you’re not gardening organically, it’s a sensible rule of thumb: use finished compost and avoid questionable inputs in edible containers.
Budget planning and smart DIY swaps
A terrace garden can be done on a shoestring or styled like an outdoor showroom. The trick is to spend on what changes your daily experience (comfort and irrigation) and save on what you can DIY (containers and trellises).
- Spend: a comfortable chair, a reliable watering system, and 2–3 large “anchor” containers that define the space.
- Save: use grow bags, DIY trellises (bamboo + zip ties), and start herbs from seed.
As a practical range, a starter terrace setup with 10–12 containers, potting mix, basic tools, and a few plants often lands between $150 and $450. Add drip irrigation and a timer and you might move toward $220–$550, but you’ll reduce plant losses and weekend labor.
Maintenance rhythm: what it really takes
Plan your terrace garden so it fits your schedule. A well-designed container garden is less about constant work and more about short, regular check-ins.
- Weekly time: expect 45–90 minutes total for watering checks, pruning, and harvesting once established (less with irrigation, more in heat waves).
- Daily in peak summer: a 2–5 minute walk-through to spot wilt, pests, or dry pots (especially in wind).
Seasonal task list
- Spring (setup and reset): refresh topsoil, check irrigation lines, plant warm-season crops after nights stay above 10°C.
- Summer (shape and support): tie tomatoes every week, deadhead flowers, mulch thin spots, and watch for spider mites in hot, dry weather.
- Autumn (tidy and transition): remove spent annuals, sow a final round of greens if you still have 3–5 sun hours, clean pots and tools.
- Winter (protect and plan): group pots to reduce exposure, elevate containers off cold floors, and reduce watering—most plants need far less when growth slows.
If you only do one maintenance habit: keep a small pair of snips near the door. A quick cutback of basil, a few dead leaves removed, and a tomato tied in place turns “I should deal with that” into a terrace that always looks intentional.
Once your terrace has a clear path, a wind-softening screen, and plants chosen for your sun hours—not someone else’s dream garden—you’ll notice the space changes how you use your home. The door opens and the terrace doesn’t feel like a leftover ledge anymore; it feels like a room with shade, scent, food, and a view you created on purpose.
Sources: U.S. Environmental Protection Agency (EPA), Heat Island Effect overview (2023). USDA National Organic Program, compost/manure guidance and food safety intervals (2022). University of Minnesota Extension, windbreak porosity and effectiveness guidance (2020).