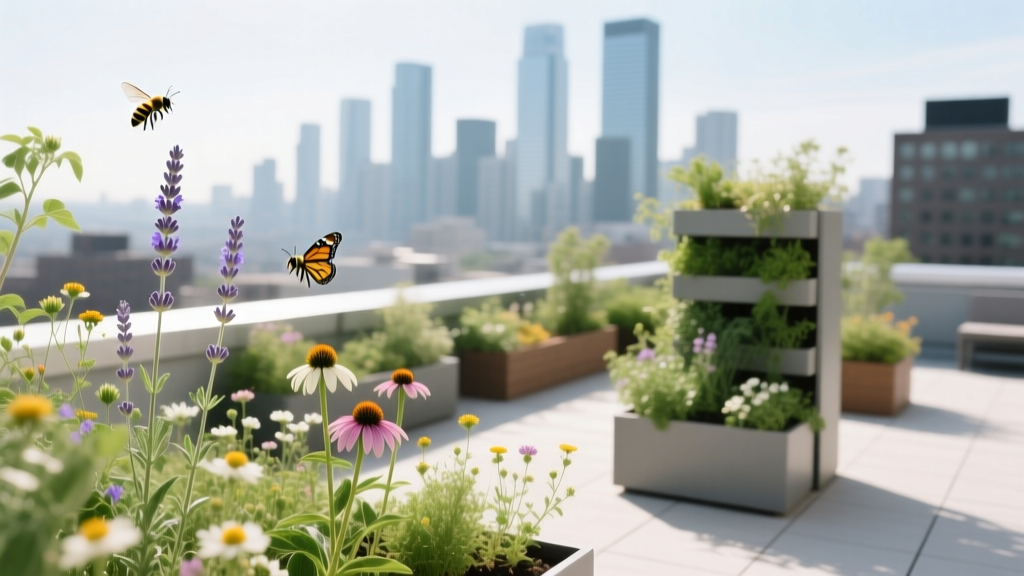
Urban Rooftop Pollinator Garden
The wind up here is different. It’s sharper, a little saltier in coastal cities, and it always seems to find the one loose corner of your outdoor rug. You step onto the roof with coffee, excited to garden—then the reality hits: blazing sun bouncing off brick, a narrow footprint, a landlord who doesn’t want “mess,” and a rooftop that feels more like a skillet than a backyard. The good news is that pollinator gardens actually thrive in these conditions when you design for them. Think of this project as building a small, durable habitat—one that looks intentional from the street and performs like a tiny ecosystem under pressure.
I’m going to walk you through a rooftop pollinator layout the way I’d sketch it for a client: start with constraints (weight, wind, and water), shape movement and seating, then build layered planting that blooms from spring to frost. Along the way you’ll see specific plant varieties, spacing, container sizes, and a few real-life scenarios (renter-friendly, family-friendly, and “I travel a lot” friendly) so you can pick the version that matches your life.
Start with the rooftop realities (so your garden lasts)
1) Sun and heat: plan for 6–10 hours of direct light
Most rooftops get longer, harsher sun exposure than ground-level gardens. If you’re seeing 6–10 hours of direct sun in midsummer, you’ll want plants that don’t sulk in heat and containers that buffer roots. A simple first step: observe for a day and note where full sun hits at 9 a.m., 12 p.m., and 4 p.m. You’ll usually discover a “furnace corner” (bright, windy, reflective) and a calmer zone behind a parapet wall or stair bulkhead—use both intentionally.
2) Wind: treat it like a design material
Wind is the rooftop wildcard. It dries containers fast, snaps tall stems, and can make pollinators less likely to linger if there’s no shelter. We’ll use a few tactics: heavier planters at the perimeter, shrubs or sturdy grasses as living wind buffers, and a low “pocket meadow” in the most protected area. Even a 36-inch-high parapet can create a calmer microclimate directly behind it.
3) Weight and water: design with safety and drainage in mind
Before you buy a single pot, confirm what you’re allowed to do. Building limits vary, so check with your building manager/HOA and, if needed, a structural professional. The goal is to avoid concentrating loads in one spot. Spread containers out, and don’t block drains. Use pot feet or risers so water can flow under planters and you’re not creating puddles against roofing membranes.
“Urban green roofs can support diverse pollinators when they include a variety of flowering plants and structural diversity.” — Hall et al., 2017
That principle—variety plus structure—is the backbone of the layout we’ll build.
A layout that feels designed: zones, paths, and layered planting
Choose a workable footprint: a sample 10' × 12' rooftop garden
Let’s use a common starting space: 10 feet by 12 feet (120 sq ft). You can scale up or down, but this size is big enough for meaningful bloom and small enough to manage with containers. The plan uses three zones:
Zone A: Perimeter habitat strip (wind buffering + long bloom)
Zone B: Central “pollinator bar” (high-nectar plants, easy viewing)
Zone C: Small seating nook (you’ll actually use the roof, which means you’ll maintain it)
Perimeter strategy: anchor the edges with heavier planters
Start with the perimeter because it’s where wind and visual clutter show first. Use six rectangular planters around the edges—each about 36" L × 18" W × 18" H. That size is stable, holds enough soil for deep-rooted perennials, and visually frames the space like a low hedge.
Spacing guideline: place planters with 6–12 inches between them for drainage access and to prevent one long, continuous weight line. If your roof is narrow, reduce the gap but keep a way to inspect roof surface and drains.
Create one clear path (even if it’s tiny)
Pollinator gardens can look chaotic if you don’t give the eye a resting line. In small rooftop spaces, a 24-inch-wide path is enough. Use two or three interlocking deck tiles strips, gravel trays, or a single outdoor runner (secured at edges). That path is the “spine” that makes containers look intentional.
Build layers: tall-back, mid, and spillers
Think like a stage set:
- Back layer (18–48 inches): grasses and sturdy perennials that handle wind.
- Middle layer (12–24 inches): long-blooming nectar plants.
- Front/spill layer (4–12 inches): thyme, sedums, trailing flowers—softens edges and shades soil.
This layered approach also improves pollinator use: different insects prefer different flower shapes and heights. The Xerces Society emphasizes that pollinator habitat is stronger with a diversity of flowering species and bloom times (Xerces Society, 2023).
Step-by-step setup (designed for a weekend build)
- Map sun and wind. Mark your windiest edge and your calmest corner. Aim to put taller planters on the windward side.
- Set your “no-go” areas. Keep a 18-inch buffer around roof drains and access hatches.
- Lay the path. Establish a 24-inch walkway from the door to seating first; everything else is arranged around it.
- Place perimeter planters. Start with 6 planters (36" × 18" × 18"). If your budget is tight, begin with 3 and expand.
- Add 2–3 large “feature” containers. Use 20–24 inch diameter round pots for a small shrub or grass + underplanting.
- Fill with a lightweight container mix. Avoid heavy garden soil. Plan on roughly 2.5–3 cubic feet of potting mix per 36" × 18" × 18" planter (depending on shape and drainage layers).
- Plant in clumps. For pollinators, repeat the same plant in groups of 3–5 rather than singletons—easier for bees to forage efficiently.
- Install a simple drip line (optional but powerful). A basic kit and timer saves your garden in heat waves and travel weeks.
- Mulch and label. Add 1–2 inches of fine bark or composted mulch to slow drying; label plants so you remember what you loved (or what failed) next season.
Plant selection: specific varieties that thrive on rooftops
The best rooftop pollinator planting is tough, long-blooming, and repeatable. You’re not chasing rarity; you’re building reliable nectar and pollen while keeping the look clean. Below are proven container performers with strong pollinator value. (Whenever possible, choose regionally native species—these are widely available options with strong performance.)
Core perennials (the backbone)
Lavandula angustifolia ‘Hidcote’ (English lavender)
Why it works: heat tolerant, fragrant, strong bee magnet, tidy shape. Container tip: plant one per 16–18 inch pot; keep crown slightly above soil line for drainage.
Nepeta × faassenii ‘Walker’s Low’ (catmint)
Why it works: blooms for months, handles wind, softens edges, loved by bees. Spacing: 18 inches between plants in a long planter.
Echinacea purpurea ‘PowWow Wild Berry’ (coneflower)
Why it works: summer nectar, sturdy stems, seedheads for birds later. Spacing: 12–16 inches. It reads modern when repeated in clumps.
Salvia nemorosa ‘Caradonna’ (ornamental sage)
Why it works: vertical accent, long bloom, high pollinator traffic, great in wind. Spacing: 12–18 inches.
Achillea millefolium ‘Moonshine’ (yarrow)
Why it works: drought tolerant, flat landing-pad flowers for beneficial insects. Spacing: 18 inches; don’t overwater.
Grasses and structural plants (wind-proofing that looks intentional)
Calamagrostis × acutiflora ‘Karl Foerster’ (feather reed grass)
Why it works: upright, minimal flopping, handles rooftop gusts. Use: one plant in a 20–24 inch pot as a “corner anchor.”
Panicum virgatum ‘Northwind’ (switchgrass)
Why it works: strong vertical habit; great autumn color; provides cover and movement without chaos. Use: one per 20-inch pot, underplant with thyme or sedum.
Herbs and low growers (the spill and the scent)
Thymus serpyllum (creeping thyme)
Why it works: drought tolerant, tiny flowers for small bees, living mulch that shades soil. Spacing: 8–12 inches.
Origanum vulgare ‘Hot & Spicy’ (ornamental oregano)
Why it works: bees love it; airy blooms; drought tolerant once established. Great at the front edge of planters.
Sedum ‘Autumn Joy’ (Hylotelephium)
Why it works: late-season nectar when pollinators need it most; nearly indestructible in containers. Spacing: 12–18 inches.
Annuals for instant impact (and extended bloom)
Zinnia elegans ‘Profusion Orange’
Why it works: nonstop color, attracts butterflies, thrives in heat. Spacing: 10–12 inches.
Cosmos ‘Sensation Mix’
Why it works: light, airy, pollinator-friendly; fills gaps quickly. Container tip: stake lightly in windy sites.
Lobularia maritima (sweet alyssum)
Why it works: excellent for hoverflies and beneficial insects; cool-season strength. Use as a front-edge spiller.
A note on pesticides (keep the “welcome sign” up for pollinators)
Avoid systemic insecticides in pollinator containers. Pollinator health organizations consistently advise reducing pesticide exposure and prioritizing integrated pest management. If aphids show up, start with a sharp water spray, then insecticidal soap as a last resort, applied at dusk when pollinators are less active.
Comparison table: three rooftop pollinator layout styles
| Layout style | Best for | Typical container count | Watering needs | Visual vibe |
|---|---|---|---|---|
| Perimeter habitat + central pollinator bar | Most rooftops; balanced seating and habitat | 10–14 containers | Medium (lower with drip) | Designed, structured, easy to expand |
| Meadow trays (low, wide planters) | Windy roofs; minimalist look | 6–10 large trays | Low–medium | Modern, low profile, textural |
| Vertical trellis + pocket containers | Tiny spaces; privacy needs | 8–16 smaller pots + 1 trellis | Medium–high | Lush walls, layered heights, cozy |
Budget planning and DIY alternatives (real numbers)
Let’s talk cost honestly, because rooftop gardens can balloon fast. Here’s a realistic starting budget for the 10' × 12' plan using containers (not a full green roof build):
- Planters: 6 rectangular planters at $45–$120 each (resin is cheaper; metal or wood costs more). Estimated: $270–$720.
- Potting mix: roughly 20–25 cu ft total for a starter layout. At $10–$18 per 2 cu ft bag: $100–$225.
- Plants: 25–40 plants (mix of perennials and annuals) at $6–$18 each: $200–$600.
- Mulch + amendments: $20–$60.
- Optional drip kit + timer: $45–$120.
A common total lands around $500–$1,500 depending on container choice and how perennial-heavy you go.
DIY swaps that still look polished
If your budget needs to stay closer to $250–$400, here’s how I’d value-engineer without making it look temporary:
- Use fewer, larger containers. Three 24-inch pots often look better than twelve tiny ones—and they dry out slower.
- Choose plugs or smaller starter plants. They fill in by midseason if watered well.
- Repurpose food-grade buckets (with drainage holes) and sleeve them inside nicer cachepots or wood slat wraps.
- Grow from seed for annuals: zinnias and cosmos are fast and forgiving.
- Skip gravel “drainage layers.” Modern container practice favors soil volume; use pot feet for drainage instead of filling depth with rock.
Three real-world rooftop scenarios (and how I’d design each)
Scenario 1: The renter who needs everything reversible
Constraints: no drilling, no permanent irrigation, must keep roof surface accessible.
Design move: a modular grid of containers you can rearrange.
I’d use 8–10 containers max: four 36" rectangular planters for the perimeter, two 20-inch feature pots, and 2–4 smaller herb pots near the door. Choose plants that tolerate occasional missed watering: sedum, yarrow, catmint, thyme, and ‘Caradonna’ salvia. Add a shallow dish with pebbles for water (refresh often) placed near shade so it doesn’t become a hot pan.
Reality check: without drip, expect watering 3–5 times per week during heat waves.
Scenario 2: The family roof where safety and mess matter
Constraints: kids/pets, desire for seating and clear circulation, avoid “bee panic” near the door.
Design move: keep the highest-activity nectar plants slightly away from the main traffic lane.
Put your pollinator “bar” on the far side of the seating area so insects are busy where you’re watching, not where you’re stepping out. Use a 30-inch clear zone around the door with low, non-sticky plants (thyme, sedum, oregano) and keep taller bloomers (coneflower, salvia, lavender) clustered 4–6 feet away. Add one small tree-form shrub (like a compact dwarf lilac if your climate allows, or a dwarf ninebark in cooler regions) in a sturdy pot as a visual anchor and partial screen.
Reality check: you’ll still have bees—because you’re doing it right. The goal is predictable placement, not avoidance.
Scenario 3: The frequent traveler who needs resilience
Constraints: missed weeks, inconsistent watering, you still want blooms.
Design move: fewer containers, larger soil volume, and automatic watering.
Build around 5–7 big containers only. Use drought-tolerant perennials: ‘Moonshine’ yarrow, sedum, catmint, lavender, and switchgrass. Install a basic drip system with a timer set to water early morning for 10–20 minutes, adjusting for heat. Your annuals should be minimal; instead, rely on perennials and one or two tough annuals like ‘Profusion’ zinnias in peak summer.
Reality check: even drought-tolerant plants in containers need consistent water to establish. The first 4–6 weeks after planting are the most important.
Maintenance expectations (what it actually takes)
A rooftop pollinator garden is not high-maintenance, but it is high-attention during hot spells. Here’s a realistic rhythm:
Weekly time: plan on 30–60 minutes per week in mild weather, and 60–90 minutes during peak summer heat if you’re hand-watering.
Spring (setup and momentum)
- Cut back grasses and perennials before new growth.
- Top-dress containers with 1 inch compost or fresh mix.
- Check irrigation lines (if installed) and flush them.
Summer (bloom management)
- Deadhead salvia, catmint, and zinnias to extend bloom.
- Water deeply; aim for thorough saturation rather than quick sips.
- Stake tall stems if windstorms are common.
Fall (late nectar and winter prep)
- Leave some seedheads (coneflower, grasses) for birds and winter structure.
- Reduce watering as temperatures drop.
- Group pots closer together to reduce wind desiccation in winter (if your roof allows).
Winter (depending on climate)
In cold climates, containers are harsher on roots than in-ground planting. Choose cold-hardy perennials and larger containers when possible. Avoid letting pots sit waterlogged. If you’re in a freeze-thaw region, pot feet and clear drainage are non-negotiable.
Small design details that make pollinators stay longer
Use repetition. A rooftop garden looks calmer when you repeat 3–4 main plants (for example: lavender, salvia, coneflower, sedum) and then add seasonal accents.
Provide a water source. A shallow dish with stones gives insects a safe landing. Place it where it won’t bake in direct afternoon sun and refresh it every few days.
Aim for continuous bloom. Your goal is to have something flowering from early spring through fall. That can be as simple as: spring thyme/alyssum, summer salvia/lavender/coneflower, late sedum.
Design for observation. Put your most active flowers within 3–6 feet of your seating so you can enjoy the garden’s “show.” When you enjoy it, you maintain it.
Research supports the idea that even small urban green spaces can support pollinators when designed with floral diversity and bloom continuity (Baldock et al., 2015). That’s encouraging news for rooftops: you don’t need acres—you need smart plant choices and a layout that keeps them healthy.
A rooftop pollinator planting recipe (copy/paste friendly)
If you want a straightforward starter palette for a 10' × 12' space, here’s a balanced mix that reads cohesive and feeds pollinators:
- 3 × Lavandula ‘Hidcote’
- 5 × Salvia ‘Caradonna’
- 5 × Nepeta ‘Walker’s Low’
- 5 × Echinacea ‘PowWow Wild Berry’
- 3 × Sedum ‘Autumn Joy’
- 2 × Panicum ‘Northwind’ (or 2 × ‘Karl Foerster’)
- 6 × Thymus serpyllum as edging/spill
- 10 × Zinnia ‘Profusion Orange’ (summer punch, optional)
Plant the grasses and taller perennials toward the windward edge, keep catmint and thyme spilling along the path side, and tuck zinnias into gaps for instant color.
When the wind kicks up and the city noise drops away for a moment, you’ll start noticing new regulars: small native bees zigzagging around salvia spikes, butterflies pausing on zinnias, hoverflies patrolling for aphids. This is the quiet win of a rooftop pollinator garden—it turns an exposed, underused slab into a living space that feels both designed and generously alive, one container at a time.
Sources: Baldock, K.C.R. et al. (2015). “Where is the UK’s pollinator biodiversity? The importance of urban areas for flower-visiting insects.” Proceedings of the Royal Society B. / Hall, D.M. et al. (2017). “The city as a refuge for insect pollinators.” Conservation Biology. / Xerces Society (2023). Pollinator conservation resources and habitat guidance.