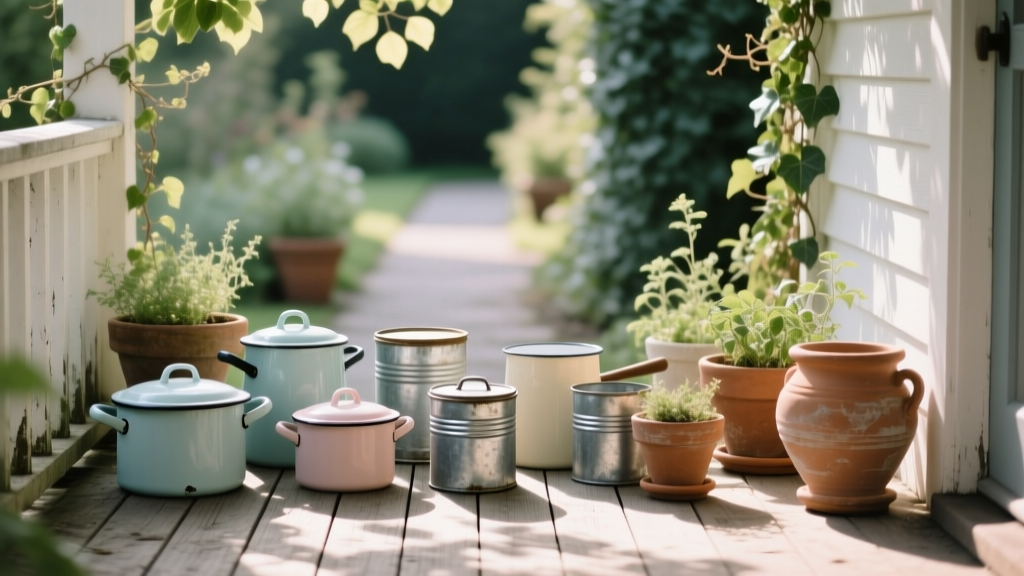
Porch Vintage Container Collection
The porch looked charming from the street—until you stepped onto it. A wobbling plastic pot by the door, a sun-faded hanging basket, and a sad little plant that seemed to be apologizing. The space wasn’t the problem. The problem was that nothing felt intentional. If you’ve got a porch that’s almost welcoming but not quite pulling its weight, a vintage container collection is one of the fastest ways to add character, season-long color, and structure—without ripping up a single square foot of ground.
Think of this as a small-scale landscape design project: we’ll create rhythm, repetition, and a sense of “rooms” using containers that look like they’ve lived a life—galvanized tubs, whiskey barrels, enamel pots, terracotta, or flea-market finds. Then we’ll plant them in a way that actually works: correct volumes, proper drainage, sunlight matching, and a maintenance plan that won’t eat your weekends.
Start With the Porch Reality Check (So the Design Fits)
Before you buy a single plant, take two measurements and one observation. This is where porch container collections fail or thrive.
Measure the “walk line” first
On most porches, the most important feature is not the railing or the steps—it’s the path people take from steps to door. Maintain a clear walking lane of at least 36 inches (common accessibility guidance and comfortable for carrying packages). If your porch is narrow, go for fewer, larger containers rather than many small ones that feel like obstacles.
Note your true light (not what you wish you had)
Track sunlight for one day. Porches are tricky: roof overhangs, neighboring trees, and house orientation can turn “full sun” into “bright shade.” Use this quick classification:
- Full sun: 6–8+ hours of direct sun
- Part sun: 4–6 hours
- Bright shade: 2–4 hours or filtered light
- Shade: under 2 hours
Write it down for each zone—near steps, by the door, and along the rail—because those microclimates can differ by 2–3 hours.
Design Principles for a Vintage Container Collection That Looks Intentional
Vintage style isn’t random. The best collections feel curated: the containers relate to each other, the plants repeat, and the layout has a clear hierarchy.
1) Choose a “container palette,” not just containers
A practical rule: pick two main materials and one accent. For example:
- Main: terracotta + galvanized steel
- Accent: enamelware or an old wooden crate liner
This keeps flea-market variety from turning into visual noise. If your porch has strong existing elements (black iron railings, warm wood floorboards), match them: galvanized pairs well with black metal; terracotta warms up gray composite decking.
2) Repeat shapes, vary heights
Use repetition to calm the eye: two matching pots flanking the door, three similar terra-cotta rounds along the rail. Then introduce height changes for energy: a tall “thriller” plant or a pedestal stand. Aim for three height tiers:
- Low: 8–14 inches (shallow bowls, window boxes)
- Mid: 16–24 inches (classic pots, crocks)
- Tall: 28–42 inches (urns, half barrels, pots on stands)
3) Work in odd numbers—except at the door
Odd-number groupings (3 or 5) feel more natural in decorative arrangements. The exception: symmetrical pairs by the entry read as “planned” and instantly elevate curb appeal.
4) Leave negative space on purpose
Not every inch needs a pot. Negative space highlights what you did choose. A good starting ratio for most porches: 60% open floor, 40% planted. If you’re working with a 6 ft x 10 ft porch (60 sq ft), that means roughly 24 sq ft worth of container footprints—often 6–10 containers, depending on size.
“A successful container composition relies on proportion and repetition—echo the same plant or form in several places so the eye reads it as a unified design rather than a collection of singles.” — University of Illinois Extension, container gardening guidance (2020)
Layout Strategies: Three Porch Plans You Can Copy
Below are layout approaches I use when designing compact residential entry spaces. Each assumes you keep that 36-inch walk line clear.
Plan A: The “Door Frame” (Best for narrow porches)
Use when: You have a tight porch (like 4 ft deep) and need order.
- Two matching tall containers (e.g., 18–22 inch diameter) flanking the door.
- One low trough or window box along the rail (keep height under 12 inches so it doesn’t feel crowded).
- One accent vintage piece—an enamel pot or a small galvanized bucket—placed diagonally opposite the door for balance.
Plan B: The “Stair Landing Collection” (Best for porches with steps)
Use when: Your steps are the visual focal point.
- Group 3 containers at the top landing: tall, mid, low.
- Repeat one plant variety in all three to unify them (like the same coleus cultivar).
- Add two small pots halfway down the steps only if you still have 30+ inches of step clearance.
Plan C: The “Rail Rhythm” (Best for long porches)
Use when: You’ve got length (like 20 ft of rail) and want flow.
- Place medium pots every 4 feet for a steady rhythm.
- Anchor each end with a larger container (half barrel or tall urn).
- Keep plant palette tight: 5–7 plant types total.
Container Choices: Vintage Look, Modern Performance
Vintage containers can be porous, shallow, or drainage-challenged. The goal is to keep the aesthetic while giving roots the conditions they need.
| Container Type | Vintage Vibe | Best For | Watch Outs | Typical Cost |
|---|---|---|---|---|
| Terracotta pot (14–18") | Classic, warm, aged patina | Herbs, geraniums, drought-tolerant mixes | Dries fast; can crack in freeze | $20–$60 |
| Galvanized tub (15–25 gal) | Farmhouse, industrial | Bold annual mixes, dwarf shrubs | Must drill drainage; heats in sun | $25–$80 |
| Half whiskey barrel | Rustic, substantial | Mini “shrub + spiller” arrangements | Heavy when wet; needs airflow under | $50–$120 |
| Enamelware pot/basin | Cottage, collected | Small accents, succulents (with drainage) | Often shallow; chips expose metal | $10–$40 |
Drainage non-negotiable: Most porch plants die from waterlogged soil. If your vintage container doesn’t have holes, drill 6–10 holes of 1/4-inch diameter in the base (more for large tubs). Elevate heavy pots on pot feet or strips of wood so water can escape.
For soil, don’t use garden dirt. Use a high-quality potting mix; containers need air as much as water. The Royal Horticultural Society notes that container plants typically require more frequent watering because potting media dries quickly in sun and wind (RHS, 2023).
Plant Selection: Specific Varieties That Nail the Vintage Porch Look
Vintage containers pair best with plants that feel generous—mounding forms, trailing edges, blooms with a slightly old-fashioned mood. Below are reliable varieties that also perform in the reality of porch microclimates.
Full sun (6–8+ hours): crisp color and heat tolerance
- Pelargonium ‘Calliope Dark Red’ (annual geranium): classic porch personality, handles heat, bold in terracotta. Space one plant per 12–14 inch pot or 3 plants in a half barrel.
- Lavandula angustifolia ‘Munstead’ (lavender): vintage cottage tone, fragrance at the entry. Needs sharp drainage; best in terracotta. Give it a pot at least 14 inches wide.
- Calibrachoa ‘Superbells Cherry Red’: nonstop trailing bloom for galvanized tubs—great spiller over the rim. Plant 3 around the edge of an 18–20 inch container.
- Helichrysum petiolare ‘Licorice’: silvery foliage that makes bright blooms look intentional; very “collected” with galvanized metal.
Part sun (4–6 hours): the most flexible porch light
- Hydrangea macrophylla ‘Let’s Dance Blue Jangles’ (dwarf hydrangea): strong vintage feel in a half barrel; blooms with enough light and regular water. Give it 20–24 inches of container width.
- Begonia ‘Whopper Red with Bronze Leaf’: huge presence, handles sun-to-part shade, reads lush in enamelware or aged pots.
- Coleus ‘ColorBlaze Wicked Witch’: deep moody foliage that makes everything look designed; repeat it in multiple pots for cohesion.
- Sweet potato vine ‘Marguerite’: chartreuse trail to brighten shady corners and soften hard edges.
Bright shade (2–4 hours): elegant foliage and flowers that don’t sulk
- Fuchsia ‘Gartenmeister Bonstedt’: tubular blooms, hummingbird friendly, looks perfect in vintage hanging containers.
- Impatiens (New Guinea ‘Divine Violet’): big blooms with fewer disease issues than older impatiens types; lush in crocks and bowls.
- Heuchera ‘Caramel’: coppery foliage that reads antique; performs well in containers with good drainage.
- Carex oshimensis ‘Evergold’: grassy arch that adds movement and a tailored edge in shade.
For edible charm (and renter-friendly practicality), tuck in thyme ‘Creeping’ along container edges, or grow basil ‘Genovese’ in a small terracotta pot by the door—fragrance is part of the welcome.
Three Real-World Scenarios (With Designs That Fit)
These are common porch situations I see when clients want “vintage container charm” but need it to function day-to-day.
Scenario 1: The renter porch with rules (no drilling, no heavy mess)
Challenge: You can’t drill into the porch, maybe you can’t drill holes in containers, and you may need to move everything at lease end.
Solution: Use vintage containers as cachepots (decorative outer pots) and keep plants in nursery pots inside.
- Pick 5–7 cachepots from thrift stores: enamel basins, galvanized buckets, even an old crock.
- Place a plastic saucer inside the cachepot, then drop in the nursery pot.
- Design: two matching mid-size pots by the door + three mixed sizes by the steps.
Budget: Thrifted cachepots at $8–$25 each; plants $6–$18 each. A full look can land around $120–$220 depending on plant size.
Scenario 2: A sunny front porch that bakes (reflected heat, drying wind)
Challenge: South- or west-facing porches often get heat from siding and concrete. Plants fry; small pots dry in hours.
Solution: Fewer, larger containers + heat-tough plants + moisture strategy.
- Choose two 20–24 inch containers (half barrels or large terracotta).
- Plant each with: 1 geranium ‘Calliope Dark Red’ (thriller), 2 calibrachoa (filler/spiller), 1 helichrysum ‘Licorice’ (spiller).
- Mulch the top of soil with a 1-inch layer of fine bark to slow evaporation.
Maintenance reality: In peak summer heat, expect watering 4–6 times per week (containers can dry fast; wind accelerates it). The RHS specifically highlights the frequent watering needs of containers in warm conditions (RHS, 2023).
Scenario 3: The shaded porch that feels “flat”
Challenge: Shade can look green-and-quiet when you want personality.
Solution: Go heavier on foliage color and texture, and use vintage containers with brighter finishes (enamel, lighter terracotta).
- Anchor with a galvanized tub (brightens shade) planted with carex ‘Evergold’ + heuchera ‘Caramel’ + sweet potato vine ‘Marguerite’ spilling over.
- Add two smaller enamel pots with New Guinea impatiens ‘Divine Violet’ to punch color at eye level.
- Include one dark-leaf coleus repeated in two spots to create rhythm.
Spacing note: For a lush but not crowded look, space impatiens about 8–10 inches apart in a wide bowl; coleus about 10–12 inches apart in medium pots.
Step-by-Step Setup: Build the Collection Like a Designer
This is the process I use on-site so the arrangement feels composed, not scattered.
- Sketch your porch rectangle with door swing and steps. Mark a 36-inch clear path.
- Pick your anchor containers first: choose 2 large pieces (matching or closely related) to set the style.
- Dry-place all containers empty before planting. Stand in the street view, then at the door looking out. Adjust until it feels balanced.
- Set height tiers: if everything is the same height, add one stand or flip a sturdy crate upside down under a pot (secure it).
- Add pot feet or risers under heavy containers for drainage and to protect wood decking.
- Prep drainage: drill holes (if allowed). If not, use cachepot method with saucers.
- Use fresh potting mix and a slow-release fertilizer. Follow label rates; for many products, that’s roughly a feeding window of 8–12 weeks.
- Plant with a repeat: choose one “signature plant” (coleus, geranium, or carex) and use it in at least 3 containers.
- Water deeply until water runs out the bottom (or until the nursery pot drains). Then top-dress with mulch or decorative gravel.
- Add one finishing vintage detail that’s not a plant: a small lantern, an antique watering can, or a simple coir doormat to tie the story together.
Budget Planning and DIY Alternatives (Without Sacrificing Style)
A vintage container porch can be done on a tight budget if you spend strategically: invest in two anchors, then thrift the rest.
- Anchor container investment: 2 quality pots at $50 each = $100. These set the tone and last for years.
- Thrifted accents: 4–6 smaller cachepots at $10–$20 each = $40–$120.
- Potting mix: 2 bags at $12–$18 each = $24–$36.
- Plants: 10 plants at $6–$12 each = $60–$120.
DIY alternatives that still look vintage:
- Use a wooden crate lined with thick plastic (poke a few holes) as a faux “antique planter.”
- Turn mismatched pots cohesive with a limewash-like finish (for terracotta) or matte spray paint (for plastic), then sand edges lightly for age.
- Create height using upside-down clay pots as pedestals (secure the top pot so it can’t tip).
Maintenance Expectations: What It Takes to Keep It Lovely
Porch containers reward small, consistent care. The good news: you don’t need marathon gardening days.
Weekly rhythm (average 20–45 minutes per week)
- Watering: Check moisture 3–5 times per week in summer; daily during heat waves for small pots. Water in the morning when possible.
- Grooming: Deadhead geraniums and calibrachoa; pinch coleus tips for fullness (about 10 minutes total).
- Quick pest scan: Look under leaves for aphids or whiteflies, especially on fuchsia and impatiens.
Seasonal tasks (the designer’s checklist)
- Spring: Refresh top 2 inches of potting mix; re-fertilize; clean containers with mild soap and water.
- Mid-summer: Swap tired bloomers; cut back leggy spillers by 1/3 to restart growth.
- Fall: Replace annuals with mums, ornamental kale, and trailing ivy; add small pumpkins to play up the vintage theme.
- Winter: Move breakable terracotta to a protected area in freeze-prone climates. Use evergreen boughs and twigs in large containers for structure.
The University of Minnesota Extension notes that container plantings generally require more frequent watering and fertilization than in-ground plantings due to limited root volume (University of Minnesota Extension, 2022). Plan for that, and your porch will stay lush instead of fading by July.
Small Details That Make Vintage Feel Real (Not Staged)
To keep the collection from looking like a store display, mix “perfect” with “weathered.” Pair one clean pot with one chipped enamel basin. Let trailing plants soften edges. And keep your color story tight: for example, burgundy + blush + silver foliage, repeated across containers, looks like it belongs to the house.
When you step back, you want to see a welcome, not a scatter of pots. A vintage container collection works because it’s flexible: you can shift pieces as light changes, swap plants seasonally, or take it all with you if you rent. The porch becomes a living vignette—practical, movable, and unmistakably yours.
Sources: Royal Horticultural Society (RHS), “Container gardening” guidance (2023). University of Minnesota Extension, container gardening notes (2022). University of Illinois Extension, container gardening and design guidance (2020).