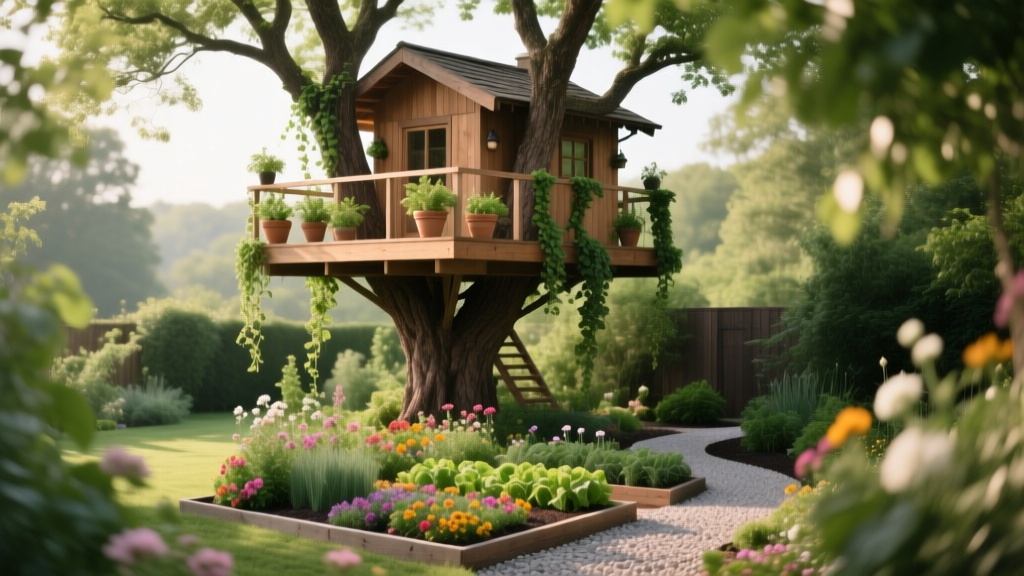
Backyard Treehouse Garden Below
You’ve got a treehouse overhead—laughter, rope ladder, maybe a little lookout deck—and beneath it… the awkward zone. It’s too shady for your sun-loving tomatoes, too exposed to be a cozy seating area, and it collects stray toys, acorns, and that one forgotten plastic shovel. The space under a treehouse can feel like leftover real estate.
But as a designer, I see it as the most story-rich corner of the yard: a place where architecture (the treehouse) meets living texture (plants) and practical needs (storage, safety, circulation). With a few layout moves and the right plant palette, you can turn “under the fort” into a layered garden room that looks good from the kitchen window and still survives kid traffic.
Start With the Real Constraints: Shade, Roots, and Foot Traffic
Before you buy a single plant, stand under the treehouse at three times of day—morning, midday, late afternoon—and note where light lands. Under most treehouses you’ll get “broken shade”: dappled light plus pockets of deeper shade from the platform above. Most shade-tolerant ornamentals prefer 3–6 hours of filtered light; deep shade plants tolerate 0–3 hours.
Also check the tree itself. If your treehouse is on an oak or maple, expect dense surface roots and competition for moisture. The Royal Horticultural Society cautions that working around tree roots means avoiding major digging and improving soil carefully rather than severing roots (RHS, 2023). That informs everything: we’ll design with shallow soil building, containers, and root-friendly planting pockets.
Quick site measurements that shape the whole layout
Grab a tape measure and capture these numbers:
- Clear head height under the platform: aim for at least 6 ft (72 in) of comfortable movement in the main circulation line.
- Platform drip line: measure the footprint of the deck above—this is your “dry-ish” zone, often sheltered from rain.
- Main walking path width: keep a primary route at 36 in wide for easy passing (especially with kids carrying gear).
- Distance from trunk: keep planting and edging at least 18–24 in away from the trunk flare to protect the tree.
- Sunlight hours: estimate 2, 4, or 6 hours of filtered light; we’ll match plants to that reality.
Layout Strategy: Make Three Zones Under the Treehouse
The best under-structure gardens work because they’re zoned. Not with fences—just with edges, material changes, and plant height. Here’s the layout I use again and again, scaled to fit tiny or generous yards.
Zone 1: The “Landing Strip” (Circulation + Safety)
This is the route from the ladder/stairs to the rest of the yard. Give it a durable surface so it doesn’t become mud or compacted roots. If your under-treehouse footprint is, say, 10 ft x 12 ft, reserve a 3 ft wide path that runs cleanly from entry to exit.
Materials that behave well under shade: compacted decomposed granite, mulch stabilized with a grid, or stepping stones set in fine gravel. Skip slick flagstone in heavy shade unless it gets enough sun to dry.
Zone 2: The “Green Room” (Planting + Texture)
Wrap the space with planting beds along the perimeter—think of them as living walls. Beds can be narrow: even a 18 in deep band can hold ferns, heuchera, and sedges that soften the structure and hide stored items.
If tree roots prevent digging, build up with a 2–4 in layer of compost and leaf mold, then top with mulch. Keep added soil shallow to avoid suffocating roots; use pockets rather than raising the entire grade.
Zone 3: The “Utility Nook” (Storage That Disappears)
Every family needs a place for balls, sand toys, or a small mower battery charger. Under the platform is ideal—if it’s organized. Place a slim storage bench or weatherproof cabinet in the driest corner (often near the trunk side, depending on roofline). Design it into the garden by placing taller plants in front and keeping access via a stepping stone pad.
Design Principles That Make It Feel Like a Garden (Not Under-Deck Storage)
Principle 1: Use a strong edge to “draw the room”
Under a treehouse, edges do the heavy lifting. A simple curve of steel edging, bricks, or a cedar border instantly signals intention. For renters, a 6–8 in tall no-dig border with mulch inside reads like a garden bed without permanent excavation.
Principle 2: Layer heights—low, medium, tall—like theater seating
Place the lowest plants (4–8 in) near the path, medium (10–18 in) behind, and taller accents (24–36 in) at corners. This keeps sightlines open for kids while still creating depth.
Principle 3: Repeat two or three plants for calm
Shade spaces can look busy fast. Choose 2–3 “workhorse” plants and repeat them in drifts. Then add a few accent plants with different leaf shape for personality.
“In designed landscapes, repetition of form and texture is one of the simplest ways to create visual unity—especially in small spaces.” — Landscape Architecture Foundation, guidance on landscape design fundamentals (LAF, 2020)
Principle 4: Plan for dry shade under the platform
Dry shade is the tricky combination of low light plus low moisture. Under the treehouse roofline, rainfall may not reach the soil. University of Minnesota Extension notes that most trees have shallow, competing roots, making consistent watering and soil improvement important for understory planting success (University of Minnesota Extension, 2022). Translation: choose plants that tolerate dry shade or commit to drip irrigation.
Plant Selection: Varieties That Actually Work Under a Treehouse
I’ll give you a plant palette that’s attractive, durable, and easy to source. Spacing matters in small gardens; I’m including typical spacing so you can estimate quantities and cost.
Reliable structural plants (the backbone)
- Helleborus x hybridus (Lenten rose) — Evergreen-ish foliage in many climates, late winter blooms, tolerates dry shade once established. Spacing: 18–24 in.
- Carex oshimensis ‘Evergold’ (variegated sedge) — Brightens shade, tidy mounding form, great along paths. Spacing: 12–15 in.
- Heuchera ‘Caramel’ or ‘Obsidian’ (coral bells) — Colorful foliage, handles dappled light; choose variety based on your home’s exterior tones. Spacing: 12–18 in.
Plants for the deepest shade pockets (0–3 hours of light)
- Dryopteris erythrosora (autumn fern) — Coppery new fronds, reliable texture. Spacing: 18–24 in.
- Polystichum munitum (western sword fern) — Bold, architectural, great backdrop. Spacing: 24–30 in.
- Asarum europaeum (European wild ginger) — Low groundcover, glossy leaves, good for edging. Spacing: 12 in.
Plants that tolerate kid traffic (and bouncing balls)
- Liriope muscari ‘Big Blue’ — Tough edging plant, grassy look, purple flowers. Spacing: 12 in.
- Fragaria vesca (alpine strawberry) — Edible groundcover, charming, handles part shade with some sun. Spacing: 10–12 in.
- Thymus serpyllum (creeping thyme) in sun pockets — Only if you truly have 5–6 hours of light at the edge; fragrant and walkable. Spacing: 8–12 in.
Containers that cheat the light (and protect tree roots)
If you can’t dig because of roots—or you rent—containers are your best friend. Choose wide, stable pots (16–20 in diameter) that won’t tip when kids run by. Great container performers in shade:
- Hydrangea macrophylla ‘Mini Penny’ in part shade (needs consistent moisture)
- Begonia ‘Gryphon’ for bold seasonal foliage
- Hosta ‘June’ (if slugs aren’t severe; use iron phosphate bait as needed)
A Practical Comparison: Groundcover Options Under a Treehouse
| Option | Light Needed | Durability Under Foot | Typical Spacing | Notes for Treehouse Areas |
|---|---|---|---|---|
| Mulch (wood chips) | Any | High | N/A | Best for paths + play zones; refresh 1–2x/year |
| Carex ‘Evergold’ | 3–6 hrs filtered | Medium | 12–15 in | Great edging, brightens shade; avoid constant trampling |
| Liriope ‘Big Blue’ | 2–6 hrs | High | 12 in | Excellent along steps and ladder landing zones |
| Asarum europaeum | 0–3 hrs | Low | 12 in | Pretty, but protect from direct play traffic |
| Alpine strawberry | 3–6 hrs | Medium | 10–12 in | Edible + playful; needs some sun at edges |
Step-by-Step Setup: A Designer’s Order of Operations
This sequence avoids the classic mistake of planting first and then realizing you need to move everything to build a path.
- Mark circulation. Use a hose or string to mark a 36 in wide path from ladder/stairs to yard exit.
- Choose your surface. For a budget-friendly option, lay cardboard, add 3 in of wood chips for a path; for a cleaner look, set 18 in x 18 in concrete steppers in gravel.
- Define beds with edging. Keep beds at least 18–24 in from the trunk flare.
- Improve soil lightly. Top-dress bed zones with 2 in compost; do not deep-till around tree roots.
- Place “anchor” plants first. Install ferns/hellebores at corners and key sightlines.
- Fill with repeat plants. Add drifts of sedge or heuchera at consistent spacing (12–18 in) for rhythm.
- Add a utility nook. Set a storage bench on pavers so it doesn’t sink; leave 24 in clearance in front for access.
- Mulch. Apply 2–3 in mulch, keeping it a few inches away from plant crowns and the tree trunk.
- Water in deeply. First two weeks: water 2–3 times/week if rainfall is limited, especially under the platform’s dry zone.
Budget Planning (With DIY Alternatives)
Costs vary by region, but here are realistic planning numbers you can use to sketch a budget. For a 10 ft x 12 ft under-treehouse footprint with a small path and beds:
- Mulch: 1 cubic yard often covers ~100 sq ft at 3 in. Expect $35–$65 per cubic yard (bulk) plus delivery if needed.
- Steel or composite edging: $2–$5 per linear foot depending on brand and height.
- Plants: 1-gallon perennials often run $10–$18 each. A simple scheme might use 18–28 plants depending on spacing and bed width.
- Stepping stones: basic concrete steppers can be $6–$12 each; you may need 6–10 for a short run.
- Storage bench/cabinet: $80–$250, or DIY from exterior plywood and a waterproof paint system.
DIY swap ideas: Use log rounds or salvaged brick as edging. Convert a weatherproof deck box into seating by adding a cushion. If you can’t afford a full stepping stone path, do a “two-step rhythm” pattern: stones only where feet land (entry, turning points), with mulch between.
Three Real-World Layout Scenarios I’d Use (and Why)
Scenario 1: The small yard (under-space is 6 ft x 8 ft)
In a tight footprint, the goal is to prevent clutter. I’d run a single 30–36 in path line and keep planting beds skinny—12–18 in deep along two sides. Use Carex ‘Evergold’ repeated (it reads bright even in shade), with one bold fern as a focal point. Add a single container at the far corner instead of multiple small pots (which visually fragment a small space).
Maintenance expectation: 20–30 minutes/week in growing season (mostly watering and tidying), plus a spring mulch refresh.
Scenario 2: The renter-friendly build (no digging, no permanent changes)
If you rent, keep everything reversible. Build the garden with:
- Cardboard sheet mulch + wood chips for paths
- Fabric grow bags or lightweight resin pots (16–20 in wide)
- A freestanding bench for storage
Plant choices: hosta ‘June’, begonia ‘Gryphon’, and carex in containers; liriope in pots near traffic zones. When you move, the garden moves with you.
Budget expectation: You can often keep this under $250–$600 by prioritizing mulch, a few larger pots, and smaller plant sizes that fill in over time.
Scenario 3: The heavy-kid-traffic family yard (soccer balls + birthday parties)
Here the under-treehouse area needs to handle impact. Keep the center open and durable: wood chips or compacted gravel. Move planting beds to the perimeter and protect them with a low border (even 6 in of timber edging helps). Choose plants with structure that won’t snap easily: liriope, carex, hellebores, and sturdy ferns.
Include a “drop zone” hook rail on a post (if allowed) for helmets and jackets. If you can run irrigation, a simple drip line with a battery timer saves stress—dry shade failures often come down to inconsistent water during the first summer.
Scenario 4: The show-from-the-house version (you want it to look designed year-round)
If your kitchen window looks straight at the treehouse, treat the under-planting like a small stage set. Use repetition and evergreen texture: a drift of hellebores, a ribbon of carex, and a backdrop of Polystichum munitum. Add one statement container (matte black or rusted steel look) with a hydrangea if you have part shade and irrigation. Place a small uplight (low-voltage, warm color temperature) aimed into foliage—light makes shade gardens feel intentional after sunset.
Sunlight and Water: Make Dry Shade Work for You
Under the treehouse platform, rainfall can be blocked. If you notice dust-dry soil even after rain, treat it like a covered patio bed. Two practical fixes:
- Drip irrigation: a basic kit can be $30–$80 and pays for itself in plant survival.
- Watering basin pockets: create small soil saucers around plants (not against the tree trunk) so water soaks in rather than running off mulch.
Remember that the tree’s needs come first. Keep mulch pulled back from the trunk and avoid piling soil around the base. The RHS emphasizes protecting the root zone and minimizing disturbance when gardening under trees (RHS, 2023).
Maintenance Expectations: What It Really Takes
A well-designed under-treehouse garden is not high maintenance, but it is not zero maintenance either—especially the first year.
- Weekly time: plan on 30–45 minutes/week in spring and summer (watering, quick weed pull, checking mulch depth). In fall/winter: 10–20 minutes/week.
- Spring: top-dress with compost (1–2 in), refresh mulch, cut back damaged fern fronds, divide crowded heuchera if needed.
- Summer: deep water 1–2 times/week during heat spells; check containers daily in hot weather (pots dry faster).
- Fall: decide whether to leave some leaf litter as natural mulch (fine leaves shredded are helpful), but keep thick mats off crowns of heuchera/hellebores.
- Winter: watch for soil heaving in freeze-thaw climates; re-seat plants and add a light mulch layer if exposed.
If you want the lowest-effort option, lean harder on mulch + a few durable structural plants rather than many delicate perennials. Simple always reads more “designed” in shade.
Small Details That Make It Feel Finished
These are the finishing touches I add when I want the space to feel cohesive rather than improvised:
- A single material story: match edging to treehouse trim (black metal edging with black hardware, cedar edging with cedar stairs).
- A defined “kid landing” pad: a 3 ft x 3 ft chip area or pavers at the base of the ladder prevents a worn dirt crater.
- One nighttime light: a warm uplight aimed at foliage, not eyes. It turns the under-space into a garden room after dark.
- Intentional storage: one bench beats five buckets. If it’s contained, the whole garden reads calmer.
Once the path is clear, the beds are edged, and the plant palette repeats—your under-treehouse zone stops being the leftover space. It becomes a grounded, shady retreat with a practical center and a soft perimeter, a place that works as hard as the treehouse above it.
Sources: Royal Horticultural Society (RHS), guidance on gardening around trees and protecting roots (2023). University of Minnesota Extension, notes on tree root competition and understory planting considerations (2022). Landscape Architecture Foundation (LAF), landscape design fundamentals emphasizing repetition and unity (2020).