Window Box Flower Combinations
The street is quiet until you notice it: one window looks finished, intentional—like someone cared enough to dress it for the season. The neighboring window (maybe yours) is perfectly fine… but flat. If you’ve ever stood inside with a cup of coffee, stared out at a blank sill, and thought, “I could do better than two random geraniums,” you’re exactly where a window box shines. It’s a tiny garden with high visibility, and the difference between “plants in a box” and a designed composition comes down to layout, plant pairing, and a few practical measurements.
I’m going to walk you through design principles I use for clients—homeowners and renters—so you can build window box flower combinations that read well from the street, thrive in your sunlight, and don’t turn into a weekly rescue mission.
Start With the Box: Dimensions, Volume, and Sightlines
Before we talk flowers, we talk real estate. Window boxes fail most often because they’re too small (not enough soil volume) or they’re hung where watering becomes a chore.
Right-size the window box
As a practical baseline, aim for a box that’s at least 6–8 inches deep, and ideally 8–10 inches if you want lush mixes that won’t dry out by lunchtime. Length depends on your window, but a classic proportion is to match the window width or go up to 2–4 inches wider on each side if mounting allows.
- Typical box for a standard window: 36 in. long × 8 in. deep × 8 in. tall
- Soil volume goal: around 3–5 gallons of potting mix for a 36-inch box (varies by box shape)
- Drainage: at least 4–6 drainage holes spaced along the bottom
Design for viewing distance
You’re designing for two viewpoints: (1) curb/street (10–30 feet away) and (2) from inside looking down. From the street, you need clear silhouettes and bolder color blocks. From inside, texture matters—fragrance, leaf shape, and detail. The best mixes do both: strong “read” from afar, and satisfying nuance up close.
Layout Strategies That Make Combinations Look Designed
Window box design is repeatable. I lean on a few principles that keep combinations coherent even when you change colors each season.
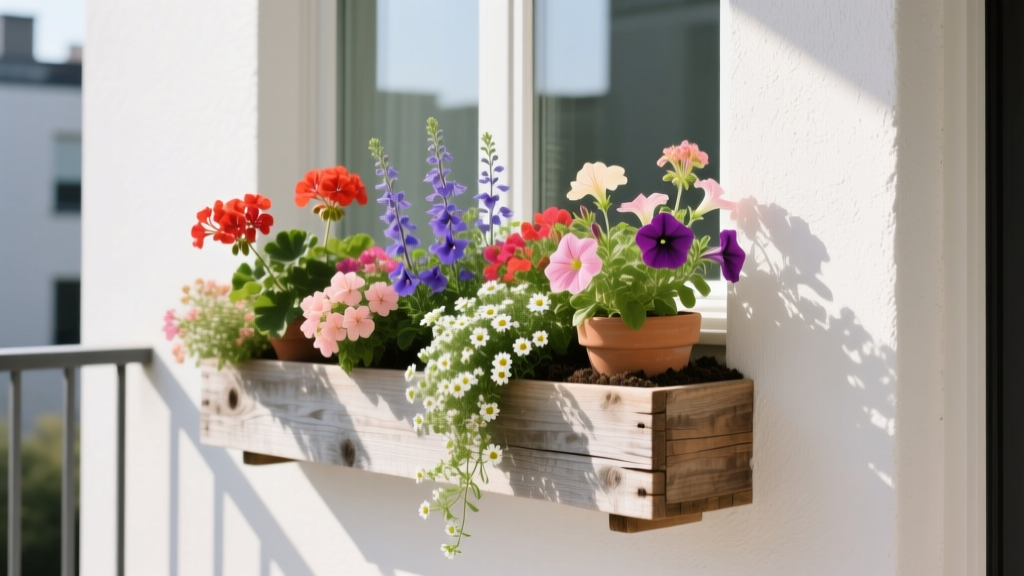
The thriller–filler–spiller method (with a window-box twist)
The classic container formula still works, but window boxes are narrow, so scale matters:
- Thriller: 1–2 upright plants (12–24 inches tall) placed slightly off-center, not dead center.
- Filler: mid-height bloomers to bulk out the middle.
- Spiller: trailing plants to soften the hard edge and visually “attach” the box to the building.
When in doubt, repeat the same structure along the length: a small rhythm of upright accents every 12–18 inches rather than one big centerpiece.
Color planning: pick a palette, then pick plants
Color is where most window boxes go sideways. A reliable approach is to choose a palette first:
- Monochrome: all pinks + silvers (calm, classic)
- Analogous: purple–blue–white (cool, expansive)
- Complementary: purple + yellow (high contrast, cheerful)
Also consider the house color. Bright flowers pop against dark siding; soft pastels shine against white trim; intense red can fight with warm brick unless you anchor it with greens.
Texture and leaf size: the secret to “expensive-looking” boxes
Flowers come and go, but foliage structure holds the design together. Mix at least three leaf types:
- Fine: bacopa, lobelia, euphorbia ‘Diamond Frost’
- Medium: calibrachoa, petunias, verbena
- Bold: coleus, sweet potato vine, heuchera
“Use foliage as your framework. Flowers are the jewelry—beautiful, but the outfit needs structure.” —TimberPress author and garden designer Debra Prinzing (Prinzing, 2018)
Sunlight: Match the Mix to Your Hours
Window boxes are microclimates. Reflected heat from glass and siding can add stress, especially on south and west exposures. Estimate your direct sun:
- Full sun: 6+ hours of direct sun
- Part sun/part shade: 3–6 hours
- Shade: under 3 hours
For bloom-heavy boxes, the difference between 4 hours and 7 hours is the difference between “pretty” and “nonstop flowers.” The National Gardening Association notes many popular annuals perform best with ample sun and consistent moisture (National Gardening Association, 2021).
Comparison: Reliable Window Box Combination Templates
| Scenario | Sunlight | Best “Thriller” | Best “Fillers” | Best “Spillers” | Water Needs |
|---|---|---|---|---|---|
| Hot, sunny, windy | 6–8 hrs | Angelonia ‘Angelface’ | Calibrachoa ‘Superbells’, verbena | Trailing lantana, sweet potato vine | High (check daily in heat) |
| Bright shade (porch roof) | 2–4 hrs | Coleus ‘ColorBlaze’ | Impatiens (New Guinea), begonias | Bacopa, creeping jenny | Moderate |
| Pollinator-forward | 5–7 hrs | Salvia ‘Mystic Spires’ | Scaevola, calibrachoa | Nasturtium trailing types | Moderate–high |
| Low-maintenance color | 4–6 hrs | Geranium (Pelargonium) | Wax begonias, dusty miller | Ivy (annual use), bacopa | Moderate |
Plant Selection Recommendations (With Specific Varieties and Why They Work)
Below are combinations I’ve used (or specified) because they hold their shape, flower reliably, and forgive missed waterings better than fussier options. Availability varies by region, but these are widely sold through garden centers.
Combination 1: “Sunset Over Brick” (Full Sun, High Impact)
Best for: south or west windows with 6–8 hours sun; warm-toned homes (brick, tan, cedar).
- Thriller: Angelonia ‘Angelface Super Blue’ (vertical, heat-tolerant, doesn’t flop)
- Filler: Calibrachoa ‘Superbells Tropical Sunrise’ (constant blooms, small flowers read well at distance)
- Filler: Verbena ‘Superbena Royale Chambray’ (pollinator-friendly, strong color)
- Spiller: Ipomoea batatas ‘Sweet Caroline Lime’ (bold foliage, drought resilience)
Why it works: Angelonia keeps the composition upright, calibrachoa fills without deadheading, and the lime foliage makes the warm flowers look brighter. This mix tolerates reflected heat from glass better than many petunia-heavy boxes.
Combination 2: “White Linen + Silver” (Part Sun, Elegant and Calm)
Best for: east-facing windows with 3–5 hours morning sun; modern or classic facades.
- Thriller: Pelargonium (geranium) ‘Calliope White’ (clean, structured blooms)
- Filler: Euphorbia ‘Diamond Frost’ (airy, long-blooming, softens transitions)
- Filler: Scaevola ‘Whirlwind White’ (fan flowers, heat tolerant)
- Spiller: Helichrysum petiolare ‘Licorice Plant’ (silver trailing foliage)
Why it works: White reads from the curb, silver foliage looks “designed,” and these plants don’t demand constant deadheading. The palette also plays well with almost any siding color.
Combination 3: “Bright Shade Jewel Box” (Shade/Part Shade)
Best for: north-facing windows or covered porches with 1–3 hours direct sun.
- Thriller: Coleus ‘ColorBlaze Rediculous’ (big leaves, dramatic height)
- Filler: Begonia ‘Dragon Wing Red’ (tough, reliable blooms in shade)
- Filler: Impatiens ‘SunPatiens Compact White’ (handles bright shade, strong flowering)
- Spiller: Bacopa ‘Snowtopia’ (delicate white spill; keep evenly moist)
Why it works: In shade, foliage is the star. Coleus brings structure and saturation; begonias and impatiens provide steady color where sun lovers would sulk.
Real-World Scenarios (And How I’d Design Each)
Let’s make this practical. Here are three situations I see constantly, with specific layout calls.
Scenario A: Rental apartment, no drilling allowed
Problem: You want a window box, but the lease forbids exterior hardware.
Design solution: Use a rail-mounted or inside-sill box. If you have a Juliet balcony or railing, choose adjustable railing brackets. For an inside-sill approach, pick a watertight planter with a saucer and keep spills contained.
Plant pick: “White Linen + Silver” works well because it looks intentional even from indoors, and it’s not as thirsty as a petunia-only mix.
Budget note: A quality 36-inch resin box is often $25–$45, while railing brackets can add $15–$30. DIY alternative: a sturdy plastic trough with a hidden inner liner and a separate catch tray.
Scenario B: South-facing window with intense afternoon heat
Problem: Flowers fry, and the box dries out fast.
Design solution: Increase soil volume (deeper box), use fewer plants with more root room, and choose heat-tolerant species. Add a thin layer of mulch (even decorative pebbles) to slow evaporation.
Plant pick: “Sunset Over Brick” is built for this exposure.
Concrete tweak: In a 36-inch box, plant 7–9 plants total (not 12–14) to reduce competition for water.
Scenario C: Busy homeowner who travels—needs low-maintenance color
Problem: You’re away for weekends; you need plants that bounce back.
Design solution: Choose drought-tolerant, self-cleaning bloomers; install a simple drip kit if possible.
Plant pick: Geraniums + dusty miller + bacopa is forgiving and still charming. Geraniums store moisture in stems; dusty miller laughs at heat; bacopa trails softly if kept moderately moist.
DIY irrigation: A basic battery timer + micro-drip kit is often $35–$70 depending on brand and length. Even a single drip line can buy you a few extra days in summer.
Step-by-Step: Set Up a Window Box That Stays Healthy
This is the workflow I use so you don’t end up replanting mid-season.
- Confirm your sunlight hours. Watch the window on a clear day or use a sun-tracking app. Record direct sun; reflected light doesn’t count the same.
- Choose the box size. For most windows, start at 24–36 inches long and 8–10 inches deep.
- Add drainage. If your box doesn’t have holes, drill 1/4-inch holes every 6–8 inches. Elevate slightly with spacers so water can escape.
- Use quality potting mix. Avoid garden soil. Mix in slow-release fertilizer per label rates (common products feed for 8–12 weeks).
- Lay out plants before planting. Set them on top of the soil in their pots. Step back 10 feet and check balance.
- Spacing rule of thumb. In window boxes, plant annuals roughly 6–8 inches apart (more space in hot sites).
- Plant in layers. Put thrillers first (slightly back), then fillers, then spillers near the front edge.
- Water deeply. First watering should run out the bottom. This settles air pockets and encourages roots to move outward.
- Finish with a thin mulch layer. Even 1/2 inch of fine bark or coco chips helps in sunny exposures.
Budget Planning (With DIY Alternatives)
Window boxes can be surprisingly affordable if you plan the structure once and just swap seasonal plants.
- Entry-level setup: Box + brackets ($40–$80) + soil ($10–$20) + plants ($35–$90) = roughly $85–$190 for a 36-inch box.
- Higher-end look without higher-end cost: Spend on foliage structure (coleus, licorice plant, sweet potato vine) and use fewer flowering annuals. The foliage carries the design even when blooms pause.
- DIY box alternative: A cedar fence board project can be built to 36 × 9 × 9 inches with exterior screws and landscape fabric as a liner. Seal the exterior only; avoid sealing the interior where roots sit.
If you’re tempted to pack in extra plants for instant fullness, remember you’re also buying future water stress. Slightly wider spacing often looks better by mid-season.
Maintenance Expectations: What It Takes to Keep It Looking Crisp
Most window boxes are small containers in a hot spot—meaning they’re closer to “patio pot” maintenance than “in-ground bed” maintenance. The good news: tasks are quick.
Weekly time commitment
- Typical week: 20–40 minutes total per window box (watering checks, quick snips, fertilizer)
- During heat waves (90°F+): check moisture daily; watering may take 5 minutes per day
Ongoing care checklist
- Watering: Water when the top 1 inch feels dry. Morning is best.
- Feeding: If you didn’t use slow-release, apply a liquid fertilizer every 7–14 days at label rate. Excess fertilizer can cause legginess.
- Deadheading:
- Geraniums and angelonia: quick deadhead keeps them tidy.
- Calibrachoa and many modern petunias: often “self-cleaning,” but benefit from occasional trimming.
- Mid-season haircut: Around week 6–8, trim trailing plants back by 1/3 to encourage fresh bloom and prevent the “curtain” look that blocks airflow.
Seasonal swaps (simple and satisfying)
Plan for at least two seasonal looks if you want a long display:
- Spring: pansies/violas, small bulbs tucked in (if depth allows), trailing ivy or creeping jenny
- Summer: the combinations above (heat and bloom focused)
- Fall: ornamental kale, mums, heuchera, small grasses
For guidance on plant timing and frost dates, Cooperative Extension resources are reliably region-specific; many note the importance of matching planting time to local conditions and avoiding cold damage in tender annuals (University of Minnesota Extension, 2020).
Small Design Upgrades That Make a Big Difference
If you want your box to look like it was installed by a designer, borrow these finishing moves:
- Repeat one plant: Use the same spiller at both ends for symmetry, even if the center is more playful.
- Limit the chaos: Keep it to 3–5 plant types per box for a cleaner read.
- Echo a house detail: Pull one color from your front door, shutters, or trim and repeat it in the flowers.
- Control the edges: Spill plants should drape 4–8 inches over the front—enough to soften, not so much that it hides the flowers behind.
A window box is a small project with outsized payoff: it changes how the whole facade feels. Once you know your sunlight hours, commit to a palette, and build a simple thriller–filler–spiller structure, the plant combinations become easy to swap and refine. Start with one window, take notes on what thrives, and by next season you’ll be designing with confidence—like that one house on the street that always looks finished.
Sources: National Gardening Association (2021). University of Minnesota Extension (2020). Prinzing, D. (2018).