Front Yard Landscaping for Curb Appeal
You pull into the driveway after a long day and catch your front yard in the headlights: a patchy rectangle of tired lawn, a lonely shrub leaning toward the porch light, and a walkway that feels like a hallway instead of a welcome. It’s not that the space is “bad”—it’s just not doing any work for you. The good news: curb appeal isn’t about expensive hardscape or rare plants. It’s about layout, proportion, and a few repeatable choices that make the yard feel intentional from the street to the front door.
Let’s treat this like a real design project. We’ll start by reading the space, then lay out a plan that’s buildable in a weekend or two. I’ll give plant varieties that perform, with spacing and sun needs, plus cost ranges and maintenance expectations so you can decide what’s realistic for your time and budget.
Start with the “arrival path”: what do visitors see first?
Most front yards fail for one simple reason: the eye doesn’t know where to go. Your job is to create a clear visual path from curb to door. Stand at the street (or the sidewalk) and look toward the entry. If you can’t identify one strong focal point within 3 seconds, you need a hierarchy.
Three anchors that create instant structure
Use these as your design backbone:
- Entry anchor: A pair of matching containers, a small tree, or a bold planting bed near the porch steps.
- Path edge: Low, repeatable plantings that “stitch” the walkway to the yard.
- Street frame: A simple bed line or a small ornamental tree that softens the house-to-street transition.
Real estate research consistently shows that landscape improvements influence perceived home value. For example, the National Association of REALTORS® reports that standard lawn care and landscape maintenance can return value at resale (NAR, 2023). Even if you’re renting, the visual payoff is immediate: photos look better, guests find the door easily, and the whole property reads as cared-for.
Design principles that make small and average front yards feel larger
These strategies work on a 20 ft × 30 ft starter yard and on a wider suburban frontage. The difference is scale, not technique.
1) Use “big shapes, small details”
From the street, tiny fussy beds disappear. Favor bold bed lines and repeated masses. A bed that’s 5–7 ft deep reads as substantial; a bed that’s 18 inches deep reads like an afterthought. If your front yard is narrow, go deeper in fewer places rather than making skinny beds everywhere.
2) Repeat just 3–5 plant types
Repetition creates calm. If every plant is different, the yard looks busy and smaller. Pick:
- 1 structural evergreen (year-round shape)
- 1 flowering shrub or perennial (seasonal star)
- 1 grass or groundcover (texture + fill)
- Optional: 1 accent plant (limited use for punctuation)
3) Match plant scale to window and porch height
As a rule, foundation plantings should mature to about 1/3 to 1/2 the height of the wall they’re in front of. This keeps plants from swallowing windows while still grounding the house. If your porch railing is 36 inches high, plants in the 24–36 inch mature range look tailored and intentional.
4) Design for your light (and be honest)
Before you buy plants, track sun for one day. Most front yards fall into these practical categories:
- Full sun: 6+ hours of direct sun
- Part sun/part shade: 3–6 hours
- Shade: <3 hours (often north-facing or under trees)
Those categories are standard in horticulture references, and they matter because “wrong light” is the #1 reason new plantings struggle. The USDA Plant Hardiness Zone Map (USDA, 2023) is also worth checking before you fall in love with a plant online.
Layout strategies you can copy (with buildable dimensions)
The clean walkway border (fastest visual upgrade)
If you only do one thing, do this. Add a border bed along one or both sides of the walkway, at least 24–36 inches wide. Keep it low near the path so it doesn’t flop into walking space.
Spacing rule of thumb: Place perennials and small shrubs so their mature width just touches. For a plant that matures to 24 inches wide, space it 18–24 inches on center (closer for faster fill, wider for airflow).
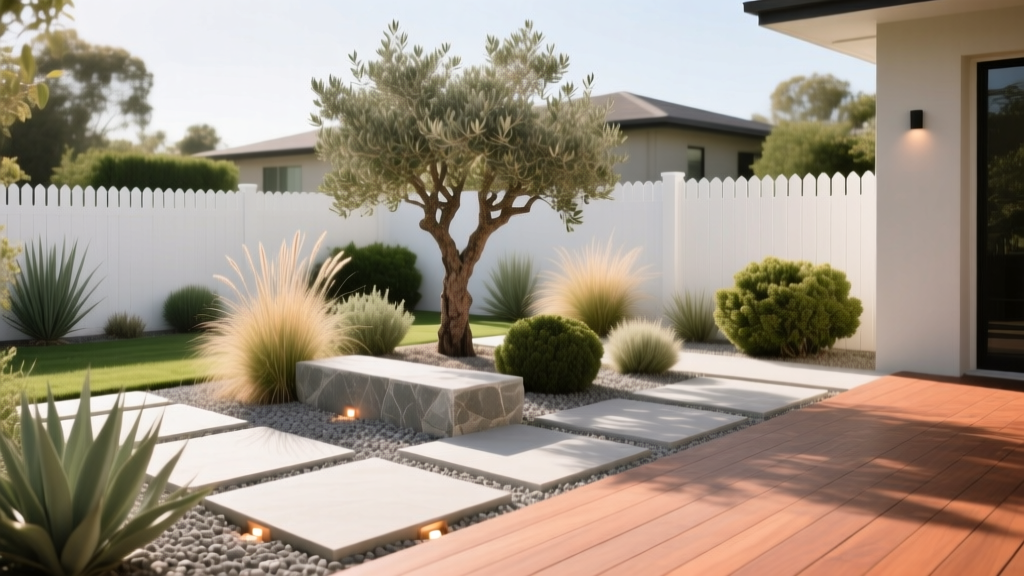
The “porch pocket” bed (turn the entry into a destination)
Create a deeper planting pocket near the steps or porch—think 6 ft × 6 ft minimum if you can. This is where you place a small ornamental tree, a bold shrub, or tall grasses. Your eye lands here, then moves to the door.
The curved bed line trick (softens boxy lawns)
A gentle curve makes a flat front yard feel designed. Keep curves broad and simple. A good guideline is to avoid tight S-curves and instead draw a single arc with a radius of roughly 8–12 ft so it reads from the street.
Plant palettes that look designer (with specific varieties)
The goal is to pick plants that hold their shape, tolerate real-life conditions, and still look good when you miss a week of maintenance.
Palette A: Sunny, low-maintenance, modern
Best for: South- or west-facing yards with 6–8 hours sun.
- Boxwood alternative (evergreen structure): Ilex crenata ‘Sky Pencil’ (Japanese holly). Upright, narrow, great for flanking entries. Space 24–30 inches apart if used as a rhythm along the porch.
- Flowering shrub: Hydrangea paniculata ‘Bobo’ (panicle hydrangea). Stays compact, blooms reliably in sun. Space 3 ft apart. Looks crisp against siding.
- Perennial color: Nepeta ‘Walker’s Low’ (catmint). Long bloom window, pollinator-friendly, tidy mounding. Space 18–24 inches.
- Texture grass: Calamagrostis ‘Karl Foerster’ (feather reed grass). Vertical accent that reads from the street. Space 24–30 inches.
- Groundcover edge: Thymus serpyllum (creeping thyme) near path edges in full sun; fragrant and neat. Space plugs 8–12 inches.
Palette B: Part-shade entry that still feels bright
Best for: East-facing or dappled shade with 3–5 hours sun.
- Evergreen structure: Rhododendron ‘PJM’ (compact rhododendron). Broadleaf evergreen, early color, holds mass. Space 4 ft apart.
- Reliable perennial: Hemerocallis ‘Stella de Oro’ (daylily). Tough, repeat bloom, clean grassy foliage. Space 18 inches.
- Bold foliage: Hosta ‘June’ or ‘Halcyon’. Great leaf color in shade; use in drifts of 3–5. Space 24–30 inches.
- Shade groundcover: Epimedium (barrenwort). Excellent for dry shade once established. Space 12–18 inches.
Palette C: Drought-tolerant “hot curb” strip (reflective heat)
Best for: Hellstrip areas between sidewalk and street, or near driveways—often hot, compacted, and dry.
- Architectural shrub: Juniperus ‘Blue Star’ (dwarf juniper). Tough, blue color, tidy mound. Space 3 ft.
- Long-blooming perennial: Salvia nemorosa ‘Caradonna’. Upright purple spikes, drought tolerant once established. Space 18 inches.
- Hardworking groundcover: Sedum ‘Angelina’ or Sedum ‘Autumn Joy’ (upright). Great for heat and lean soils. Space 12–18 inches.
- Accent grass: Festuca glauca (blue fescue). Tight clumps, clean edging. Space 10–12 inches.
“Foundation plantings should complement the architecture and create simple, readable masses—too many specimen plants create visual clutter and more maintenance.” — Association of Professional Landscape Designers (APLD), design guidance widely taught in residential landscape planning
A quick comparison to choose the right approach
| Approach | Best for | Typical install time | Upfront cost range | Weekly maintenance (growing season) |
|---|---|---|---|---|
| Walkway border bed (24–36 in wide) | Any front yard, fastest curb appeal | 4–8 hours | $150–$600 | 20–40 minutes |
| Porch pocket bed (6 ft × 6 ft+) | Creating an entry focal point | 1–2 weekends | $400–$1,500 | 30–60 minutes |
| Full front foundation redesign | Homes with overgrown shrubs or blank facades | 2–4 weekends | $1,200–$4,000+ | 45–90 minutes |
Step-by-step: a practical front yard layout you can implement
This is the process I use when I’m sketching a front yard for a client who wants results without a full construction project.
- Measure two key rectangles: the lawn area and the planting-bed area you want to create. Even a rough measure helps. Example: lawn is 22 ft × 18 ft; new bed will be 3 ft deep along a 20 ft walkway.
- Decide your focal point: usually the front door, but sometimes a porch column, a specimen pot, or a small tree. Pick one.
- Mark bed lines with a hose: stand at the street and adjust until the curve reads cleanly. Keep the narrowest bed section at least 24 inches wide so plants have room.
- Place “structure plants” first: evergreens or shrubs that hold shape. Use odd-number groupings (3 or 5) unless you’re framing a door (pairs look great there).
- Fill with repeaters: choose one perennial (or grass) and repeat it every 3–5 ft along the bed to create rhythm.
- Edge and mulch: install a crisp edge; add 2–3 inches of mulch (keep it off stems). This is where the “finished” look comes from.
- Water in deeply: for the first 2–3 weeks, plan on deep watering 2–3 times per week if rain doesn’t do it for you.
Real-world scenarios (so you can steal the parts that fit)
Scenario 1: The rental-friendly refresh (no digging, quick change)
Challenge: You’re renting, you can’t regrade or install permanent beds, and you need maximum visual change with minimal risk.
Layout move: Use containers to create an “entry anchor” and a short, removable border.
- Place 2 matching 18–22 inch wide pots at the porch steps with Ilex crenata ‘Sky Pencil’ (or a dwarf conifer) for year-round height.
- Add 3–5 smaller pots along the walkway with catmint or lavender in sun, or ferns/hostas in shade.
- Define the edge using dark mulch in a narrow strip (18 inches)—even a temporary edge reads as intentional.
Cost reality: Expect roughly $200–$450 for pots, soil, and 7–10 plants if you shop big-box plus one nicer nursery shrub. DIY alternative: use lightweight resin pots and a simple top-dress of mulch or pine fines to make them look higher-end.
Scenario 2: The “overgrown foundation shrubs” rescue (the classic problem)
Challenge: Old yews or junipers have eaten the windows; the house looks smaller and darker.
Layout move: Reduce to fewer, better-placed shrubs and add negative space. You don’t need to fill every inch with green.
- Remove or heavily prune shrubs that block windows (check local rules and the plant’s ability to regenerate from old wood).
- Replace with a simpler lineup: for a 30 ft foundation run, try 5 ‘Bobo’ hydrangeas spaced at 3 ft and 3 clumps of ‘Karl Foerster’ grass between them for vertical lift.
- Keep plants at least 18 inches away from siding for airflow and maintenance access.
Cost reality: DIY removal can be sweat equity; replacement planting might run $600–$1,800 depending on plant size (1-gallon vs 3-gallon vs 5-gallon). DIY alternative: buy smaller sizes and be patient—most shrubs and grasses will catch up in 2–3 seasons with consistent watering.
Scenario 3: The narrow front yard with a straight path (feels like a corridor)
Challenge: A tight side-to-side space can feel like you’re walking down a chute to the door.
Layout move: Widen one side of the bed into a “bulge” pocket that interrupts the hallway feel.
- Keep one side of the path a consistent 24 inches wide for clean passage.
- On the other side, create a pocket that expands to 5 ft wide for about 6–8 ft of length.
- In that pocket, plant one focal plant (a dwarf Japanese maple in part shade, or a compact hydrangea in sun) and underplant with repeating groundcover.
Cost reality: A single specimen plant can be $80–$250 depending on size and variety. DIY alternative: use a strong container focal point instead of a tree if you can’t dig.
Scenario 4: The dry, sunny “heat trap” by a driveway
Challenge: Plants bake next to concrete; irrigation is limited; the area looks sparse and crispy.
Layout move: Shift to drought-tolerant plants, reduce lawn edge fussiness, and mulch well.
- Use a 4 ft deep bed along the driveway edge to prevent mower damage and reduce heat-stressed turf.
- Plant in tough repeats: ‘Caradonna’ salvia in clusters of 3, blue fescue in clusters of 5, and a few dwarf junipers as anchors.
- Mulch at 3 inches and water deeply once a week for the first season; after establishment, many of these can handle less frequent watering.
Budget planning (and where to spend for maximum curb appeal)
If you’re trying to keep the project sane, here’s how I prioritize spending:
- Spend on structure: 2–5 shrubs or evergreens that hold the design together year-round. These are your “bones.”
- Save on fillers: grasses and perennials can be bought smaller (plugs or 4-inch pots) and spaced tighter for faster fill.
- Don’t skimp on soil prep: a few bags of compost and proper mulch depth prevents failure. A common DIY approach is adding 1–2 inches of compost into the top layer of soil in planting zones before mulching.
Concrete cost example (small project): A 20 ft walkway bed that’s 3 ft wide is 60 sq ft. Mulch at 3 inches depth requires about 0.56 cubic yards (60 sq ft × 0.25 ft = 15 cu ft; 27 cu ft per yard). At retail, that might be $35–$90 depending on bagged vs bulk and local pricing. Add plants: 10 perennials at $8–$15 each plus 3 shrubs at $30–$60 each and you land in the $250–$600 range.
DIY alternatives that still look professional
If you’re not ready for full bed creation, you can still get a designed look.
- Edge refresh: Cut a new edge line (crisp curves) and top-dress with mulch. That alone can make the yard look maintained.
- “One great pot” strategy: Choose one oversized pot (18–24 inches wide) with a thriller-filler-spiller combo. Example for sun: dwarf conifer + ‘Supertunia’ petunia + trailing sweet potato vine.
- Solar lighting restraint: If you add path lights, use fewer and place with intention—e.g., 6 lights along a long path instead of 14 in a row. The goal is a gentle rhythm, not an airport runway.
Maintenance expectations (so your curb appeal stays)
A good front yard design should not demand constant attention. For most planting beds, plan on 30–60 minutes per week in the growing season once established (less in winter, a bit more during spring cleanup).
Seasonal task checklist
- Spring (1–2 hours once): cut back ornamental grasses before new growth; remove winter-damaged stems; refresh mulch where it’s thinned below 2 inches.
- Early summer (15–30 min/week): deadhead where it matters (salvia, catmint) and spot-weed while weeds are small.
- Mid/late summer (15–45 min/week): deep water during heat; check for irrigation overspray or dry pockets near driveways.
- Fall (1–2 hours once): light pruning for shape (avoid heavy pruning on spring-blooming shrubs); leaf cleanup so groundcovers don’t smother.
- Winter (10 minutes occasionally): brush heavy snow off shrubs to prevent breakage; note what looked good and what disappeared for next year’s tweaks.
One practical tip: curb appeal is about what looks good from 30–60 feet away. If a plant only looks nice up close, it’s better suited to the backyard. Front yards reward strong shapes, repeated color, and clean edges—the things you can see from the street, in every season.
When you’re ready to start, pick one anchor (entry, path edge, or street frame) and execute it cleanly rather than scattering effort everywhere. The front yard doesn’t need more stuff—it needs a clearer plan. With a few well-spaced shrubs, a repeatable perennial, and a bed line that makes sense, you’ll walk up to your own door and feel that quiet click of “this looks right.”
Citations: USDA Plant Hardiness Zone Map (USDA, 2023). National Association of REALTORS® Remodeling Impact Report / landscaping and lawn care return data (NAR, 2023).