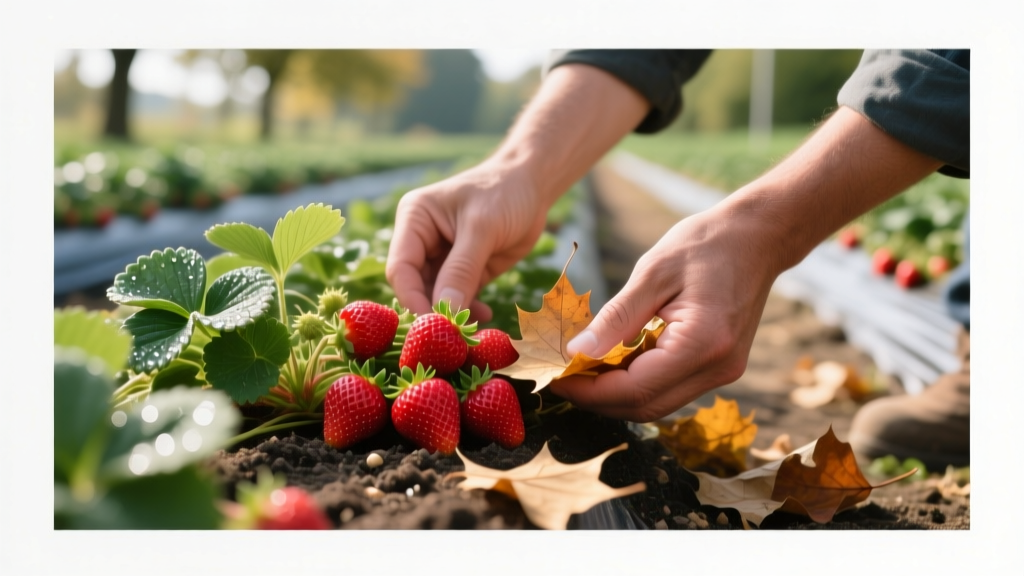
Cleaning Up Fallen Leaves Around Strawberries
The first warm afternoon of spring, you head out to check your strawberry bed and find it: a soggy mat of maple leaves plastered to the crowns, pale new growth struggling underneath. Last year, that same bed produced sweet berries in June. This year, the plants look tired before they’ve even started. That leaf layer seems harmless—“natural mulch,” right?—but around strawberries it can be a sneaky troublemaker, trapping moisture at the crown, sheltering slugs, and setting the stage for fungal disease.
Cleaning up fallen leaves around strawberries isn’t about making the garden look tidy. It’s about managing humidity, temperature swings, pests, and crown health. The trick is knowing when to remove leaves, how much to remove, and what to use instead so you protect plants without smothering them.
What Fallen Leaves Really Do in a Strawberry Bed
Leaves can be helpful elsewhere, but strawberries are low-growing and crown-sensitive. A dense layer of wet leaves can turn the plant’s “neck” (the crown) into a damp collar—especially in cool weather when evaporation is slow.
- They hold water at crown level, raising the risk of crown rot and leaf spot.
- They reduce airflow, so leaves stay wet longer after rain or irrigation.
- They provide cover for pests like slugs, sowbugs, earwigs, and sometimes rodents.
- They can delay spring warm-up of the soil by several days, slowing early growth in colder climates.
That said, a light layer of shredded leaves can function as mulch, especially between rows. The difference is thickness, moisture retention, and whether the crowns are buried.
“Most strawberry diseases need long periods of leaf wetness. Anything that holds moisture around the plant—dense mulch against the crown, weeds, or matted leaves—tips the odds in the pathogen’s favor.” — Adapted from University of Minnesota Extension guidance on strawberry diseases (2023)
Timing: When to Clean Up Leaves (and When to Leave Them Alone)
Strawberries have two sensitive windows: late fall (when they’re preparing for winter) and early spring (when crowns wake up). Your leaf strategy should shift with the season.
Fall: Remove the “mats,” keep the “mulch”
In fall, you’re trying to prevent prolonged wetness while still buffering the soil from temperature swings. If tree leaves have piled into a thick blanket, they should come off the plants.
- Best timing: after most leaves have dropped but before repeated hard freezes. In many gardens, that’s late October to mid-November.
- Rule of thumb: don’t allow more than 1 inch of unshredded leaves over strawberry crowns.
- Ideal between-row mulch depth: 2–3 inches of shredded leaves or clean straw, kept off the crowns.
If you’re in a cold-winter region and use winter protection (straw mulch), apply it after plants have hardened off and nighttime temperatures are consistently around 20°F (-6°C) or lower for several days. That timing is commonly recommended in northern strawberry culture to prevent premature smothering while still protecting crowns from heaving.
Spring: Pull leaves back early—before crowns stretch
In spring, your job is to get sunlight and airflow back to the crowns. Remove soggy leaf mats as soon as you can walk in the bed without compacting soil.
- Target window: when daytime highs regularly reach 45–55°F (7–13°C) and you see new green growth starting.
- What to remove first: anything plastered to the crown or stuck in the plant.
- What can stay: a thin layer between plants, especially if shredded and not touching crowns.
Don’t wait until you see disease spots. By then, leaf wetness has already done its work.
Three Real-World Scenarios (and What Actually Works)
Scenario 1: The “Maple Leaf Quilt” After Autumn Winds
You’ve got broad maple leaves that overlap like shingles. They don’t break down fast, and they trap water.
- What happens: crowns stay wet; slugs overwinter in the damp layer.
- Fix: rake gently with a fan rake across the bed (not into it), then top-dress with 2 inches of clean straw between plants, keeping straw 2–3 inches away from each crown.
Scenario 2: Strawberries Planted Under a Deciduous Tree
This one is common in small yards: strawberries tucked along the dripline of a tree. Leaves rain down for weeks.
- What happens: repeated leaf fall means repeated smothering; light levels drop; fungal pressure climbs.
- Fix: commit to a quick weekly cleanup during peak leaf drop (10 minutes beats a spring disaster). Consider edging the bed and using a lightweight row cover or low tunnel after leaf drop to prevent reaccumulation.
Scenario 3: A Wet Spring With Standing Water in Low Spots
Everything stays damp, and leaves turn into a soggy lid over the soil.
- What happens: botrytis (gray mold) and leaf spot flare early; roots struggle for oxygen.
- Fix: remove leaves promptly, then use a coarse mulch (clean straw or pine needles) that breathes. If you can, raise the bed 4–6 inches over time with compost and topsoil to improve drainage.
How to Clean Up Leaves Without Damaging Strawberry Plants
Strawberry crowns and shallow roots don’t appreciate aggressive raking. Think “lift and remove,” not “scrape and tear.”
Step-by-step: A gentle cleanup routine
- Choose a dry day if possible. Wet leaves are heavier and more likely to pull stems and crowns.
- Start by hand near crowns: lift leaves up and away from the plant. If the leaves are matted, peel them back in sheets.
- Use a fan rake lightly between rows, pulling material toward you rather than pushing into plants.
- Check crown exposure: crowns should be visible at the soil surface—not buried, not perched high.
- Replace with a breathable mulch between plants: 1–2 inches of clean straw or pine needles is plenty for spring moisture moderation.
What not to do
- Don’t use a leaf blower on high aimed at the crowns; it can desiccate and expose roots, especially in sandy soil.
- Don’t bury crowns under compost or leaf piles—strawberries hate having their growing point covered.
- Don’t leave thick mats thinking they’ll “feed the soil” quickly. Whole leaves can take months to break down.
Watering: Leaf Cleanup Changes Your Irrigation Needs
When you remove a damp leaf blanket, the bed dries faster. That’s good for disease prevention, but it means you may need to water a bit more intentionally—especially as plants start flowering.
How much to water
Most strawberries do best with about 1–1.5 inches of water per week (rain + irrigation), with steady moisture during flowering and fruit fill. If you rely on overhead sprinklers, leaf cleanup becomes even more important because overhead watering extends leaf wetness time.
- Best method: drip irrigation or soaker hose under mulch.
- Watering time: morning, so foliage dries quickly if it gets wet.
- Avoid: evening overhead watering—cool nights + wet leaves is a classic disease setup.
Quick field test
Stick your finger into the soil near the plant (not right against the crown). If the top 2 inches are dry, it’s time to water. If it’s moist, wait.
Soil: What Leaf Litter Can Hide (and How to Keep Soil Strawberry-Friendly)
Strawberries thrive in well-drained soil with plenty of organic matter, but not a soggy, anaerobic layer. Leaf mats often signal another issue: poor drainage or low airflow at ground level.
Key soil targets
- Soil pH: roughly 5.5–6.8 for most garden strawberries.
- Drainage: water should infiltrate; avoid sites where water stands longer than 24 hours after rain.
- Mulch approach: keep crowns clear; mulch the pathways and between plants.
If leaf piles repeatedly form because of bed placement, consider installing a simple low edging (even 4-inch tall boards) to keep windblown leaves from rolling in, or relocate the bed to a more open area over time.
Light: Leaves Don’t Just Smother—They Shade
Strawberries want sun, and lots of it. Even a few weeks of shade in early spring can reduce vigor and set you up for smaller yields later.
- Minimum: 6 hours of direct sun.
- Better: 8+ hours for best fruiting.
When leaves accumulate, they shade the crown and lower leaves—the exact area where new growth starts. If you’re growing under trees, leaf cleanup won’t fully solve the shade problem, but it can prevent the worst crown smothering.
Feeding: Don’t Let Leaf Cleanup Trick You Into Over-Fertilizing
A common mistake: you remove leaves, notice plants look pale, and respond with a big dose of nitrogen. That can push lush growth that’s more susceptible to botrytis and leaf diseases.
A steadier feeding plan
- Spring (as growth starts): top-dress with 1/2 inch of finished compost around plants, keeping compost off crowns.
- If using granular fertilizer: follow the label, but many gardeners do well with a light application around 0.5 lb of actual nitrogen per 1,000 sq ft split into two feedings (early spring and after renovation for June-bearing types). If you’re not sure what “actual nitrogen” means, compost is the safer route.
- Avoid heavy feeding during bloom: it can increase soft growth and disease pressure.
For June-bearing strawberries, many university recommendations emphasize post-harvest renovation practices and appropriate fertility timing for next year’s bud formation. See North Carolina State Extension strawberry production guidance (2022) for timing principles and renovation notes, and Penn State Extension strawberry culture resources (2023) for home garden management practices.
Comparison: Fallen Leaves vs. Better Mulches (With Practical Data)
If you like the idea of “free mulch,” you don’t have to give it up—you just have to process it. Whole leaves behave very differently than shredded leaves or straw.
| Cover Material | Recommended Depth | Airflow at Crown | Moisture Holding | Best Use Around Strawberries | Main Risk |
|---|---|---|---|---|---|
| Whole fallen leaves | 0–1 inch (avoid on crowns) | Low | High (mats easily) | Only thinly between rows, removed from crowns | Crown smothering, slug habitat |
| Shredded leaves | 1–2 inches | Medium | Medium | Between plants/rows if kept off crowns | Compaction if applied too thick |
| Clean straw | 2–3 inches (winter can be more, pulled back in spring) | High | Medium | Classic mulch for clean fruit and airflow | Weed seeds if not clean |
| Pine needles | 1–2 inches | High | Medium | Great in wet climates; doesn’t mat much | Harder to source in some areas |
Method A vs. Method B: Realistic cleanup approaches
- Method A: Leave leaves in place (common “natural” approach). Works only if the layer stays thin (<1 inch), doesn’t mat, and crowns remain exposed. Risk climbs fast in wet springs.
- Method B: Remove mats + replace with breathable mulch. Takes 20–40 minutes for a small bed but typically reduces slug hiding spots and leaf wetness time substantially. This is the method that saves plants in rainy years.
Common Problems Linked to Leaf Piles (and How to Fix Them)
If you’ve had issues in the past, fallen leaves are often the “silent partner” that made the problem worse. Here’s what to watch for.
Gray mold (Botrytis) flaring at bloom and fruit set
- Symptoms: fuzzy gray growth on blossoms or fruit; berries rot fast, especially after rain.
- Leaf link: damp, shaded canopy and poor airflow.
- Fix:
- Remove leaf mats and old dead leaves near crowns.
- Mulch with clean straw to keep fruit off soil.
- Water at the base; avoid overhead irrigation during bloom.
- Thin crowded plants so air can move.
Leaf spot / leaf scorch looking worse each year
- Symptoms: small purple spots that enlarge; leaves brown from edges; reduced vigor.
- Leaf link: old infected debris staying wet and pressed against plants.
- Fix:
- Remove dead leaves in spring cleanup—don’t compost if heavily diseased; dispose off-site.
- Switch to drip irrigation.
- Renovate June-bearing beds after harvest (mow/trim foliage per local extension guidance), then keep the bed clean going into fall.
Slugs and sowbugs chewing ripe berries
- Symptoms: irregular holes in fruit; slime trails; damage increases under dense cover.
- Leaf link: leaf mats are perfect daytime shelter.
- Fix:
- Remove thick leaves and any boards/flat debris touching soil.
- Use straw mulch (fluff it—don’t pack it down).
- Set slug traps or use iron phosphate bait per label directions during wet spells.
Troubleshooting: Symptoms You See After Cleanup (What They Mean, What To Do)
“My plants wilted after I removed the leaves.”
- Likely cause: you removed a moisture-retaining layer and exposed soil to wind/sun; roots are shallow.
- Do this: water deeply to moisten the root zone, then add 1 inch of straw or shredded leaves between plants (not on crowns). Check moisture for the next 7–10 days.
“Crowns look blackened or mushy under the leaf mat.”
- Likely cause: crown rot or suffocation from prolonged wetness.
- Do this: remove the plant and inspect. If the crown is soft and brown inside, discard it. Improve drainage, reduce mulch contact with crowns, and avoid replanting strawberries in the same exact spot immediately if you suspect a soilborne rot issue.
“New growth is pale green and slow.”
- Likely causes: cold soil, waterlogged conditions, or mild nitrogen deficiency.
- Do this: first fix wet feet—remove leaf mats, check drainage, and avoid overwatering. Then top-dress with compost (1/2 inch) once the bed begins to warm. Don’t panic-fertilize during cold snaps.
“I cleaned everything up and now weeds exploded.”
- Likely cause: leaves were acting like a weed barrier.
- Do this: replace with a better barrier: 1–2 inches of straw or shredded leaves, and hand-weed while weeds are small (weekly for 3 weeks makes a big difference). Avoid deep hoeing near crowns.
What to Do With the Leaves You Remove
Don’t waste them. Just don’t put them right back where they’ll cause the same issues.
- Shred and compost: shred first for faster breakdown; leaves compost beautifully when mixed with green material.
- Leaf mold pile: bag or bin leaves to make leaf mold—excellent for soil structure next year.
- Use elsewhere: whole leaves are better around shrubs or in pathways where matting isn’t suffocating a crown.
- If disease was heavy: dispose of the worst infected material rather than composting at low temperatures.
Small Habits That Keep Leaf Cleanup Easy All Year
The easiest spring cleanup is the one you prevented in fall. A few small habits make a big difference.
- Edge the bed so leaves don’t tumble in with every wind.
- Do a 5-minute rake after big windstorms in autumn.
- Keep plants spaced so leaves don’t knit together; overcrowding holds debris and moisture.
- Refresh mulch lightly rather than letting any one material build into a thick, airless layer.
When you get this right, strawberries respond fast. Crowns dry out, new leaves stand up instead of lying down, and your first blossoms are less likely to rot before they even become berries. You’ll still have to contend with weather (we all do), but you won’t be handing diseases and slugs a cozy, damp hiding place at the base of every plant.
Sources: University of Minnesota Extension strawberry disease management resources (2023); North Carolina State Extension strawberry production guidance (2022); Penn State Extension strawberry culture and home garden recommendations (2023).