How to Use Mylar Reflectors for Fruit Trees
Last spring I visited a backyard orchard where the peach tree looked like it had two personalities: the south side was loaded with flower buds and the north side was thin, leafy, and reluctant. The gardener had watered and fertilized evenly, pruned well, and still couldn’t get balanced growth or fruit set. The fix wasn’t another fertilizer or a “magic” spray—it was light. We propped a simple Mylar reflector on the darker side for six weeks, and the difference in bud development and fruit color by midsummer was obvious from the driveway.
Mylar reflectors aren’t new in horticulture, but home gardeners often overlook them for fruit trees. Used correctly, reflective film can push more usable light into shaded canopies, improve fruit color, and even help dry foliage faster after rain—without changing your watering schedule or ripping out your fence. Used poorly, it can scorch fruit, confuse pollinators, or just become backyard litter after one windy night.
This is the hard-won, practical approach: when Mylar helps, when it doesn’t, and how to install it so it actually survives weather and pays you back in better fruit.
What Mylar reflectors do (and what they don’t)
Mylar is a polyester film often sold as “reflective film” or “space blanket” material. In orchard settings, reflective groundcovers have been used to improve light distribution inside the canopy, which can improve fruit color and sometimes sweetness depending on the crop and climate. Home gardeners can use the same principle on a smaller scale by placing reflective film where it bounces sunlight into shaded areas.
“Light distribution within the canopy is a major driver of fruit color development; reflective materials can increase the amount of light reaching shaded fruit.” — Penn State Extension tree fruit guidance (2023)
Here’s what to expect when Mylar is used well:
- Better color on apples, peaches, nectarines, plums, and pears—especially on the shaded side of the canopy.
- More even ripening because interior fruit gets more light.
- Faster drying after dew/rain in some setups, which can reduce disease pressure.
Here’s what Mylar won’t fix:
- A tree that’s chronically under-watered or over-watered.
- Severe nutrient imbalance (especially nitrogen overload causing too much leafy growth).
- Bad pruning structure that keeps the canopy packed tight.
- Too little sun overall (a tree in 2–3 hours of sun won’t become a full-sun tree with reflectors).
Best situations for Mylar in home orchards (3 real-world cases)
Case 1: Fence shade on the north or east side
Common setup: fruit tree planted 6–10 ft from a tall fence or garage wall. You get a bright, productive “sun side” and a weak “shade side.” Mylar placed on the shaded side (or on the ground angled toward it) can bounce morning or midday light into that weak zone. This is one of the most reliable uses because you’re correcting a predictable shade pattern.
Case 2: Small trees in tight suburban yards
Dwarf apples and espaliered pears often live in narrow side yards. If your tree only gets direct sun from late morning to mid-afternoon, reflective film can help “fill in” the lower canopy. In practice, I see the biggest improvement in fruit color on apples and pears—less green, more blush—when reflectors are deployed 2–4 weeks before harvest.
Case 3: Rainy climates and disease-prone canopies
In humid regions, anything that helps leaves dry faster can matter. Reflectors can increase light and warmth under the canopy, which may reduce leaf wetness duration. Don’t treat this as a silver bullet for scab or brown rot—still prune, thin, and manage sanitation—but it can be another lever.
Light management: placement, angles, and timing
Light is the main reason to use Mylar, so the setup matters more than the brand. Think like sunlight: you want to redirect light into the canopy, not blast a mirror at a single fruit cluster until it cooks.
Where to place Mylar reflectors
- Ground reflectors: Lay film on the ground under the canopy or just outside the dripline, then secure it. This is the easiest approach and mimics commercial reflective mulches.
- Vertical reflectors: Mount film on stakes, a simple frame, or attach it to a fence to bounce lateral light into the canopy. Useful when the sun is lower (morning/late afternoon) or when ground space is limited.
- Angled panels: A panel angled 30–45° often gives a more useful bounce than flat ground film when you’re targeting the lower canopy.
Timing (when Mylar pays off most)
For fruit quality, reflectors are most useful when fruit is sizing and coloring. In many home orchards, that means:
- Apples/pears: deploy 3–5 weeks before expected harvest.
- Peaches/nectarines/plums: deploy 2–4 weeks before harvest.
- Citrus (container or warm climates): use in winter or shoulder seasons to boost light to the canopy when sun angles are low.
If you put Mylar down at bloom and forget it, you’re more likely to deal with weeds, messy irrigation, and torn film without much benefit. Target the window when it matters.
How much extra light is “too much”?
On very hot days, reflected light plus heat can stress fruit. A simple rule I use: when forecast highs are consistently above 90°F (32°C), be cautious with aggressive reflectors around thin-skinned fruit (peaches, nectarines). On extreme heat spikes above 100°F (38°C), pull the reflector for a day or two or shade the hottest side to avoid sunburn.
Washington State University’s tree fruit resources highlight that fruit sunburn risk rises with high temperatures and direct radiation, especially when fruit is suddenly exposed after pruning or thinning (WSU Extension publication, 2020). Reflectors are essentially a controlled way of increasing radiation—so you manage them with the same respect.
Watering: keep irrigation consistent when reflectors are installed
Mylar changes the microclimate under the canopy. It can slightly reduce soil evaporation if it covers the ground like a mulch, or it can increase localized heat if air movement is limited. The key is not to start “chasing” the changes with erratic watering. Fruit trees like consistency.
Practical watering targets (backyard scale)
- Young trees (1–3 years): aim for roughly 5–10 gallons per watering, 1–2 times per week depending on soil and heat.
- Established trees: plan on 15–25 gallons per watering during dry stretches, typically every 7–14 days.
Those numbers assume you’re wetting the root zone, not sprinkling the surface. If you’re using drip irrigation, it often takes 2–4 hours to deliver a deep soak depending on emitter output. With Mylar on the ground, check that emitters aren’t blocked and that water isn’t pooling and creating anaerobic spots.
Simple moisture check you can trust
Use the “hand squeeze” test: dig 6–8 inches down near the dripline. Grab a handful of soil.
- If it forms a weak ball and breaks apart with a poke: usually good.
- If it won’t form a ball at all: water is likely needed.
- If it forms a tight ball and oozes water or feels slick: too wet—pull back irrigation and improve drainage.
Soil and groundcover: Mylar is not mulch (treat it differently)
Reflective film is not a soil builder. It doesn’t feed microbes and it won’t improve texture. What it can do is interfere with rainfall penetration and normal mulching routines if you lay it wall-to-wall.
Best practice: keep a mulch ring and use Mylar strategically
I like this setup for most home orchards:
- Maintain a wood-chip mulch ring 2–4 inches deep, staying 4–6 inches away from the trunk to prevent rot.
- Place Mylar outside the inner mulch ring, closer to the canopy edge, where it can reflect light upward without smothering the trunk zone.
- Leave a few gaps so water can enter easily and you can inspect soil.
If weeds are your main driver, use cardboard + chips for weed suppression and reserve Mylar for the last few weeks before harvest when you want extra light.
Feeding: don’t “fertilize for reflectors”
When gardeners see improved light, they sometimes also add more fertilizer “to push fruit.” That’s how you end up with leafy growth and bland fruit. Light and nitrogen interact: more nitrogen pushes vegetative growth, which can shade fruit again and undo the benefit you’re trying to create.
Practical feeding guidelines
- If your tree is already putting on 12–18 inches of new shoot growth in a season, go easy on nitrogen.
- Prioritize soil health: compost topdressing 1/2–1 inch in spring under mulch is often enough for mature backyard trees.
- If a soil test indicates low potassium, correct it—potassium is closely tied to fruit quality.
For specific nutrient rates, rely on local extension recommendations tied to soil tests. Home orchard fertilizing guidelines from cooperative extensions consistently stress testing rather than guesswork (University of California Agriculture and Natural Resources home orchard resources, 2022).
Comparison: Mylar vs white paint vs pruning (with real numbers)
Reflectors are one tool. Here’s how they stack up against two other common ways gardeners try to solve “shaded fruit” and uneven ripening.
| Method | Typical cost (home scale) | Time to deploy | Best use window | Main risk | What you can realistically improve |
|---|---|---|---|---|---|
| Mylar reflector (ground/vertical) | $15–$40 for enough film for 1–3 small trees | 30–60 minutes per tree | 2–5 weeks pre-harvest | Fruit sunburn above ~90°F/32°C; wind damage | Color on shaded side; more even ripening |
| Summer pruning (selective thinning cuts) | $0 if you have pruners | 20–45 minutes per tree | Mid-summer; avoid heat spikes | Sudden sun exposure can sunburn fruit; overstimulation of watersprouts | Long-term light penetration; canopy size control |
| Whitewashing trunk/limbs (50:50 latex paint:water) | $10–$25 | 30–45 minutes | Late fall to early spring | Messy; not for boosting fruit color directly | Reduces sunscald on bark; protects young trees |
Notice the difference in timing: pruning is structural and long-term; whitewash is protective; Mylar is a targeted, short-term light booster. If you want better fruit color this season without over-pruning, Mylar is often the fastest lever to pull.
Step-by-step: installing Mylar reflectors so they don’t become trash
The biggest failure I see is flimsy film flapping itself into ribbons after the first strong wind. The second biggest failure is laying it down and forgetting that it blocks normal access for irrigation checks and fruit drop cleanup.
Materials
- UV-stable reflective film (thicker is easier to reuse)
- Landscape staples or sod pins (at least 6–8 per sheet)
- Optional: 1x2 lumber or PVC to make a frame for vertical panels
- Clamps or zip ties
- Scissors/utility knife
Ground reflector method (most common)
- Pick a calm day. If winds are over 10–15 mph, wait. You’ll fight it the whole time.
- Weed first. Pull tall weeds that will poke holes or shade the reflector.
- Cut to size. Start with a piece roughly 3 ft x 6 ft for a small tree, larger for semi-dwarf canopies.
- Position for bounce. Place it on the shaded side of the tree, just outside the densest mulch ring.
- Secure the edges. Use pins every 12–18 inches around the perimeter. Add a few in the center if it billows.
- Check irrigation. Run your drip/soaker for 5 minutes and confirm water is going where you expect.
- Monitor for hot spots. For the first week, inspect fruit on the sunny side and lower canopy every couple days.
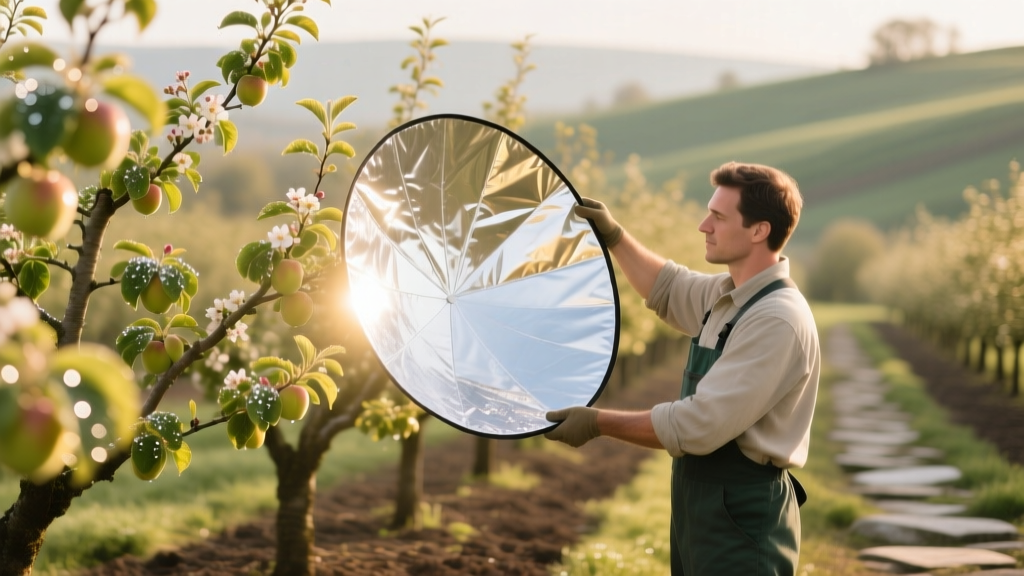
Vertical panel method (for fence shade or narrow spaces)
- Build a simple frame (for example, a 2 ft x 4 ft rectangle) with scrap wood or PVC.
- Stretch Mylar tight and staple/clip it so it doesn’t flap.
- Set the panel 2–4 ft from the canopy edge, angled slightly upward.
- Stake it well; wind load is real.
Common problems (and fixes) when using Mylar
Troubleshooting: fruit sunburn
Symptoms: pale, bleached patches; later turns brown or corky on apples; on peaches/nectarines you may see a tan, leathery spot on the exposed side.
Most likely causes:
- Reflector installed during a heat wave (above 90°F/32°C).
- Sudden exposure after heavy pruning or aggressive thinning.
- Reflector aimed like a mirror at one fruit cluster.
Fix:
- Pull the reflector temporarily during extreme heat (especially above 100°F/38°C).
- Reposition so it reflects broadly into the canopy rather than directly at fruit.
- Maintain some leaf cover; don’t strip the south side bare.
Troubleshooting: increased pests hiding under the film
Symptoms: earwigs, sowbugs, slugs, or ants congregating; fruit damage near the ground.
Most likely causes: film laid over damp soil with hiding spots and no airflow.
Fix:
- Lift the film weekly, especially after irrigation, to disrupt hiding places.
- Keep reflectors out only during the targeted window (a few weeks before harvest).
- Use traps (rolled cardboard for earwigs; iron phosphate bait for slugs where appropriate) rather than spraying under the canopy.
Troubleshooting: mildew or fungal issues don’t improve
Symptoms: powdery mildew persists; brown rot shows up near ripening despite reflectors.
Most likely causes: canopy still too dense; infected fruit left on tree/ground; watering overhead late in day.
Fix:
- Thin fruit properly: on apples, often 6–8 inches apart per cluster; on peaches, typically 6 inches apart along the branch (adjust for variety and branch strength).
- Prune for airflow after harvest or during dormant season, and do light summer thinning cuts if needed.
- Sanitation: remove mummified fruit and pick up drops at least 2 times per week during ripening.
Troubleshooting: reflector keeps tearing or blowing away
Symptoms: shredded film; staples pulled; noisy flapping.
Most likely causes: too-thin material, not enough anchors, or placed where wind tunnels through.
Fix:
- Use more pins: every 12 inches on the windward edge.
- Add a thin batten (strip of wood) along edges and pin through it.
- Switch to framed vertical panels where ground placement is too exposed.
Using Mylar with pruning, thinning, and training (the smart combo)
Reflectors shine (pun intended) when you pair them with good canopy management. If your tree is a dense umbrella, reflected light hits leaves on the outside and never reaches the fruit inside.
My go-to sequence for better fruit quality is:
- Late spring: thin fruit early enough to size well (often within 30–45 days after bloom for apples; sooner for stone fruit depending on variety).
- Early summer: do minimal summer pruning—remove a few upright water sprouts blocking the interior, not a full haircut.
- Pre-harvest: install Mylar for 2–5 weeks to boost final color and ripening uniformity.
Safety and neighbor-proofing (things you’ll be glad you considered)
Reflective film can be surprisingly bright. In close neighborhoods, a poorly aimed vertical reflector can throw glare into a neighbor’s kitchen window for hours.
- Angle reflectors toward the canopy, not outward.
- Keep panels low—often below 3 ft is enough for dwarf trees.
- If glare is an issue, use slightly less mirror-like reflective fabric (still bright, less “flash”).
Also keep reflectors away from direct contact with tender bark, especially on young trees. The trunk can heat up and stress the cambium if light is focused there. If you’re worried about trunk sunscald, that’s a separate issue—use whitewash (interior latex paint diluted 50:50 with water) on the trunk during dormant season rather than trying to “solve” it with Mylar.
A simple seasonal plan you can repeat
If you want a repeatable routine that doesn’t become a whole lifestyle, here’s the one I use for most backyard fruit trees:
- Spring: mulch, check irrigation, and thin fruit as needed. Keep the canopy open enough that you can toss a hat through it (not a joke—if air and light can’t move, problems follow).
- Mid-summer: correct obvious shade with a few pruning cuts, not a hard prune.
- Late summer into harvest: deploy Mylar reflectors for 2–5 weeks, monitor heat, and remove/roll up film after harvest to keep pests and litter down.
When you get it right, the payoff is immediate and satisfying: the apples color more evenly, peaches blush on the “shy” side, and you stop feeling like only half your tree knows it’s supposed to be fruiting. Mylar is not a substitute for sun, water, or pruning—but as a targeted light tool, it can turn a frustrating microclimate into a dependable harvest.
Citations: Penn State Extension tree fruit guidance on canopy light and color development (2023); Washington State University Extension publications on fruit sunburn risk and heat/light exposure (2020); University of California Agriculture and Natural Resources home orchard resources emphasizing soil testing and targeted fertilization (2022).