Spring Garden: Testing Compost Readiness
The next 2–6 weeks decide how productive your spring garden will be. Beds are warming, seedlings are queued up, and you’re about to ask your soil to do a lot of work fast. If your compost isn’t fully ready, it can tie up nitrogen, attract pests, or burn tender transplants. If it is ready, it’s the quickest way to improve structure, moisture-holding, and early-season nutrient availability right when roots are waking up.
This is a practical “right now” checklist for testing compost readiness, using it safely, and timing spring tasks so you don’t lose momentum to cold snaps, wet soil, or spring pests.
Top priority this week: test compost readiness before you spread it
Spring compost use is a race against planting dates. Aim to test compost 7–14 days before you plan to top-dress beds or fill containers so you have time to screen, finish, or reroute an unfinished batch.
Step 1 (10 minutes): the smell, look, and feel test
Ready compost is boring—in the best way. It should be dark brown to nearly black, crumbly, and smell like soil or a forest floor. If it smells sour, like ammonia, or like rotting food, it’s still decomposing aggressively and can create problems in beds.
- Smell: earthy is good; ammonia = too much nitrogen/too wet; sour = anaerobic.
- Texture: crumbly, not slimy; you should be able to rake it apart.
- Identity: you should not recognize most original materials (except small woody bits).
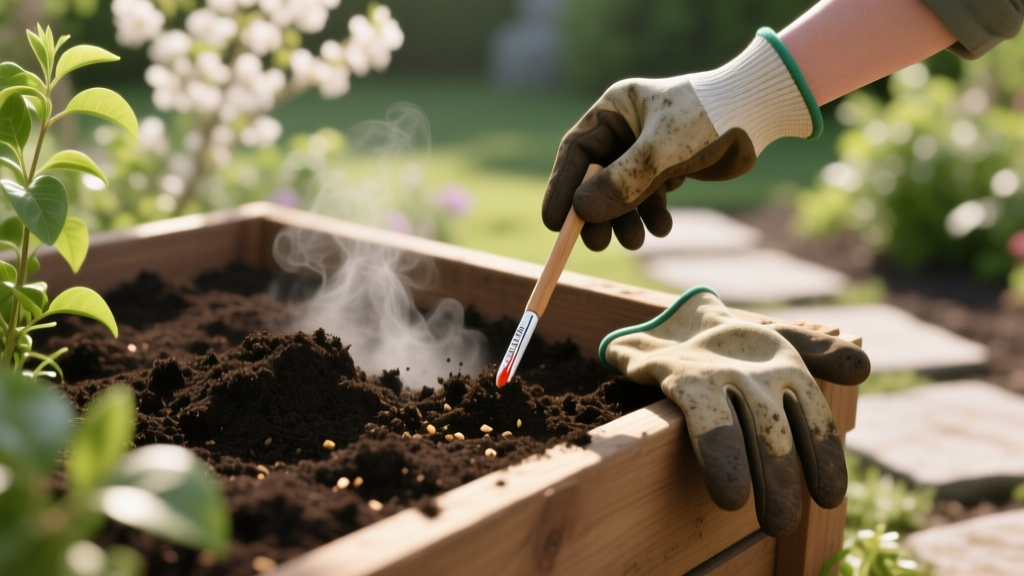
Step 2 (same day): temperature threshold test (most reliable in spring)
Use a compost thermometer (long probe) and take readings in the center. In spring, finished compost should be close to ambient air temperatures and not “reheat” after turning.
- Active composting: often runs 130–160°F (54–71°C) in the hot core.
- “Curing” compost: typically drops below 90°F (32°C) and stays steady.
- Ready to use: stays within about 10–20°F of ambient and does not climb after you turn it.
If your pile is still above 100°F (38°C) in the center, treat it as unfinished for direct seeding and transplanting. Let it cure longer or use it as mulch around established perennials instead of mixing into seed beds.
“Compost that is still actively decomposing can compete with plants for nitrogen and may injure seedlings. A curing period after active composting stabilizes the material for garden use.” — Extension guidance summarized from compost maturity recommendations (Cornell Waste Management Institute, 2020)
Step 3 (3–7 days): the bag test (a simple maturity check)
Put 2–3 cups of moist compost into a sealed zip-top bag. Leave it at room temperature for 3 days.
- If it smells worse when you open it (sour/rotten/ammonia), it’s still unstable.
- If it smells the same (earthy), it’s likely stable enough for garden use.
Step 4 (7–14 days): the germination test for seed-bed safety
This is the spring “insurance policy” if you’ll direct-seed carrots, lettuce, beets, or anything small-seeded. Mix compost 1:1 with potting mix (or clean sand/seed-starting mix). Sow 10 fast seeds (radish or cress). Keep evenly moist at 65–75°F (18–24°C) for 7 days.
- Pass: germination and growth comparable to your control pot (no compost).
- Fail: poor germination, yellowing, or stunting = compost is too “hot,” salty, or immature.
High salts are a common hidden problem in compost made with lots of manure or if the pile was repeatedly dried and re-wetted. If you suspect salt, use compost as a thin top-dress rather than mixing heavily into containers.
Fast decision guide: what to do with compost based on test results
| What you observe | What it means | Best spring use (right now) | What to do next |
|---|---|---|---|
| Earthy smell, crumbly, no reheating after turning | Stable/ready | Mix into beds; seed beds; potting blends (sparingly) | Screen if needed; apply 1/2–1 inch to beds |
| Warm core >100°F or reheats after turning | Still active | Mulch around established shrubs/perennials (not against stems) | Turn and aerate; cure 2–4 more weeks |
| Ammonia smell or slimy texture | Too wet/too much nitrogen; anaerobic pockets | Do not use near seedlings | Add dry browns; turn; keep moisture like a wrung sponge |
| Lots of recognizable food scraps | Immature; pest-attracting | Keep in bin/pile only | Cover with browns; increase heat/aeration |
Research note: Home compost piles that reach and maintain high temperatures are more likely to reduce pathogens and weed seeds. The USDA National Organic Program compost guidance commonly cited by extension educators uses benchmarks of 131°F (55°C) for several days with turning for aerated piles (context varies by system). For home gardeners, the takeaway is practical: heat + turning reduces risk; curing improves plant safety.
What to prepare (right after compost testing): beds, tools, and soil timing
Compost readiness matters, but so does soil readiness. Working wet spring soil can create compaction that lasts all season.
Soil “workability” test (do this before you dig)
Grab a handful of garden soil from 3–4 inches deep and squeeze.
- If it forms a tight ball and smears, it’s too wet—wait 3–7 days.
- If it crumbles when you poke it, it’s workable.
Compost application rates for spring
- Vegetable beds: top-dress 1/2–1 inch of finished compost and lightly incorporate into the top 2–3 inches (or leave as mulch if you’re no-till).
- Perennials and shrubs: 1/2 inch as a ring under the dripline; keep compost 2–3 inches away from stems/crowns.
- Lawns (spot improvement): screened compost as a thin topdress 1/4 inch over thin areas.
- Containers: compost is an ingredient, not the whole recipe—keep compost to 20–30% of container mix unless you know it’s low-salt and very mature.
Extension guidance consistently warns that compost varies widely; if you’re using municipal or purchased compost, ask for a recent analysis (salts/EC, pH, maturity). The University of Minnesota Extension notes compost should be mature and stable before applying to gardens, especially where seeds are germinating (University of Minnesota Extension, 2019).
Spring timeline: a month-at-a-glance schedule
| Spring window | Compost actions | Garden actions tied to compost readiness | Key thresholds to watch |
|---|---|---|---|
| Early spring (4–6 weeks before last frost) | Take temp readings; do bag test; turn if reheating | Prep beds without deep digging; start seeds indoors | Soil workable; compost core ideally <90–100°F |
| Mid-spring (2–4 weeks before last frost) | Germination test; screen finished compost | Top-dress beds for peas/greens; set up row cover | Night lows often 28–40°F; watch forecast |
| Late spring (0–2 weeks before/after last frost) | Apply finished compost; reserve unfinished for mulch | Transplant brassicas; direct-seed carrots/beets if soil >45°F | Frost date; soil temp climbing to 50–60°F |
| Post-frost (2–4 weeks after last frost) | Side-dress heavy feeders with finished compost | Plant beans and warm crops when soil >60°F | Warm nights >50°F for tomatoes/peppers |
What to plant (based on compost status and temperature)
Use finished compost to set up quick early crops. If your compost isn’t ready, don’t stall—plant into soil with a light mulch of leaf mold or straw, and hold compost for later side-dressing.
Direct-seed now (cool soil, compost must be mature)
As soon as soil is workable and trending above 45°F, you can direct-seed:
- Peas
- Spinach
- Lettuce
- Radishes
- Carrots (best with screened, finished compost only)
Timing anchors: In many Zone 5 gardens, this is often 2–4 weeks before the average last frost date. In Zone 7, it’s often earlier, but spring rain can keep soil too wet—use the squeeze test rather than the calendar.
Transplant soon (cool-season crops tolerate light frost)
Brassicas and hardy greens can go out when night temperatures are regularly above 28–30°F and you can protect them. Good candidates:
- Broccoli, cabbage, kale
- Onion sets, leeks
- Chard
If compost is still immature, place it as a thin mulch around transplants (not mixed in the planting hole). Mixing immature compost into the root zone is where nitrogen tie-up and root irritation show up fastest.
Hold off (warm-season crops need warm soil, not just warm days)
Tomatoes, peppers, cucumbers, squash, and beans perform best when soil warms to 60°F and nights hold above 50°F. Compost can help soil warm and buffer moisture, but only if it’s stable and applied properly (thin layer, not a cold, wet blanket).
What to prune (spring cuts that reduce disease pressure)
Pruning isn’t only about shape—it’s spring disease prevention. Do these before wet weather and leaf-out trap humidity.
Prune now: apples/pears (dormant to early bud swell)
In cold-winter regions (Zones 3–6), late winter to early spring is prime time for structure pruning before active growth. Remove dead, damaged, and crossing branches. Clean tools between trees to limit disease movement.
Wait to prune: spring-flowering shrubs
Lilac, forsythia, and many early bloomers set flower buds last year. Pruning now removes flowers. Prune right after bloom instead.
Perennials: cut back with pest awareness
Cut back last year’s stalks before new growth gets tangled, but check for beneficial insect activity. If you see overwintering cocoons or stems with cavities, cut and set aside in a quiet corner for a few weeks so beneficials can emerge.
What to protect (frost, wind, and spring pests)
Spring protection is about short, decisive actions tied to forecasts. Your compost work supports plant resilience, but row cover and sanitation prevent setbacks.
Frost protection thresholds to use this week
- 32°F: light frost risk—cover tender seedlings and blossoms.
- 28°F: hard freeze—protect brassica transplants and early blooms; move containers.
- Above 40°F nights: many cool-season crops cruise; pests also wake up faster.
Keep lightweight row cover or frost cloth ready for quick deployment. Avoid plastic touching leaves overnight; it can transmit cold and cause damage.
Slug and cutworm prevention (especially in cool, wet springs)
Compost and mulches can create ideal slug habitat when spring stays damp. Prevention beats rescue:
- Water in the morning so the surface dries by night.
- Clear dense debris right around seedlings for the first 2–3 weeks after planting.
- Use collars for brassicas and tomatoes to stop cutworms (paper cups with bottoms removed work).
- Scout at dusk with a flashlight for 5 minutes twice a week.
Damping-off and seedling disease prevention
If compost is immature or too wet, it can increase disease pressure in seed beds and containers. Keep these rules tight:
- Use finished, screened compost only in seed-starting blends.
- Prioritize airflow: don’t crowd seedlings; vent cold frames on sunny days above 55°F.
- Water from below when possible; avoid constant surface wetness.
Extension resources commonly emphasize compost maturity and proper curing to prevent phytotoxic effects and seedling problems; Cornell’s compost maturity materials highlight stability and curing as key to safe use (Cornell Waste Management Institute, 2020).
Regional spring scenarios: adjust compost timing to your reality
Spring doesn’t behave the same everywhere. Use these scenarios to decide what to do with compost and planting schedules right now.
Scenario 1: Cold spring in USDA Zones 3–5 (late frosts, slow soil warm-up)
If your average last frost date is around May 5–25, you’ll often have a long, muddy shoulder season. In these areas:
- Do compost temperature checks weekly; cold air can make a pile look “done” when the core is still active.
- Prioritize raised beds—they drain faster and warm sooner.
- Keep compost applications light until soil is workable; spreading on saturated soil invites compaction.
Best move: If compost is borderline, use it as a top-dress around established perennials now and reserve the most finished material for seed beds closer to planting time.
Scenario 2: Wet spring in USDA Zones 6–7 (warm spells + heavy rain)
Warm days can push early growth, but wet soil is the limiter. Compost that’s too fine or applied too thick can seal the surface.
- Screen compost and apply in a thin layer (1/2 inch) to avoid crusting.
- Use paths and boards to avoid stepping in beds.
- Watch for slugs and fungal issues—scout twice weekly.
Best move: Keep unfinished compost in the bin to finish; use leaf mold or shredded leaves as a temporary mulch that won’t tie up nitrogen as aggressively.
Scenario 3: Mild winter/early spring in USDA Zones 8–10 (fast growth, fast pest cycles)
In warm zones, compost piles can stay active all winter, and pests ramp up early. You may be planting tomatoes while other regions are still testing compost.
- Do the bag test and germination test—warm weather can mask instability until seedlings stall.
- Don’t over-apply compost to containers; salts accumulate faster with frequent watering.
- Expect earlier aphids and whiteflies; manage nitrogen (don’t “push” lush growth too hard).
Best move: Use mature compost as a thin top-dress and feed with targeted fertilizers only after plants establish. Overrich beds invite soft growth that pests love.
Right-now checklist: compost readiness + spring garden execution
Print this mentally and run it this weekend.
Compost readiness checklist (20 minutes + waiting time)
- Probe the center temperature: record it.
- Turn the pile; recheck temperature after 24–48 hours (reheating = not ready).
- Do the 3-day bag test.
- If direct-seeding: start a 7-day germination test with radish.
- Screen a bucket of compost now so it’s ready when you are.
Bed prep checklist (same day)
- Do the soil squeeze test before digging.
- Clear winter weeds before they set seed.
- Lay out planting rows and irrigation/soaker hoses now (before plants fill in).
- Top-dress with finished compost (1/2–1 inch) only if soil is workable.
Protection checklist (next cold night)
- Stage row cover/frost cloth before sunset if forecast is 32°F or lower.
- Use collars for cutworm-prone transplants.
- Scout for slugs after rain; remove hiding spots right around seedlings.
When compost isn’t ready: how to keep spring planting on schedule
If your compost fails the bag or germination test, don’t force it into seed beds. Use one of these spring-safe options instead:
- Finish it faster: Turn, add dry browns, and aim for moisture like a wrung-out sponge. A re-energized pile can heat back into the 130–160°F range if balanced.
- Cure it: Let it sit 2–4 weeks with occasional turning. Curing is where compost becomes plant-friendly.
- Use it strategically: Mulch around established shrubs, under fruit trees (not touching trunks), or in ornamental beds where seeds aren’t germinating.
- Bridge with leaf mold or aged shredded leaves: These improve moisture management without the same risk of nitrogen tie-up as fresh scraps.
One more spring reality: a compost pile can be “finished enough” for mulch but not for seed starting. Make separate piles or label bins so your best-finished material is reserved for the most sensitive jobs.
Compost + spring fertility: avoid the two common mistakes
Mistake #1: Putting compost in the planting hole like potting soil. In spring, that can create a water-holding pocket that stays colder and wetter than surrounding soil—slowing roots and encouraging rot. Instead, improve the whole bed surface evenly, then plant.
Mistake #2: Assuming more compost is always better. Compost is soil amendment, not a complete fertilizer plan. Some composts are low in nitrogen; others are high in salts. Use reasonable rates (generally 1/2–1 inch per season for vegetables) and pay attention to plant color and growth.
If you want a data-backed baseline, consider a soil test every 2–3 years, especially if you compost heavily. Many extension services recommend routine testing to prevent phosphorus buildup and nutrient imbalance (guidance varies by state; check your local extension).
Spring rewards decisive action: test compost, apply only what’s stable, and keep planting moving with protection and timing. When your compost passes the temperature, bag, and germination checks, you can spread it with confidence—then shift your focus to sowing, pruning, and pest prevention while the season is still on your side.
Citations: Cornell Waste Management Institute (2020), compost maturity and curing guidance; University of Minnesota Extension (2019), compost use and maturity recommendations for gardens.