How to Save a Plant That Has Been Over-Fertilized
The most common over-fertilizing mistake isn’t “using too much fertilizer” at all—it’s doubling down after the plant looks stressed. Yellowing leaves? People add more feed, thinking it’s hungry, when the roots are actually burning and can’t drink properly. The good news: most over-fertilized plants are salvageable if you act fast and treat it like a salt poisoning problem, not a nutrition problem.
Below are the shortcuts and proven fixes I use (and recommend) when a plant gets hit with fertilizer burn—indoors, outdoors, in containers, and in garden beds.
First: Confirm It’s Fertilizer Burn (So You Don’t Make It Worse)
Tip: Check for “crispy edges + white crust” before you do anything drastic
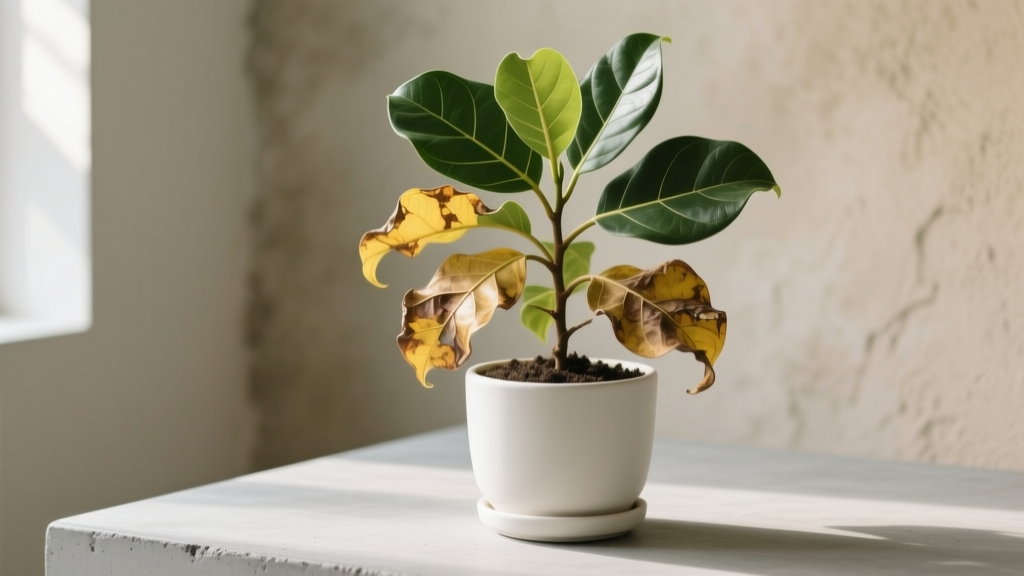
Fertilizer burn usually shows up as brown, crispy leaf tips/edges, sudden droop even when soil is moist, and sometimes a white crust on the soil surface or pot rim (dried salts). If you see yellow leaves and limp growth right after feeding—especially within 24–72 hours—assume salt stress first. Example: a pothos that was fine on Monday, got a “little extra” liquid feed Tuesday, and is droopy with brown tips by Thursday is a classic case.
Tip: Smell and feel the potting mix—ammonia smell means trouble
If the soil smells sharply “chemical” or like ammonia, it often signals excess soluble nitrogen or a concentrated fertilizer pocket. Gently dig 1–2 inches down with a spoon; if you see undissolved granules or a slimy layer, stop fertilizing immediately and move to the rescue steps below. This is common when slow-release pellets get watered heavily in hot weather and dump nutrients fast.
Tip: Use the cheap diagnostic: runoff EC/TDS if you have a meter
If you already own a $15–$25 TDS/EC meter (common in hydroponics), test the runoff from a container plant. While ideal ranges vary by plant, a sudden jump compared to your normal readings is the tell; many houseplants start showing stress when salts spike. Real-world example: a grower who normally sees runoff around 600–900 ppm but suddenly gets 2,000+ ppm after feeding—time to flush.
For science-backed context, excess fertilizer increases soluble salts in the root zone and can cause “physiological drought” (roots can’t take up water even when it’s present). University extension resources routinely flag soluble salts as a top container-plant stressor.
Emergency Triage: What to Do in the First Hour
Tip: Stop the source—remove spikes, tea bags, pellets, and top-dressings immediately
Pull out fertilizer spikes, slow-release tablets, or any “fertilizer tea bag” products right away. If you top-dressed granular fertilizer, scoop off the top 1/2 inch of soil where most of it sits. Example: if you sprinkled a 10-10-10 on a basil pot, removing the top layer can prevent the next watering from dissolving even more salts into the root zone.
Tip: For liquid fertilizer mistakes, flush within 30 minutes if you can
If you just applied an over-strong liquid feed, don’t wait for symptoms—start flushing while the salts are still mobile. Move containers to a sink/tub and run room-temperature water through the pot for several minutes. The goal is to push dissolved salts out the drainage holes before they bind to the mix.
Tip: Don’t “balance it out” with more products
Skip the impulse to add epsom salt, compost tea, kelp, or “root stimulators” right now. When roots are chemically irritated, extra inputs can worsen osmotic stress or create more chemical interactions in the soil. Your job for the next 7–14 days is to reduce salts and let roots regrow.
The Core Fix: Leach Excess Salts (Without Drowning the Plant)
Tip: Use the 3x pot-volume flush for containers (the most reliable shortcut)
For potted plants, flush with a volume of water equal to about 3 times the container volume (a standard leaching rule of thumb in horticulture). For a 1-gallon pot, run roughly 3 gallons of water through it in stages, letting it drain freely. This is based on the principle of leaching soluble salts out of the root zone; extension guidance commonly recommends leaching as the corrective action for high soluble salts in containers.
Tip: Flush in pulses, not one long blast
Do it in 3 rounds: pour until water runs out, wait 5–10 minutes, repeat. Pulsing gives salts time to dissolve and move with the next flush instead of channeling straight through. Example: a peace lily that droops badly after overfeeding often perks up faster with pulsed flushing than with a single flood.
Tip: Use saucer discipline—never let the pot reabsorb salty runoff
Empty the saucer every time during rescue week. If the pot sits in runoff, it wicks the salts right back up. A simple hack is to elevate the pot on chopsticks or a cooling rack inside the saucer so drainage can’t re-enter.
Tip: If your water is hard, use cheaper “better water” strategically
Hard tap water can add more salts (calcium, magnesium, bicarbonates). You don’t need to buy fancy water forever—just use 1–2 gallons of distilled or reverse-osmosis water for the flush on small to medium pots. Cost check: distilled water is often $1–$2 per gallon, which is cheaper than losing a $25 houseplant.
“High soluble salts can cause root injury and leaf burn; leaching with clear water is the primary corrective practice for container media.” — Extension guidance summarized from university horticulture resources (e.g., University of Florida IFAS, 2018; Colorado State University Extension, 2020)
When Flushing Isn’t Enough: Root and Soil Rescue Options
Tip: Do a partial soil swap (the 30% method) to save time and reduce shock
If the plant is too big to fully repot or you’re worried about root disturbance, remove and replace roughly 30% of the potting mix—mostly the top and outer ring where salts accumulate. Slide the plant out, gently crumble away the outside layer, and replace with fresh mix. Example: a large rubber plant in a 12-inch pot often rebounds with a partial swap plus one good flush.
Tip: Full repot if you used slow-release fertilizer or granules (they keep dissolving)
If you can see pellets or granules throughout the mix, repotting is faster than trying to flush repeatedly. Rinse the pot, use fresh potting mix, and only tease roots lightly—don’t “bare-root” a stressed plant unless you have to. This is especially true for osmocote-type products that continue releasing after each watering and warm day.
Tip: Trim dead roots only—leave the “iffy” ones alone for now
Dead roots are brown/black, mushy, and may smell sour; healthy roots are firm and usually pale. Snip only what’s clearly dead with sterile scissors (wipe with 70% isopropyl alcohol). Over-trimming reduces the plant’s ability to recover because it has fewer working roots to rehydrate itself.
Leaf Burn Triage: What to Cut, What to Keep
Tip: Don’t remove every damaged leaf—keep at least 60% of the canopy if it’s still green
It’s tempting to “clean it up,” but the plant needs working leaves to power root repair. If a leaf is mostly green with crispy tips, keep it; if it’s more than 50% brown and collapsing, remove it. Example: on a spider plant with tip burn, you can trim the brown tips cosmetically without removing the entire leaf.
Tip: Cut with a purpose: trim brown tips following the natural leaf shape
Use sharp scissors and mimic the leaf’s pointed shape so it looks natural and avoids a blunt, browned edge. This is purely cosmetic, but it helps you see whether new damage is still happening (a great diagnostic during recovery week).
Three Real-World Rescue Scenarios (And Exactly What Worked)
Scenario 1: Over-fertilized tomatoes in a raised bed (lush leaves, no fruit)
A common case: someone adds a high-nitrogen fertilizer twice (or uses lawn fertilizer nearby), and tomatoes explode in leafy growth but drop blossoms. Fix: stop nitrogen, water deeply to move salts down, and switch to a lower-N option later (like a tomato fertilizer with a smaller first number). Timing trick: give it 10–14 days with no feed, then reassess growth and flowering before adding anything.
Scenario 2: Houseplant hit with “double strength” liquid feed (brown tips in 48 hours)
A pothos or philodendron gets fed at 2x concentration because the cap markings are confusing. Fix: flush with 3x pot volume, empty saucers for a week, and keep in bright indirect light (not harsh sun) while roots recover. Most plants show improvement in turgor within 24–72 hours if the roots weren’t severely burned.
Scenario 3: Blueberries and other acid-lovers burned by the wrong fertilizer
Blueberries hate high-salt fertilizers and don’t like nitrate forms as much as ammonium-based sources; the wrong product can scorch them fast. Fix: flush the root zone with slow, deep watering and top-dress with 1–2 inches of pine bark fines to buffer moisture and reduce stress while you wait it out. If you fertilize again later, use a blueberry/azalea formula and apply at the low end of the label rate.
Method Comparison: Flush vs Repot (Which Saves the Plant Faster?)
| Method | Best for | Time to do | Typical cost | Risk level |
|---|---|---|---|---|
| 3x pot-volume flush | Liquid fertilizer mistakes; mild to moderate salt buildup | 15–30 minutes | $0–$4 (tap vs 2 gallons distilled) | Low (if pot drains well) |
| Partial soil swap (~30%) | Recurring overfeeding; visible crust/salts on top | 20–40 minutes | $5–$15 (fresh potting mix) | Medium-low |
| Full repot | Slow-release pellets/granules mixed in; severe burn | 30–60 minutes | $10–$25 (mix + new pot if needed) | Medium (root disturbance) |
DIY Fixes and Money-Saving Tricks That Actually Help
Tip: Make a “flush funnel” from a cut plastic bottle to prevent mess
Cut the bottom off a 2-liter bottle and use it like a funnel collar around the plant stem to direct water into the pot without splashing soil out. This is especially handy for dense foliage plants. It costs $0 and keeps you from losing potting mix while you flush several gallons through.
Tip: Use a chopstick to break up fertilizer pockets
If granules clumped in one spot, water can tunnel past them and leave a concentrated hot zone. Poke 6–10 holes evenly around the pot with a chopstick before flushing to help water move through the whole root ball. Example: this works great for herbs in small nursery pots where fertilizer tends to sit in one ring near the rim.
Tip: Skip “flush additives” unless you’re in hydro—and even then, be careful
In soil and potting mixes, most flush products aren’t necessary; plain water and good drainage do the heavy lifting. Save your money for fresh potting mix or a better watering can with a narrow spout. If you garden in containers a lot, spending $10–$15 on a bag of quality mix often beats buying bottles of corrective additives.
Aftercare: The 14-Day Recovery Plan (So It Doesn’t Happen Again)
Tip: Pause fertilizer for a full 2 weeks (even if the plant looks “hungry”)
Damaged roots can’t use nutrients efficiently, and feeding too soon restarts the burn cycle. Mark your calendar for 14 days after the rescue flush/repot. Example: after saving an overfed monstera, wait two weeks, then restart at 1/4 strength.
Tip: Restart at 1/4 strength, not 1/2—most people underestimate how little plants need
Use 25% of the label rate for the first two feedings, spaced 2–4 weeks apart depending on growth and season. If the plant responds well (new growth, no new tip burn), then move up to 1/2 strength later. This one tweak prevents repeat burns better than any fancy product.
Tip: Time fertilizer to active growth, not to your shopping schedule
Many houseplants slow down in winter; feeding during low light increases salt buildup because the plant isn’t using nutrients. As a rule, fertilize when you see new leaves or longer days, and back off when growth stalls. Example: a fiddle-leaf fig in a dim corner often needs little to no fertilizer from November through February.
Tip: Water to runoff once a month to prevent salt creep in containers
If you normally water lightly, salts can accumulate over time. Once every 4 weeks, water until you get steady drainage for 30–60 seconds, then discard the runoff. This “mini-leach” is a prevention hack used by many indoor growers, and it’s cheaper than replacing plants.
Tip: Choose fertilizers that are harder to overdose (and measure like a baker)
If you tend to “eyeball it,” switch to products with clearer dosing: a pump dispenser or a teaspoon-per-gallon label you can measure. Keep a dedicated measuring spoon in your fertilizer bin. A tiny misread—like 2 tablespoons per gallon instead of 2 teaspoons—creates a 3x overdose, which is exactly how many plants get burned.
Extra Notes for Garden Beds (Because You Can’t Just “Flush a Pot”)
Tip: Use slow, deep irrigation to move salts down—fast sprinkling doesn’t help
In beds, the goal is to leach salts below the main root zone without creating runoff. Run a soaker hose long enough to wet 6–8 inches deep, then pause and repeat the next day. Example: after a granular fertilizer accident around hydrangeas, two deep soakings spaced 24 hours apart often reduces leaf scorch progression.
Tip: Don’t add more compost immediately if you used “hot” manure-based fertilizer
Some composts and manures add extra soluble salts—exactly what you don’t want during recovery. If you want a gentle top-dress, use leaf mold or aged bark rather than fresh manure compost. Extension publications commonly note that composts can vary widely in soluble salt content, which is why “more organic matter” isn’t always the right emergency move.
Sources You Can Trust (And Why They Matter)
University and extension recommendations consistently point to soluble salts as the mechanism behind fertilizer burn in containers and many bed situations, and they repeatedly list leaching as the practical fix. Two solid starting points for gardeners who want the science behind the steps:
- University of Florida IFAS Extension (2018), container media and soluble salts guidance for ornamentals and houseplants.
- Colorado State University Extension (2020), fertilizer injury/salt stress troubleshooting and corrective leaching practices.
If your plant is still declining after you flush/repot—new leaves emerging deformed, stems turning black at the base, or a sour rot smell that won’t quit—assume the roots were damaged enough to invite disease. At that point, taking cuttings (for houseplants) or replanting (for annuals) can be the fastest way to “save” the genetics even if the original root ball doesn’t make it.
Most of the time, though, a quick salt-removal response plus a two-week fertilizer timeout gets you back on track—and you’ll be amazed how many “mystery problems” disappear once you stop treating fertilizer like a cure-all.