Apartment Balcony Garden on a Budget
You slide open the balcony door with a coffee in hand, ready for a breath of fresh air—and you’re met with a narrow slab of concrete, one wobbly chair, and a railing that looks more “utility” than “oasis.” The sun hits hard for a few hours, then the building across the way throws shade like a curtain. You want herbs, maybe tomatoes, maybe something that blooms. You also don’t want to spend $400 on matching planters that still leave you with a cluttered, hard-to-water mess.
Let’s treat your balcony like a small design project: we’ll measure, pick a layout that fits your daily habits, then choose plants that earn their keep. The goal is a balcony that looks intentional, functions smoothly, and stays within a realistic budget—without sacrificing beauty.
Start With the Three Balcony Realities: Space, Sun, and Wind
1) Measure like a designer (it takes 10 minutes)
Before you buy anything, grab a tape measure. Many balconies are tighter than they feel: a common size is 4 ft x 10 ft (about 40 sq ft). Write down:
- Depth (door to railing): for example, 48 inches
- Length (left to right): for example, 120 inches
- Railing height: often around 36–42 inches
- Door swing clearance: leave at least 24 inches so you’re not bumping pots
Also note any building rules (some ban railing planters or require drip trays). If you rent, plan for “reversible” changes: freestanding planters, zip-tied trellises, and no drilling.
2) Track sunlight in a simple way
On a typical day, check your balcony at three times: morning, midday, late afternoon. You’re looking for total direct sun hours. Most edible plants want 6+ hours of direct sun; many herbs and leafy greens tolerate 3–5 hours. If you only get 2–3 hours, you can still grow plenty—just pivot toward shade-tolerant choices (we’ll cover those).
For context, the Royal Horticultural Society (RHS, 2021) notes that fruiting crops like tomatoes generally crop best in full sun, while leafy crops and many herbs can cope with partial shade.
3) Respect wind and heat reflection
Balconies can be wind tunnels. Wind increases water loss and can snap tender stems. Heat-reflecting walls can also bake containers. If you can’t add a screen, design for sturdiness: heavier pots on the floor, flexible plants up high, and a watering system that doesn’t rely on perfect daily attention.
A Budget-Friendly Layout Strategy That Always Works: Think in Zones
When designers work small spaces, we avoid scattering items. Instead, we create zones. On a balcony, three zones keep things tidy:
Zone A: The “Living Strip” (where you stand and sit)
Reserve a clear path of 24–30 inches wide from the door to the chair. If your balcony is only 48 inches deep, this forces you to keep most planters on one side (or vertical). This one move is what separates “cozy” from “cluttered.”
Zone B: The “Grow Wall” (vertical or railing side)
This is your production area: herbs, greens, and compact fruiting plants. Using vertical space saves money because you can grow more without buying huge containers.
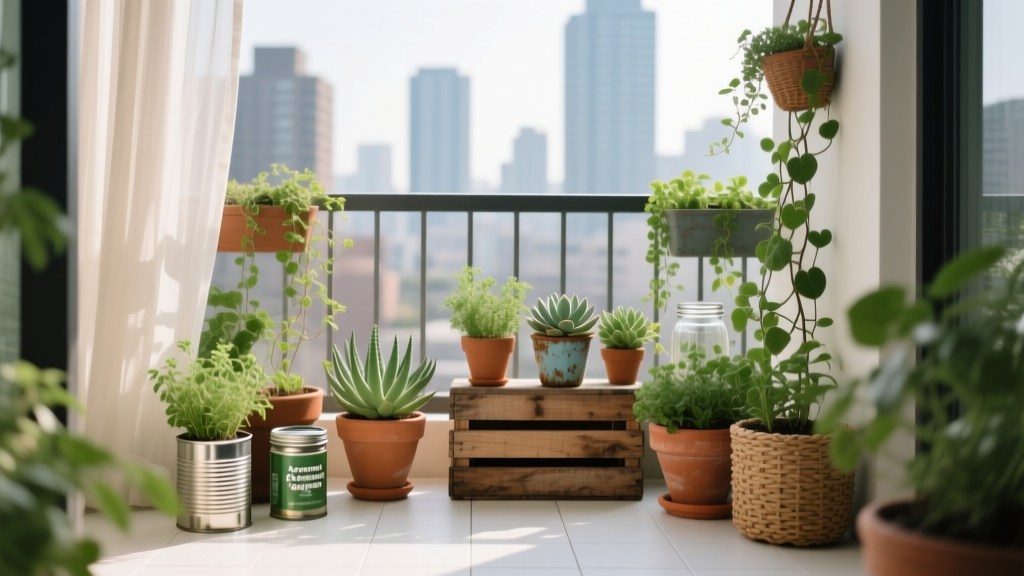
Zone C: The “Anchor Corner” (one big pot that makes it feel designed)
Pick one larger container—something around 14–18 inches wide—to hold a statement plant plus trailing accents. One anchor pot is often cheaper than many small pots, and it visually organizes the space.
Balcony Layout Options (Choose One, Don’t Mix All Three)
Option 1: The Rail-and-Runway Layout (best for narrow balconies)
Planters line the railing side, leaving a clear walkway by the building wall. Add a small bistro chair and foldable table near the door. The result: easy movement, easy watering, and a clean look.
Option 2: The Corner L-Garden (best for lounging)
Put your biggest containers in one back corner and along one side, forming an “L.” This creates a green backdrop behind seating and keeps the center open. Great for renters who want ambiance more than maximum yield.
Option 3: The Vertical Pantry (best for maximum harvest)
Use a freestanding shelf (metal or resin) against the wall and hang lightweight pots. This works especially well when sunlight hits one wall strongly for 4–6 hours. With drip trays, you can keep it tidy for apartment life.
Step-by-Step Setup (Budget First, Then Beauty)
- Sketch your balcony with rough dimensions (example: 4 ft x 10 ft) and draw a 24-inch walkway.
- Choose one layout option above and commit to it.
- Pick containers by function:
- One anchor pot: 14–18 inches wide
- Two to four medium pots: 10–12 inches wide
- One rectangular planter: 24–30 inches long for greens
- Buy potting mix once, correctly. For most balconies, plan on 40–60 quarts total to start (more if you go heavy on containers).
- Add saucers/drip trays to every pot (protects downstairs neighbors and your lease).
- Install vertical support (zip-ties + trellis netting, or a freestanding tomato cage).
- Plant in layers: tallest at the back/rail, medium in the middle, trailing at the edges.
- Water deeply after planting until water drains out; then monitor daily the first week.
Costs: A Realistic Budget Breakdown (and Where to Save)
Here’s a starter budget that produces a “designed” look with real harvest potential. Prices vary by city, but these are common big-box and local nursery ranges:
- Potting mix: 50 quarts at $12–$18
- Anchor pot (14–18"): $15–$30 (resin is lighter than ceramic)
- 3 medium pots (10–12"): $18–$30 total (or reuse food-safe buckets for less)
- Rectangular planter (24–30"): $18–$35
- Seeds: $2–$4 per packet (often cheaper than starts)
- Herb starts (optional): $4–$6 each
- DIY trellis (twine + bamboo): $6–$12
If you’re trying to cap spending at $75–$120, prioritize: soil quality, one anchor container, and seeds. You can thrift or repurpose the rest.
Container Choices: What to Buy vs. What to DIY
| Container Type | Approx. Cost | Best For | Budget/DIY Alternative |
|---|---|---|---|
| 14–18" resin pot | $15–$30 | Anchor plant + trailing edge | Food-safe 5-gal bucket (drill drainage holes) |
| 24–30" window box/rectangular planter | $18–$35 | Cut-and-come-again greens | Plastic storage bin with drilled drainage + saucer |
| Fabric grow bag (5–10 gal) | $6–$12 | Tomatoes, peppers; great drainage | Reusable shopping tote (line + drainage) if sturdy |
| Railing planter | $10–$25 | Herbs, strawberries (if allowed) | Hanging basket on shepherd hook stand |
Plant Selection: Compact, Productive, and Forgiving
Balcony plants should do at least two of these: handle container life, tolerate inconsistent watering, and look good up close. I’m recommending varieties that are widely available and well-suited to small-space growing.
For sunny balconies (6+ hours of direct sun)
Cherry tomato (Solanum lycopersicum) ‘Sungold’ or ‘Tiny Tim’: ‘Sungold’ is famously flavorful and productive; ‘Tiny Tim’ stays compact for containers. Give tomatoes a container of at least 5 gallons and a sturdy cage. Space one tomato per pot.
Sweet pepper ‘Lunchbox Red’: compact plants with snack-size peppers. Use a 3–5 gallon pot. Peppers like warmth and consistent moisture.
Basil ‘Genovese’: thrives in sun and loves regular harvesting (which keeps it bushy). Plant one basil in a 8–10 inch pot, or 8 inches apart in a long planter.
Marigold ‘Gem’ series: small, bright, and helpful for pollinator activity. A few marigolds also make edible plantings look intentionally designed, not purely utilitarian.
For part-sun balconies (3–5 hours of direct sun)
Lettuce ‘Black Seeded Simpson’: fast, forgiving, and perfect for “cut-and-come-again.” Sow a pinch of seed every 2 weeks for continuity. Thin to about 6 inches apart.
Swiss chard ‘Bright Lights’: beautiful stems that read like ornamentals. Space 8–10 inches apart in a rectangular planter; it keeps producing with leaf harvesting.
Parsley ‘Italian Flat Leaf’: handles partial sun, stays attractive, and is expensive at the grocery store—so it earns its container space.
Mint ‘Spearmint’ (in its own pot): mint is tough and useful, but it spreads aggressively. Keep it isolated in a dedicated container to avoid takeover.
For bright shade (2–3 hours of sun or mostly indirect light)
Arugula ‘Astro’: tolerates lower light better than fruiting crops and grows quickly. Thin to 4–6 inches.
Begonia (wax begonia varieties): long bloom season, good shade performance, and neat form in containers. If your main goal is “lush,” begonias deliver without needing full sun.
Heuchera (coral bells) ‘Caramel’ or ‘Palace Purple’: colorful foliage that looks designed all season and handles container life well. Pair with trailing ivy or sweet potato vine for contrast.
For general plant-light matching, the University of Minnesota Extension (2020) emphasizes that most vegetables need full sun, while leafy greens and many herbs tolerate partial shade, which is exactly the pivot that makes balcony gardens succeed.
A Note on Edibles and Food Safety on Balconies
If you’re near heavy traffic or construction dust, rinse edibles well and consider focusing on fruiting crops (tomatoes, peppers) rather than low-growing leafy greens, which catch more debris. Always use potting mix (not in-ground soil) to avoid compaction and drainage issues in containers.
“The best small-space gardens are designed around routines: where you water, where you harvest, and where you actually sit.” — Susan Morrison, landscape architect, in an interview with Garden Design magazine (2019)
Three Real-World Balcony Scenarios (With Layout and Plant Plans)
Scenario 1: The 4' x 10' windy balcony, renter-friendly, wants herbs + privacy
Design move: Use the Rail-and-Runway layout, but keep weight low for stability. Add one tall, narrow “screen” plant in the anchor corner.
Plan:
- Anchor corner: 18-inch pot with feather reed grass ‘Karl Foerster’ (upright, architectural) plus trailing sweet potato vine
- Railing/rail-side pots: basil, thyme, chives (each in 6–8 inch pots)
- Rectangular planter: lettuce mix, arugula; sow every 2 weeks
Budget tip: Grasses and vines can be bought as smaller starter plants to save money—expect $8–$15 each instead of mature specimens at $25+.
Scenario 2: The 6' x 8' south-facing balcony, full sun, wants tomatoes without chaos
Design move: Use the Corner L-Garden. Keep the center open and place messy producers in one contained zone.
Plan:
- Two 10-gallon grow bags: ‘Sungold’ tomato + ‘Bushsteak’ or compact slicer (one plant per bag)
- One 5-gallon pot: ‘Lunchbox’ pepper
- Underplant edges with marigolds to reduce the “bare soil” look
- Herbs in small pots clustered on a thrifted stool (raised = less bending)
Spacing note: Leave at least 18 inches between tomato containers for airflow, which helps reduce disease pressure.
Scenario 3: The 3' x 12' east-facing balcony, part sun, wants flowers + low maintenance
Design move: Use the Vertical Pantry but stock it with ornamentals and a few herbs—this keeps watering simple and the look cohesive.
Plan:
- One shelf unit (about 24 inches wide): begonias on the brightest level, heuchera lower down
- One rectangular planter: parsley + chives + lettuce (harvestable and tidy)
- One anchor pot: dwarf hydrangea alternative if sun is limited—choose heuchera + trailing ivy for year-round foliage interest instead
Budget tip: Skip fancy shelf systems. A basic resin or metal utility shelf often costs $25–$45, and it’s portable when you move.
Smart Spacing and Planting Combinations (So Pots Don’t Fight Each Other)
Balcony containers look best when you design with “thriller, filler, spiller” in mind—one upright focal plant, one mounding plant, one trailing plant. But keep the combination practical:
- Tomato + basil can work visually, but basil often wants more frequent water than a tomato prefers. If you pair them, keep basil in its own small pot tucked near the tomato, not sharing the same container.
- Chard + marigolds is an excellent mix: chard gives structure; marigolds add color in gaps.
- Parsley + trailing nasturtium: nasturtiums spill nicely and are edible, but they need decent light. Keep this combo for 4+ hours of sun.
Rule of thumb for small edibles: don’t overpack. Plants in containers need airflow. When in doubt, thin seedlings so leaves don’t constantly overlap.
DIY Upgrades That Look Expensive (But Aren’t)
- Make a unified look with one color: paint mismatched pots the same matte black or warm white. A single can of exterior spray paint is often $6–$10.
- Create a simple trellis wall: bamboo stakes + jute twine in a grid. It supports peas or nasturtiums and reads as “designed.”
- Use a shallow tray as a watering station: keep your watering can, pruners, and fertilizer in one spot so maintenance stays easy.
Watering and Fertilizing Without Turning It Into a Chore
Container gardens fail more often from inconsistent watering than from bad plant choices. Expect to water:
- Summer: 3–7 times per week depending on heat and wind (small pots dry fast)
- Spring/Fall: 1–3 times per week
If you want a low-cost hack, group thirsty plants together so you’re not guessing. Self-watering planters can be helpful, but they aren’t required if you choose larger soil volumes (bigger pots = slower drying).
For feeding, a simple routine works:
- Leafy greens and herbs: light fertilizer every 2–4 weeks
- Tomatoes/peppers: start feeding once flowering begins; continue every 1–2 weeks with a tomato-appropriate fertilizer
Maintenance Expectations (Real Time Costs, Not Wishful Thinking)
If your balcony is set up for easy access and grouped watering, the weekly workload stays reasonable:
- Average time: 30–60 minutes per week (more during heat waves)
- Deadheading flowers: 5–10 minutes weekly for begonias or marigolds
- Harvesting: 5 minutes a few times per week (the fun part)
Seasonal tasks keep things running:
- Early spring: refresh top 2 inches of potting mix, check drainage holes, sanitize reused pots
- Mid-summer: prune tomatoes, re-sow lettuce if it bolts, watch for aphids
- Fall: pull tired annuals, plant cool-season greens if light allows, store empty pots
Making It Feel Like a Garden (Not a Plant Storage Area)
Here’s the designer trick: leave a little empty space. A balcony garden breathes when there’s a visible surface—floor tile, a small rug, or the tabletop. Aim for 70–80% of the perimeter planted, not 100% of every inch filled.
Add one comfort element that doesn’t compete with plants: a folding chair, a lantern, or a narrow outdoor mat sized around 2 ft x 3 ft. It signals that the balcony is meant to be used, not just maintained.
Once your zones are set, your containers are doing real work, and your plant choices match your sun hours, the budget part gets easier. You stop buying “random rescue plants” and start making deliberate swaps: a bolting lettuce becomes a pot of parsley; a struggling flowering annual becomes a heuchera that looks good from April to November.
The best part is how quickly it changes the feel of daily life. One month from now, you’ll slide that door open and see a green edge, a tidy walkway, and something ready to snip for dinner—proof that good design isn’t about having more space. It’s about using the space you already have with intent.
Sources: Royal Horticultural Society (RHS), “Vegetables: growing in sun or shade” (2021). University of Minnesota Extension, “Growing vegetables in containers” (2020). Garden Design magazine interview with Susan Morrison (2019).