Rooftop Bee Garden Plant List
The roof looks perfect from the street—clean lines, a little skyline view, maybe even a grill. But up there, it can feel like a baking sheet: wind whips across the parapet, the sun hits hard, and every planter seems to dry out the moment you turn your back. If you’ve ever watched a single honeybee circle once and vanish, you know the problem isn’t “more flowers.” It’s designing a rooftop that offers dependable nectar and pollen, safe landing zones, and bloom coverage from spring through fall—without overloading your structure or your weekends.
Let’s design a rooftop bee garden the way a landscape designer would: start with constraints (weight, wind, sun, water), sketch a layout that’s pleasant for people and functional for pollinators, then choose plants that thrive in containers and make bees show up consistently.
Design principles for rooftops: make it easy for bees to find, feed, and return
1) Start with a quick site read: sun, wind, and roof load
Most rooftops get strong light. A minimum target for bee-friendly bloom density is 6+ hours of direct sun (more is better for lavender, salvias, and thyme). If your roof gets 8–10 hours, you can run a Mediterranean-leaning plant palette with minimal fuss.
Wind is the quiet plant killer up high. Plan on a “wind edge” along the perimeter where you’ll place heavier planters and sturdier plants (grasses, dwarf shrubs). Keep delicate blooms and tall, hollow-stem perennials a bit inward where turbulence is lower.
Weight matters. Many residential roofs are engineered to handle a certain live load; if you don’t know yours, ask the building manager or consult a structural pro. A saturated 24-inch planter can be surprisingly heavy. As a practical reference point, a 24" x 24" fiberglass planter with wet potting mix can easily exceed 120–180 lb depending on depth and soil blend. Use lighter containers, build upward with trellises instead of deep soil, and avoid creating one huge, immovable mass.
2) Design for “patches,” not a scattered bouquet
Bees forage efficiently when the same plant is grouped. A good rooftop rule is to plant in clumps of 3–7 containers per key species (or 3–5 plants in a trough), then repeat that clump elsewhere. You’ll see more consistent bee traffic than you will with one pot each of ten different flowers.
3) Prioritize a bloom calendar: early, peak, late
Your plant list should cover three time windows: spring ramp-up, summer abundance, and fall fueling. The Xerces Society notes that pollinators benefit from a “succession of blooms” across seasons (Xerces Society, 2023). On rooftops—where forage can be isolated—this matters even more.
4) Offer water without creating a mess
Bees need water, but rooftops also need drainage that won’t stain decking or annoy neighbors. Use a shallow dish in shade (slows evaporation) with landing stones. A simple setup: a 10–12 inch saucer filled with pebbles, kept topped up 2–3 times per week during heat waves.
5) Avoid pesticides; design to prevent problems instead
Healthy container plants are less pest-prone when they’re not stressed. Right-size your pots, use consistent irrigation, and keep airflow. If you must intervene, choose the gentlest approach first (hand removal, water spray, horticultural soap used at dusk when bees aren’t active). The U.S. EPA emphasizes reducing bee exposure to pesticides and avoiding applications during bloom (EPA, 2022).
“Urban roofs can become high-quality habitat when designs provide continuous bloom, nesting resources, and avoid pesticide exposure.” — Green roof and pollinator habitat synthesis in urban ecology research (see Hall et al., 2017)
Layout strategies: three proven rooftop formats
Format A: The “U-Shape Forage Loop” (best for entertaining roofs)
Concept: A U of planters along the perimeter with a clear central walkway. People circulate; bees get a continuous forage edge.
Sample dimensions: Works beautifully on a 12' x 20' roof area. Leave a 36–42 inch clear path for comfortable movement and container maintenance.
Planter plan: Use 8–10 medium planters (18–24" diameter) plus 2 troughs (36–48" long) for mass planting.
Format B: The “Sun Island + Windbreak Spine” (best for windy rooftops)
Concept: A sturdy line of heavier planters (the spine) acts as a windbreak, with a sunny island of nectar plants in its lee.
Sample dimensions: On a 10' x 10' area, place a 10' long spine of rectangular planters on the windward side, then cluster 6–8 smaller pots behind it.
Planting trick: Put structural plants (little bluestem, dwarf rosemary, compact grasses) in the spine planters. Keep softer flowers (catmint, calendula, thyme) in the sheltered zone.
Format C: The “Rail Planters + Two Anchor Tubs” (best for renters)
Concept: Rail planters provide linear forage; two large tubs deliver visual punch and serious bloom volume without a full remodel.
Sample dimensions: A 6' x 8' balcony roof corner can support 4 rail planters plus 2 tubs (20–24" diameter). This format is movable and often landlord-friendly.
Step-by-step setup (a practical build you can do in a weekend)
- Map sun and wind for one day. Note where sun hits at 9 a.m., noon, and 4 p.m. Identify the windiest edge.
- Choose container sizes by plant role. Anchor shrubs in 20–24" pots; perennials in 12–16"; herbs in 8–12".
- Use a lightweight rooftop potting mix. Aim for fast drainage; avoid garden soil (too heavy, compacts).
- Install saucers or pot feet. Keep containers from trapping moisture against roof membranes and staining surfaces.
- Set up irrigation early. A DIY drip kit is usually $35–$80 depending on size. If hand-watering, group thirstier plants together.
- Plant in clumps. Repeat the same species in multiple pots for stronger bee draw.
- Add a water dish and a “resting rock.” Place it where you’ll see it (you’ll maintain it more often).
- Mulch lightly. A 1 inch layer of fine bark or gravel reduces evaporation and keeps potting mix from crusting.
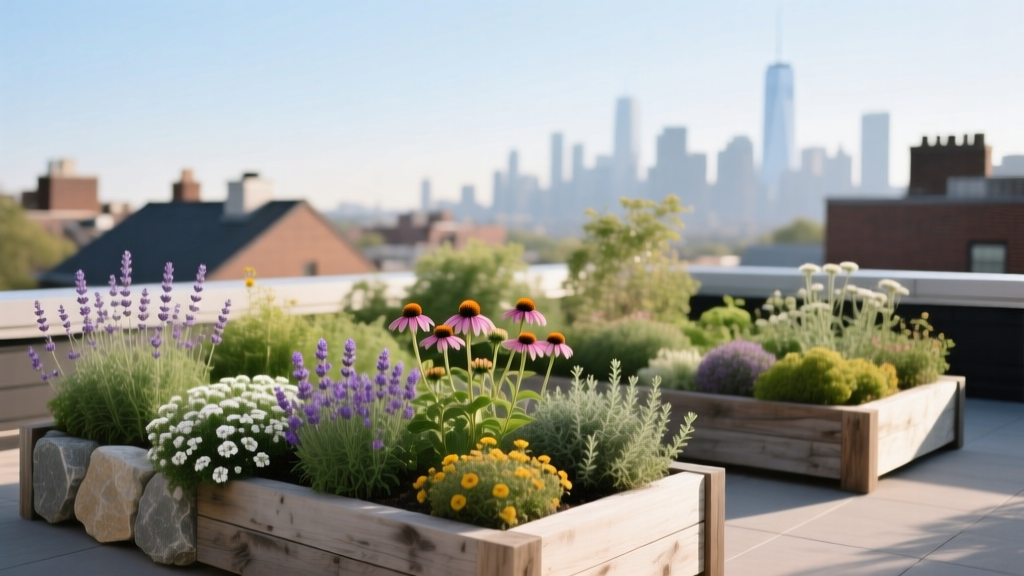
Rooftop bee garden plant list: container-proven varieties and why they work
The best rooftop bee plants share a few traits: they flower generously, tolerate wind and sun, perform in containers, and don’t demand constant deadheading. Below is a designer’s plant list with specific varieties chosen for reliability.
Long-blooming summer anchors (your main nectar engine)
Lavandula angustifolia ‘Hidcote’ (English lavender) — Compact, fragrant, and a bee magnet. Likes full sun and lean soil. Put in a 14–18" pot; space 16–18" if planting in a trough. Blooms early to mid-summer, and you can shear lightly after flowering.
Salvia nemorosa ‘Caradonna’ — Dark stems, violet spikes, repeat bloom with a haircut. Thrives in heat and wind once established. Plant in 12–16" pots; spacing 12–15". Excellent for adding vertical rhythm in a rooftop layout.
Nepeta x faassenii ‘Walker’s Low’ (catmint) — A workhorse for continuous bloom. It softens hard edges of planters and keeps flowering with occasional trimming. Give it a 16" pot; it can spill nicely over the sides.
Echinacea purpurea ‘PowWow Wild Berry’ — Strong stems, bold color, long season, and a landing-pad flower shape. Use a 16–20" pot and consistent watering during establishment.
Early-season support (so bees find you in spring)
Crocus tommasinianus (bulb, “Tommies” crocus) — One of the earliest bee snacks. Plant 20–30 bulbs in a 18–20" bowl for impact. They disappear by late spring, making room for summer plants in the same container (a designer trick called layering).
Allium ‘Purple Sensation’ — Globe flowers that read well from indoors and pull pollinators in. In a trough, space bulbs 6 inches apart.
Thymus vulgaris ‘German Winter’ (culinary thyme) — Tiny blooms, huge value. Bees work thyme hard. Plant in 10–12" pots; drought tolerant and happy in sun.
Late-season fuel (critical on rooftops)
Solidago rugosa ‘Fireworks’ (goldenrod) — If you want a late-season bee party, this is it. Use a 20" pot; it can get tall, so place it where wind won’t snap stems (behind the spine/windbreak). Goldenrod is often unfairly blamed for allergies; ragweed is the common culprit.
Sedum (Hylotelephium) ‘Autumn Joy’ — Succulent leaves, minimal watering, and late blooms that pull in bees and other beneficials. Great for rooftop heat. Plant in 12–16" pots.
Symphyotrichum novi-belgii ‘Purple Dome’ (New York aster) — Compact aster with serious fall nectar. Give it a 16–20" pot and cut back in early summer once to keep it bushy.
Herbs that earn their space (edible + pollinator value)
Rosmarinus officinalis ‘Arp’ (rosemary, cold-hardy type) — In milder climates, rosemary can be a year-round anchor shrub. In colder regions, treat it as a seasonal container plant and overwinter indoors. Use a 18–24" pot for stability.
Origanum vulgare ‘Hot & Spicy’ (oregano) — Let it flower. Oregano blooms are tiny but powerful for bees. Plant in a 10–12" pot; it spreads and can be trimmed for cooking.
Foeniculum vulgare ‘Bronze’ (bronze fennel) — Airy umbels, great for beneficial insects. It can get tall (4–5 ft), so reserve it for larger roofs or the sheltered side of a windbreak. Choose a 20–24" pot.
Compact shrubs and structure (so the garden looks designed, not accidental)
Perovskia atriplicifolia ‘Little Spire’ (Russian sage, compact) — Silvery foliage, long bloom, loves heat. Use a 18–20" pot and pair with purple/blue for a cohesive palette.
Hydrangea paniculata ‘Bobo’ — Not a top nectar plant, but it gives structure, shade for the water dish, and a lush feel in a small footprint. Great for the human experience of the roof. Use a 20–24" pot and steady watering.
Comparison table: top rooftop bee plants at a glance
| Plant (Variety) | Best Sun | Container Size | Spacing (in troughs) | Bloom Window | Why Bees Care |
|---|---|---|---|---|---|
| Lavender (‘Hidcote’) | 6–10 hrs | 14–18" pot | 16–18" | Early–mid summer | High nectar; strong scent beacon |
| Salvia (‘Caradonna’) | 6–10 hrs | 12–16" pot | 12–15" | Late spring–summer (reblooms) | Repeat flowers; easy landing spikes |
| Catmint (‘Walker’s Low’) | 6–10 hrs | 16" pot | 18" | Late spring–fall | Long bloom; constant forage |
| Sedum (‘Autumn Joy’) | 6–10 hrs | 12–16" pot | 12–15" | Late summer–fall | Late nectar when roofs can go quiet |
| Aster (‘Purple Dome’) | 6–8 hrs | 16–20" pot | 18–20" | Fall | Critical end-of-season fuel |
Three real-world rooftop scenarios (and how the plant list changes)
Scenario 1: The renter with a 6' x 8' roof corner and strict rules
Constraints: No drilling, minimal weight, everything must be movable, and you’ll likely hand-water.
Layout: “Rail Planters + Two Anchor Tubs.” Use 4 rail planters for herbs (thyme, oregano, compact basil you let flower) and 2 tubs for lavender and salvia.
Plant picks: ‘Hidcote’ lavender, ‘Caradonna’ salvia, thyme, oregano, plus a pot of sedum for fall. Add a bowl of crocus bulbs for spring.
Budget: DIY with basic plastic/resin pots can land around $120–$250 total. If you step up to lightweight fiberglass for the two anchors, plan $300–$600 depending on brand and size.
Scenario 2: The windy high-rise roof with 10 hours of sun and constant exposure
Constraints: Wind shear, rapid drying, occasional heat reflection from nearby glass, and a need for sturdy containers.
Layout: “Sun Island + Windbreak Spine.” Put three rectangular planters (36–48" long) on the windward edge. Behind them, cluster medium pots in repeating groups.
Plant picks: Spine planters: ‘Little Spire’ Russian sage, ‘Arp’ rosemary (or a tough ornamental grass like little bluestem). Shelter zone: catmint, salvia, sedum, echinacea. Include goldenrod ‘Fireworks’ only if you can shelter it.
Practical note: Add drip irrigation. In peak summer, plan on 10–20 minutes weekly to check emitters and refill a timer battery—far less than daily hand-watering.
Scenario 3: The family roof deck (12' x 20') that must look good from indoors
Constraints: You want a designed look, not a nursery lineup. Also: kid-safe circulation and space for a table.
Layout: “U-Shape Forage Loop” with a 42" clear walkway and a small seating zone. Repeat a limited palette for calm: lavender + salvia + catmint, then seasonal accents.
Plant picks: Two 48" troughs planted in drifts (3 catmint, 3 salvia each), plus anchor tubs with hydrangea ‘Bobo’ for softness and shade. Add crocus and alliums in spring bowls, then swap to zinnias (from seed) for late summer color.
Budget: A “nice but not luxury” build—mixing fiberglass anchors with resin support pots—often lands around $600–$1,200 including soil, plants, and a simple drip line. You can cut that by starting more from seed and using food-grade buckets with drainage holes hidden inside decorative sleeves.
Costs, spacing, and purchasing strategy (so you don’t overspend)
Here’s how I keep rooftop bee gardens cost-efficient without making them look cheap:
Buy fewer, larger anchor plants (2–4 items) and more economical perennials to fill. A single 20–24" statement pot reads designed; ten tiny pots read cluttered.
Typical plant costs: 1-gallon perennials often run $12–$22; 2–3 gallon shrubs $35–$75 depending on region. Seeds (zinnias, cosmos, calendula) are a budget cheat code—often $3–$6 per packet for dozens of plants.
Spacing reality: In containers, slightly tighter spacing looks lush faster, but don’t choke airflow. As a workable average, plan perennials at 12–18 inches apart in troughs, and one feature plant per pot unless it’s a broad spiller like thyme or catmint.
Maintenance expectations: what it really takes week to week
A rooftop bee garden can be surprisingly manageable if you design it for your schedule.
Weekly time: Plan on 30–60 minutes per week in the growing season for watering checks, deadheading a few bloomers, and quick pest scouting. Without irrigation, hot spells can add 10 minutes per day for hand-watering.
Spring tasks (1–2 sessions): Cut back perennials, top-dress pots with compost, refresh mulch, and restart irrigation. This is also when you plant bulbs if you’re doing fall-planted containers (alliums, crocus go in autumn).
Summer tasks (ongoing): Trim salvia and catmint after their first big bloom to trigger a flush. Keep the water dish clean and filled. In extreme heat, move a few pots so tender plants aren’t reflected by hot walls.
Fall tasks (1–2 sessions): Leave some stems and seed heads standing if you can—structure helps overwintering beneficial insects. Swap tender annuals for sedum and asters if you want stronger late bloom. Drain and store irrigation components if freezing is expected.
Winter tasks (optional but helpful): Group pots together to reduce wind exposure, wrap sensitive containers, and keep soil slightly moist (not wet) if you have evergreens like rosemary in mild climates.
DIY alternatives that still look designed
If you’re working with a tight budget or rental restrictions, you can still build a rooftop bee garden that feels intentional.
DIY “nested pot” method: Put an inexpensive nursery pot (with your plant) inside a decorative outer container you already own. This makes seasonal swaps easy and reduces mess when repotting.
Upcycled planters: Food-safe 5-gallon buckets can become sleek planters with a coat of exterior paint and a few drainage holes. Use them for herbs and drought-tolerant perennials (thyme, oregano, sedum).
Seed-forward color: Reserve one trough for annuals from seed—calendula and zinnias provide a long bloom window and are easy to tuck among perennials. Let a portion of your herbs flower (basil, oregano, thyme) to increase nectar without buying extra plants.
Source-backed notes to keep your rooftop pollinator-friendly
The strongest rooftop bee gardens follow the same core guidance found in pollinator research and extension recommendations: continuous bloom, diverse flower forms, and minimal pesticide exposure. The Xerces Society’s pollinator habitat resources emphasize season-long bloom planning and native-leaning diversity (Xerces Society, 2023). The U.S. Environmental Protection Agency’s guidance for pollinator protection highlights application timing and reducing exposure during flowering (EPA, 2022). And urban ecology research on green roofs has repeatedly found that roofs can support pollinators when plant choices and habitat features are intentional (Hall et al., 2017).
If you build your rooftop garden as a set of repeating forage patches—lavender, salvia, catmint—then stitch in spring bulbs and fall finishers like asters and sedum, you’ll notice a change that feels almost immediate. The roof stops being a hot, empty surface and starts acting like a living edge in the sky: a place where bees arrive with purpose, circle with confidence, and keep coming back because there’s always something blooming when they need it.
References: Xerces Society (2023); U.S. Environmental Protection Agency (EPA) (2022); Hall, D.M. et al. (2017) urban green roof/pollinator habitat research synthesis.