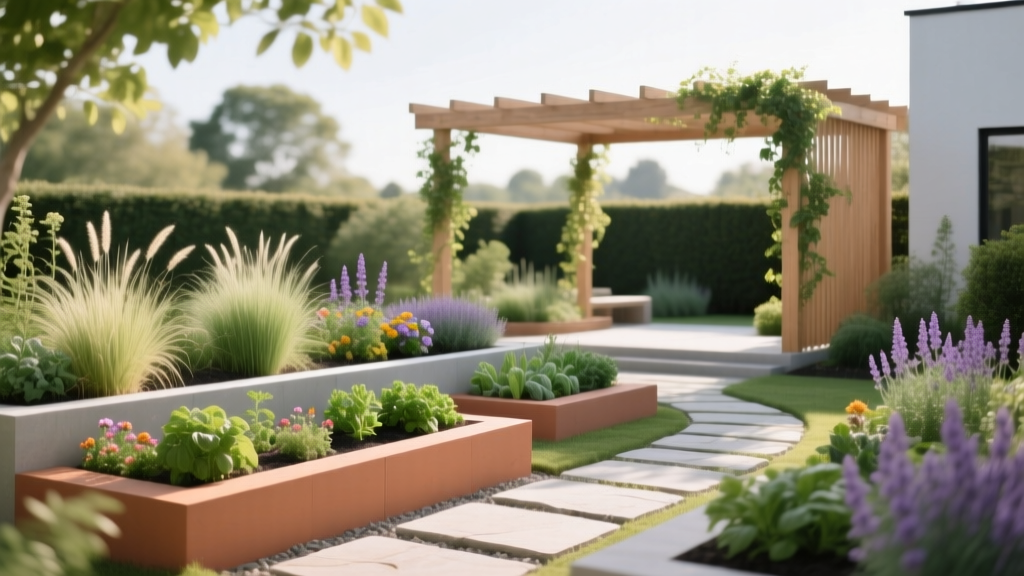
Backyard Garden Layout Plans That Work
You step outside with coffee in hand and scan the yard like you’ve done a hundred times. The fence line feels too bare. The patio is sunny but looks harsh at midday. The “garden corner” you imagined has become a spot where the hose tangles and the compost bin steals the view. If this sounds familiar, you don’t need more garden ideas—you need a layout that makes the space behave.
When I design a backyard garden plan, I’m not thinking in plant lists first. I’m thinking in routes, sun patterns, work zones, and what you want to see from the kitchen window. The best backyard layouts are the ones that feel obvious once they’re built: paths where your feet naturally go, beds sized so you can actually reach the middle, and plants chosen for the light you truly have (not the light you wish you had).
Start With a Simple Site Walk (Before You Draw Anything)
Give yourself 20 minutes and a notepad. Walk the yard like a designer, not a homeowner in a hurry.
Measure only what matters
You don’t need a full survey to make a layout that works. Capture these numbers:
- Total yard footprint (example: 30 ft x 40 ft = 1,200 sq ft).
- Patio size and door location (example: 12 ft x 14 ft with a door on the 12-ft side).
- Any fixed utilities: AC unit clearance (often 24–36 inches), septic lids, hose bibs.
- Sun hours in 2–3 key spots: morning, midday, late afternoon. For vegetables, target 6–8+ hours of direct sun; for many ornamentals, 3–5 hours can still be productive.
Track sunlight like a pro (without buying gear)
Pick a clear day and note sun exposure at 9am, 12pm, and 3pm. If you’re planning edibles, this matters more than soil perfection. The USDA notes that “most vegetables require full sun,” typically interpreted as at least 6 hours of direct sun daily (USDA, 2020).
Design Principles That Keep a Backyard Plan From Falling Apart
Layouts fail when they’re drawn as pretty shapes instead of working spaces. Use these principles to keep your garden functional long after the first planting.
Principle 1: Make movement effortless (paths first)
People garden where it’s easy to walk. Start your plan by drawing the most natural route from the door to the places you’ll visit: grill, seating, compost, vegetable bed, shed, gate.
Path sizing that actually works:
- Main path: 36–48 inches wide (comfortable for two people passing or a wheelbarrow).
- Secondary path: 24–30 inches wide (one person, light cart).
- Mulch path budget: wood chips often run $35–$60 per cubic yard locally; a 3-inch-deep mulch path covering 100 sq ft uses about 0.93 cubic yards.
Principle 2: Keep beds reachable (so you don’t compact soil)
For in-ground or raised beds, design so you can reach the center without stepping in. That usually means:
- Bed width: 4 ft max if accessible from both sides; 2–2.5 ft if against a fence/wall.
- Raised bed height: 12–18 inches is a practical DIY build for most backyards; 24 inches is more accessible but costs more in soil and lumber.
Principle 3: Put high-maintenance plants where you’ll see them
Herbs, salad greens, and containers belong near the door—within 15–25 ft if possible—so you’ll harvest, water, and notice pests early. The “out of sight” corner is for low-care shrubs, native grasses, and storage.
Principle 4: Design for four seasons, not four weekends
A working backyard layout includes structure that looks good in January. Think evergreens, ornamental grasses, winter stems, and hardscape edges.
“Good design is sustainable design. It’s about creating places people use—every day—so landscapes are maintained and valued.” — American Society of Landscape Architects (ASLA), 2017
Three Backyard Layout Plans (With Real Dimensions You Can Copy)
Pick the plan that matches how you live, not what you think a garden “should” be.
Plan A: The Patio-to-Plate Layout (Best for edible-focused yards)
Scenario: You cook often, want vegetables and herbs, and you’ll water by hand sometimes.
Core layout:
- A 4 ft wide main path from patio to beds.
- Two raised beds, each 4 ft x 8 ft, set parallel with a 3 ft working aisle between them.
- A herb strip bed near the door: 2 ft x 10 ft.
- Compost tucked behind a screen of shrubs, at least 10 ft from seating if possible.
Spacing that keeps plants healthy: Many common vegetables do best with 12–18 inches between plants (tomatoes often need 24 inches or more depending on training). Cornell Cooperative Extension notes that correct spacing improves airflow and reduces disease pressure (Cornell Cooperative Extension, 2019).
Budget snapshot: Two 4x8 raised beds built from cedar or pine typically land around $150–$300 per bed depending on lumber prices, plus soil. If you need about 1 cubic yard of soil per bed (roughly for a 12-inch height), bulk soil can run $40–$80 per cubic yard, sometimes more delivered.
Plan B: The Rental-Friendly Container Grid (No digging, high impact)
Scenario: You rent, or you don’t want to commit to permanent beds. You want flexibility and minimal infrastructure.
Core layout:
- Arrange containers in a simple grid with 24 inches between pots for access.
- Use a 6 ft x 9 ft “garden pad” made from outdoor pavers or a weed barrier + mulch to unify the look.
- Add one trellis panel against a fence for vertical growing (beans, cucumbers, clematis).
DIY alternative: Instead of expensive planters, use food-grade 5-gallon buckets (drill drainage holes). A bucket typically holds one pepper plant or a compact tomato. For a cohesive look, paint buckets a single matte color and group them in odd numbers (3, 5, 7).
Cost reality: A decent 20-inch resin pot can be $25–$45. A bag of high-quality potting mix is often $10–$18. Start with 6–10 containers and expand as you learn your sun patterns.
Plan C: The Family Yard With a “Green Room” (Play space + garden without chaos)
Scenario: You need lawn or play space, but you also want a garden that feels intentional (not squeezed into scraps).
Core layout:
- Keep an open central rectangle (example: 20 ft x 25 ft) for play or pets.
- Create a perimeter planting band 4–6 ft deep around two sides, with a curved edge to soften fences.
- Add a small seating nook: a 7 ft diameter circle of gravel or pavers tucked into one corner.
Why it works: You’re separating “activity” from “planting.” Kids and dogs run the center; plants own the edges. Your maintenance becomes predictable: mow the center, mulch and prune the perimeter.
Comparison Table: Choose the Layout That Fits Your Life
| Layout Plan | Best For | Space Needed | Typical Upfront Cost | Weekly Maintenance |
|---|---|---|---|---|
| Patio-to-Plate (Raised Beds) | Vegetables, herbs, daily harvesting | Approx. 12 ft x 18 ft for 2 beds + paths | $400–$900 (beds + soil + mulch) | 2–4 hours/week in peak season |
| Rental Container Grid | Flexibility, no digging, portability | As small as 6 ft x 9 ft | $150–$600 depending on containers | 1–3 hours/week (more watering) |
| Family “Green Room” Perimeter | Balanced yard: play + beauty | Works in 25 ft x 30 ft and up | $300–$1,200 (plants + edging + mulch) | 1–2 hours/week once established |
Plant Selection That Makes the Layout Succeed (Not Just Look Nice)
Plants should match your light, your watering habits, and your tolerance for pruning. Below are layout-friendly picks with specific varieties that earn their keep.
For sunny edible beds (6–8+ hours)
Tomato: ‘Sungold’ cherry tomato is productive and forgiving; train it on a trellis to keep a 24-inch spacing manageable. For tighter spaces, try ‘Tiny Tim’ (container-friendly).
Peppers: ‘California Wonder’ (classic bell) and ‘Lunchbox’ mini peppers perform well in containers and raised beds. Space at 18 inches.
Cut-and-come-again greens: ‘Black Seeded Simpson’ lettuce and ‘Red Russian’ kale give repeated harvests, which is ideal for small layouts. Space at 10–12 inches for baby leaf, wider for full size.
Herbs near the door: ‘Genovese’ basil (reliable), chives (perennial), and thyme (drought-tolerant edging herb). Keep mint only in containers so it doesn’t take over the bed.
For part shade (3–5 hours) along fences and side yards
Hydrangea: ‘Incrediball’ smooth hydrangea handles more sun than classic mopheads if watered well, but still performs in bright shade. Give it 4–5 ft of width.
Perennials: Heuchera (‘Caramel’ for warm foliage) and hosta (‘Halcyon’ for blue leaves) make a clean, designed look with minimal fuss. They’re excellent “edge plants” along paths.
Edible shade option: Parsley and cilantro tolerate part shade better than fruiting crops and tuck neatly into mixed borders.
For structure and privacy (the backbone plants)
Evergreen: ‘Green Giant’ arborvitae grows fast but gets huge; in small yards, consider ‘North Pole’ arborvitae (narrower habit). Space many arborvitae about 3–5 ft apart depending on mature width—check the tag and don’t plant for the size it is today.
Flowering shrub: Spirea ‘Magic Carpet’ stays compact and gives color without constant pruning. Great for the perimeter band in Plan C.
Ornamental grass: Calamagrostis ‘Karl Foerster’ stands upright, doesn’t flop, and looks good in winter. Space at 24–30 inches for a repeating rhythm along a fence.
Step-by-Step: Turn a Sketch Into a Backyard Layout You’ll Actually Use
This is the build order I use to avoid expensive do-overs.
- Mark the routes. Use a garden hose or rope to lay out the main path (aim for 36–48 inches wide). Walk it from the door to your key destinations.
- Place the “anchors.” Set bed corners, container zones, or the seating circle with stakes. Stand at your kitchen window—make sure the view lands on something intentional.
- Confirm sun. Re-check sunlight on the exact spots where beds/containers will go. If the vegetable area gets less than 6 hours, shift it before building anything permanent.
- Install edges and paths. Cardboard + 3 inches of wood chips is a fast DIY path. For a longer-lasting path, use decomposed granite or pavers over compacted base.
- Build beds or set containers. Don’t fill raised beds with 100% bagged soil if you can buy in bulk—mix topsoil + compost for cost control.
- Plant in layers. Start with shrubs/structure, then perennials, then annuals and edibles. This keeps the layout readable even if you don’t finish everything in one weekend.
- Mulch and label. Mulch reduces watering and weeds; label plants so you can track what worked and what didn’t.
Real-World Scenarios (How the Same Principles Adapt)
Here’s how I’d adjust plans for three common backyards—because “one size fits all” is how gardens end up half-finished.
Scenario 1: Narrow side yard (8 ft wide x 30 ft long)
These often feel like wasted space, but they’re perfect for a linear layout. Use a 24-inch path down the center with 2-foot-deep beds on one or both sides. If one side is shady, plant it with hostas, heuchera, and ferns; keep the sunny side for herbs, strawberries, or a slim trellis of pole beans.
Small-space win: Add one repeating plant every 4–5 ft (like ‘Karl Foerster’ grass) to make the space feel designed instead of cluttered.
Scenario 2: Tiny urban backyard (15 ft x 20 ft) with a patio you can’t remove
Don’t fight the hardscape—make it the organizing grid. Place 6–8 containers in a clean arrangement, then add one vertical element (a 6-ft trellis or a narrow evergreen). Choose plants that look good up close since this is a “sit-in-it” space: rosemary, basil, ‘Profusion’ zinnias, and a compact blueberry like ‘Jelly Bean’ (container-friendly with the right soil).
Budget tactic: One trellis panel plus a vining plant creates privacy faster than a row of shrubs—and usually for under $100–$150 total if you DIY the trellis.
Scenario 3: Suburban backyard (40 ft x 60 ft) that feels empty and exposed
Big backyards often need rooms. Create a perimeter garden band 6 ft deep on two sides, then carve a destination: a firepit circle, a hammock zone, or a small dining pad. Keep the open lawn as a simple shape (rectangle or oval), not a wiggly leftover.
Planting strategy: Use “layers” along the fence: evergreen at the back, flowering shrubs in front, perennials/grasses at the edge. This reduces the “fence tunnel” feel and gives you privacy within 2–3 seasons rather than waiting a decade.
Budget Considerations and Smart DIY Swaps
Backyard garden layouts get expensive when you build everything at once or pay retail for materials that could be sourced locally.
- Phase the build: Do paths + one anchor bed in year one. Add shrubs and a seating nook in year two. This spreads costs and lets you learn the site.
- Use bulk materials: Compost and soil in bulk are usually cheaper than bags, especially for raised beds.
- Choose smaller plants: A 1-gallon shrub establishes quickly if watered consistently, and it can cost half as much as a 5-gallon size.
- DIY edging: Steel edging is sleek but pricey; a clean spade-cut edge plus mulch can look just as professional if maintained.
If you’re watching costs closely, invest first in layout bones (paths, bed sizes, access). Plants can be added gradually, divided, or swapped later. A bad path or poorly placed bed is what costs money to undo.
Maintenance Expectations (So the Garden Fits Your Week)
A layout “works” when it matches your time. Here’s a realistic rhythm for the growing season:
- Edible-focused beds: plan on 2–4 hours per week May–September (watering, harvesting, tying tomatoes, pest checks).
- Container gardens: plan on 1–3 hours per week, with more frequent watering in heat—containers can need water every 1–2 days during hot spells.
- Perimeter ornamental borders: after establishment, often 1–2 hours per week (weeding, deadheading, pruning touch-ups).
Seasonal tasks you can count on:
- Spring (1–2 weekends): refresh mulch, cut back grasses, prune summer-flowering shrubs, prep beds.
- Mid-summer (weekly short visits): water, harvest, scout for pests, trim edges so paths stay crisp.
- Fall (1 weekend): remove spent annuals, plant bulbs, top-dress compost, cover beds with leaves or mulch.
- Winter (1 hour/month): check for storm damage, plan next season, order seeds early.
Little Details Designers Use to Make Layouts Feel “Finished”
If you want that polished look without a massive renovation, borrow these tricks:
- Repeat a material: the same mulch, the same pot style, or the same edging line ties everything together.
- Limit your plant palette: choose 5–7 core plants and repeat them. Variety comes from placement, not dozens of unrelated species.
- Create one focal point: a small tree, a sculptural pot, a bench, or a trellis covered in a vine. Without a focal point, the eye doesn’t settle.
When you step back after a day of layout work, the yard should read clearly: an easy route from the door, a place to sit, a place to grow, and a place to tuck away the practical stuff. That’s the moment a backyard stops being “space” and starts being a garden you’ll actually use—on a Tuesday, not just on a sunny Saturday.
Sources: USDA (2020); Cornell Cooperative Extension (2019); American Society of Landscape Architects (ASLA) (2017).